Showing posts with label waffles. Show all posts

Friday, January 19, 2024

Buttermilk Waffles!


My favorite waffles are the ones where you start the batter the night before...and it has yeast. In the morning you add eggs and melted butter and you are ready to put the batter in the waffle iron.

Recently I was going through some recipes found in my local newspaper, the Press Democrat, that I saved to try. A recipe for buttermilk waffles was one of them...and I had plenty of buttermilk in the fridge.

A few mornings ago I gave the recipe a try. For the batter I followed it as written with two exceptions: I added 1/4 cup chopped walnuts to the flour mixture and, because my waffle iron is ancient and slow, I added 1/2 teaspoon baking powder to the flour mixture. Baking soda reacts quickly with the acid in the buttermilk, but the baking powder would continue to give lift to the waffles throughout the cooking time.

Once I decided to bake the waffles, I realized that I had both blueberries and raspberries, so I added about 1/4 cup each to the flour mixture right before I added the liquid. It takes a bit of care to mix in the liquid and not crush the berries, but it's worth it! Just the fragrance of the hot raspberries is intoxicating.


These were great waffles...light, crispy on the outside and tender and fluffy on the inside. The buttermilk adds tang and the walnuts and berries added crunch and flavor. Soooo good. Try this one yourself!


Buttermilk Waffles
Press Democrat and Washington Post by Becky Krystal

Makes 5 servings (five 7-inch round waffles)

2 1/4 cups (280 grams) all-purpose flour
1 1/2 teaspoons baking soda
1/2 teaspoon fine salt
1/2 teaspoon baking powder
1/4 cup chopped walnuts (optional)
2 large eggs,
2 cps (480 ml) buttermilk (whole or low-fat)
4 tablespoons (1/2 stick/57 grams) unsalted butter, melted and cooled, plus more for optional topping 
Note: May substitute some or all with neutral oil)
1 teaspoon vanilla extract
1/4-1/2 cup each blueberries and raspberries (optional)
Neutral oil, for brushing the waffle iron
Maple syrup, for serving (optional)

Preheat the oven to 200 degrees. Have a large baking sheet ready.

In a large bowl, whisk together the flour, baking soda, salt, and baking powder. Stir in the walnuts.
In a separate medium bowl whisk the eggs until lightly beaten. Whisk in the buttermilk, butter and vanilla until combined.

Add the berries to the flour mixture and gently toss to coat with flour and combine with the flour mixture.

Stir the egg mixture into the flour mixture gently until it forms a smooth, thick batter...any lumps should be fruit.

Brush a waffle iron with oil or spray with nonstick spray, and preheat it according to the manufacturer's directions. Ladle enough of the batter to cover three-fourths  of the surface of the iron...roughly 1/2 to 3/4 cups (120-180 ml) of batter per waffle. Close the waffle irone and cook for 3-5 minutes, or until the iron alerts you the waffle is done. You will be looking for the waffle to be crisp and golden brown.

Repeat with the remaining batter, placing finished waffles on the baking sheet in the oven to keep warm, if desired.

Serve with maple syrup, pats of butter or other toppings as desired.

Wednesday, March 09, 2022

Blueberry Waffles

We have been having chilly mornings with frost on the grass some days, so I decided to make waffles. I've been feeding the sourdough starter that my daughter gave me and decided to feed some of the toss off as a base for them. That was probably the reason they were so crisp on the outside and fluffy and soft on the inside...good starter.

As far as the blueberries go, I made the mistake of not coating them with batter as I usually do. The result was that they stuck to the waffle iron upper plate...not fun to clean up after the iron cooled and some of them scorched a bit...see the really dark spots in the photo. Thank you Sweetie for doing that. So if you decide to go with any berry cooked inside the waffle, mix them into the batter first. You'll be glad you did because they really add to the flavor of the waffle, but you really don't need that clean up issue.

This recipe is for the Amazing Overnight Waffles that work so well with either sourdough starter or active dry yeast. I made a half batch and replaced 1/4 cup of the flour with Irish Whole Meal Flour from King Arthur Baking Company which adds a nice, nutty flavor and some flecks of whole wheat and bran, too. Delicious!

My waffle iron is one that I bought at a yard sale in Berkeley over 40 years ago. It takes a little longer to heat up than it did all those years ago, but I like my waffles crispy on the outside and it does that. Use what ever waffle iron you have and be sure to let it cook until the steaming stops...you'll probably have nice crispy waffles, too.


If you keep up with what's going on here in Northern CA, we now have three lambs. Two were born a couple of weeks ago and the last lamb was born over the weekend. It's big for a newborn lamb, all black except for a cute white tail that waves madly when it nurses.


Amazing Overnight Blueberry Waffles

Sponge:
1 cup sourdough starter
½ cup all-purpose flour
1 tablespoon sugar
½ cup water
Whisk together and let sit, uncovered, at room temperature for 2 hours

Batter:
1 1/2 cups unbleached all-purpose flour
1/2 cup Irish wholemeal wheat flour
all of the sponge
1/8 teaspoon instant yeast
1 tablespoon sugar
½ teaspoon salt
2 cups milk
6 tablespoons unsalted butter, melted
2 large eggs
1 cup fresh blueberries, washed and drained


Nonstick spray
Butter (and bread) for the waffle iron
Whipped cream if you are feeling decadent or maple syrup if you prefer


Combine the flour, yeast, sugar, and salt in a medium bowl. Add the sponge that has sat for 2 hours waiting for this moment, and whisk to combine. Add the milk and whisk until blended. Cover the bowl tightly with plastic wrap and let stand overnight at room temperature (or put in the fridge if room temp. is over 70 degrees F.)

The next morning, preheat the waffle iron. Melt the 6 tablespoons butter and let cool a bit. Beat the egg is a small bowl (unnecessary if using egg substitute) then beat it into the batter along with the melted butter. 

Lightly spray the hot waffle iron with non stick spray, top and bottom plates, and then butter a piece of bread and use that to rub some butter on top and bottom plates.

Add the blueberries to the batter and stir gently just to coat the blueberries with the batter. Add just enough batter to cover the cooking surface…this varies by waffle iron…about 2/3 cup. Lower the top and cook until golden brown…it’s OK to check now and then. It takes about 2-3 minutes and it's usually when the steam is almost gone. You want it golden brown.

Serve hot, right away, with whipped cream or maple syrup, or toppings of your choice.

Note; If you have too many waffles for the number of people you are feeding, bake the leftover batter a little less than the ones you are eating, let cool on a baking rack, then freeze and store in the freezer tightly wrapped. Re-heat in the toaster.

Saturday, October 14, 2017

Spiced Gingerbread Waffles


Strange how different things can be in less than a week. On Saturday evening a week ago I stirred together a batter for the next morning. We were having our neighbors over for breakfast on Sunday and I wanted to try out a recipe that I had cobbled together for a seasonal waffle. Somehow gingerbread always seems like a fall treat to me, with the richness of cinnamon, ginger, nutmeg and cloves and the added heft of dark molasses. A long time ago I took those flavors and made donuts, filled with lemon curd. They were sooo good.


This time I wanted to take my favorite overnight waffle recipe and turn it into a gingerbread waffle recipe. I had made some great gingerbread that included all those signature ingredients, plus stout, so I decided to use them all in the batter. Well, it turns out that putting both the molasses and the stout into the overnight yeast mixture was a mistake. The mixture rose pretty high in the bowl, then subsided, so by the time I was making the batter, the yeast wasn't helping things rise, plus the batter was sort of flabby once cooked. Not my idea of a good waffle for sure. We still had them for Sunday breakfast and they had good flavor, but I was determined to try again and see if I could get a better waffle. I do enjoy a good waffle!

In the meantime, we had strong winds Sunday night, which blew a firestorm our way, wiped out the homes of friends and acquaintances, and sent us smoke and unease through last night. This morning the smoke was far less and we heard that the fires were being contained, although there is still some danger. Last night I knew that strong winds were called for that could have started things up again, but I wanted to be hopeful, not fearful.

So last night I whisked together the flour, yeast, spices, salt and milk, covered the bowl and let it all sit overnight so that we could have Overnight Gingerbread Waffles. In the morning the dough looked fluffy, just as I hoped it would.


To the melted, cooled margarine (cuz I can't do butter) I added the molasses and stirred it together well. I beat the egg a bit to break it up and loosen the white, then added it and the butter mixture to the overnight mixture. No stout was used this time.

These made really great waffles, even better in flavor than the Sunday ones. I think that the stout had intensified the spices, so the waffles did taste spicier, but also somewhat bitter. Maybe one day I'll figure out a way to include just a small amount of stout. In the meantime, these are delightful, seasonal waffles if you like gingerbread. You can decrease the amount of ginger a bit, too, if you want it blander, but I'm quite happy with these spicy waffles!


Spicy Amazing Overnight Gingerbread Waffles
based on a recipe from Mollie Katzen's Sunlight Cafe' Cookbook

2 cups unbleached all-purpose flour
1 teaspoon ground cinnamon
1 1/2 tablespoons ground ginger
1/4 teaspoon freshly grated nutmeg
1/4 teaspoon ground cloves

1 teaspoon yeast
1 tablespoon brown sugar
½ teaspoon salt

2 cups milk (I used soy milk)
1/4 cup dark molasses

6 tablespoons unsalted butter, melted
1 large egg (I used ¼ cup egg substitute)
Nonstick spray
Butter for the waffle iron
Lemon curd – optional, but nice
OR Applesauce - especially home made - wonderful

OR Pure maple syrup – hard to resist on waffles
whipped cream - hard to resist on anything


Combine the flour, spices, yeast, sugar, and salt in a medium bow. l Stir the milk  into the flour mixture until blended. Cover the bowl tightly with plastic wrap and let stand overnight at room temperature (or put in the fridge if room temp. is over 70 degrees F.)

The next morning, preheat the waffle iron. Melt the 6 tablespoons butter and let cool a bit, then stir in the molasses. Beat the egg in a small bowl (unnecessary if using egg substitute) then beat it into the batter along with the melted butter. The batter may be a bit thin.

Lightly spray the hot waffle iron with non stick spray, top and bottom plates, and then butter a piece of bread and use that to rub some butter on top and bottom plates. Make sure that indicator light/gauge shows iron is still hot enough. If not, let it heat a little more.

Add just enough batter to cover the cooking surface…this varies by waffle iron…about 2/3 cup. Lower the top and cook until dark golden brown…it’s OK to check now and then. It takes about 2-3 minutes. The steam usually almost stops rising when it is done.
Serve hot, right away, with lemon curd, applesauce or maple syrup, whipped cream, or toppings of your choice.

Note; If you have too many waffles for the number of people you are feeding, bake the leftover batter a little less than the ones you are eating, let cool on a baking rack, then freeze and store in the freezer tightly wrapped. Re-heat in the toaster.


Friday, April 10, 2015

Amazing


When I was growing up pancakes were part of a special breakfast, but not rare, at least as far as I remember. Waffles, on the other hand, were very special, perhaps because my Mom made the recipe that included stiffly beaten egg whites for giving the waffles both crispness and height. When you make the batter that way, it takes extra time to separate the eggs and an extra bowl to beat up the whites, so it is not the easiest thing to do. Pancakes depend on a chemical reaction, usually baking powder, for their loft, so they are quick and easy.

Now that it is finally strawberry time with local berries available on Hwy. 12, in my mind it is also waffle season. My lovely neighbor brought us a basket of berries and a jar of freshly made strawberry jam. Those are all the toppings necessary for the right waffle. So what's the right waffle? A waffle that is made with yeast and that you start the night before gets my vote. It's a Mollie Katzen recipe and it is called, with good reason, The Amazing Overnight Waffle. Because the yeast causes the batter to rise once it hits the hot waffle iron, no extra work with beaten egg whites is necessary. You do have to melt some butter before plugging in the waffle iron in the morning, and, once the butter cools, add an egg, then stir that mixture into the batter, but that is the work of just a few moments.


The waffles are really crisp and lovely on the outside and tender on the inside. They are just fine with maple syrup and butter, have been made by me with blueberries scattered over the batter once it goes into the hot waffle iron (as in photo above), would be super with crumbled bacon used the same way, but are out of this world wonderful topped with strawberries...and a few dots of fresh strawberry jam.

These waffles are amenable to having part of the flour be whole wheat if you want a more earthy flavor. A sprinkle of flax seeds would add some heart healthy nutrition, too. I've even made these in a gingerbread version! Just remember to start the batter the night before and leave it, covered, on the counter so the yeast has time to work it's magic. Once you see how easy they are and taste your first bite, you'll agree that they are amazing.

Amazing Overnight Waffles
from Mollie Katzen's Sunlight Cafe' Cookbook

2 cups unbleached all-purpose flour
1 teaspoon yeast
1 tablespoon sugar
½ teaspoon salt
2 cups milk
6 tablespoons unsalted butter, melted
1 large egg (I used ¼ cup egg substitute)
Nonstick spray
Butter for the waffle iron
Sliced strawberries – optional, but nice

Combine the flour, yeast, sugar, and salt in a medium bowl Add the milk and whisk until blended. Cover the bowl tightly with plastic wrap and let stand overnight at room temperature (or put in the fridge if room temp. is over 70 degrees F.)

The next morning, preheat the waffle iron. Melt the 6 tablespoons butter and let cool a bit. Beat the egg is a small bowl (unnecessary if using egg substitute) then beat it into the batter along with the melted butter. The batter may be a bit thin.

Lightly spray the hot waffle iron with non stick spray, top and bottom plates, and then butter a piece of bread and use that to rub some butter on top and bottom plates.

Add just enough batter to cover the cooking surface…this varies by waffle iron…about 2/3 cup. Lower the top and cook until golden brown…it’s OK to check now and then, but while there is still a lot of steam coming out the sides of the iron, you may want to wait before lifting the lid. It takes about 2-3 minutes. You want it golden brown, but not too dark a brown.

Serve hot, right away, with strawberries and jam, or maple syrup, or toppings of your choice.


Note; If you have too many waffles for the number of people you are feeding, bake the leftover batter a little less than the ones you are eating, let cool on a baking rack, then freeze and store in the freezer tightly wrapped. Re-heat in the toaster.

Friday, April 26, 2013

Mothers Day is Coming


Hard to believe, but it is almost May. Not only that, Mothers Day is a bit early this year, since it is on Sunday, May 11 th. Now you might already have the perfect gift picked out, or even purchased, but it's also possible that you have no idea what to get Mom.

If she likes to cook and bake, consider giving her my beautiful cookbook Classic Comfort Food, full of delicious recipes and lovely photos. I created it for my Mom for Mothers Day last year. You know if it is good enough for my Mom it is probably good enough for yours, too.

There are classics like biscuits, soda bread, waffles, fried chicken, coconut cake, sugar cookies and more!

Now the great part...you can get $10 off the book if you order it through Blurb by May 2, 2013. That should get it to you just in time for the big day, since they will ship it either to you or to your Mom...whatever address you give them.

To order through Blurb and get that $10 off, click HERE or on the image of the book at the top right of this blog (in the web version). At checkout be sure to put in SHARING10 for the promotion code to get that discount. Don't delay...May 2nd will be here so quickly and Mothers Day is just around the corner.

Also, you can buy a copy just for yourself, or as a Graduation gift (perfect of a grad who will be living in their own place with a kitchen now), or as a gift for a wedding, too. Just use SHARING10 for the promotion code and you are good to go and save $10 on the book.

Not exactly a give-away, but a good deal for a wonderful cookbook!

Hugs and kisses, Elle

Monday, August 06, 2012

Blackberry Syrup

When I was talking, in recent post, about the harvest starting to be ready to pick I completely forgot to mention the blackberries. We must have gotten just the right combination of rain and sun and fog because the blackberries this year are gorgeous and plentiful.

Sweet and juicy, we usually just eat them out of hand or put some in with the morning fruit or with our cereal. Every now and then I take some of the berry baskets I save from year to year and I spend some time picking enough blackberries to have some fun with.


This time I used a recipe I saw in the August issue of Sunset magazine to make a blackberry syrup. One of the nice side effects of the effort is that, as the syrup simmers, the whole house smells like ripe blackberries. I did such a great job of simmering that I ended up with something closer to a jam than a syrup, but when I was ready to use it I just mixed in a little water and heated it up in the microwave. I also made a third of the amount in the recipe because it was too hot that day to pick 3 pounds of blackberries!  I started with 3/4 pound of berries, weighed on my scale, then adjusted the amount of sugar, lemon zest, and lemon juice proportionally.

A stash of already cooked sourdough waffles waiting the freezer meant that a luxurious breakfast of sourdough waffles with fresh strawberries topped with blackberry syrup was quick and easy. I heated the waffles in the toaster oven so that they were hot and crisp, dropped a large handful of sliced strawberries on top, then enhanced that with a generous helping of warm, sweet, fragrant blackberry syrup. The perfect summer breakfast and you don't even need butter on the waffles! Don't forget, National Waffle Day for Americans is August 24th. Can you wait that long?

Since these waffles had been made with half whole wheat flour and some flax seed meal they were even healthy. You can find the basic sourdough waffle recipe here. It is a good one because you start the batter the night before, so the batter is ready to bake right away, sometimes even before the waffle iron has heated up.

With the addition of a little more flour in the batter you could make these up as sourdough pancakes and cook them in a frying pan. The strawberries and blackberry syrup will still taste great. No strawberries? Fresh sliced nectarines or peaches would be delightful with this syrup.


Blackberry Syrup
Makes 6 half-pint jars

3 pounds fresh blackberries
2 1/2 cups sugar
1 tablespoon lemon zest
1/4 cup lemon juice

Prepare 6 half-pint canning jars and lids. One of the reasons I made a smaller amount was that I didn't have time to do the canning part. If you have the time and know how to can, and have enough berries, by all means do the full recipe.

Put berries, sugar, lemon zest and juice and 3/4 cup water into a wide pot. Cook over low heat, stirring occasionally, until fruit releases juices, about 30 minutes.

Smash berries with a potato masher. Cook until juices have thickened, stirring occasionally, about 45 minutes more.

Strain syrup into a 2 quart glass measuring cup. Press fruit with a ladle or spatula to push remaining juice into the cup. Discard seeds and pulp.

Pour strained syrup into jars, leaving 1/2 inch headspace. Can, processing 10 minutes. If you want to learn about canning, go to sunset.com/canning.

Use the syrup drizzled over pancakes, yogurt, ice cream or, as I did, waffles.

Sunday, July 10, 2011

Waffles and Musings on Blogging


Have you ever wondered what goes into a food blog post? If you have your own blog you already know, but if you mainly visit food blogs you might be interested in my process. If not you can skip down to the photo of the waffle with strawberries and cream and start reading there. I'm sure that there are as many variations on creating food blog posts as there are recipes for chocolate chip cookies...or even more than that, but the basics still are pretty universal. To me a good food blog post includes some writing about food or food related topics, there are almost always photographs and often a recipe.

The process actually starts with a lot of thought, as is true with many arts and crafts (and I leave it to you to decide if this is art or craft or a combination) because it helps to have an idea of what you want to cook, make, bake or explore in the vast topic of 'food'. Since I have a tendency to cook the same recipes over and over with minor variations, and since I usually avoid repeating recipes, my posts are usually baking ones. For some reason I feel more drawn to experiment with and write about baking. Many days as I drive to work I'll be thinking about possible variations on a recipe as I drive. At this time of year my thought stray to berries and what I love best about them and what new-to-me recipe I can bake using them.

After a decision is made about what to make then comes the recipe comparison time. Since baking is based on proportions that work well together I often compare basic recipes for what I have in mind, using recipes in cookbooks, magazines and on the Internet to help me make sure I understand the methods as well as quantities of ingredients. After that I play (again) with variations in my head and then head to the store if I'm missing ingredients or want super fresh ones.

Next comes my favorite part...making and baking. Although I know that mis en place - gathering all the ingredients and implements and pans together before starting - is the most professional, often I only gather stuff for the first part and then gather the rest while some of the recipe is beating or cooling or rising, etc. Same goes for preheating the oven. If the steps to take will take longer than 10 minutes I leave off preheating the oven until about 10 minutes before stuff goes into the oven. Saves on fuel and keeps me from feeling so rushed.

Before the actual making and baking begins I read the recipe all the way through and then read it again while checking for ingredients that are not ones commonly in my kitchen or pans or implements I don't usually use. Trust me, you don't want to be in the middle of a recipe and discover than you're all out of parchment, or vanilla or only have an 8 pan muffin tin when you need a 12 pan one.

Following a recipe might seem simple but if you stop to answer the phone and can't remember if you added that teaspoon of salt you might end up with a flat tasting cake or bread. If you are prone to making changes to any recipe you meet like I am, knowing which part to follow and which part to change requires even closer attention. I try to type up recipes, including the variations but have been know to scrawl variations on a sticky note stuck to the recipe that most closely resembles what I'm making. In general I give credit to the creator of that recipe.

If some part of the making and baking are visually interesting I'll take photos. I love the look of fruits and veggies and like to photograph them often. I'll also take photos to make it easier to understand a complicated recipe. I know food bloggers who take dozens and dozens of photos for one post...and their results are are awesome...but I try to stick to about 12 per post so that I end up with three or four in the post. It helps the post load faster if there aren't a lot of photos and I don't wish to take the time to go through dozens to find the best three. Maybe when I'm retired in 10 years or so :).

The finished dish always gets photographed and often there is a photo of the dish plated, too. If you decide to try food blogging the best thing to do is to visit lots and lots of food blogs and see what style and type of food photo suits you.

The food has been made, photographed and enjoyed. My next step is usually to process the photos. I'm pretty adept with Photoshop so it usually doesn't take me too long. I suppose if I were more picky I'd get better photos and it would take longer, but my enthusiasms extend to many other areas in my life so blogging gets its due share and no more. I always save the photos at 72 dpi which is low resolution. What you see on the Internet really doesn't look any better in high resolution than at 72 dpi and the lower resolution helps photos load faster, plus they take up less space on your hard drive. I often save them in a folder which is labeled with the name of the dish.

Now comes my favorite part (after eating the food) which is writing the post. Usually I have something I want to share with you about the food I've made...so that's what I write. Sometimes I include tidbits of what is going on in my life and every now and then we visit the Land of St. Honore' for story time and pure fiction. No matter what the rest of the post contains, I try to make sure to mention anything that will help you re-create the recipe for yourself and your family. Posting the recipe also means that I can go back to it when I want to make it again...a digital recipe book of the best kind!

Although there are many ways to create a post I usually write the content, add the photos, add the links, check the spelling (if I'm not in a hurry to post) and then put it up. Usually I'll then check what you see and make changes or corrections if needed (and again if I have time). Lots of times I'm posting at night and too tired to be as diligent as I should be.

So that's what I do and the post itself, including taking the photos and processing them, takes about an hour to two hours. Research for the recipe is ongoing so I have no idea how long I spend on it. The recipes usually give some indication of how much time they require, but often I would be making them even if I didn't blog so I don't pay attention to that either.

If you are thinking of food blogging or already doing it and want to exchange ideas and information, feel free to comment or e-mail me. I can be a fun hobby which combines the creativity of cooking and baking, photography and writing.


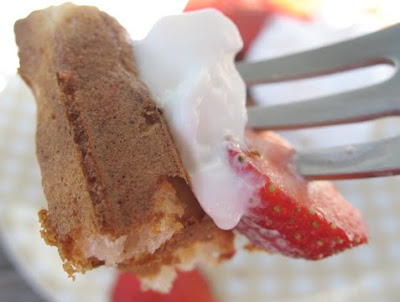
So now that you have some idea on how my blog posts are created, for today the post will be about waffles. Unlike many recipes I post, this one is a variation of a recipe that I've posted before. There is something about the combination of fresh strawberries and crisp, airy hot sourdough waffles that calls to me every year. For this year's variation I let the starter sit for a few days before making the batter (and the batter sits overnight) so there was a lovely pronounced sourdough flavor and aroma to these beauties. I also used some of the Irish wholemeal style flour from King Arthur for half of the flour. The resulting waffles had a nice nuttiness from that flour, plus darling little flecks wheat goodness.

You can make these without a sourdough starter, too. You'll find that recipe at the end of this post: http://feedingmyenthusiasms.blogspot.com/2009/06/ancient-church-meeting-tommy-waffles.html

You can serve these waffle with any toppings you like but they really don't need any additional butter. If you do want to top 'em with butter they will probably be even more delicious. Berries are my delight right now and we had some whipped cream handy, too. One version of total decadence is to sit in the sun next to the sweet peas and morning glories eating these luscious waffles, ripe sliced local strawberries and some whipped cream. Wish I could have shared.

NOTE: For those of you who can’t imagine having a single purpose item like a waffle iron, perhaps it helps that mine was from a garage sale and is eons old. It’s smallish and round and fits inside of a stew pot so it doesn't take up extra room in the cupboard. If it is still working when I die, my survivors will probably discard it, but for now it does the trick and produces nice circles of yummy, crispy waffles.


Amazing Overnight Wholemeal Waffles
adapted for sourdough starter
from Mollie Katzen's Sunlight Cafe' Cookbook

Sponge:
1 cup sourdough starter
½ cup all-purpose flour
1 tablespoon sugar
½ cup water
Whisk together and let sit, uncovered, at room temperature for 2 hours

Batter:
1 cup unbleached all-purpose flour
1 cup Irish wholemeal wheat flour
all of the sponge
1/8 teaspoon instant yeast
1 tablespoon sugar
½ teaspoon salt
2 cups milk
6 tablespoons unsalted butter, melted
2 large eggs

Nonstick spray
Butter (and bread) for the waffle iron
Sliced strawberries
Whipped cream if you are feeling decadent or maple syrup if you prefer


Combine the flour, yeast, sugar, and salt in a medium bowl. Add the sponge that has sat for 2 hours waiting for this moment, and whisk to combine. Add the milk and whisk until blended. Cover the bowl tightly with plastic wrap and let stand overnight at room temperature (or put in the fridge if room temp. is over 70 degrees F.)

The next morning, preheat the waffle iron. Melt the 6 tablespoons butter and let cool a bit. Beat the egg is a small bowl (unnecessary if using egg substitute) then beat it into the batter along with the melted butter. Whisk the egg white until it forms soft peaks. Fold into the batter with a spatula.

Lightly spray the hot waffle iron with non stick spray, top and bottom plates, and then butter a piece of bread and use that to rub some butter on top and bottom plates.

Add just enough batter to cover the cooking surface…this varies by waffle iron…about 2/3 cup. Lower the top and cook until golden brown…it’s OK to check now and then. It takes about 2-3 minutes and it's usually when the steam starts to diminish. You want it golden brown, but not dark brown.

Serve hot, right away, with strawberries, whipped cream or maple syrup, or toppings of your choice.

Note; If you have too many waffles for the number of people you are feeding, bake the leftover batter a little less than the ones you are eating, let cool on a baking rack, then freeze and store in the freezer tightly wrapped. Re-heat in the toaster.

Friday, January 29, 2010

Bread in Any Other Form Smells as Great

When I hear the word BREAD, I immediately have a mental image of a loaf of bread, shaped in a bread pan and with a rounded, crusty, golden top. That’s probably because my Dad used to bake bread from scratch and that’s how his bread looked.

For Bread Baking Day #26 Jamie of Life's a Feast asked us to bake a birthday party bread.

Instead of baking my iconic bread, I decided to bring what would be needed if I showed up early to help get ready for the party…waffles. They have a totally different shape, being somewhat flat and indented with those lovely squares that hold the syrup, but they smell just a great as any loaf of freshly baked bread. Sweetie and I enjoyed one plain, then I partied them up with chopped dried Michigan cherries (thanks W-Gs!).


To make them dual purpose and good enough for the Monthly Mingle hosted by the same lovely blogger, Jaime at Life's a Feast, I included the cherries and added a sprinkle of chocolate chips


…chocolate and cherries are always wonderful together and they were this time, too. The Monthly Mingle theme is Bread and Chocolate, so this fits it perfectly.

The waffles themselves are started the night before and the batter is finished off in the morning. Because all you are adding is melted butter and some egg, you can finish the batter while the waffle iron is heating. Since you add butter to the batter, you don’t really need any added at the table. We poured on a bit of real maple syrup.

If I had taken the time, a cherry compote would have been even better.

For those of you who can’t imagine having a single purpose item like a waffle iron, perhaps it helps that this one was from a garage sale and is eons old. It’s smallish and round and fits inside of a stew pot. If it is still working when I die, my survivors will probably discard it, but for now it does the trick and produces nice circles of yummy waffles.


I'm sending this over to Susan at Wild Yeast for her wonderful weekly event Yeastspotting. If you love bread, you should check it out...she has lots of lovely breads and rolls and other yeasted goodies featured each week.


Amazing Overnight Waffles with Chocolate Chips and Dried Cherries
from Mollie Katzen's Sunlight Cafe' Cookbook

2 cups unbleached all-purpose flour
1 teaspoon yeast
1 tablespoon sugar
½ teaspoon salt
2 cups milk
6 tablespoons unsalted butter, melted
1 large egg (I used ¼ cup egg substitute)
Nonstick spray
Butter for the waffle iron
!/3 cup dried cherries, chopped
1/3 cup semi-sweet chocolate chips
Pure maple syrup – hard to resist on waffles

Combine the flour, yeast, sugar, and salt in a medium bowl Add the milk and whisk until blended. Cover the bowl tightly with plastic wrap and let stand overnight at room temperature (or put in the fridge if room temp. is over 70 degrees F.) I figured out a sourdough version since my starter needed feeding and I hate to actually toss out the 'toss-off'.

The next morning, preheat the waffle iron. Melt the 6 tablespoons butter and let cool a bit. Beat the egg is a small bowl (unnecessary if using egg substitute) then beat it into the batter along with the melted butter. The batter may be a bit thin.

Lightly spray the hot waffle iron with non stick spray, top and bottom plates, and then butter a piece of bread and use that to rub some butter on top and bottom plates.

Add just enough batter to cover the cooking surface…this varies by waffle iron…about 2/3 cup. Sprinkle about a tablespoon of the cherry bits and similar amount of chocolate chips over the batter. If you like and can be fast, use the bottom of the scoop (which has batter on it) to dab a bit of batter over the tops of the chocolate chips. That keeps them from melting all over the iron.


Lower the top and cook until golden brown…it’s OK to check now and then. It takes about 2-3 minutes. You want it golden brown, but not dark brown.
Serve hot, right away, with maple syrup, or toppings of your choice.

Note; If you have too many waffles for the number of people you are feeding, bake the leftover batter a little less than the ones you are eating, let cool on a baking rack, then freeze and store in the freezer tightly wrapped. Re-heat in the toaster.


Sourdough Version
1 cup sourdough starter
1 1/2 cups unbleached all-purpose flour
1 tablespoon sugar
½ teaspoon salt
1 ½ cups milk
6 tablespoons unsalted butter, melted
1 large egg (I used ¼ cup egg substitute)
Nonstick spray
Butter for the waffle iron
!/3 cup dried cherries, chopped
1/3 cup semi-sweet chocolate chips

Combine the sourdough starter, flour, yeast, sugar, and salt in a medium bowl Add the milk and whisk until blended. Cover the bowl tightly with plastic wrap and let stand overnight at room temperature (or put in the fridge if room temp. is over 70 degrees F.)

The next morning, preheat the waffle iron. Melt the 6 tablespoons butter and let cool a bit. Beat the egg is a small bowl (unnecessary if using egg substitute) then beat it into the batter along with the melted butter. The batter may be a bit thin.

Lightly spray the hot waffle iron with non stick spray, top and bottom plates, and then butter a piece of bread and use that to rub some butter on top and bottom plates.

Add just enough batter to cover the cooking surface…this varies by waffle iron…about 2/3 cup. Sprinkle about a tablespoon of the cherry bits and similar amount of chocolate chips over the batter. If you like and can be fast, use the bottom of the scoop (which has batter on it) to dab a bit of batter over the tops of the chocolate chips. That keeps them from melting all over the iron. Lower the top and cook until golden brown…it’s OK to check now and then. It takes about 2-3 minutes. You want it golden brown, but not dark brown.
Serve hot, right away, with maple syrup, or toppings of your choice.

Thursday, April 24, 2008

Amazing Breakfast Waffles

One of the things that often keeps me from making anything more complicated for breakfast than a bowl of oatmeal is the time it takes to put together a batter and then cook it and then clean up from it.

The advantage of this recipe is that you start the batter the night before and only need to add the egg and melted butter in the morning. Now, it's true, there is still some cleaning up to do and waffles do take a while to bake in the waffle iron, but the amazing ease of putting the batter together, plus the fact that they taste great, makes it worthwhile. An added bonus is that the house smells like freshly baked bread...hard to beat on a chilly spring morning. This is what the bowl of batter looked like first thing in the morning...all the yeasties had been having a party overnight, so it's all foamy.

We added fresh strawberries on topof the finished waffles, too. A sure sign of spring, these came from Watsonville, just south of San Francisco. No butter was needed. Pure maple syrup filled up some of those depressions very nicely.

The ingredients for this are so simple that most people will have them handy in the pantry. That makes it so easy to whisk the first part together one evening, cover it, let the little yeasties do their thing overnight, then finish it off and enjoy the next morning. We had a couple of cooked waffles left over (I know, hard to believe, but we did try our best to demolish them all...and failed) and they went into the freezer and then a couple of days later the toaster oven...and were still delish.

Amazing Overnight Waffles
from Mollie Katzen's Sunlight Cafe' Cookbook

2 cups unbleached all-purpose flour
1 teaspoon yeast
1 tablespoon sugar
½ teaspoon salt
2 cups milk
6 tablespoons unsalted butter, melted
1 large egg (I used ¼ cup egg substitute)
Nonstick spray
Butter for the waffle iron
Sliced strawberries – optionsl, but nice
Pure maple syrup – hard to resist on waffles

Combine the flour, yeast, sugar, and salt in a medium bowl Add the milk and whisk until blende. Cover the bowl tightly with plastic wrap and let stand overnight at room temperature (or put in the fridge if room temp. is over 70 degrees F.)

The next morning, preheat the waffle iron. Melt the 6 tablespoons butter and let cool a bit. Beat the egg is a small bowl (unnecessary if using egg substitute) then beat it into the batter along with the melted butter. The batter may be a bit thin.

Lightly spray the hot waffle iron with non stick spray, top and bottom plates, and then butter a piece of bread and use that to rub some butter on top and bottom plates.

Add just enough batter to cover the cooking surface…this varies by waffle iron…about 2/3 cup. Lower the top and cook until golden brown…it’s OK to check now and then. It takes about 2-3 minutes. You want it golden brown, but not dark brown.
Serve hot, right away, with strawberries and maple syrup, or toppings of your choice.

Note; If you have too many waffles for the number of people you are feeding, bake the leftover batter a little less than the ones you are eating, let cool on a baking rack, then freeze and store in the freezer tightly wrapped. Re-heat in the toaster.

If you get a chance to check out this cookbook, do. It has wonderful recipes for anything you might want to eat for breakfast...and a few surprises, too.