Have you ever wondered what goes into a food blog post? If you have your own blog you already know, but if you mainly visit food blogs you might be interested in my process. If not you can skip down to the photo of the waffle with strawberries and cream and start reading there. I'm sure that there are as many variations on creating food blog posts as there are recipes for chocolate chip cookies...or even more than that, but the basics still are pretty universal. To me a good food blog post includes some writing about food or food related topics, there are almost always photographs and often a recipe.
The process actually starts with a lot of thought, as is true with many arts and crafts (and I leave it to you to decide if this is art or craft or a combination) because it helps to have an idea of what you want to cook, make, bake or explore in the vast topic of 'food'. Since I have a tendency to cook the same recipes over and over with minor variations, and since I usually avoid repeating recipes, my posts are usually baking ones. For some reason I feel more drawn to experiment with and write about baking. Many days as I drive to work I'll be thinking about possible variations on a recipe as I drive. At this time of year my thought stray to berries and what I love best about them and what new-to-me recipe I can bake using them.
After a decision is made about what to make then comes the recipe comparison time. Since baking is based on proportions that work well together I often compare basic recipes for what I have in mind, using recipes in cookbooks, magazines and on the Internet to help me make sure I understand the methods as well as quantities of ingredients. After that I play (again) with variations in my head and then head to the store if I'm missing ingredients or want super fresh ones.
Next comes my favorite part...making and baking. Although I know that mis en place - gathering all the ingredients and implements and pans together before starting - is the most professional, often I only gather stuff for the first part and then gather the rest while some of the recipe is beating or cooling or rising, etc. Same goes for preheating the oven. If the steps to take will take longer than 10 minutes I leave off preheating the oven until about 10 minutes before stuff goes into the oven. Saves on fuel and keeps me from feeling so rushed.
Before the actual making and baking begins I read the recipe all the way through and then read it again while checking for ingredients that are not ones commonly in my kitchen or pans or implements I don't usually use. Trust me, you don't want to be in the middle of a recipe and discover than you're all out of parchment, or vanilla or only have an 8 pan muffin tin when you need a 12 pan one.
Following a recipe might seem simple but if you stop to answer the phone and can't remember if you added that teaspoon of salt you might end up with a flat tasting cake or bread. If you are prone to making changes to any recipe you meet like I am, knowing which part to follow and which part to change requires even closer attention. I try to type up recipes, including the variations but have been know to scrawl variations on a sticky note stuck to the recipe that most closely resembles what I'm making. In general I give credit to the creator of that recipe.
If some part of the making and baking are visually interesting I'll take photos. I love the look of fruits and veggies and like to photograph them often. I'll also take photos to make it easier to understand a complicated recipe. I know food bloggers who take dozens and dozens of photos for one post...and their results are are awesome...but I try to stick to about 12 per post so that I end up with three or four in the post. It helps the post load faster if there aren't a lot of photos and I don't wish to take the time to go through dozens to find the best three. Maybe when I'm retired in 10 years or so :).
The finished dish always gets photographed and often there is a photo of the dish plated, too. If you decide to try food blogging the best thing to do is to visit lots and lots of food blogs and see what style and type of food photo suits you.
The food has been made, photographed and enjoyed. My next step is usually to process the photos. I'm pretty adept with Photoshop so it usually doesn't take me too long. I suppose if I were more picky I'd get better photos and it would take longer, but my enthusiasms extend to many other areas in my life so blogging gets its due share and no more. I always save the photos at 72 dpi which is low resolution. What you see on the Internet really doesn't look any better in high resolution than at 72 dpi and the lower resolution helps photos load faster, plus they take up less space on your hard drive. I often save them in a folder which is labeled with the name of the dish.
Now comes my favorite part (after eating the food) which is writing the post. Usually I have something I want to share with you about the food I've made...so that's what I write. Sometimes I include tidbits of what is going on in my life and every now and then we visit the Land of St. Honore' for story time and pure fiction. No matter what the rest of the post contains, I try to make sure to mention anything that will help you re-create the recipe for yourself and your family. Posting the recipe also means that I can go back to it when I want to make it again...a digital recipe book of the best kind!
Although there are many ways to create a post I usually write the content, add the photos, add the links, check the spelling (if I'm not in a hurry to post) and then put it up. Usually I'll then check what you see and make changes or corrections if needed (and again if I have time). Lots of times I'm posting at night and too tired to be as diligent as I should be.
So that's what I do and the post itself, including taking the photos and processing them, takes about an hour to two hours. Research for the recipe is ongoing so I have no idea how long I spend on it. The recipes usually give some indication of how much time they require, but often I would be making them even if I didn't blog so I don't pay attention to that either.
If you are thinking of food blogging or already doing it and want to exchange ideas and information, feel free to comment or e-mail me. I can be a fun hobby which combines the creativity of cooking and baking, photography and writing.

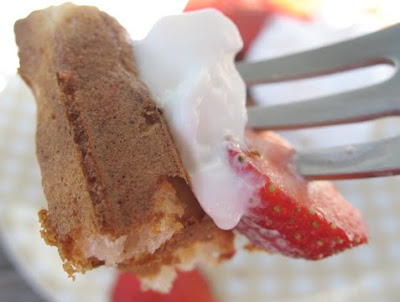
So now that you have some idea on how my blog posts are created, for today the post will be about waffles. Unlike many recipes I post, this one is a variation of a recipe that I've posted before. There is something about the combination of fresh strawberries and crisp, airy hot sourdough waffles that calls to me every year. For this year's variation I let the starter sit for a few days before making the batter (and the batter sits overnight) so there was a lovely pronounced sourdough flavor and aroma to these beauties. I also used some of the Irish wholemeal style flour from King Arthur for half of the flour. The resulting waffles had a nice nuttiness from that flour, plus darling little flecks wheat goodness.
You can make these without a sourdough starter, too. You'll find that recipe at the end of this post: http://feedingmyenthusiasms.blogspot.com/2009/06/ancient-church-meeting-tommy-waffles.html
You can serve these waffle with any toppings you like but they really don't need any additional butter. If you do want to top 'em with butter they will probably be even more delicious. Berries are my delight right now and we had some whipped cream handy, too. One version of total decadence is to sit in the sun next to the sweet peas and morning glories eating these luscious waffles, ripe sliced local strawberries and some whipped cream. Wish I could have shared.
NOTE: For those of you who can’t imagine having a single purpose item like a waffle iron, perhaps it helps that mine was from a garage sale and is eons old. It’s smallish and round and fits inside of a stew pot so it doesn't take up extra room in the cupboard. If it is still working when I die, my survivors will probably discard it, but for now it does the trick and produces nice circles of yummy, crispy waffles.

Amazing Overnight Wholemeal Waffles
adapted for sourdough starter
from Mollie Katzen's Sunlight Cafe' Cookbook
Sponge:
1 cup sourdough starter
½ cup all-purpose flour
1 tablespoon sugar
½ cup water
Whisk together and let sit, uncovered, at room temperature for 2 hours
Batter:
1 cup unbleached all-purpose flour
1 cup Irish wholemeal wheat flour
all of the sponge
1/8 teaspoon instant yeast
1 tablespoon sugar
½ teaspoon salt
2 cups milk
6 tablespoons unsalted butter, melted
2 large eggs
Nonstick spray
Butter (and bread) for the waffle iron
Sliced strawberries
Whipped cream if you are feeling decadent or maple syrup if you prefer
Combine the flour, yeast, sugar, and salt in a medium bowl. Add the sponge that has sat for 2 hours waiting for this moment, and whisk to combine. Add the milk and whisk until blended. Cover the bowl tightly with plastic wrap and let stand overnight at room temperature (or put in the fridge if room temp. is over 70 degrees F.)
The next morning, preheat the waffle iron. Melt the 6 tablespoons butter and let cool a bit. Beat the egg is a small bowl (unnecessary if using egg substitute) then beat it into the batter along with the melted butter. Whisk the egg white until it forms soft peaks. Fold into the batter with a spatula.
Lightly spray the hot waffle iron with non stick spray, top and bottom plates, and then butter a piece of bread and use that to rub some butter on top and bottom plates.
Add just enough batter to cover the cooking surface…this varies by waffle iron…about 2/3 cup. Lower the top and cook until golden brown…it’s OK to check now and then. It takes about 2-3 minutes and it's usually when the steam starts to diminish. You want it golden brown, but not dark brown.
Serve hot, right away, with strawberries, whipped cream or maple syrup, or toppings of your choice.
Note; If you have too many waffles for the number of people you are feeding, bake the leftover batter a little less than the ones you are eating, let cool on a baking rack, then freeze and store in the freezer tightly wrapped. Re-heat in the toaster.


*Note to self* Start thinking about cooking while driving to work.
ReplyDeleteWow - you are so organised. My posts come about in a much more chaotic and haphazard way but then that probably shows in my blog!!!
ReplyDeleteI just wish there was more time. Just an extra hour in the day pleeeeeeeease!
Ooh, a new use for sourdough starter! These look wonderful!
ReplyDeleteMmmmm, waffles....
ReplyDeleteI'm not nearly as organized as you are with my posts! But I have learned to make sure to scrawl the ingredients for a recipe onto a piece of paper and have a pencil on hand to make note of changes I've made as I mix the ingredients. And one of these days, I'll learn to read, re-read AND retain what I've read in a recipe before proceeding.