

The colorful, sweet yeasted cake called a King Cake is a traditional treat for Mardi Gras season. Yes, from January 6th, Epiphany, to next Tuesday is the season for Mardi Gras, the celebratory time before the beginning of Lent. As the world has become more secular, the religious basis for some celebrations has been lost or muted, but the church calendar still sets when Lent begins. It's on the early side this year, since Easter is in early April. Lent, of course, is the time of penance between Ash Wednesday, which is the day after Fat Tuesday (Mardi Gras in French), and Easter.

Since only some folks care about all that religious stuff, let's focus on the reason for this post, which is King Cake. Imagine a period of about six weeks, give or take a week, when life is one big party...and lots of parades if you live in New Orleans, the U.S. center of Mardi Gras. That gives you multiple weekends to party even if you are a working stiff. The King Cake keeps the party going. Inside each is hidden a charm or a baby, or even a nut half. The person whose portion of the King Cake contains that hidden nugget is responsible for the next party or, at a minimum, the next King Cake. OK Madeline, you are bringing the cake, so where is the party cher? Let the good times (Bon Temps) keep rolling on!
My daughter Kate has many skills and talents and has lately become a great cook. She has always enjoyed baking things like cookies. Still, baking bread is a new skill for her. King Cake is actually a rich yeasted sweet bread. You may be one of those who are apprehensive about baking with yeast as Kate was, so you can understand why we decided to bake this 'together', using a combination of Zoom and FaceTime. She was making her first stand mixer assisted bread and that worked very well.

I found a good foundational recipe online at Tori Avey.com. This site also included a wonderful history of the King Cake and lots of options and information. Because Kate wanted to make a filled King Cake and I wanted to make a braid, I re-wrote the recipe to make those shapes easy to understand. The recipe below uses Tori Avey's ingredients and basic directions and my added techniques and clarifications. The basic dough is the same for the most part for both King Cakes. I kneaded in golden raisins and candied fruitcake mix and used some orange zest for flavoring when I made my dough. Kate kneaded in chopped dried cherries in her dough. The cherries are a great combo with the chocolate-hazelnut-caramel-sea salt spread she received as a gift from a friend in France and which she used for the filling. Check out the technique for adding the fruit to the dough...it works every time and the fruit is well-distributed.


Kate shaped her risen dough first, rolling it into a rectangle (above, with rolling pin), spreading on the chocolate-nut spread (directly above...doesn't it look yummy?) and rolling it up like a jelly roll (below - look at the lovely pinched seam),


transferring it to a baking sheet lined with foil and spritzed with oil. She then shaped it into a circle and pinched the ends together and covered it for the second rise (directly above). After rising, she gave it the egg wash (below).

Kate baked her King Cake to a golden brown. After cooling, she added icing and the traditional purple, gold and green sugar decorations. Her guys really loved it and one of the had a second helping!


We made my braid next after Kate had shaped hers and while it was rising. I divided it into three pieces with my bench scraper (above).

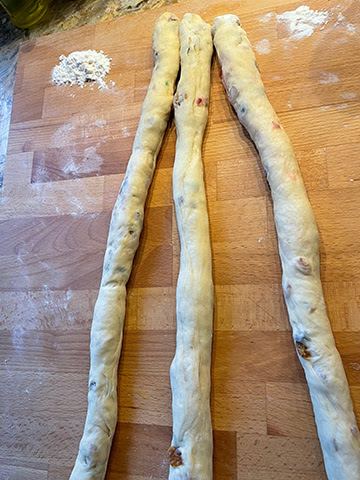
Those three pieces were rolled into long snakes. Three long snakes of dough were pinched together at the top, then braided, not too tightly, and the ends tucked under.

Then the braid was shaped into a circle and the ends pinched together. That too was covered for the second rise.

After an egg wash over the tops of the loaves, each went into the oven at hand. The hardest part was knowing when they were done.


Mine browned on top very quickly, so I had to cover it with foil for the last 10 minutes of so. Kate's took longer to bake through because the filling made it denser than a braid.

After cooling we each made icing and decorated our King Cakes with gold, green, and purple sugars.
Being an hour behind, I was able to share some with Sweetie for a late tea time snack. Delicious! Sweetie liked that it was slightly chewy and not too sweet.
Kate had hers with her guys as dinner dessert. Delicious again!! Her finished loaf was very professional looking, had wonderful oven spring, a lovely shape, golden crust, nice loose crumb and to die for flavor. The fruit was perfectly distributed throughout the loaf. The icing and sugars were lovely and colorful. All in all a stunning first bread!


King Cake
Based on the King Cake at Toriavey.com
1 package Rapid Rise dry yeast (1/4 oz.)
1/4 cup warm water (tepid - about 105 degrees F)
1/2 cup warm milk (tepid)
1/4 cup granulated sugar
1/4 cup unsalted butter (1/2 stick) (room temperature)
1 large egg (room temperature)
3/4 teaspoon salt
1 teaspoon grated lemon zest (optional) and/or 1/2 teaspoon vanilla extract
2 1/4 cups unbleached all-purpose flour, plus more for shaping
1/4 - 1/2 cup golden raisins and/or fruitcake mix, or chopped dried cherries
egg wash - 1 egg beaten with 1 teaspoon water
Nutella or similar spread - about 1/2 cup
Large bean or a pecan half or walnut half or hazelnut (whole)
1 cup confectioners' sugar, sifted
2 tablespoons unsalted butter, softened (1/4 stick)
1/2 teaspoon vanilla or lemon extract
1 tablespoon milk, fresh lemon juice or water (they are all
good)
Green, yellow and purple decorating sugars OR
food coloring to color icing those colors
Directions:
In a small bowl or measuring cup, sprinkle the yeast over the warm (tepid) water. Stir in 1 teaspoon sugar. Let stand until foamy, about 5 minutes.
In a stand mixer bowl, combine the yeast mixture and a tablespoon of flour. Stir with a spoon or spatula to combine. Add the milk, sugar, butter, egg, salt and lemon zest/vanilla. Stir to combine. There will be lumps of butter...that's OK. Stir in 1 cup flour with a spoon or spatula.
Remove the dough from the dough hook to a lightly floured work surface. Knead in the raisins/candied fruit/chopped dried cherries by flattening the dough, spreading on half the fruit, then rolling dough up like a jelly roll. Fold in ends, flatten again, spread remaining fruit, roll up, then knead the fruit in. Form into a ball. Place in a oiled (I use spray oil - Original Pam) bowl and turn to coat the ball with oil, then cover with a clean shower cap or a piece of plastic wrap sprayed with oil, oil side towards the ball of dough. Put bowl in a warm place and let rise until doubled, about 2 hours.
Take dough from bowl onto a lightly floured surface and knead a few times to get rid of excess gas. If doing the braid, divide the dough into 3 pieces, as equal in weight as possible, and shape each piece into a snake. Place the first 'snake' onto a parchment or Silpat lined (or foil lined with a spritz of oil) baking sheet (sheet pan is great). Place the other two snakes of dough parallel to the first. Join by pinching together at the top, then braid by crossing alternating strands, but not too tightly. Pinch the ends together after forming the braid into a circle or oval by pulling the ends together. Push the large bean, nut half or whole hazelnut into one of the braids until hidden.
Cover with spray oiled plastic wrap where the oiled side is towards the braid, place in a warm place, and let rise until about doubled, about 1 hour.
If filling the dough, take the de-gassed dough and press or roll into a rectangle, about 16" x 10". Spread the filling over the rectangle, leaving an inch uncovered on all sides. Place the large bean, nut half or whole hazelnut on the filling towards one long edge of the rectangle. Beginning from a long end, roll up jellyroll style. Pinch the edge where it meets the roll. Place roll, carefully, seam side down on a parchment or Silpat lined (or foil lined with a spritz of oil) baking sheet (sheet pan is great). Bring the ends together to form an oval or circle and pinch ends together. Cover with spray oiled plastic wrap where the oiled side is towards the braid, place in a warm place, and let rise until about doubled, about 1 hour.
Position a rack in the center of the oven. Preheat oven to 350 degrees F. For either version, use a pastry brush to brush the egg wash on the top of the King Cake. Bake until golden brown, 25 - 30 minutes. Cool on a wire rack.
When completely cool, place the King Cake, on the rack, on top of the baking sheet (to catch any drips, sugar, etc.). Make the icing. Drizzle over the non-braided version and sprinkle bands of the colored sugar on the wet icing, using all three colors. Let dry. Cut and enjoy.
For the braided version you can do the same, or you can ice each section of the braid in turn, use one color per section of braid and let that dry before starting on the next section so that you can shake off excess sugar. Let dry. Cut and enjoy.


No comments :
Post a Comment