Sunday, June 23, 2024

Early Berries In An Upside-Down Cake


Late June is often when the olallieberries down the driveway are ripe and plentiful. It's always fun to try different recipes to highlight their great flavor and juiciness. For a recent meeting I made an upside-down cake that made good use of them, was enhanced with whole pecans, and made a delightful treat, good for any time of the day.

This is a single layer cake made with buttermilk, which gives a nice tang that offsets a bit of the sweetness of the topping, for a nice balance. I made it in a cast iron skillet, but if you melt the butter in a microwave oven or in a small pot on the stove, you can make it in a 9-inch square or round cake pan, too.

I combined a few different recipes to create this cake, so it's possible that the topping has a bit too much butter...but I liked it that way. I think it would work with 4, 5, or 6 tablespoons of butter in the topping, but the 4 tablespoons in the cake was just right.

Although I made this with olallieberries, blackberries are very similar and much easier to find, so I'm calling it Blackberry Upside-Down Cake.


Blackberry Upside-Down Cake

1 1/4 cups all-purpose flour
1/2 teaspoon baking powder
1 teaspoon baking soda
1/4 teaspoon salt
6 tablespoons butter 
2/3 cup light brown sugar
1 tablespoon rum
1 pint blackberries, rinsed and drained - dry with paper towels if not fairly dry when drained
19-20 pecan halves
1/4 cup butter, at room temperature
1/2 cup granulated sugar
2 large eggs, at room temperature
2 tablespoons rum
1/2 cup buttermilk, at room temperature

On a sheet of waxed paper, or in a bowl, whisk together the flour, baking powder, baking soda and salt. Set aside.

Preheat the oven to 325 degrees F.

In a 10-inch cast iron skillet over medium heat, stir together the 1/4 cup butter and the light brown sugar until melted . Remove from the heat and stir in the rum. Arrange the blackberries over the butter/sugar/rum mixture in an even layer. Fit the pecan halves, curved side down, among the berries. Set aside.
(Alternately, melt the butter in a microwave oven or on the stove in a pot. Add the sugar, stir, and cook another minute. Stir in the rum and then pour into a 9-inch square or round cake pan. Arrange blackberries and pecans as above. Set aside and use just like the skillet with prepared blackberries below.)

In the bowl of a stand mixer, beat the butter and sugar until light, about 3 minutes. Add the eggs, one at a time, combining thoroughly after each. Use a spatula to scrape the bowl and beaters as needed.

 Combine the rum and the buttermilk. Add 1/2 of the reserved dry ingredient mixture to the batter, beat just to combine. Add all of the rum and buttermilk and beat just to combine. Add the remaining dry ingredient mixture and beat until just combines. Use a spatula to scrap the bowl and beaters and beat again to combine the scrapings into the batter.

 Pour and scrape the batter over the prepared blackberries in the skillet. Smooth to even the batter. Place in the preheated oven and bake 40-45 minutes, or until the cake springs back when lightly touched in the center.

 Cool on a wire rack 15 minutes. Loosen the sides of the cake with a spatula or a knife. Place a large serving plate over the skillet and invert. Slowly lift the skillet to allow all the juices to drip onto the cake. If any part of the topping sticks to the skillet or cake pan, use a small offset spatula to return it to the cake top.

 Can be served warm or at room temperature.


Since this is a blog about my life as well as about baking and cooking, I have to share that this weekend Sweetie and I made a repair to the house by the sunspace that required a lift machine. A woodpecker decided that he or she should store their acorns in the corner of the outside of the sunspace so they pecked multiple holes, despite our efforts to scare them off. This happened a few months ago, but wedding and other plans delayed the repair. 


Sweetie said that it was full of acorns! He sprayed insecticide into  the space and then covered the hole with roofing tape to keep any moisture out (hopefully preventing sprouting of acorns!), then screwed two long metal plates made of flashing material over the area where the bird was fond of pecking. I had painted them earlier in the same gray as the house and followed up today by painting the caulking and the screws. The final touch was to add a multicolor pinwheel in a flag holder to  the area below the repair to discourage any further bird activity (no photo, sorry). The repair went up to the eaves, a bit higher than this photo.


Above is a photo of the machine. It was easy to operate and kind of fun since it went up and down, sideways and also swung around in a circle. The bucket was not easy to get in and out of and Sweetie tweaked his back getting out the final time. Fortunately we were done.

Tuesday, June 18, 2024

Start With Pesto


I know that mayonnaise is a favorite spread for a good sandwich, but I love this sandwich and it has no mayo and doesn't need any. It starts instead with pesto.

A favorite restaurant from my younger years had a great chicken sandwich which included chicken, melted mild cheese, roasted red peppers and pesto. It was served on focaccia bread and was delicious.

Recently I made a similar sandwich, but used slipper rolls (ciabatta rolls) instead of the focaccia bread. The chicken was actually left over grilled chicken thighs but this sandwich didn't seem like leftovers at all. The photo below give you an idea of how it looks inside. You can put the red peppers either under the chicken or over it.


Chicken Sandwich with Cheese, Red Pepper and Pesto

For each sandwich:

1 grilled chicken thigh or breast. If leftover, heat on half power in microwave until hot.
1 ciabatta roll, sliced so you have a top and bottom, toasted
about 2 tablespoons shredded jack or mozzarella or similar mild white cheese
about 2 tablespoons prepared pesto
2-3 strips roasted red pepper (from a jar is fine)

1) Slice the grilled, heated chicken into thin slices
2) Place the cheese on the toasted ciabatta roll bottom. Melt the cheese in the microwave or under a broiler. I use a toaster oven. When melted, top with the red pepper strips, which should almost cover the cheese.
3) Spread the pesto on the top slice of ciabatta roll. If roll has cooled, you could heat it a bit in the toaster oven which is warm from melting the cheese, or briefly use the microwave.
4) Place the warm chicken over the red pepper strips and then place the pesto enriched top over the chicken. Press down lightly and serve your sandwich. 

Sunday, June 16, 2024

Happy Father's Day to Some Dads


 First, a toast to the father of my children, Charlie! He has done a wonderful job over the years of being the kind of Dad that everyone wishes for.


Then, a toast to Aaron, husband of our daughter and Dad of Raine, seen here with him at Bodega Head, plus of sons River and Landon. He has been a bedrock dad to Raine and a role model of what a Dad should be like.

Even though I should be scanning the older photos in my care so that I have resources for photos of years gone by, that hasn't happened enough, so there aren't many to choose from for my Dad and maternal Granddad, but here are one of each of them. My paternal grandfather died before I really knew him and I don't have any of him handy, either, but all of these men are loved even though they are gone.


This photo is of my Dad, Max, hugging one of my sisters, maybe even on Father's Day.


This one is of my maternal grand father Jim Mangan, smiling at K. They made quite a pair.


Wishing all Dads a most Happy Father's Day!

Saturday, June 15, 2024

Fresh Peas


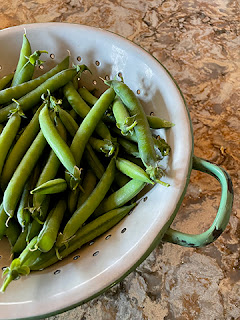
A friend who has a large veggie garden every year gave me a tour of it today and when we were done she and her husband gave us a bag of freshly picked green peas. She had been out of town for a week and returned a couple of days ago to a garden just brimming with peas ready to pick.

These were beautiful peas, tightly packed into their pods, and oh so sweet. I shelled about two cups worth to steam for our dinner and will probably do the same for tomorrow's dinner because peas, like fresh corn, tend to quickly go from sweet to starchy. Don't want to waste them!

Do you, dear reader, have a source for really fresh produce, perhaps your own garden? 

No recipe, really, for these peas. Once shelled I steamed them just long enough to heat them through, then applied about a teaspoon butter...that's it.  The photo below is of the shelled, uncooked peas.


Monday, June 10, 2024

Enjoying the Berries of Early June


I wish that I could say that I'm super concerned about using seasonal ingredients in my meals, but in truth I purchase raspberries and blueberries in winter knowing that someone has most likely shipped them from the southern hemisphere. The same is true of broccoli...I eat it year round when it's really a fall or winter veg.

That said, I do enjoy celebrating the arrival of local produce. Our local strawberry farm began selling their fruit in May, much later than usual due to the extended chilly spring and late rains. We just bought some on Thursday and then I discovered yesterday that the olallieberries  that grow down by the road are ripe...at about their usual time. We had a heat spell for a few days (high 90s) earlier in the week and that really pushed the ripening. This morning it was foggy and cool, so I filled up three pint baskets with gorgeous, huge, ripe olallieberries in short order. There were even a few that were over ripe already.

The best thing to do with ripe, seasonal berries like these are to enjoy them just as they are...well, after a quick wash to get rid of any dust or bugs...to enjoy their juiciness, tang and sweetness. I also like them on my morning cereal or with plain yogurt. 

Today we were invited by our neighbors across the street to come for dinner tonight. They lead very busy lives so we find that spur of the moment plans work best. I offered to bring a dessert with the berries. The great thing was that I had already planned to make scones to go with the berries and then planned to add a dollop of freshly whipped cream. So much nicer to have others to share it with!

These scones go together fairly quickly with about a 20 minute prep time and another 20 minutes for the baking. I used soy creamer instead of the heavy cream since I was saving the cream for whipping. I put the cut up butter in the freezer for a few minutes while I made the egg-creamer-almond extract mixture and the dry ingredient mixture. I baked them on pizza pans that I had lined with parchment paper. It wasn't in the recipe, but I also sprinkled some sparkling sugar over the tops of the scones since they were headed for dessert, but that's optional.

Do try these this summer while all the berries and stone fruits are plentiful and ripe and juicy. You'll be glad you did.

To make these shortcakes you put a scone on a plate, scoop about 1/3 cup berries on top, then add a large dollop whipped cream and serve. You will need:

1 pint whipping cream, chilled and whipped to soft peaks...with a teaspoon sugar added as you whip.
2 pints fresh berries - rinse and drain - if strawberries, hull, then slice - use all one kind or mix them
1/2 recipe Almond Cream Scones (save the other half for having with tea or freeze)


Almond Cream Scones
Cream Scones enriched with both almond flour and almond extract
a variation of two recipes in Dorie Greenspan's Baking: from my home to yours
"Perfect for every scone-able occasion"

1 large egg
2/3 cup cold heavy cream or Silk soy creamer
1/8 teaspoon almond extract
1/4 cup all-purpose flour
1/2 cup cake flour
1 cup almond flour
(or grind 1 cup blanched almonds and the following sugar in a food processor until finely ground)
2 tablespoons sugar
1 tablespoon baking powder
1/4 teaspoon salt
5 tablespoons unsalted butter, cut into small pieces and chilled


Center a rack in the oven and preheat the oven to 400 degrees F. Line a baking sheet with parchment or a silicone mat.

Stir the egg, cream and almond extract together. Set aside.

Whisk the flour, cake flour, almond flour, sugar, baking powder and salt together in a large bowl. Drop in the butter and, using your fingers, toss to coat the pieces of butter with flour. Quickly, working with your fingertips or a pastry blender, cut and rub the butter into the dry ingredients until the mixture is pebbly. You'll have pea-size pieces, pieces the size of oatmeal flakes and pieces the size of everything in between...and that is just right.

Pour the egg and cream over the dry ingredients and stir with a fork just until the dough, which will be wet and sticky, comes together. Don't overdo it. Still in the bowl, gently knead the dough by hand, or turn it with a rubber spatula 8 to 10 times. If not sticky, add a tablespoon or two of heavy cream or soy creamer.
Lightly dust a work surface with flour and turn out the dough. Divide it in half. Working with one piece at a time, pat the dough into a rough circle that's about 5 inches in diameter, cut it into 6 wedges and place it on the baking sheet. (at this point, the scones can b e frozen on the baking sheet, then wrapped airtight. Don't defrost before baking - just add about 2 minutes to the baking time.)

Bake the scones for 20 -22 minutes, or until their tops are golden and firm. Keep an eye on them the last 5 minutes or so so they don't overbake.

Transfer them to a rack and cool for 10 minutes before serving, or wait for them to cool to room temperature.