Tuesday, August 21, 2018

Yeasted Peach and Berry Coffee Cake for the Bread Baking Babes


Usually I try to post the BBB recipe on the 16th of the month along with the other Babes, but this month my back didn't cooperate (probably because of too much work on fixing up the back deck) so it took me until today to bake this delicious, impressive coffee cake. Our Kitchen of the Month is Judy of Judy's Gross Eats. She chose a delightful treat with yeast bread and jam.

I had eight egg yolks in the fridge from prior cooking, so I decided to use the Challah recipe from Peter Reinhart's Artisan Breads Every Day book. It needed exactly the number of yolks I had, plus it doesn't use milk, and it used oil instead of butter...all items that work for me. I've never made the traditional Challah braid, but half of the dough is now in the freezer so I can try that at a later date. The recipe from Judy is very similar but it uses melted butter and whole eggs.

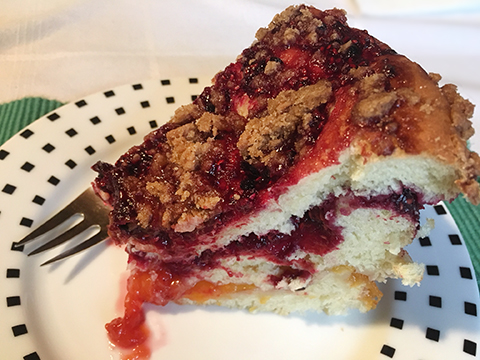
This is a rich, smooth, tight crumb bread with a tinge of yellow from the yolks. It is easy to work with so I decided to use a tube pan as Tanna did, hoping to avoid the fallen center. Well, it rose to the top of the pan, making an impressively high coffee cake at the sides,


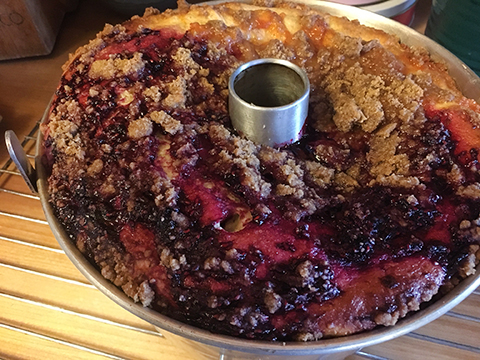
 but when it cooled, the center still fell. I think that all that home made jam was a destabilizing influence.


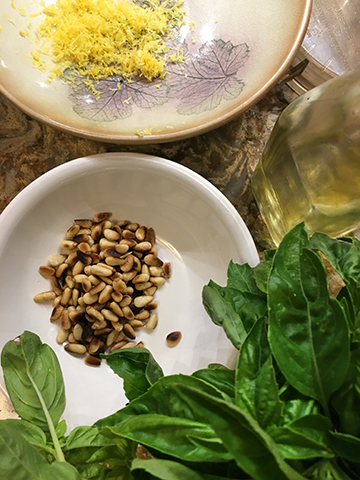
For the jam I had three peaches, a bag of frozen raspberries in the freezer, and some blackberries picked down the driveway on Sunday. None of them yielded 5-6 cups required for the jam, so I made two batches of jam; one peach and one berry using both the raspberries and the blackberries. It was a little more work and more pans were used, but I think having the two colors was pretty and the two flavors went together really well. On top half the cake had peach and half had berry. The raspberries in particular made the house smell wonderful both when I made the jam and when the cake baked.


Sweetie really liked this cake. I served it barely warm and one slice was enough, so we still have about 8 servings left! I suspect that a neighbor, the librarians or firemen will get a treat soon.

Check out what the other Bread Baking Babes have done with this recipe.


If you'd like to be a Bread Baking Babes Buddy, just email Judy by Aug. 29th with a photo and a brief description of your baking experience. The original recipe can be found on her blog, and so can her email.


Challah (to be used for the Yeasted Fruit Jam Coffee Cake)
from Peter Reinhart's Artisan Breads Every Day

(Note: I used the grams weights and did weigh my ingredients on a scale with a tare...highly recommended.)

2 /14 cups (18 oz. / 510g) lukewarm water (about 95 degrees F or 35 degrees C)
1 1/2 tablespoons (0.5 oz. / 14g) instant yeast
8 - 10 egg yolks (6 oz / 170g), depending on weight
5 tablespoons (2.5 oz / 71g) vegetable oil
6 tablespoons (3 oz / 85g) sugar or 4 1/2 tablespoons honey or agave nectar
1 tablespoon (.075 oz / 21g) vanilla extract- optional (I used 1 teaspoon almond extract, measured, not weighed)
7 1/2 cups (34 oz / 964g) unbleached bread flour
2 1/2 teaspoons (0.66 / 19g) salt or 4 teaspoons coarse kosher salt

Combine the water and yeast in a mixing bowl and stir with a whisk to dissolve. Add the egg yolks, oil, sugar, almond extract (if using) and whisk lightly to break up the egg yolks, then add the flour and salt. If using a mixer, use the paddle attachment and mix on the lowest speed for 2 minutes. If mixing by hand, us a large spoon and stir for about 2 minutes. The dough should be coarse and shaggy. Let dough rest for 5 minutes.

Switch to the dough hook and mix on medium-low speed, or continue to mix by hand using a large, wet spoon, for 4 minutes.

Use a bowl scraper to transfer the dough to a lightly floured work surface, then dust the top of the dough with flour. Lightly knead for 1 - 2 minutes, adding more flour as needed to prevent sticking. The dough should be soft, supple and tacky but not sticky. Form the dough into a ball, place it in a clean, lightly oiled large bowl, and cover the bowl with plastic wrap (or a clean shower cap). Immediately  refrigerate the dough overnight or for up to 4 days. It will double in size as it cools.

On baking day remove the dough from the refrigerator about 2 hours and 10 minutes before you plan to bake. Transfer to a lightly floured work surface and divide in half. If possible, use a scale to make sure the weights are very close to the same. Set one half aside for another use and use the other half to follow the recipe for the Yeasted Fruit Jam Coffee Cake on Judy's blog.

Monday, August 20, 2018

Lemon Blackberry Cake with #TheCakeSliceBakers


Unfortunately my back has been acting up for the last few days, so no blogging for a while. Even the making of this cake was affected because I needed a cake for a birthday party but needed to simplify it. I know it looks fancy, but the blackberries were picked and the jam was made before my back went out and the cute piped icing at the bottom and for the candles was done on Sunday when I was feeling better.


We are baking from The Perfect Cake from America's Test Kitchen and in that cookbook this was a four layer cake (four full layers, not two cut in halves horizontally) which means a longer baking time since two are baked at a time, not four. It also used mascarpone cheese in the icing, which is not something that I can eat due to severe dairy allergies. It's also something that I haven't found a substitute for, so I made a 'buttercream' icing using non-dairy margarine and a different recipe entirely. Because the margarine doesn't whip as light as butter and because it also has more moisture in it than real butter, the icing isn't as stable, so a two layer cake made more sense as well as being faster.


I did make the fresh blackberry jam from the recipe in The Perfect Cake, although I strained it to remove the seeds and most of the skins. Blackberry seeds just seem wrong for a fancy cake. Because I only had two layers, I was able to put some of the jam directly on a cake layer and then put the blackberry flavored buttercream on top,


plus on the top and the sides. The sides looked much better with plenty of icing instead of the veil look recommended by the Perfect Cake recipe. Since there were only two layers I felt that the extra icing was needed to balance out the cake. I got raves for the icing because it was delicious, using some lemon juice and the blackberry jam and not a lot of sugar, so it wasn't overly sweet. I used a circle of fresh blackberries on top for decoration.


The cake has both lemon zest and lemon juice. Because the extra step of whipping the whites and folding them in was too much time on my feet, I used the Perfect Party Cake recipe from Dorie Greenspan's Baking; from my home to yours book for the cake. It uses the dry/wet/dry/wet/dry method for adding the dry and wet ingredients to the butter/sugar/egg mixture, which goes quickly and still produces a moist, tender, fine grained cake.


Next month I hope to go back to following the recipe exactly, but I have to say that this sure did make a pretty and delicious layer cake...and it was perfect for a party of 5. We ate all but two or three slices and all the plates were clean of both cake and icing when we were done...I think everyone loved this cake!


I particularly enjoyed the lemon. It's fresh flavor was a great counterpoint to the sweet blackberries in the jam and icing. Here's a slice for you.


Be sure and check out the other Cake Slice Bakers posts to see which cake they made. #atkcake


The Cake Slice Bakers are baking from a new book "The Perfect Cake" from America's Test Kitchen.

Our choices this month are...

August 2018
  1. Blueberry Boy Bait
  2. Raspberry Charlotte
  3. Blackberry-Mascarpone Lemon Cake
  4. Peanut Butter and Jam Cake.
Visit our members to see what cake choice they baked up! 


Monday, August 13, 2018

Quick Peach Crisp


The other evening I had some very ripe peaches on hand. Unfortunately I didn't have the energy to make a peach pie, which is what I had gotten the peaches for. Still, they weren't improving with age, so I decided to make a peach crisp. It goes together much more quickly than a pie and still gives me that hit of warm, nutmeg scented peaches. The day before I had made a bowl with nothing but warm, nutmeg scented peaches and that was great, but adding a crisp topping makes it special.


I started with two ripe, peeled and pitted peaches. I cut them into chunks and layered them in the bottom of a rectangular baker. In the microwave in another heat safe container I melted butter and added brown sugar and the nutmeg. Then I did the 'quick' part by adding plain granola to the butter mixture (well, not really butter - non-dairy margarine) and stirred it well to coat the granola clusters with the mixture. Usually I would have had to measure out oats and flour and salt, etc., so this was faster.

The crisp topping went over the peaches and it all went into a preheated 350 degree F. oven for 20 minutes. The result? Hot peaches, browned topping, peaches juices scented and flavored with nutmeg. What could be better? A scoop of vanilla soy ice cream. Ooops, Sweetie ate it all, so we went with some soy creamer instead. Delicious...and quick dessert for two.


Quick Peach Crisp
Serves 2

2 ripe peaches, pitted and peeled and cut into chunks
2 tablespoons butter or margarine
2 tablespoons brown sugar
1/8 teaspoon nutmeg
3/4 cup plain granola (I used Bob's Red Mill)

Preheat oven to 350 degrees F.

Layer peach chunks in an even layer in the bottom of a 6 x 9-inch baking pan. (You could use a 9 x 9-inch pan and double the ingredients and have enough for 4 people.)

In a medium bowl microwave the butter, brown sugar and nutmeg until the butter us melted. Stir well. Stir in the granola until all the cereal is coated with the butter mixture. Evenly distribute the granola mixture on top of the peach layer and bake for 20 minutes, or until the crisp topping is golden brown. Serve at once. Garnish with ice cream, whipped cream, or cream.

Thursday, August 09, 2018

Fresh Basil in Pesto


Most years I plant basil seeds in a wide and somewhat shallow planter. Some years the basil does well and fills up the planter. Some years I get a few spindly plants. This year the basil is happy and the planter is packed and the plants are getting tall. Time to use them and a great way to use basil is in pesto. Normally I'd make a mixture of basil, pine nuts,olive oil and parmesan cheese, with some salt and pepper added to taste.

Now that cheese is in my past, I decided to try making it without parmesan. I used fresh lemon juice and lemon zest to add some zing and some almond flour for body. Of course the star is the basil, which is as it should be. We had it mixed with some potato gnocchi that were a bit unstable so that half turned to mashed potatoes when heated in simmering water. It was a new brand of gnocchi. Wonderful in taste but I think I'll go back to the more stable kind.

The pesto was just right...lots of basil flavor heightened by the lemon and mellowed by the nuts. I toasted the pine nuts a little too much but with all that basil you would never know. The olive oil wasn't the real fancy kind used for finishing...it would be wasted for the same reason...it's all about the basil. You could taste the lemon, mostly as an afternote. A touch of salt was necessary. There is still enough in the fridge for another pasta or gnocchi dish...YAY!

No Cheese Pesto

1 cup, packed, fresh basil leaves...stems discarded
1/3 cup toasted pine nuts
1/3 cup almond flour
1 teaspoon lemon zest
juice from a lemon
1/3 cup olive oil, or to taste
salt and pepper to taste

In a food processor bowl fitted with the steel blade place the basil, pine nuts, almond flour, lemon zest and lemon juice. Process until fairly smooth, scraping down sides as needed. With machine running, use the feed tube and add the olive oil in a thin stream until pesto is to your liking. Add salt and pepper to taste. Serve at once.

Leftover can be stored in a small glass jar. Pour a little additional olive oil gently to create a thin layer of oil on top of the pesto. This keep air out and prevents the pesto from turning brown.

Sunday, August 05, 2018

Shrimp on the Barbie


Sweetie absolutely loves shrimp. When we go to Costco he always buys some cooked shrimp to have for lunch that week. They cook the kind he likes with garlic and butter, so I have something else for lunch, but I like shrimp, too, so sometimes we get the plain kind with cocktail sauce for dipping.

Last night we had a made-up recipe BBQ Shrimp. The marinade is the made up part, since the shrimp were purchased already cleaned and with all the shell except for the very last part of the tail removed.

The marinade used both regular and Meyer lemons because that's what I had on hand. I used Penzey's Spices Greek Seasoning blend, which contains salt and pepper, garlic, dried lemon peel, oregano and marjoram, all great flavors for shrimp. If you don't have that, season the marinade to taste with minced garlic, dried oregano and marjoram, salt and pepper as well as the lemon juice.

I marinated the shrimp for about a half hour, 15 minutes, then I turned the bag over for another 15. Much longer and you start 'cooking' the shrimp with the acid in the lemon juice, like with ceviche.

While the shrimp were marinating, I soaked wooden skewers in water. Once it was time to cook the shrimp, I threaded them on the skewers, starting with the tail end and going through the largest part last. The marinade also had olive oil in it, so all Sweetie had to do was put them on the barbie and make sure to not overcook them. Shrimp only needs a couple of minutes per side.

We had them with grilled zucchini from the garden, sliced tomato from the garden dressed with olive oil, garlic and pepper and balsamic vinegar, and store bought potato salad. It was close to 90 in our neck of the woods yesterday and still around 80 when Sweetie was barbecuing, so only having to be out in it for a short time was perfect.


The shrimp were moist and succulent and lightly flavored with the citrus and herbs. These would work well as an appetizer, too. You could have a thin slice of cucumber or zucchini, pepper, a dab of yogurt or smashed avocado and a shrimp on top.

Hope that you are staying cool (or warm the the Southern hemisphere) and enjoying the summer.


Shrimp with Citrus Marinade

1 pound shrimp, cleaned and shell removed except for tail, rinsed and drained
juice of two lemons
1/4 cup olive oil
1/2 teaspoon Penzey's Greek Seasoning blend
or
to taste: salt, pepper, lemon zest, garlic, dried oregano, dried marjoram

In a large ziploc bag place the lemon juice, olive oil and seasoning(s). Shake to distribute and let sit five minutes for the herbs to rehydrate.

Add the shrimp and shake to coat with the marinade. Lay the bag flat and make sure that the shrimp are in one layer. Let marinate for 15 minutes. Turn the bag over and marinate for another 15 minutes.

While the shrimp is marinating, soak 6-8 wooden skewers in water ( I used a broiler pan, but a rimmed baking pan would work, too) for at least 30 minutes. You can soak them longer if you like, but the shrimp cooks so quickly that 30 minutes seems to be enough.

Once the shrimp have marinated for 30 minutes, remove from the marinade. Discard the marinade. Thread the shrimp on the skewers, starting with the tail end, just above the shell and being sure to pierce the upper part of the shrimp. This will make curled shrimp, which is what they do when they cook anyway. I put five on a skewer, but you may do more or less depending on the size of your shrimp.

Grill on a preheated barbeque for about 2 minutes per side. Cooked shrimp will be opaque and pink. Don't overcook. Serve at once with lemon wedges and/or cocktail sauce, although we had them just as they came off the grill and they were delicious that way!

Saturday, August 04, 2018

The Deck and the Garden


Recipes have been scarce on this blog for a while and posts, too. I blame our work on the back deck. Sweetie and I have been spending every day for the last two weeks (minus, for me, the three days last weekend when I was in LA) taking apart the old deck and refurbishing it, then putting down new deck boards and putting in new posts for railing. As is normal in the summer, this has been hot work. By dinner time there is no energy for new recipes, either savory or sweet.

We have house painters coming on Monday, so we have stopped the deck work for a while (although we might work on railings) and our perseverance paid off. Both the lower and the middle deck are done, leaving only the steps, railings, and some of the upper deck! Exciting. Here is how it looks:


It might not look like much, but the larger deck is 11 x 16 feet.

The garden is the other thing that has my attention. The squash, cucumbers, beans and...finally!...tomatoes are gradually ready to harvest (see top photo for all but beans), but I find that I need to harvest the beans daily in  order to have beans that aren't huge and tough. The basil is getting big, too. The flowers are also a joy, but need deadheading and today I began the process of weeding out the old, spent wildflowers and trimming the tops off the iris leaves. Soon it will be time to put down more bark chip mulch, too. It's certainly needed near the potted zinnia and flax in the photo below. Someone gave me a sign that says, "A garden is a thing of beauty and a job forever" and they spoke the truth.


Tonight we are having grilled shrimp, grilled planks of zucchini squash, sliced tomatoes with balsamic, olive oil and basil chiffonade so maybe I'll have a shrimp recipe to post soon.