Showing posts with label potatoes. Show all posts

Saturday, February 06, 2016

Fun Fingerlings


I know that a lot of posts lately have been savory and with no sign of dessert or bread baking, but that is kind of how life is going, too. Sweetie is shedding pounds and asks that I avoid too much baking, but I think he didn't mind for today's dish.

Our generous and delightful neighbors across the road gave us a bag of mixed fingerling potatoes from their garden. They are wonderful to look at with the soil still coating them and little knobs sticking out here and there. This is actually something I made last Sunday, but life has been super busy, so baked crispy fingerlings is finally showing up here. We also were given some non-fingerlings, so I chunked them up and boiled them, too.

To make this, clean your potatoes, but don't remove the skin. Cut into chunks, about 1.5 - 2 inches wide. Cook the potato chunks in boiling water in a good sized pot until tender, then drain.Preheat the oven to 450 degrees F while the potatoes cook.

Now comes the fun part. Spread the cooked potato chunks on a sheet pan lined with parchment paper or a silicon mat. Make sure there is a little room between the chunks. Then use a large fork (I use one from our carving set that has three tines) or a potato masher to mash each chunk. You want the chunk to hold together but have some bits sticking up. Those will get crispy in the oven.


Drizzle some olive oil over the chunks and sprinkle with salt and/or pepper and any herbs you like with potatoes. Minced fresh rosemary goes well in this recipe.

Put the pan in the preheated oven and bake for 10 minutes. Check how brown the potatoes are and turn pan around front to back and keep baking until chunks have golden to dark brown places. Since the potatoes are already cooked, how dark they are is personal preference.

Serve at once. Be sure to scoop up those delicious browned bits while serving. These make a great side dish for almost any fish, meat, our poultry entree you can think of. They're also gluten and dairy free.


For a vegetarian feast, top the potatoes with freshly made aoili and fill your plate up with steamed fresh veggies of all kinds. I like green beans, peas, broccoli, carrots, spinach or kale, parsnips, and beets, but use what ever is seasonal and fresh. Vegenaise can be used instead of aoili for a vegan version, but you might need to thin it with a bit of soy milk.

Friday, September 11, 2015

Almost Salad Nicoise


Classic Salad Nicoise has tuna, potatoes, green beans, hard cooked egg, black olives and salad greens with a garlic dressing. For dinner one evening this week I made my own version which had many of those elements, but I decided on a citrus-mustard dressing. Sweetie had bought some beautiful tuna steaks and grilled them so that they were still very pink inside, then he sliced them to put on top of the salad.

I cooked red potatoes and green beans and kept them hot while I made the dressing. The salad greens were comprised of romaine, iceberg, red cabbage. There were also some non-traditional carrot slices. When the tuna slices were ready I drained the potatoes and green beans and put them on top of the salad greens in a large bowl. The dressing when on next and it was all tossed together. Because I forgot to cook them ahead of time we didn't have hard cooked egg. Because I really don't care for olives, those were not included either. As you can see, not a classic at all, but still an interesting dinner for a hot evening. Our plates were piled with the dressed greens mixture and the tuna slices placed on top, to one side. I really enjoyed the contrast between the icy salad greens and the warm potatoes, beans, and tuna. An additional salad of fresh tomatoes, sliced, then dressed with balsamic vinegar, olive oil, and pepper completed the plate. It was delicious!

We have been having a heat wave with three straight days of 102 degree highs, preceded by a couple of days around 100 degrees and followed today by a high in the 90s. It should be in the 80s tomorrow and I am very grateful. Hot weather has never been my thing.

Citrus Mustard Dressing

grated zest of 1/2 medium orange
grated zest of 1/2 lemon
grated zest of 1/2 lime
juice of 1 lemon
juice of 1/2 lime
2 teaspoons Dijon style mustard
salt and pepper to taste
about 1/4 cup good quality olive oil

Place the grated zests and the citrus juice in a small bowl. Whisk in the mustard, salt and pepper. Continue whisking and very slowly add in the olive oil.

Saturday, November 29, 2014

Tuber Based Dinner Rolls


I was looking back at all the posts I've done in November and discovered that I never did share the recipe with you for the dinner rolls I made that were based on tubers I bought from the local farm stand. They looked like garnet yams, but turned out to be white starchy tubers, more like a very starchy Idaho potato than a yam. The flesh went from very white to a sort of dirty tan color as soon as they were peeled, so I wasn't sure how the rolls would look, but I guess there was enough flour to lighten them up.


These dinner rolls were based on a recipe from Tanna of My Kitchen in Half Cups that she gave as a challenge years and years ago when the Daring Bakers were just starting. It happens to also be the first post I wrote telling a tale in the Land of St. Honore'. At that point I think there were around 100 Daring Bakers and it seemed that many visited most of the posts that the other members put up. Part of the reason that I ventured into fiction was to make my post just a bit different from the others, in hopes that it would provide a nice break to those who were visiting lots and lots of sites. I guess I had gotten bored with my own posts and wanted to lighten up my offering. You may want to read the story if you have time.

The dinner rolls were made from a nice potato bread dough...nice, but sticky! I rolled it out thinly enough that I could slather it with butter and sprinkle lots of freshly chopped Italian parsley on top of the butter, then roll it up jelly-roll fashion and cut the rolls as you do for cinnamon rolls...with a length of dental floss, crossed. Then I put about 8 or 9 rolls in each greased cake pan and let them rise. I baked them in a 350 degree F oven until light golden brown. They were a big hit at a luncheon the next day. Still in the pan I refrigerated them overnight, then baked them another 10 minutes before lunch to finish baking and to warm them and crisp up the crust. If you serve them the same day as the original baking, bake longer until deep golden brown, then turn out of the pans and serve hot.

Tender Potato Bread

(based on a recipe in Home Baking: The Artful Mix of Flour & Tradition Around the World by Jeffrey Alford and Naomi Duguid
Daring Bakers Challenge #13: November 2007

Makes 24 soft dinner rolls

Some additional notes about this recipe and the dough:
Potatoes and potato water give this bread wonderful flavor and texture. The dough is very soft and moist and might feel a little scary if you’ve never handled soft dough before. But don’t worry: Leaving it on parchment or wax paper to proof and to bake makes it easy to handle.
Once baked, the crumb is tender and airy, with tiny soft pieces of potato in it. The dinner rolls are soft and inviting.

Some Notes about Flour:
King Arthur Artisan Organic All-Purpose Flour is fairly new in the markets in the US now and is advertised to be best for making European-style hearth breads with a protein level of 11.3%

Conversion Chart for yeast:
1 oz/ 1 Tablespoon of fresh yeast = 0.4 oz/ 1.25 teaspoon active or instant dry yeast = 0.33 oz / 1 teaspoon instant or rapid rise (bread machine) yeast. Reference: Crust & Crumb by Peter Reinhart

Ingredients:
4 medium to large floury (baking) potatoes, peeled and cut into chunks. (Elle's Note: I used those red-skinned tubers that looked like yams on the outside and by shape. They worked just fine.)
Tanna Note: For the beginner bread baker I suggest no more than 8 ounces of potato; for the more advanced no more than 16 ounces. The variety of potatoes you might want to use would include Idaho, Russet & Yukon gold, there are others.
4 cups(950 ml) water, reserve cooking water
1 tablespoon plus 1 teaspoon salt
2 teaspoons active dry yeast
6 ½ cups to 8 ½ cups (1 kg to 1350g) unbleached all-purpose
1 tablespoon unsalted butter, softened
1 cup (130g) white whole wheat flour
1/4 cup (4 tablespoons) salted butter, softened
2-3 tablespoons finely chopped Italian parsley

Making the Dough (Directions will be for making by hand):
Put the potatoes and 4 cups water in a sauce pan and bring to boil. Add 1 teaspoon salt and cook, half covered, until the potatoes are very tender.

Drain the potatoes, SAVE THE POTATO WATER, and mash the potatoes well.

Measure out 3 cups(750ml) of the reserved potato water. Add extra water if needed to make 3 cups. Place the water and mashed potatoes in the bowl you plan to mix the bread dough in. Let cool to lukewarm (70-80°F/21 - 29°C) – stir well before testing the temperature – it should feel barely warm to your hand. You should be able to submerge you hand in the mix and not be uncomfortable.

Add yeast to 2 cups all-purpose flour and whisk. Add yeast and flour to the cooled mashed potatoes & water and mix well. Allow to rest/sit 5 minutes.

Note about Adding Yeast: If using Active Dry Yeast or Fresh yeast, mix & stir yeast into cooled water and mashed potatoes & water and let stand 5 minutes. Then add 2 cups of flour to the yeast mix and allow to rest several minutes. If using Instant Dry Yeast, add yeast to 2 cups all-purpose flour and whisk. Add yeast and flour to the cooled mashed potatoes & water and mix well. Allow to rest/sit 5 minutes.

Sprinkle in the remaining 1 tablespoon salt and the softened butter; mix well. Add the 1 cup whole wheat flour, stir briefly.

Add 2 cups of the unbleached all-purpose flour and stir until all the flour has been incorporated.

Note: At this point you have used 4 cups of the possible 8 ½ cups suggested by the recipe.
Turn the dough out onto a generously floured surface and knead for about 10 minutes, incorporating flour as needed to prevent sticking. The dough will be very sticky to begin with, but as it takes up more flour from the kneading surface, it will become easier to handle; use a dough scraper to keep your surface clean. The kneaded dough will still be very soft. Place the dough in a large clean bowl or your rising container of choice, cover with plastic wrap or lid, and let rise about 2 hours or until doubled in volume.

Turn the dough out onto a well-floured surface and knead gently several minutes. It will be moist and a little sticky.

Forming the Rolls:
Divide the dough into 2 pieces. Place one piece to one side and cover loosely.

Butter a 13 x 9 inch sheet cake pan or two shallow cake pans. Cut the dough into 8-9 equal pieces. Roll one piece out on a lightly floured work surface to a rectangle about 16 x 10 inches. Spread 2 tablespoons salted butter over the rolled out dough, leaving a 1/2 inch unbuttered edge on one long side. Sprinkle with half the parsley.  Roll up jelly-roll fashion and use a crossed length of dental floss or a sharp knife to cut the log into 8-9 pieces.  Place each piece, cut side up, into a buttered cake pan or into the larger pan, leaving 1/2 inch between the pieces. Repeat with second piece of dough. filling the second cake pan or filling up the larger pan. Cover with plastic wrap and let rise for about 35 minutes, until puffy and almost doubled.

Baking the rolls

Preheat the oven to 375 degrees F. Place a baking stone or tiles (if you have them) or a large baking sheet on the middle oven rack to preheat along with the oven.

Dust risen rolls with a little all-purpose flour or lightly brush the tops with a little melted butter or olive oil (the butter will give a golden/browned crust). Immediately place baking pan(s) with rolls on the stone, tiles or baking sheet in the oven. Place the rolls next to the loaf in the oven.

Bake rolls until golden, about 30 minutes.


Transfer the rolls to a rack when done to cool.  Note about cooling times: Rolls can be served warm or at room temperature.

Tuesday, December 31, 2013

Buttermilk Yeast Rolls and Cheesy Potatoes for Christmas Eve


It's true that it's New Year's Eve, not Christmas Eve, but we are catching up here. Happy New Years y'all!!


I'm still searching for the perfect dinner roll, but the ones I made for Christmas Eve dinner are mighty close. I used a recipe from Baking with Julia and although the original recipe was for a loaf of bread, with the bread made in a dough machine, I didn't actually change the ingredients, something I'm not known for. Being an experienced baker I knew that I could convert the process to make the dough in my trusty stand mixer and that the dough could then be divided into rolls at shaping time instead of being shaped into a loaf. Julia claims that you can also make the dough into bread sticks....maybe next time! These rolls were the perfect accompaniment to baked ham, potato casserole, steamed broccoli and salad. They were delicious without butter and decadent with.

The rolls were light but sturdy enough that they didn't collapse when you bit into them. They had a slight tang from the buttermilk, but were clearly yeast rolls. The bread lovers in the family enjoyed them immensely. I had never used powdered buttermilk before making these rolls, but I will make use of it now instead of fresh buttermilk, even though the reconstituted powder doesn't have the same creamy texture that fresh does. Usually that will not make a difference since my main use of buttermilk is for things like Irish Soda bread, scones, waffles, biscuits and that sort of baked good. I'm looking forward to seeing how the powder does next time I make the soda bread. I'll let you know.

Buttermilk Rolls
from Baking with Julia but made with a mixer and into rolls, not a bread machine and into a loaf. Instructions are my own.

3 cups (approximately) bread flour or unbleached all-purpose flour (I used bread flour)
1 teaspoon salt
3 tablespoons powdered buttermilk
2 1/2 teaspoons (one packet) active dry yeast
1 cup (approximately) room-temperature water
3 tablespoons pure maple syrup
1 tablespoon unsalted butter, at room temperature

In a large bowl whisk together the flour, salt and buttermilk powder. Set aside. In the bowl of a stand mixer fitted with a bread hook, place the water, yeast and maple syrup. Let stand 10 minutes. The yeast will 'bloom'. Add the butter and start the mixer on low. Slowly and gradually add the dry ingredient mixture. The dough will form and 'climb' the dough hook. Knead with the stand mixer for 8 - 10 minutes. Turn the dough out into an oiled bowl or rising container, cover loosely, set in a warm place and let rise until doubled in bulk, about 1.5 hours.

When dough has risen, turn out onto a lightly floured work surface, flatten with your hands and divide into 11 or 12 pieces. Shape each piece into a ball and put into a lightly greased 9-inch cake pan, leaving a little space between the balls so they can expand. Cover lightly with oiled plastic wrap and let rise in a warm place until doubled in bulk, about 45 minutes. Preheat the oven to 425 degrees F. toward the end of the rising time.

Bake rolls in the preheated oven, reducing the oven temperature to 375 degrees F when you put the pan in the oven. Bake about 15-20 minutes, or until the rolls are golden to dark brown. Turn the rolls out onto a wire rack, separate and serve at once. Makes 11 - 12 rolls.


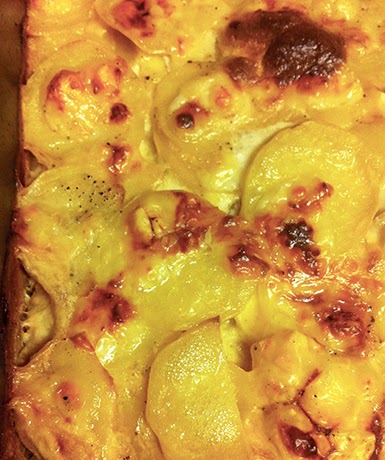
The other dish that was new that night was the potato casserole from Julia Child's classic Mastering the Art of French Cooking. Although I've made the Savoyard potatoes from that book, I had not tried her method for the classic gratin of potatoes. I used very thinly sliced Yukon gold potatoes, which lent the dish a nice golden glow, plus the milk and Swiss cheese that Julia recommends.


I made these a day in advance since the ham was going to take up the oven, which meant that I added additional milk when it was time to reheat the casserole. A key step here is to make sure that the baking dish is not too deep. Mine was somewhere between 1.5 and 2 inches deep. This depth allows for plenty of exposed potatoes across the top of the casserole, allowing the excess water in the milk to evaporate and also allowing the cheese and milk to form a nice crust on top. Quite a few guests had seconds, so I know that this was a hit. It probably would be at your house, too, and it's not hard to make. Who can hate cheese and potatoes?

Gratin Dauphinois
(Scalloped Potatoes with Milk and Cheese) from Mastering the Art of French Cooking by Julia Child, Louisette Bertholle and Simone Beck

2 lbs. Yukon Gold potatoes (6-7 cups when sliced), (or other boiling potatoes)
A fireproof baking-serving dish about 10 inches in diameter and 2 inches deep (if recipe is increased, dish must be wider but no deeper) - I used a 9 x 13-inch baking pan, like the kind you use for brownies, and it worked very well
4 tablespoons butter, softened
1 teaspoon salt (I used garlic salt for 1/4 of it instead of the fresh garlic that Julia calls for)
1/8 teaspoon pepper, freshly ground
1 cup (4 oz) grated Swiss cheese (I used diced Swiss)
1 cup boiling milk

Preheat the oven to 425 degrees F. Peel the potatoes and slice them 1/8 inch thick. Place in a basin of cold water. Drain when ready to use.

Smear the inside of your baking dish or pan with 1 tablespoon of the butter. Sprinkle with 1/4 of the salt, and use garlic salt if you can. Drain the potatoes and dry them in a towel. Spread half of them in the bottom of the dish. Divide over them half the remaining salt, and half the pepper, cheese and butter. Arrange the remaining potatoes over the first layer, and season them. Spread on the rest of the cheese and divide the butter over it. Pour on the boiling milk. Set the baking dish over heat and when simmering, set in upper third of preheated oven. Bake for 20 - 30 minutes or until potatoes are tender, milk has been absorbed, and the top in nicely browned. (As the oven is hot, and the dish shallow, the potatoes cook quickly.)

Since I cooked mine in advance (the day before), I brought the cooked potatoes to room temperature, preheated the oven again, poured about 1/2 cup milk over the top of the potatoes, and put the pan in the oven for another 10 minutes. By that time the milk was absorbed, the potatoes sizzling hot and just a little more browned on top.
Serves 6

Tuesday, June 21, 2011

Best Potato Casserole I've Had


We have heat people! Summer is finally here...and right on time. Should be over 95 today and the tomatoes are loving it. The beans, cukes, and chard are growing rapidly...you can almost see them get bigger as you watch. The morning glories are blooming and sending up long runners and the sweet peas are climbing, too, but I worry that this heat might be more than they like...we'll see. Although I love being in the garden, sometimes its fun to be in the kitchen. For Father's dinner I made a casserole the day before (when it was cooler) to reheat just before dinnertime.

Being Irish...well half Irish anyway...I figure that loving potatoes is a right of heritage. Although I love 'em baked and mashed and oven fried for a casserole of potatoes my favorite recipe is a gratin of potatoes with Gruyere cheesed called Pommes Savoyard.

Thinly sliced peeled potatoes are layered with a butter-onion-garlic mixture, salt and pepper, nutmeg and Gruyere cheese, then bathed in chicken or beef broth and baked until the potatoes are tender and the top is golden brown. Because you are not using a large amount of butter and are using no milk or cream this dish is easier on the waistline than some potato casseroles. Whenever I serve it there are always requests for second helpings and most people also request the recipe. I wish I could sit you down at my table and give you those first and second helpings, but since I can't I can at least give you the recipe so you can impress and please YOUR friends and family!

If you have a food processor with the slicing disc for thin slices, this is the time to use it. You can also use the grating disc to grate the cheese. I used pre-sliced Swiss cheese because that's what I had on hand, so I used a sharp knife to cut it into tiny dice. Even without the food processor this is a pretty easy recipe but you do need to allow plenty of time for it to cook to mellow tenderness.

Pommes Savoyard
3 all-purpose potatoes (about 1 pound), peeled ( I used Idahos)
3 tablespoons butter, melted
2 tablespoons finely minced onion (I used about twice this amount...I love onions)
2 garlic cloves, minced
salt and pepper to taste
nutmeg, freshly grated if possible
1/2 cup grated Gruyere or Swiss cheese (about 2 ounces)
1 cup beef broth or chicken broth (I used a bit more -see note below -and used chicken broth)

Preheat oven to 350 degrees F. Peel potatoes and slice them 1/8-inch thick. (Rinse in cold water, then drain and pat dry with paper towels - this part I skipped and it came out fine, but you can do it if you like).

Combine the butter, onion and garlic. Use on third of the mixture to grease a shallow 1 quart baking dish. (A shallow dish is important so that you get plenty of browned topping!)

Spread half of the potatoes in a dish, and season to taste with salt and pepper and nutmeg.

Sprinkle half of the cheese over the potatoes. (I made a single layer of potatoes over the initial butter mixture, seasoned it and sprinkled on about 1/4 of the cheese, then put in a second single layer and treated it as I did the first layer, repeated that process until there were no more potatoes to layer...about 4 layers).

Arrange the remaining potato slices in an even layer over the cheese; season with salt, pepper and nutmeg. Top with the remaining cheese.

Pour the broth over all and dot with the remaining butter mixture. Note: I made sure that the broth comes up almost to the top of the layered potatoes so that they will cook evenly throughout...you may need to use more broth than the recipe calls for but it is worth it and the broth cooks into the potatoes and cooks off so the potatoes keep their shape and are not soggy, so it's OK.

Bake for 1 1/4 hours, or until the potatoes are tender throughout and golden brown on top. Serves 4 - 6.

Wednesday, March 16, 2011

On the Far Side of the World

My ancestors lived in Ireland, the misty green land. One of the staples of the diet is the potato and the Irish have ever loved their tatties. On the far side of the world from Ireland is New Zealand. The natives there, the Maori, also enjoy potatoes. The Bread Baking Babes' kitchen of the month is Lien's blog Nottie van Lien and she gave us a wonderful Maori bread recipe that uses a cooked potato and some water as the ingredients for a starter, so this bread has fermented potato as it's sourdough starter. She included a beautiful New Zealand fern stencil, but I wasn't able to use that, so look for it on the other Babes' sites.

The first time I tried to make the starter I somehow introduced something that spoiled the starter. It smelled really bad and had reddish (dark pink actually) splotches through the starter. I actually made the dough with it but that smelled bad, too, and the bad smell overpowered the fresh rosemary fragrance which is hard to do! On the advice of some of my fellow Babes I threw the whole thing out...probably saving myself from unpleasant stomach cramps or worse...and started over again. This is one of the reasons that I treasure being part of such a warm and responsive baking group.

For the next starter I was super careful. I made sure that everything I used was glass, ceramic or stainless steel and I made sure to wash everything in very hot water as I went along. I also put the glass bowl with the starter in it into a soft sided insulated bag...and idea I got while reading some of the Forging Fromage blogs which I linked to through Natashya's blog Living in the Kitchen with Puppies. If it works for fermenting fromage, why not sourdough starter? That kept the temperature even and kept the starter warm enough.

Success! the starter was lovely and the bread made with it is delicious! It has the distinctive flavor that bread with potato in it has and the lovely tenderness of crumb, too.

The fresh rosemary goes wonderfully with the potato flavor. All in all a lovely loaf! I couldn't find my Xacto knife for a stencil, so I used a paring knife and made a fairly crude star stencil, but it does add some pizzazz to the look of the loaf.

Thank you Lien for providing such a great recipe. I hope that lots of my dear readers will consider trying this recipe...and that they have initial success with the starter, too. If it smells really, really sour, like sour milk only more so, don't use it, OK?

To be a buddy all you need to do is find the recipe at Lien's blog...the link is HERE, then bake the bread and send her an e-mail with the link to your post and do it by the 29th of March. Do check out the great breads made this month by the other Bread Baking Babes...the links are in the sidebar at top right.

So what stencil are YOU going to use?
Sending this over to Susan at Wild Yeast for the weekly Yeastspotting event...a true breadhead's delight...check it out by clicking HERE.

Tuesday, November 30, 2010

Hearty Beef Stew

There are certain dishes that evoke fond childhood memories...that fresh coconut birthday cake or crescent cookies and rum balls at Christmas or Dad's hush puppies with fried fish in the summer.

This beef stew is such a recipe. It was a favorite for dinner when it had been snowing all day and we had been out sledding with our friends. There was a hill down by the creek that was a favorite...easy to climb but a good swift ride down and a nice long flat area at the end to slow down in. Returning home with chilled fingers and toes and a nose that would do Rudolph the Reindeer proud it was so red, it was great to open the door and smell the rich aroma of beef and potatoes and onions. Usually we would have biscuits, too, so the kitchen would be warm from the oven being on. Even if it was my turn to set the table I didn't mind...we were having stew!

A good stew is thick and hearty and loaded with good things. The long simmering tenderizes the beef chuck (which is not the most tender of cuts) and you can even do as I do and make the first part, with just the meat, onions and seasonings and water, and then refrigerate it overnight to allow the flavors to blend. The next day allow some time for it to reheat, then continue on with the recipe.

This one is my Mom's recipe and, good frugal housewife that she is, she adds leftovers whenever possible...all those small containers and plastic bags of corn or carrots or green beans or peas (to name the most popular ones) thaat have been hiding out in the fridge now have a place to go...but you can just add about 3 cups of mixed cooked or frozen vegetables of your choice. This makes a stew that is all about the beef flavor, but it isn't spicy. If you like some heat in your stew, add some cayenne or pepper sauce if you must, but try it without first...you may decide that it's perfect as written. Must be those childhood memories again, but I wouldn't change a thing!

BTW the photo is not top notch but I'm at work when there is daylight, which is what I try to use for photos. Trust me, it tastes even better than it looks!

Beef Stew
From Family Food

2 pounds beef chuck, cut into 1 ½ -inch cubes
2 tablespoons vegetable oil
½ teaspoon Worcestershire sauce
1 clove garlic
1 medium onion, sliced
1 -2 bay leaves
a dash of allspice or cloves
4 cups boiling water
6 carrots
6 Idaho potatoes
1 tablespoon salt
1 teaspoon pepper
1 small can white onions or ½ bag frozen small white onions
leftover vegetables or frozen mixed vegetables
Flour and water paste to thicken gravy

Brown the meat in the fat. (If you wipe the cubes with a paper towel first they will brown more easily and spatter less.) Cook the meat in batches, removing browned meat to a bowl until all are browned. Remove any excess fat and return all the meat to the pot. (I use a large enameled cast iron Dutch Oven to cook the stew but any large pot with lid is fine.)

Add Worcestershire sauce, garlic, onion, bay leaves, allspice or cloves, and the boiling water to the meat in the pot. Cover, bring to a simmer and simmer 2 hours. Remove bay leaves.
Add the carrots, and the potatoes, both of which have been cut into bite sized pieces. Cook, covered, until carrots and potatoes are tender. Add the onions and any leftover vegetables desired. ( If no leftover veggies are available, add some frozen mixed vegetables or any cooked vegetables you like. I usually add at least 3 cups of veggies.)

Cover and heat through. Make a paste of flour and water to thicken the gravy. Add to the stew and simmer until thickened. (I usually use ¼ cup flour and an equal amount of cold water to make the paste, but you may want to experiment to get the kind of gravy thickness you like. I also removed some of the cooked potatoes this time and mashed them, then returned them to the pot for an even thicker stew.)

Serves 6 -8.

Thursday, March 18, 2010

Seafood Chowder for Chilly Weather

This St. Patrick's Day passed with no corned beef and cabbage, nor Irish soda bread. We had a nice green salad with cucumbers and oranges and walnuts, some potatoes roasted with rosemary and garlic (there's the bit of Irish for 'ya), and a steak cooked on the grill. The rain has stopped long enough to uncover the grill and put it to use.

Since none of those seem worthy of a post, I'm going to tell you about the seafood chowder I made when it was still cold and rainy and wintry. It will probably get cold and rainy again, so I'll be prepared...and so will you if spring is still playing hard to get.

Trader Joe's makes a really nice frozen mixed seafood concoction. It has some squid, some baby scallops, and some small shrimp. Along with a can of chopped clams in their juices those mixed seafood goodies were the basis for the chowder.

A true chowder, in my opinion, needs both onions and potatoes. I also like to add some celery, carrot and, if I have it on hand, some red pepper cut into a fine dice. A little butter, a good quantity of milk, and some flour and water to thicken things up all add to the finished product.

Seasonings are pretty personal. I added some garlic, some minced Italian (broad leaf) parsley, and a bit of thyme. Lots of people also add a dash (or more) of hot pepper sauce. I added a dash of cayenne pepper instead. A good grind or two of black pepper finished it off.

The taste of the sea is in every warm, creamy, delicious bite.

I didn't use a recipe book for this, just sort of threw it together one night.


Mixed Seafood Chowder
Serves 4-6

1 medium onion, finely diced
1/2 cup celery, diced
1/4 cup carrot, diced
1 clove of garlic, minced
1 tablespoon olive oil
4 medium russet potatoes
1 cup water
2 cups milk
1 package frozen mixed seafood ( about 1/2 pound each squid, small scallops and small shrimp)
2 cans chopped clams in their juices
1 tablespoon finely chopped parsley - Italian flat leaf if best for flavor
1/4 teaspoon dried thyme
dash cayenne pepper (or more if you like it with more spice)
2 tablespoons butter, softened
2 tablespoons flour
salt and pepper to taste

In a large pot, saute the onions, celery, carrots and garlic in the olive oil until soft, about 3-5 minutes. Add the russet potatoes and the water and bring to a boil. Reduce heat to simmer, cover pot and simmer until potatoes are tender. Add the milk, seafood mixture, clams, parsley, thyme, cayenne pepper and stir to combine. Cover the pot and simmer for 5 minutes.

In a small bowl mix together the butter and flour. Add to the chowder and stir to combine with the chowder. Turn heat up to medium-high and cook, stirring constantly, until the chowder is thickened. Adjust seasonings with salt and pepper. Serve at once.

Sunday, August 09, 2009

Parsley, Sage, Rosemary and Thyme

Today I had a surpise visit from someone I became friends with when I lived in the open ward looney bin that was the City of Berkeley. By now it might be a very sane place. Back then there were mentally ill people wandering the streets, having been released to the community by then Governor Ronald Reagan (before he became President) who felt that mental health was a 'neighborhood problem', which is what it became in time. The politics were a bit nutty, too. Good news is I learned to think crazy which has come in handy in later life more often than one might expect.

It took guts and good will for this friend from long ago to drive up the highway and show up. We have been on the outs for a few years. This is an exceedingly rare thing for me so I've probably behaved badly in the process. Hugs were exchanged and we talked and laughed. I'm glad she came. Sometimes doors you thought you have shut spring open again unexpectedly.

When she arrived I had just begun to make a chicken dish for dinner. This is the kind of dish you can usually make with ingredients that your have on hand in your pantry and freezer. Veggies from your garden or from the market or farmer's market work well in this stew. For seasoning not only did I saute' lots of onions and some celery and chopped carrots, but I added flat leaf parsley, dried sage, rosemary and thyme, plus some pepper. Brought back the old song and that seemed appropriate somehow.

This made a nice stew with lots of veggies, some of which cooked with the chicken and some were added toward the end of cooking. I like my stew with a thickened broth, but you could serve it as is, although it might be more of a stew or chowder that way. With a few slices of the chunky zucchini bread we had a fine, easy meal.

Hope you had a great weekend! My your surprises be as welcome as mine was.

Scarborough Fair Chicken Stew
Serves 4

1 large onion, chopped
1/2 cup chopped carrots
2 ribs celery, chopped
1 tablespoon olive oil
2 tablespoons chopped fresh flat leaf or Italian parsley
1/2 teaspoon dried sage
1/2 teaspoon rosemary
1/2 teaspoon dried thyme
2 cups chicken broth
4 boneless skiness chicken breasts, cut in large dice (bite sized pieces)
1 large or 2 medium Idaho type potatoes, cut in cubes about 1/2 inch across, peeled if you like
salt and pepper to taste
1 cup fresh or frozen corn off the cob
1 cup fresh or frozen green beans, in bite sized pieces
1 cup fresh or frozen green peas
enough flour and water in a slurry to thicken the broth, as desired

Saute' the onions, carrots and celery in the olive oil until the onions are transluscent, about 5 minutes, stirring every so often.
Reduce the heat to medium and add the parsley, sage, rosemary, thyme, chicken broth, pieces of chicken, cubes of potatoes and broth. Season to taste with salt and pepper. Cover and let cook, stirring occasionally, until the potatoes are tender when pierced with the point of a sharp knife.
Add the corn, beans, and peas and stir to combine well. Cover and continue to cook another 2-3 minutes, until the beans are almost tender.
If you are thickening your stew, add the slurry and stir well to combine, then keep stirring until the broth thickens and begins to bubble. Serve hot.
You can use more and different vegetables to reflect what you have on hand or in the garden or from the farmer's market, but this combo was very tasty!


Here is the song from the title:

Are you goin to Scarborough fair? parsley, sage, rosemary and thyme

Remember me to one who lives there, she once was a true love of mine

Tell her to make me a cambric shirt, parsley, sage, rosemary and thyme

Without no seams nor needlework, then she'll be a true love of mine

Tell her to find me an acre of land, parsley, sage, rosemary and thyme

Between the salt water and the sea strand, then she'll be a true love of mine

Tell her to reap it in a sickle of leather, parsley, sage, rosemary and thyme

And to gather it all in a bunch of heather, then she'll be a true love of mine

Are you goin to Scarborough fair? parsley, sage, rosemary and thyme

Remember me to one who lives there, she once was a true love of mine

Sunday, February 08, 2009

Soup - Looks the Same..but What a Difference!

I’ve made a vegetable soup, usually spinach, but sometimes broccoli or chard, for years, thickening it with mashed potatoes.

This time I wanted to make it using roasted potatoes and onions, instead of sautéed onions and mashed potatoes that had been boiled. I used the floury kind of potatoes even though I usually use waxy red potatoes in this soup. They really respond well to roasting.

To up the ante on a different taste, I decided to add a little balsamic vinegar to the vegetables to be roasted. I wasn’t sure how it would turn out, but was game to try it.

Once the soup was finished it looked much the same as the old Spinach and Potato Soup…a rich green, with flecks of potatoes and onions visible. I always leave the skin on, so this is never a smooth puree soup. Once I tasted it I was ecstatic. The roasting and balsamic really brought the potato flavor to the forefront.

Before the spinach was the star. Now the potato was king. The roasting also made this an earthy tasting pottage. The onions are a back note and you don’t really taste the balsamic vinegar as such.

This is the perfect hearty soup for a cold day or evening. We might eat ours by the woodstove tonight, listening to the rain blowing against the windows, chasing the last drops of soup with a chunk of freshly baked cheddar ale bread (which I will post about in the next day or two).


Hearty Potato and Spinach Soup
Serves 2-4

2 large or 2 medium Idaho type potatoes (the floury kind), cut into 1 inch dice
1 medium onion, cut into wedges, about 10 or 12
3- 4 tablespoons olive oil
2 tablespoons balsamic vinegar
1 large colander washed fresh baby spinach leaves (about 8 cups), steamed and chopped or
1 -10 oz. package frozen, chopped spinach, defrosted
2 cans low sodium chicken broth

Preheat oven to 450 degrees F. In a gallon zip lock bag or other large disposable bag, place the potatoes and the onion wedges. Add the olive oil and balsamic vinegar. Close bag and shake to completely coat the veggies with the oil and vinegar. Turn out onto a foil lined large baking sheet. Spread so that they are in a single layer. Bake for 30 minutes, or until potatoes are browning. Don’t burn the onions. Remove pan from oven. Cool veggies slightly and remove the onion s to a chopping board. Chop the roasted onions to roughly ¼ inch dice.
When cool, turn the potatoes into a saucepan and mash with a fork or potato masher. Add the can of low sodium chicken broth, the onions, and the chopped spinach. Stir to combine. Put into a food processor or blender and blend until soupy, but still a little rough in texture. (May take two batches if doing in a blender.) Return to saucepan, add the nutmeg and warm over low heat until heated through, stirring occasionally to keep from sticking.

Serve hot, garnished with a dollop of sour cream and sprinkle of cayenne.


This soup is perfect for the event No Croutons Required, hosted this month by Holler at Tinned Tomatoes. The theme is using potatoes. Toward the end of February be sure to check out all the entries.

Friday, October 19, 2007

The Many Moods of Turkey

For some of us eating a few slices of turkey at Thanksgiving is enough turkey for the whole year, thank you very much. For others turkey is a treasured treat as often as possible. I fall into the latter category. This has been a good week because I had turkey apple sausages on Wednesday

and an open-faced hot turkey sandwich with stuffing and mashed potatoes and gravy (call in the carb police!) last night.


If I had roasted a turkey myself for that meal I might be eating a grilled turkey sandwich for lunch tomorrow, turkey a' la king with rice for dinner, and some turkey rice soup by Monday. To change the flavors a bit, I could make spaghetti sauce with true Italian flavors with ground turkey, or make teriyaki meatballs for an Asian dinner, also with ground turkey. There is also the joy of a turkey pastrami sandwich on rye....I could go on and on.

One of the reasons that I can have turkey so often is that a local family, the Benedettis, grow turkeys commercially locally and have a Willie Bird's retail store about a 10 minute drive away. There they sell fresh turkey products from a refrigerated case, to order, but there are also packs of frozen turkey products, usually at a lower price than a similar item can be found in the grocery stores. They also make great sandwiches to go.

Those turkey apple sausages came from the freezer case. We are trying to empty the freezer and fridge in preparation for tenting the house for termites (termites just LOVE Sonoma County), so these sausages joined some frozen green beans, some apples off the tree, and some red potatoes from the pantry for a warm and cozy dinner on a wet and gray evening.

The wonderful turkey dinner with all those carbs can be found, year 'round, at Willie Bird's Restaurant in Santa Rosa. It is almost a throwback to the 50's or 60's restaurant with booths, those little wrapped butter pats brought with the bread basket, and they even have liver on the menu for dinner...and it's very nicely cooked liver, the way you wish Mom used to make it.

Since it is that time of year, you can also pre-order a fresh turkey for Thanksgiving, although the lines to pick up the bird can be a dozen or so people sometimes. Still, a fresh turkey is superior to my taste to a frozen turkey, and it supports local agriculture.

Turkey Apple Sausages with Potatoes and Apples
This is a classic flavor combination

1 pound sausage in casings - turkey apple is a favorite - Willie Bird's if you can get it
1 tablespoon grapeseed or safflower oil
1 1/2 pounds red potatoes, scrubbed, halved, and sliced in 1/4 inch slices
1-2 tablespoons grapeseed or safflower oil
Salt and pepper to taste
1 tablespoon butter
4 medium apples, halved, cored, and sliced in 1/4 inch slices
2 tablespoons water
1 teaspoon sugar
1/4 - 1/2 teaspoon ground cinnamon

In a cast iron skillet, heat the oil until hot and saute' the sausages, turning to brown all sides. Remove sausages to a microwave safe plate and keep covered.

Meanwhile put the potatoe slices in a medium saucepan and add water to barely cover. Bring to a boil, reduce heat, and simmer until potatoes are tender when pierced. Drain the potatoes, then add them to the cast iron skillet once the sausages are removed. Add the additional oil and saute' the potatoes, turning over a few times with a spatula to allow more sides to brown. When browned to desired amount, season with salt and pepper to taste, keep warm, covered.

While potatoes are boiling and sausages are cooking, place the butter in a small cast iron skillet, put the skillet over low heat until the butter melts. Add the apple slices and turn and stir them until the slices have been slicked with the butter. Add the water and sprinkle with the sugar and cinnamon, then stir the apple slices again the distribute the spice over all the slices. Raise the heat to medium-high and saute' the apples for 10-15 minutes, stirring occasionally, until apples are tender and a bit carmelized. Add a little more water if needed to keep them from burning.

Take the microwave plate of sausages and cover, leaving a vent for steam to escape. Microwave on 1/2 power, a minute at a time, until cooked through but still tender. If you poke the sausage, it will be resistant when it is done.

Place the sausages, potatoes and apples on a serving platter and serve warm, at once. This meal is good with steamed green beans or a green salad with a light dressing.

Willie Bird's Restaurant
1150 Santa Rosa Avenue
Santa Rosa, CA 95404
(707) 542-0861
www.williebirdsrestaurant.com

If you phone the Restaurant, they can give you information for the retail store.

Monday, April 09, 2007

It's A...


Potato cooker is what it is. It is roughly a triangle with rounded sides. The lid is slightly domed and has a glass knob. There is a place at the back that looks like it used to be where the handle connected, but that was long ago.

To 'bake' the potatoes, you wash off baking potatoes, pierce the skins a couple of time with the point of a sharp knife, then fit them into the potato cooker (it holds up to 4 large ones), put it on the stove top with the heat at low and cook for about 45 minutes. The potatoes come out with fluffy interiors and crisp skins as if you had baked them in the oven, but the energy use is far less. We've also baked yams in it and they are wonderful cooked that way.


I'll bet that you could also pop corn and cook rice in this pot, but have never tried it.

Thanks for the great guesses. If you ever see one of these for sale at a yard sale or antiques place, snap it up if it isn't too expensive. I'd love to know what it cost and what they said it was for, too.