Monday, March 27, 2023

Fan Favorite Oldie But Goodie


The photos don't do this dish justice...at all. Trust me when I say that this recipe will become one of your favorites, just like it's a favorite of others stopping by this blog.

I first posted about this casserole in the spring of 2009. A lot of life has happened since then, but the recipe has been a continually searched one over the years. I first made it even longer ago than 2009, maybe even before my kids were born. It's from a delightful and unusual cookbook called the Moosewood Cookbook by Mollie Katzen. Unusual because the recipes were written by hand and the illustrations were done by hand...no photographs, no type to speak of, just warm and welcoming recipes with lots of them vegetarian, many of them celebrating cultures other than U.S.A. cultures, and ones that became favorites, like this one. Delightful because you will likely keep finding another recipe you want to try as you make your way through the book. It was first published in 1977. If you don't find it at Powell's Books (a Portland, Oregon bookstore that has a lot of used books of all kinds), then check Amazon or your local library, used book store, etc. It's a great cookbook to have on your shelf.

This recipe, Spinach-Rice Casserole, has brown rice with it's nutty flavor, spinach, cheddar cheese, eggs and milk, and some seasonings. Don't skip the sunflower seeds on top...they not only taste great and add texture, but their fragrance mingles with the other ingredients to make your kitchen smell cozy and welcoming. Perhaps the best part is that you will likely have leftovers...and they are even better than the first night. I just returned from four days in Phoenix, visiting family, and Sweetie ate leftover Spinach-Rice Casserole the first two nights I was gone. I think he would have eaten it the next two nights, but it was all gone.

Cook the brown rice first because brown rice takes a little longer than white rice. While it's cooking you chop the onion and mince the garlic and grate the cheese. I use frozen spinach that is already chopped...it just needs thawing and then squeezing the thawed spinach to get out the excess liquid. Eggs get whisked, milk added, and parsley chopped. Then you sauté the onion and garlic, add almost all of the rest of the ingredients and stir them together, add the rice and combine everything so that it can be turned out into a buttered casserole dish. After a sprinkle of both sunflower seeds and paprika, the casserole gets covered, baked, uncovered, baked some more, than cooled just enough that it doesn't burn your mouth. Feast on a soft and gloriously flavored casserole with a bit of crunch from the sunflowers. You'll be glad you took the time to bake this dish. So will friends and/or family because this make a good sized casserole (about 9 x 13-inches) that can feed quite a few lucky folks.


Spinach-Rice Casserole, based on a recipe from Moosewood Cookbook by Mollie Katzen, 1977


2 cloves minced garlic
1 medium yellow onion, peeled and chopped
1/2 teaspoon salt (More, to taste)
3 tablespoons butter (I used 2 tablespoons olive oil)
2 lbs. raw, chopped spinach or, as I did, use 1 package frozen, chopped spinach, thawed
4 cups cooked brown rice
4 beaten eggs 
1 cup milk
1 1/2 cups grated cheddar
1/4 cup chopped parsley
2 tablespoons tamari (optional)
a few dashes each - nutmeg, cayenne
1/4 cup sunflower seeds
paprika

Saute' onions and garlic with the salt in butter (or oil). When onions are soft, add spinach. Cook 2 minutes. (Alternately, thaw and drain a 10 oz box frozen chopped spinach. Add to onion mixture, but don't cook any further.)
Combine the onion mixture with the brown rice, eggs, milk, cheese, parsley, tamari, nutmeg, cayenne. Spread into buttered casserole and sprinkle sunflower seeds and then paprika on top.
Bake, covered, 25 minutes at 350 degrees F. Uncover and bake 10 more minutes.

Serves 4 - 6

Tuesday, March 21, 2023

Ruby Tuesday


 I was looking back at some of my posts in early 2009 and saw that an event going around was Ruby Tuesday...posting a photo on Tuesdays that has a red element that was important to the photo. It's OK to use a filter, as I did with this one - film grain, if you want it more like art.

Today's photo, posted on a Tuesday for tradition, was taken in Phoenix. I'll be visiting there again soon and look forward to the sun. We have been having a delightfully rainy time here for the last few weeks, with the occasional break for sun, but it's warmer in Phoenix and I look forward to enjoying the warmth and sun with family. Sweetie will still be home. Pi would be miserable without him.

Monday, March 20, 2023

Sweetie's Lemon Tart


Sweetie had a great birthday weekend! He was treated to breakfast, including an Irish Coffee, on Friday, treated to dinner that night at a new-to-us restaurant in Petaluma, treated to breakfast by other friends on Sunday, given some lovely birthday gifts.

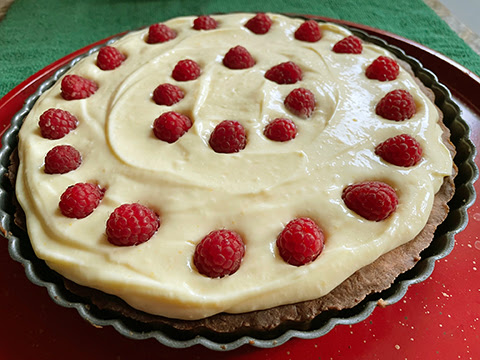
Sweetie prefers pie or tart instead of cake to celebrate his birthday. On Saturday, I made him a lemon tart using the lemons that grow near the barn. It's almost the end of lemon season, so these lemons were ripe and full flavored. Meyer lemons sometimes have a mild flavor and certainly an almost floral one, but I made sure that there was lots of zest in the filling and the recipe calls for 3/4 of a cup of lemon juice, too. I made the components ahead. Here they are ready to be put together late Saturday afternoon.


The recipe isn't one of my own. It's by Dorie Greenspan from her cookbook Baking: from my home to yours. I added fresh raspberries around the outer rim of the tart and then another circle of them closer to the middle, but the filling is just as written. The tart shell is delicious, too, and easy to make if you have a food processor. 


Both the tart shell and the filling require chilling time, so start this recipe ahead. You can even make both parts a day before...just put them together at least an hour before you serve the tart so the filling can thicken with the cold...for cleaner slices. I didn't wait long enough after filling the tart shell, so the slices on Saturday were not clean cut. When we had another piece instead of lunch today the filling had chilled enough that the pieces looked very nice. The flavor was even more lemony if that's possible!


The Most Extraordinary French Lemon Cream Tart 

By Dorie Greenspan in Baking, From My Home To Yours

1 cup sugar
Grated zest of 3 lemons
4 large eggs at room temperature
3/4 cup fresh lemon juice (from 4-5 large lemons or up to 9 smaller ones)
2 sticks plus 5 tablespoons (10 1/2 ounces) unsalted butter, cut into tablespoon-sized pieces, at room temperature
1 9-inch tart shell made with Sweet Tart Dough (recipe follows), fully baked and cooled

Have an instant-read thermometer, a strainer (if straining out the zest), and a blender (first choice) or food processor at hand.
Bring a few inches of water to simmer in a saucepan or the bottom of a double boiler.

Put the sugar and zest in a large heatproof bowl that can be set over the pan of simmering water, or in the top pan of a double boiler. Off the heat, rub the sugar and zest together between your fingers until the sugar is moist, grainy and very aromatic. Whisk in the eggs, followed by the lemon juice.

Set the bowl over the pan, or set the top into the bottom of the double boiler, and start stirring with the whisk as soon as the mixture feels tepid to the touch. Cook the lemon cream until it reaches 180 degrees F. As you whisk and you must whisk constantly to keep the eggs from scrambling, you'll see that the cream will start out light and foamy, then the bubbles will get bigger, and then as it gets closer to 180 degrees F, it will start to thicken and the whisk will leave tracks, which means that the cream is almost ready. Don't stop whisking! Continue to check the temperature. It might take a while. so be patient. Usually it's done in about 10 minutes.

As soon as the cream reaches 180 degrees F, remove from the heat and, if removing the zest, strain it into the container of the blender (or food processor); discard the zest. If not removing the zest, just scrape the cream right into the blender (or food processor). Let the cream stand, stirring occasionally, until it cools to 140 degrees F, about 10 minutes.

Turn the blender to high (or turn on the food processor) and, with the machine going, add the butter, about 5 pieces at a time. Scrape down the sided as needed as you incorporate the butter. Once all the butter is in, keep blending/processing for another 3 minutes.

Pour the cream into a container (I used a large Pyrex bowl), press a piece of plastic wrap against the surface to create an airtight seal and refrigerate at least 4 hours or overnight.

When you are ready to assemble the tart, just whisk the cream to loosen it and spoon it into the tart shell. I like to swirl the top with the back of a spoon. Serve the tart, or refrigerate until needed. If desired decorate with fresh berries.

Note: The filling will keep in the fridge for 4 days, or tightly sealed, in the freezer for up to 2 months. Thaw it overnight in the refrigerator and whisk before putting into the tart shell.

Sweet Tart Dough
From Dorie Greenspan

1 1/2 cups all-purpose flour
1/2 cup confectioners' sugar
1/4 teaspoon salt
1 stick plus 1 tablespoon (9 tablespoons) very cold (Frozen) unsalted butter, cut into small pieces
1 large egg yolk

Put the flour, confectioners' sugar and salt into a food processor and pulse a couple of times to combine. Scatter the pieces of butter over the dry ingredients and pulse until the butter is coarsely cut in- there will be some tiny pieces and some the size of peas.

Stir the yolk to break it up, then add it a little at a time, pulsing afer each addition. When the egg is in, process in long pulses - about 10 seconds each - until the dough forms clumps and curds. (I had to add about 2 teaspoons of water before clumps would form.) Turn the dough out onto a work surface and, knead lightly just to incorporate any dry ingredients that might have escaped mixing. In all of this, don't overwork the dough.

Butter a 9-inch tart pan with a removable bottom. Press clumps of the dough evenly over the bottom and up the sides of the pan, using all but one little piece (about a teaspoon worth), which you should save in the fridge wrapped in plastic wrap to patch any cracks after the crust is baked. Freeze the crust for at least 30 minutes, preferably longer, before baking.

Center a rack in the oven and preheat to 375 degrees F.

Butter the shiny side of a piece of aluminum foil and fit the foil, buttered side down, tightly against the crust. Put the tart pan on a baking sheet and bake the crust for 25 minutes. Carefully remove the foil. If the crust has puffed, press it down gently with the back of a spoon. Patch the crust if necessary, then bake for another 8 minutes or so, until it is firm and golden brown. Keep an eye on it the last few minutes and pull it out if it gets darker than golden. Transfer the pan to a cooling rack and cool to room temperature before filling. 


Happy Spring! We have some spring bulbs blooming, but it has been rainy and chilly, so we are behind the usual blooming time. Still, it's the Spring Equinox today, so let's celebreat the coming of another season.


Thursday, March 16, 2023

Bread Baking Babes Are A Village


Today is Bread Baking Babes day! Each month a different Babe chooses a bread for us all to bake and we post on the 16th. We encourage each other and try things for each other...like neighbors in a village. I've been a Babe for many years now and I still get a thrill when I bake the chosen bread. This month I'm Kitchen of the Month and I chose a fairly simple, but delicious Greek Village Bread - Horiatiko Psomi - which is enriched with milk and butter and is baked in a pot. The top is given an egg glaze after rising, then sprinkled with sesame seeds. They add a nice touch of flavor and texture to this bread. The semolina flour gives it some flavor. It's a somewhat rich bread,  not the simple Greek bread which has only flour, salt, yeast and olive oil.

Lucy Parissi is the recipe developer, food  photographer and author behind Supergolden Bakes. Supergoldenbakes.com has this recipe on their website

I have had this bread still warm with some butter, toasted, and as the bread for a ham sandwich. My favorite was the toast, but it was great bread the other ways, too.

 I love breads that can be baked in a Dutch oven...or on a baking stone and covered with a stainless steel bowl or something similar. You usually get a great crust and nice, moist loaf since the moisture is contained in the Dutch oven.


This is a fairly fine grained bread and mine was nicely moist, too. The bottom crust was sturdy and the top crust fairly thin and tender. You can slice it fairly thin if you like. Good gluten development, too. I did retard it overnight, which is almost always a good idea if you have time and refrigerator space.


Please be sure to visit the other Bread Baking Babes to see their take on this lovely bread round. I know that some have used their sourdough starter and it's likely that specialty flours like spelt have been used as well. Thanks Elizabeth of blog from OUR Kitchen for the beautiful Badge.

I encourage you to be a Bread Baking Buddy! Just bake the bread, using the recipe below, take a photo, and email the photo and a brief description of your bake to me by March 29th. I'll email you a Buddy Badge and include you in the round-up. Use 'plachman at sonic dot net' for the email address. Look at that photo below...of course you want to have some for yourself!


Normally I would include a story of how I found this recipe or why I chose it, but this week has been super busy...much more than usual...so I gave you a description of the bread instead.

Happy Bread Baking Babes March baking!


Horiatiko Psomi

Ingredients

4 1/3 cups (520 g) strong bread flour, plus extra for dusting

1/2 cup fine semolina 

1 tablespoon sugar

2 teaspoons salt

2 teaspoons (1 packet) rapid rise yeast

1 1/2 cups (360 ml) tepid water

1/4 cup (60 ml) milk

1/4 cup (60 ml) butter, melted and cooled

1 tablespoon olive oil, for the bowl

Topping:

1 egg white, beaten with 2 teaspoons water

3 tablespoons sesame seeds


Instructions

Place the flour, semolina, sugar, salt and yeast in a large mixing bowl. Stir together to combine.

Add the water, milk, and melted, cooled butter. Mix together on low speed using the dough hook attachment until the dough is elastic, smooth to the touch and forms a ball around the hook.

Alternately, to do it by hand, place the flour, semolina, sugar and salt and yeast in a large mixing bowl. Stir together to combine. 

Add the water, milk and melted, cooled butter.

Mix together using a dough whisk or a wooden spoon. You will have a shaggy dough.

Leave the dough to rest for 15 minutes then use your hands or the dough whisk to stretch and fold the dough

Flip the dough over and let it rest, loosely covered, for five minutes. Repeat the stretch and fold three more times, resting in between.

First Rise - either method

Drizzle the bowl with olive oil and turn the dough a few times so that it is greased with oil. Cover the bowl with a clean towel and leave it to rise for about 90 minutes or until doubled. In the summer it may take less time.

Deflate the dough and turn out onto a worktop lightly dusted with a little flour.

Shape the bread into a ball. Spread the dough out to make a rectangular shape. Fold one end in and then the other end over it like a letter. Flip over and use your hands to shape the dough into a ball. Cup in your hands and place in a bowl or a prepped banneton to rise for the second time, covered.

Bake

Preheat your oven to 450 degrees F (230 degrees C) for at least half an hour while the loaf is having its second rise. Place a lidded pot (Dutch oven) in the oven to preheat.

Gently invert the bread onto a dough sling or piece of baking parchment. Brush with egg wash and sprinkle with the sesame seeds.

Use a razor or lame to slice the top of the loaf with a cross shape. Carefully remove the pot from the oven. Lower the loaf into the pot, cover, and bake for 30 minutes.

Reduce the temperature to 425 degrees F (220 degrees C). Take the lid of the hot pot and bake for another 15-20 minutes.

Lift the bread out of the pot and allow it to cool on a wire rack before slicing.


Sunday, March 12, 2023

How We Think About Time


With daylight savings time started for much of the U.S. today, there has been a great deal of discussion about having it be permanent of being dropped in favor of regular time all year...or just keeping it as is.

Personally I've always done better with daylight savings time and wouldn't mind it being all year. That said, I know others who struggle with the springing forward and falling back thing each year. I think some of it has to do with some of us being morning people and some being night people, but that is a completely unscientific way of looking at it.

Do you have a preference, dear reader? Do you want to share?

One of the things that we can do in the kitchen to make time work for us is to bake bread. Inexperienced bread bakers don't feel that way; they worry about over proofing and under proofing and such, but if you've ever tried retarding bread dough in the fridge (letting your partially risen or even unrisen dough sit in the fridge for hours at a time and even overnight or for a few days), you know that time is on your side. You get to determine when to do the final rise and bake...and retarding your bread dough often yields a better, more complex flavor.

In a few days, on March 16, the Bread Baking Babes will reveal their latest bread bake. Come and see if time had anything to do with how it turned out, OK?

Tuesday, March 07, 2023

A Saucy Pasta Dish for Asparagus Season


I hope that you love asparagus as much as I do. We have been getting some for a few weeks, but the asparagus coming into the market now are thicker and really fresh. I like them just steamed al dente, but tonight I updated a dish that Sweetie and I enjoyed first in 2013, so ten years ago at asparagus time.

By the way, Sweetie has been going through a tough time for the past three weeks or so. His back has bothered him on and off over the years, but a bout this long and this painful hasn't happened for about 20 years. He finally agreed last Friday to go the his primary care doctor...but saw the Physician's Assistant, who is quite good...and ended up with some muscle relaxants, pain pills, and a referral to a back doctor.

Those meds knocked him out, so he has been sleeping a lot, even during the day (which is unusual for him), but it has done the trick. Along with frequent chiropractor visits, the rest and meds have finally worked so that he didn't need any strong meds today at all...just an ibuprofen.

This dish was sort of a celebration for a better back because I remembered that every time I made the old version that Sweetie loved it. To update it I've added butternut squash 'zoodles', fairly thin strands of the squash that I found in Whole Foods today, already prepared although still raw.

In the original recipe you stew pieces of asparagus and broccoli in garlic and oil. These veggies go on top of pasta that has been dressed with an almost cream sauce made with ricotta cheese and some of the hot water used to cook the pasta. Today I used some fresh linguine and some Kite Hill almond milk 'ricotta'. Don't forget to use freshly grated nutmeg, if possible, in the sauce...makes all the difference!

The updated recipe calls for tossing the asparagus and broccoli pieces in the garlic and oil, then removing them. The butternut squash noodles are then tossed with the remaining oil and garlic and spread over the bottom of the pan. Because they take a little longer to cook than the asparagus pieces and broccoli florets, having the squash on the bottom of the pan allows it to have more heat.  Since it's all cooked covered over low heat, all the veggies cook slowly and become flavored with the garlic.

Of course while the veggies are cooking you boil the pasta and make the sauce with the ricotta. Once everything is done it gets tossed together and makes a really delicious side dish or meal. I would imagine that you could make it with just the squash noodles and broccoli when asparagus isn't in season, but I do love asparagus and it shines in this recipe.


Fettuccine with Ricotta and Asparagus, Broccoli and Butternut Squash

from the Mediterranean Diet Cookbook
serves 4 - 6

3/4 lb tender young asparagus ( or 1/2 lb asparagus and 1/4 lb broccoli crown)
1/2 lb butternut squash 'noodles'
2 cloves garlic, finely chopped
3 -4 tablespoons olive oil
1 lb fettuccine
6 quarts water
1/2 lb fresh creamy ricotta 
dash nutmeg
salt and freshly ground black pepper, to taste
1/2 cup freshly grated Parmesan cheese

Trim touch ends off asparagus after rinsing them. Cut tender parts into 2-inch lengths. Cut broccoli crown into small florets. If needed, cut the butternut squash 'noodles' into 6-8-inch lengths.

In a sauté pan place 3 tablespoon olive oil and the garlic; stir to blend. Add the asparagus pieces and toss to coat, then remove and reserve. Repeat with the broccoli florets. Finally, add the additional tablespoon of oil if needed and add the squash 'noodles'; toss to coat and then spread over the bottom of the pan. Arrange the coated asparagus pieces and broccoli florets over the squash (do not stir) and, over low heat and covered, gently stew the garlic, squash, asparagus and broccoli in the oil until the vegetables are tender but not brown, about 15 minutes, stirring occasionally the last 5 minutes. Set aside.

Meanwhile, cook pasta in boiling water until tender. While pasta cooks, extract 1/2 cup of the cooking liquid and mix it in a small saucepan with the ricotta. Set saucepan over low heat and gently cream the ricotta and cooking water. When the ricotta is warm, taste and add salt and pepper to taste. Add the nutmeg and 1 tablespoon of the Parmesan cheese and stir to combine.

Drain the cooked pasta and combine immediately with the cheese sauce, tossing to mix well. Add the veggie mixture and toss with tongs to lightly coat the vegies and mix them with the pasta. If desired, plate or a warm platter. Sprinkle with the rest of the grated cheese and serve at once.

Saturday, March 04, 2023

Cupcakes and Buttercream


Not doing too much baking these days. I save it for special occasions like a recent birthday celebration. Didn't get the best photos, but they were truly outstanding cupcakes...I think it was the buttercream! If I share like this I'm not as tempted to eat them all myself. Would like to look OK in a bathing suit this summer...no, not a bikini...it would take forever to get that slim!

I decided to do cupcakes since they are easy serve and can be cut in half if the celebrants want a small dessert. The buttercream is a recipe that my daughter gave me. She has been baking amazing layer cakes as a hobby and giving the cakes to co-workers and this is the buttercream she uses. The cupcakes are from the book Perfect Cakes by America's Test Kitchen. On page 70 there is a cupcake recipe that produces a lovely yellow cupcake that is moist and fine textured. You can use it for cupcakes with any frosting, not just this buttercream. You use a stand mixer, start with the dry ingredients in the bowl, add the butter a piece at a time and the paddle combines it with the dry ingredient until it looks like sand, then you beat in the eggs and, finally the milk and vanilla extract. I added a bit of lemon oil, too, since I wanted lemon flavor. There was also lemon in the buttercream. Ignore the chocolate mini muffins in the photos...they were purchased and a lot were left over because, hello, buttercream!


Vanilla Cupcakes

Makes 12

1 3/4 cups (8 3/4 ounces) all-purpose flour
1 cup (7 ounces) granulated sugar
1 1/2 teaspoons baking powder
3/4 teaspoon salt
12 tablespoons unsalted butter, cut into 12 pieces and softened
3 large eggs at room temperature
3/4 cup milk
1 1/2 teaspoons vanilla extract

Adjust the oven rack to middle position and preheat to 350 degrees F. Line 12-cup muffin tin with paper or foil liner cups.

Using a stand mixer and paddle attachment, mix flour, sugar, baking powder and salt together on low speed. Add butter, 1 piece at a time, and mix until mixture resembles coarse sand, about 1 minute. Add eggs, one at a time, beating until combined and scraping beater and bowl as needed. Add milk and vanilla, increase speed to medium, and mix until light and fluffy, with no lumps remaining, about 3 minutes.

Portion batter evenly between the 12 lined cups. Bake until toothpick inserted in center comes out clean, about 18-20 minutes. Rotate pan about halfway through baking. Cool cupcakes in the tin 10 minutes on a wire rack. Remove cupcakes from tin and cool directly on the wire rack until fully cool, about 1 hour.

Frost with favorite frosting and decorate as desired.

Lemon Buttercream Frosting
from Kate  - enough for a layer cake - divide in half for 12 cupcakes
(Note: 4 sticks of butter and a 32 oz bag of powdered sugar will yield enough frosting to crumb coat and frost a 3-layer 6" cake. Use 1 cup powdered sugar to every stick (8 tablespoons) of butter.)

8 cups powdered sugar
4 sticks salted butter at room temperature (1 pound)
1/4 to 1/2 cup heavy whipping cream 
lemon extract to taste (for vanilla frosting use vanilla extract)

Use the paddle attachment for your stand mixer and whip the butter well, scraping down the sides as needed, until it is uniform and fluffy and light colored.

After the sugar is all mixed in, add 1/4 cup heavy whipping cream and about 2 teaspoons flavoring, then whip that together. If consistency doesn't seem right, add additional whipping cream 1 tablespoon at a time, whipping well after each addition. Use to ice cupcakes. Use pastry bag and tips to do decorative icing. Add color to buttercream if desired.

Gel or powder food coloring is best for coloring the frosting. A splurge is oil-based coloring brand Colour Mill - the best and some very cool colors...found on Amazon.


Tuesday, February 21, 2023

Snapshot


In a week we will be finishing off February. Time is certainly flying! I've just returned from a visit to Phoenix where I spent time with my daughter, her fiancé, and two of his sons. It was very relaxing and fun. Lots of time for the boys to hang out with each other and with a friend who lives in Phoenix.

The last time I was there we were working on the house, including doing a lime wash on the large fireplace in the room off the kitchen. This time there were a few things, like securing a wobbly electrical outlet, but mostly we spent time together enjoying ourselves, especially in the fireplace room. One evening we even hosted Aaron's sister Holly and her partner, plus a long-time friend of Aaron's and the friend's wife and daughters. It was so nice meeting some of Aaron's family and friends, including his cold plunge buddy on our final day.


I've been cleaning out my office space, too. The next part is my cork bulletin board, which has gotten so full that papers are pinned over other papers, and over cards and passwords and some artwork, too. I suspect that I'll have more than will fit, even after I sort and throw some of it out!


The garden has started to call to me. Right now there are daffodils just beginning to bloom and still some paper whites and grape hyacinths that began blooming earlier in the month. The rose bushes I pruned and sprayed are beginning to leaf out. To Sweetie's dismay the grass needs mowing. To my dismay the weeds are already taking hold. Yesterday I filled the green can with weeds and spent soil from some of the pots that don't have bulbs. Soon I'll plant some seeds in soil cells in mini-greenhouses and put them in the sunspace to sprout. Our weather has been unseasonably cool and we might even get snow this Friday, so I suspect that it will be late April or early May before tomato or squash seedlings can be planted. I like for nighttime temperatures to be 50 or above for a week to warm the soil before I plant seedlings out.


I'm still experimenting with printing with the Gelli pads and acrylic paint. The wonderful thing about prints is that you never know what you will get! Above is a photo of a print that I made recently.


The Sonoma County Airport is also the Charles Schultz Airport and they recently did a remodel. When I returned from Phoenix it was the first time that I was in the part of the 'new' airport that had the model of the Red Baron's plane up above. Soooo fun!


These are but some of the threads of the tapestry of my life at the moment. What threads are you experiencing dear reader?

Monday, February 20, 2023

Pretty Cookies with Raspberry Filling


A tea party can be fun, especially if you enjoy using pretty china tea things, including tea pots, cups and saucers, and little plates. I recently had tea with a very good friend and she loved the fact that I baked really pretty cookies to go with the tea, served on a tiered plate with all the nice china.


You don't really need to bake cookies to enjoy tea with a friend. I often use packaged cookies from the market, but this time I didn't. I baked a simple sugar cookie, cut it with a fluted round cutter, then cut the center out of half of them with a smaller fluted round cutter. Once baked and cooled, I piped vanilla buttercream just inside the edge of the whole cookies, filled the center with a thin layer of raspberry jam. Next I sifted a small amount of confectioners sugar over the cutouts. The final touch was top the raspberry/buttercream whole cookies with the cutout cookies. You could use another flavor of jam or some lemon curd instead of the raspberry jam for another take on these lovely cookies. The cookies themselves are crisp the first day, giving a nice contrast to the soft jam and buttercream. If you store them longer, the cookies soften a bit, but they are still delicious! You also don't need to have a tea party to enjoy these cookies!

When making the cookies, know that the dough tends to be soft, but you really don't want to overwork it. Be generous with the flour on your work surface and rolling pin so that the dough doesn't stick too much. I slid a small offset spatula under the cookies to make sure they were loosened before I moved them to the baking sheet with a larger spatula that supported them fully. I baked the cutout part, too, and iced small hearts with buttercream on them. A small bite is sometimes as good as a fancy one. Some of the filled ones ended up without powdered sugar since Sweetie doesn't really like powdered sugar.


Enjoy the cookies and do consider having a tea party. It's particularly nice during the winter to have a little party to lift our spirits and give us an excuse to invite a friend over.


Fancy Tea Cookies  

1 cup butter or margarine
1 cup sugar
1 egg
3 cups flour
1 teaspoon baking soda
¼ teaspoon nutmeg
about 2-3 tablespoons confectioners sugar
1 cup vanilla buttercream
1 - 1 1/2 cups raspberry jam (or other flavor jam or lemon curd)

    With butter or margarine at room temperature, beat butter or margarine in large bowl, then beat in sugar and egg until fluffy. Sift dry ingredients together and add to first mixture. Mix well. Roll dough to 1/8 inch thickness, cut with round cookie cutters. Place on lightly buttered cookie sheets. Use a smaller round cutter to cut out the middle of half of the cookies. Bake in a 400 F. oven for 7- 8 minutes. If dough sticks while rolling, chill briefly. 

    After cookies have cooled, use a small fine-mesh strainer to sift a small amount of the confectioners sugar over the cut-out cookies. Pipe a thin line of buttercream near the edge of the full cookies, then fill the center with a thin layer of the raspberry jam. Top with the cut-out cookies, pushing down gently to seal the layers together. Serve.  Makes 2 - 4 dozen cookies depending on the size of the round cutters.


Friday, February 17, 2023

Greek Easter Bread with the Babes


I'm really glad that my dairy allergy seems to have gone away because this month, the wonderful Kitchen of the Month Kelly of A Messy Kitchen invited us to bake Cypriot Easter Bread with Cheese, also known as Flaounes. Although the recipe calls for halloumi and I'm sure it would have been better with that cheese, when I tried to buy some I found that it was extremely expensive, so I went with mozzarella. Not my best idea because the cheddar was mild and so was the mozzarella. The ground cherry pits, also known as mahleb helped a little with flavor, but not alot. I was also unable to procure the resin mastic, but I did include some cardamom. All in all I found the bread to be nice but bland and the filling was also bland. The best thing was the sesame seeds.


It was a fun bread to make. I probably didn't roll it thin enough, but that made it easy to handle once I cut the dough into squares. First you paint one side with egg wash (an egg beaten with a little water), then the eggy side goes down onto sesame seeds spread in a pan - or in my case a paper plate. A scoop of the cheese mixture that was made the day before gets placed in the middle of the square, more egg wash is applied around the edges, then the edges are squeezed together to encase the cheese mixture. I had trouble with that, so I ended up with ones that looked more like boats than flowers or squares. Still, even the less pretty ones baked up to be golden with just a bit of char on top...usually where the raisins were. I made my squares 4 inches by 4 inches and reduced the amount of cheese a bit, too. Even so they were large. Next time I'll make the dough squares 3-inches square.

I still have some of the dough and some of the filling so I think that I'm going to add lemon zest to the filling and more of the mahleb, plus more sugar, to the dough. It will become a sweet roll and I'll serve it with some fruit. That's the great thing about trying new recipes...you can usually figure out how to improve on them. If I lived in Cypress I could probably find the halloumi, and the mastic easily and could have the real deal. If I ever visit it should be at Easter so I can try the authentic bread! By the way, when this is posted, which is mid-February, the hills around where we live look like the photo in the header...green fields, bare trees. Since I change out the header every now and then it won't always look that way, but right now it shows the effects of winter rain - green, green grass - and yet spring is still not even on the horizon.


Hope that you will try this and become a Bread Baking Buddy. Bake and post by February 27th and send the URL and a photo to Kelly and she will send you a Buddy Badge and include you in the round-up.

Also, be sure to visit the other Babes...I suspect that they will have done a more authentic version than mine.


Cypriot Flaounes (Greek Easter Cheese Bread)

makes 12 (3 inch x 4 inch) flaouna

 Filling

    1 tsp mastic *   
    1 tsp mahleb **   
    1 tsp sugar
    8 oz (228 g) halloumi cheese (I used all halloumi)
    8 oz (228 g) soft, mild cheddar
    1c (115 g) raisins
    1/2 c (84 g) semolina flour (I used fresh ground durum wheat)
    1 tsp baking powder
    1/2 tsp dry mint, crushed (I used fresh mint, twice as much)
    2 eggs

 Dough

    2 1/4 tsp active dry yeast
    1 1/4 c (300 ml) lukewarm milk, divided
    1 tsp mastic, optional   
    1 tsp mahleb *   
    1 tsp sugar
    4 c (512 g) flour
    1 tsp baking powder
    1/2 tsp salt
    1/3 c olive oil

For The Topping

    1 egg, beaten
    1/2 c (70 g) sesame seeds

Instructions
Day 1 - Make the Cheese Filling

    Using a mortar and pestle, combine the mastic and mahleb together with 1 tsp sugar and pound together until it is a fine powder.
    Grate the cheese and mix with the raisins, semolina flour, baking powder, pounded sugar and spice mixture, and crushed mint.
    Add the eggs, one by one, mixing until the cheese has come together as a firm mixture that can be shaped into a ball. (More or fewer eggs may be needed depending on the moisture level of the cheese used.)
    Cover the filling and refrigerate overnight, or at least 4 hours, to let the flavors come together.


Day 2 – Prepare dough, assemble and bake

    Remove cheese mixture from the refrigerator and let it come to room temperature while you prepare the dough.
    Mix yeast with 1/2 cup lukewarm milk. Set aside for the yeast to activate, 5-10 minutes.
    Pound the mastic and mahleb with 1 tsp sugar until fine.
    In a large bowl, mix together the flour, baking powder, salt, and sugar mixture.
    Add the oil and rub it into the flour with your fingertips, until the mixture has a sandy texture.
    Pour the yeast mixture into the flour and mix well with your hands.
    Add the remaining 3/4 cup of lukewarm milk gradually, kneading with your hands and adding just enough to incorporate all the dry ingredients and create a firm dough that does not stick on your hands.

    Cover dough and set aside to rise for 1-2 hours, until nearly doubled.

    Place the sesame seeds onto a wide plate or tray.
    Roll out the dough 1/8 inch thick (it should measure roughly 15x20 inches). Cut the dough into 5 inch squares. (Or cut the dough your desired shape and size.)
    Brush one side of the cut dough with the beaten egg and place it egg-side down onto the seeds.
    Place a heaping 1/4 cup of the cheese filling on top of the dough (on the un-seeded side).  (Don't compact it, so that it stays light and airy!

    Brush the egg wash on the outer edges of the dough and fold them up towards the center (leaving the top center of the filling uncovered). Pinch the un-seeded side of the corners of the dough together to keep the sides in place over the filling.
    Place the shaped flaounes on a baking tray lined with parchment paper. Brush the exposed filling with a little beaten egg.
    Let the pastries rise for 30-45 minutes, until slightly puffy.
    Near end of rising time, preheat oven to 375ºF.
    Bake the flaounes for 30 min, until deeply golden.
    

Serve with honey and cinnamon for a sweet treat or olives and sliced meat for savory.

*If you don't have mahlab, substitute 1 tsp with 1/2 tsp almond extract and 1/4 tsp cardamom (or a pinch of anise).


Tuesday, February 14, 2023

Happy Valentine's Day!


 Feeling grateful today for all of the love expressed by friends and family for my birthday and today, for Valentine's Day. Want to share the love with you, too, dear reader. Grateful that you come and read my blog and even, sometimes, leave comments!

Sunday, February 12, 2023

Sweet Roll Bread Pudding


In January I made a lovely whole wheat and cinnamon sweet roll using dough that had fresh persimmon in it. Even though it was delicious, Sweetie and I weren't able to finish the ring I made, so later in the month I made bread pudding using chunks of it as the bread part. Then I had a whole bunch of other stuff to do, so it never got posted. You can also make this just as written, using plain dry bread cubes. I didn't add the cinnamon since there was plenty in the sweet rolls, but otherwise the ingredients are almost the same. I added a diced apple along with the raisins. You really couldn't taste any of the persimmon, so if you make this with the bread you have on hand it will be great! This time I only made half the usual recipe (usual recipe is below) so Sweetie and I each had two servings. Yum!

I love bread pudding. I makes a great breakfast and a wonderful afternoon snack, plus is awesome for dessert in the evening. Along with chunks of stale bread, you use hot milk, some butter or margarine, some sugar, eggs, and flavorings. I often add fresh and/or dried fruit, especially raisins. It's not fast food because you soak the stale bread in the milk/sugar/egg mixture for a while so that the bread becomes softer and the custard is in every part of the dish, not just coating the outside of the bread. Still, it isn't difficult and you end up with a soft, custardy, sweet, fruity (if you used added fruit), flavorful comfort food. You can dress it up with some half and half or a scoop of ice cream, or if you are feeling decadent you can add some caramel sauce, but it is fine all by itself. I like it served warm, but Sweetie ate one of his two servings cold for breakfast. 


Bread Pudding with  Raisins and Cinnamon      

A recipe from 1971, from a Fredricksburg, Maryland friend, Gale 


4 cups dry bread cubes          1/4 teaspoon salt           
3 cups milk, scalded               1/4 teaspoon freshly grated nutmeg
1 tablespoon butter                1/2 teaspoon cinnamon
4 slightly beaten eggs            1 teaspoon vanilla
3/4 cup sugar                         1/4 cup raisins
½ teaspoon lemon zest                                  
                       
1) Preheat oven to 350 degrees.

2) Melt the butter in the milk. Add a little of the milk to the beaten eggs, then add eggs to rest of milk. Stir in the sugar, lemon zest, salt, nutmeg, cinnamon and vanilla.

3) Put the bread cubes in a large bowl. Pour the egg/milk mixture over, stir gently, and let sit 15-30 minutes.

4) Butter a large baking pan. A deep one will give a softer center, a shallower one will give more crispy crust. Gently stir raisins into bread mixture and pour into baking pan.

5) Bake in a pan of hot water until firm, about 1 hour. Serve warm.

Saturday, February 04, 2023

A Simple Roast Chicken

Because they are easy and fairly inexpensive, many of us pick up a rotisserie chicken when we want roast chicken. Every now and then I prefer to roast a chicken at home. If nothing else, that wisp of roast chicken fragrance when you lift the lid (if it's cooked in a Dutch oven as I prefer) is so delightful!

The good news is that a whole chicken cooked this way is amazingly easy and you can make it really simple or add to the flavor with additions like root veggies, herbs, and/or lemon or orange for a small addition of time and effort that pays off big time.

You start with a whole chicken, season it with salt and pepper, put a little water or wine in the bottom of the Dutch oven to keep it from sticking, cover it up and cook for 60 minutes. You get a cooked chicken with brown and fairly crisp skin, some yummy pan juices for sauce and clean up is easy.

One step more is to add things like peeled and sliced onion, whole or halved garlic, chunks of potato, carrot, rutabaga, turnip, etc., all shaken in a large plastic bag (like a produce bag) with a little olive oil, some herbs either fresh or dried, and some salt and pepper. The veggies get put into the Dutch oven after the chicken, all around the chicken. You can tuck some lemon wedges or orange wedges into the chicken cavity, too, for more flavor. The lid goes on, the pot goes into the oven and 60 minutes later you have a meal to die for. Add a green salad and maybe some crusty bread for soaking up the pan juices and you have such a great meal that is easy on the cook. I actually served mine (which included sliced mushrooms along with the onions and carrots and garlic) with mashed potatoes and mixed vegetables.

Leftovers can be used for sandwiches or chicken salad, or any dish that uses leftover chicken. You can also reheat it in the microwave for another meal if you also have leftover veggies. Of course the cooked poultry also freezes well for even later use.


Roast Chicken with Root Vegetables
 

1 whole butchered chicken, about 3-4 pounds, with anything inside removed
2 carrots, washed, ends removed, cut into bite sized pieces
2-3 baking potatoes, scrubbed and cut into bite sized pieces
any other root vegetable that you like, washed, ends removed and cut into bite sized pieces
and/or sliced mushrooms
1 onion, peeled, ends removed, sliced
whole or halved garlic, excess skin removed
salt and pepper to taste
fresh (1 tablespoon) or dried (1 teaspoon) thyme
2 tablespoons olive oil
lemon or orange wedges for inside the bird
salt and pepper to taste
optional: 1/4 cup dry white wine
optional: chopped Italian parsley

Preheat to oven to 375 degrees F.

Rinse the chicken (if you usually do) and place in a Dutch oven large enough for it and the vegetables.
Put the carrots, potatoes, other root vegetables if using, onion and garlic in a large disposable bag (I used produce bags from the market that I save for this purpose). Add the salt and pepper and thyme. Close the top securely and shake vigorously to distribute the seasonings. Add the olive oil and shake again to coat everything lightly with oil. Place the oiled veg all around the chicken in the Dutch oven. Place the orange or lemon wedges inside the bird. Season the outside of the bird with salt and pepper to taste. If using, add the white wine.

Cover the Dutch oven. Place in preheated oven and roast for 60 minutes. Remove from the oven and let sit for 10 minutes so the juices can migrate back into the bird.

Cut legs, thighs and wings into serving pieces. Slice the breast or cut into more serving pieces. Serve hot with pan juices spooned over. If desired garnish with chopped parsley