Monday, January 31, 2011

Things to Come

For a few months my Bread Baking Babes posts have included some notes referring to the third Anniversary of the Babes. It's going to be a celebration this month...three years of fun baking breads around our kitchen tables as a group...and great breads they have been! As with most big occasions there have been some changes between the initial euphoria...A Party!!...and now. The celebration is going to be amazing...we will each be choosing a personal favorite (or challenge...or both) from any of the breads baked during those three years.

Just to give you a sense of the broad scope of that choice, below are collages showing the breads baked and below each collage you'll find the month, kitchen of the month, and name of the bread. Isn't that an awesome collection?

Come back on February 16th for the party...and to see which one I chose, OK?

2008 (from left to right)
February: Karen - Royal Crown Tortano (in Dutch) and in English:
March: Lien - Coccodrillo
April: Tanna - Sullivan Street Pizza
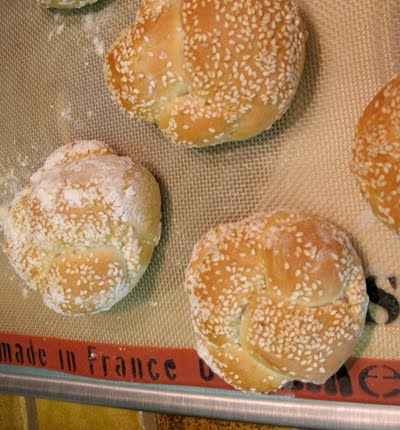
May: Sher - Poilane-Style Miche
June: Mary - Breadchick's Dark Onion Rye
July: - in memory of Sher who passed away July 20 2008; this month we made something from her blog, something that reminded us of the warm and witty personality Sher was. The news of her passing shocked us. She is our Angel Babe.
August: Ilva - Whole Wheat Pita
September: Monique - Sûkerbôlle
October: Sara - Challah
November: Görel - The Rosendal Crisp Bread
December: Lynn - Yule Wreath

In our second year, the loaves of 2009;

2009 (from left to right):
January: Katie - Croissants
February: Tanna - Pane ai Cinque Cereali con Nod (Five-Grain Bread with Walnuts)
March: Sara - Pane Francese
April: Mary - Ethiopian Injera
May: Ilva - Pane di Pasta Tenera Condita (Italian Knot Bread)
June: Lien - Asparagus Bread (in English and Dutch)
July: Natashya - Sukkar bi Tahin (Beirut Tahini Swirls)
August: Görel - Russian Black Bread
September: Karen - Chinese Flower Steam Buns
October: Gretchen - Tanta Wawa (Peruvian Bread Babies)
November: Monique - Brioche Mousseline
December: Katie - Viennese Striesel

And our third year 2010;

2010 (from left to right)
January: Lynn - Curried Naan
February: Karen - Ensaimada
March: Mary - Gluten Free No Knead Hearty Seeded Sandwich Bread
April: Sara - Potato Bread with Chives
May: Natashya - Tunisian Spicy Breads
June: Lien - Korni (in English and Dutch)
July: Lynn - Yeasted Sprouted Wheat Bread
August: Tanna - Sweet Portuguese Bread
September: Görel - Brunkans Långa
October: Elizabeth - Broa: Portuguese Corn Bread
November: Susan - Cornucopia
December: Ilva - Taralli Pugliesi


2011
January: Astrid - Hildegard's Spelt Bread


Just in case I didn't link them correctly (and because I'm posting this without doing links for some...hope to correct that soon...), you can usually go to the blog of the kitchen of the month and look in their archives for that month and year to find the recipe. The links to the Babes blogs are at right, just below the Welcome and recipe link.

Sunday, January 30, 2011

How About a Muffin?

When the kids were still at home I used to whip up a batch of muffins about once a month. Savory ones to go with soup for dinner or sweet ones for a weekend breakfast were something I just baked without thinking much about it.

Muffins really are quick breads...you combine the dry ingredients in one bowl and the wet ingredients in another, make sure the oven is hot and the muffin tins are greased and it's only a few minutes later that the muffins are in the oven. By the time you've cleaned up they are just about done and the kitchen smells heavenly!

Not very many people know it, but I had a muffin business in the East Bay when my boy was a baby. I called it Mega Muffins and I filled the cups of the muffin tin all the way up so that the tops practically met on the muffin tin top. This was before super sized muffins became popular (see, I'm ancient). I called the scone trend before it happend, too. Too bad I have no desire to run a big baking business...I might even know the next thing that will become big in the personal baked goods area. Cupcakes are almost over so you know something else (besides whoopie pies) is coming :)

But today's topic boys and girls is muffins. Last month Lisa of Parsley Sage Desserts and Line Drives did a contest and I won a gift certificate from OhNuts! Thank you Lisa and OhNuts! One of the items I ordered was a dried cherry and almonds trail mix that also has dried candied pineapple and golden raisins (plus some little chocolate ovals which I removed for the muffins).


Sweetie ate some and declared it a good mix, but I wanted to use it in muffins, too, so he kindly hid the bag until I could bake muffins...otherwise the whole bag would have been snacked on. He also really enjoyed their cashews for snacks. I was very impressed with the freshness of their products. (Yes, I did order more than the gift certificate amount, but it was too hard to choose because so many things looked ...and were...good!)

You can use any combination of your choice of dried fruits and good nuts. I used 1 cup of the mix, but a cup and a half would have been even better.

Some hints for successful muffins: In order to have your muffins be moist and tender, use as few strokes as possible to combine the wet and dry ingredients. Then scoop the batter into the muffin tins right away and get the tins into the oven right away, too. Since this recipe used both baking powder and baking soda (to react with the acid fo the buttermilk) you'll get the best oven spring if the oven is preheated so its good and hot, and if you get the muffins in the oven quickly.

The flavor of these muffins depends totally on the ingredients (there are no spices or extracts or citrus zests to hide behind) so use fresh nuts, milk, eggs and butter. Check to make sure that your whole wheat flour is also fresh smelling before using it. If your dried fruits are really dried out, you could soak them briefly in hot water then drain well on papertowels before using.

I'll bet you are going to love these muffins. They don't even need butter! Of course if you like your nice hot muffins with butter, who am I to tell you no?

Fruity Almondy Muffins

1 1/2 cup all-purpose flour
1 cup whole-wheat flour
1 teaspoon baking soda
2 teaspoons baking powder
1/2 teaspoon salt
1/2 cup brown sugar, packed
2 eggs, lightly beaten
1/2 cup buttermilk, at room temperature
1/2 cup milk, at room temperature
4 tablespoons melted butter, cooled
1 cup dried fruit and nut mix, large pieces and nuts chopped roughly (I used OhNuts! Cherry Almond Trail Mix, but removed the chocolate pieces)
1 tablespoon granulated sugar (optional)

In a medium bowl combine the first 6 ingredients (dry ingredients). Set aside.

In a medium bowl combine the next 4 ingredients (wet ingredients). Set aside.

Add the roughly chopped fruits and nuts to the dry ingredient bowl and stir to coat the added ingredients with the dry ingredients. Make a well in the center.

Pour the wet ingredients into the well of the dry ingredients. With a fork quickly, with as few strokes as possible, combine the wet and dry ingredients. Scoop roughly 1/4 cup of the batter into each cup of a 12-portion muffin cup pan where the cups have been sprayed with baking spray or greased with oil or butter. Cups should be about 2/3 full.

If desired sprinkle the tops of filled muffin cups with the granulates sugar. Bake in preheated 400 degree F oven until golden brown, about 14 - 20 minutes.

Makes 12 muffins.

Wednesday, January 26, 2011

Lemon Caper Sauce for Pork

Now that it is citrus season I'm looking for ways to include lemon, lime, orange and tangerine flavors in my cooking and baking. Add garlic and capers and you really wow your taste buds!

Although you can use this sauce on chicken, turkey (dark meat preferred for both), an assertive fish like salmon, or veal, I chose to use this sauce on some pork chops that I first marinated in buttermilk for an hour. I tried coating the buttermilk slathered chops with a seasoned flour mixture for cooking, but the coating, once browned, slid right off the chops so I don't recommend that method.

If you really must have breading, you could blot the chops, coat with flour, coat with beaten egg, coat with panko or bread crumbs and then let it set for 10 minutes before sauteing. If you use a gluten free flour like potato flour and then some breadcrumbs from a gluten free bread you could easily make this gluten free chops. Potato flour can thicken the sauce instead of the wheat flour, too.

The Lemon Mushroom Caper Sauce uses olive oil but no butter or other fat. It is absolutely delicious with a strong lemon flavor, a bit of zip from the garlic, lots of zing from the lemon zest and capers, and the mellowness of the mushrooms, too. Altogether wonderful! I cooked it up at least 1/2 hour before I made the chops, covered the finished sauce with plastic wrap laid right on the sauce to prevent a skin from forming, then covered the pot to keep it warm. The sauce part is silky and you can adjust the thickness to your taste by adding the last of the broth once the sauce has thickened...just a teaspoon more broth can thin it out a fair amount.

Lemon Mushroom Caper Sauce
an Elle crafted recipe

2 tablespoon olive or grapeseed oil
1 cup prepared mushrooms (wiped clean, sliced)
1 clove minced garlic
2 tablespoons wheat flour or potato flour
1 cup chicken or vegetable broth
juice of one lemon (zest the lemon first)
Pepper to taste
zest of one lemon
1 tablespoon capers, drained
2 tablespoons chopped Italian parsley

In a medium saucepan heat the oil over medium-high heat. Add the prepared mushrooms, stir to coat with the oil, and saute' 5 minutes, stirring frequently. Add the garlic, stir, and saute' 1 minute, stirring frequently. Add the wheat flour or potato flour, stir to combine with mushrooms and garlic, and continue to cook for another minute, stirring frequently.

In a measuring cup mix together the broth and lemon juice. Add to the mushroom mixture all at once, stirring constantly, and continue to stir until mixture thickens. You can save about 2 tablespoons of the broth mixture and add some at the end to adjust the thickness to what you prefer. Add pepper to taste.

Add the lemon zest, capers, and Italian parsley. Stir to combine. Taste and add salt and/or pepper if needed. (I avoid adding salt and often by now you will see that it isn't needed, but now is the time to add it if you find you do need to.)

If holding the sauce while you cook what it will garnish, cover sauce with plastic wrap laid right on top of and touching the sauce. Cover the pot. Re-heat (removing the plastic wrap first), if needed, using low heat.

Makes enough to sauce 4 servings.

Saturday, January 22, 2011

Thanks for the Flowers

A quick thank you to Sweetie's lovely sister in the mountains for these flowers...just now blooming. Hope you (and all dear readers) are staying snug...or cool if it's summer where you are...this weekend! XO Elle


Friday, January 21, 2011

Cheery Cherry Cookies

During the holidays we were delighted to indulge in gastronomic excess...all those rich foods and sweets were welcome treats for celebrations. Now they are all (hopefully) gone and many people are looking to keep the junk out of the house and find something to nosh on that is somewhat healthy.

I also had the added incentive that I wanted to make something for my Mom that she could enjoy with her morning coffee or afternoon tea which is high in protein and fiber and low in fat. The challenge in creating such a goodie is to also make sure that it tastes delicious, not just OK.

By starting with a recipe from the American Heart Association book Lo-fat and Luscious Desserts, I was able to make some substitutions to an already good recipe. Although I did use some barley flour because I had it on hand, you could just you that amount of whole wheat flour in place of the barley flour.

Something to note is that I used butter in place of 4 tablespoons of the tub margarine because I don't like all of the chemicals in the margarines. I used some applesauce instead of some of the fat called for. The mixture before you add the flours is pretty curdled looking...that's OK...once the flour gets added it all look just fine.

One of the nice thing about this recipe is that it uses lots of dried cherries and those cherries really add flavor and natural to the cookies. I added some slivered almonds for crunch but you could substitute chopped natural almonds or sliced almonds for a bit more fiber.

Don't overbake these or they can become too dry. Store them in an airtight container but keep them handy for a healthy snack. Bet they will be gone before you know it. Maybe that's not so healthy, but it's still gotta be better for us than holiday sweets.

Cherry Breakfast and Tea Cookies
a variation of a recipe in Low-fat and Luscious Desserts by the American Heart Assn.

2 1/4 cups dried cherries (or use dried cranberries or blueberries or a combination)
1 1/2 cups water
1/2 cup all-purpose flour
1/2 cup whole wheat flour
1/2 cup soy flour
1/2 cup barley flour
3/4 cup uncooked wheat or oat bran
1/2 teaspoon freshly grated nutmeg
3/4 teaspoon baking soda
6 tablespoons butter at room temperature
4 oz. applesauce (unsweetened if possible)
3/4 cup dark brown sugar
1 1/2 teaspoon vanilla
3 egg whites
1 1/2 cups rolled oats
1/2 cups slivered almonds

Preheat 375 degrees F.

In a small, heavy saucepan, bring cherries and water to a boil over medium-high heat; boil for 4-6 minutes, or until cherries are plump, stirring occasionally. Drain cherries, reserving 5 tablespoons liquid; set both aside.

In a medium bowl, sift together flours, nutmeg,and baking soda. Set aside.

In a large mixing bowl, with an electric mixer, cream butter, then add applesauce. Add brown sugar and vanilla, bearing until light in color, about 1 minutes. Mixture may stay curdled.

Add egg whites and beat until smooth, occasionally scraping bowl with a rubber scraper. Mixture may stay a bit curdled looking.

Add reserved cherry liquid and mix well.

Reduce speed to low and gradually add flour mixture with mixture running.

Add rolled oats, wheat or oat bran, and plumped drained cherries, stirring just until incorporated. Using a small-portion scoop or tablespoon, drop cookie dough onto heavy ungreased baking sheets or regular baking sheets lined with cooking parchment, leaving about 1 inch between cookies.

Bake for 15 minutes. Transfer cookies from baking sheets to cooling racks and let cool completely, about 20 minutes.

Sunday, January 16, 2011

Read the Recipe

Also, try not to bake bread late in the afternoon after a full day of deck demolition (or similar physical exertion). Well, that's true if you are me...maybe you are made of sturdier stuff.


Today's post is dedicated to Saint Hildegard von Bingen, who probably was made of sturdier stuff. Saint Hildegard von Bingen lived from 1098 to 1179 in Germany. She was head of an abbey, she corresponded with numerous important people of her time including kings and the Pope, and was also a healer and a mystic. She had firm beliefs about God and about eating. The Bread Baking Babes, for their last post of the first three years, are baking her Spelt Bread today. Jump over to our Kitchen of the Month, Astrid's blog Paulchen's Foodblog, for more information on both Hildegard and her bread.

This is an unusual bread because the sponge is barely wet...actually it is like dry crumbs... and the dough is stiff but you can see the gluten strands, too, when you knead it after adding more water, and my two bread pans of dough rose almost to the top by the time I put them in the oven. At that point it was 8 pm and my brain apparently had turned in early. The directions call for a 200 degree oven for 15 minutes, followed by a 195 degree oven for another half hour. What I was too tired to realize was those degrees were in Celsius, not Fahrenheit! My poor bread never stood a chance being baked at such a low temperature (should have been 350 degrees and 325 degrees Fahrenheit). By the time I figured it out it was almost 10 pm so I baked them another half hour this morning at the correct temperatures to finish cooking them. The results (caved in at the middle) do not honor Hildegard nor Astrid. This Babe should probably be on my knees saying the rosary in penance, but I'm hoping that Hildegard's spirit will be kind and that when I make it again, with the correct oven temperatures, that it will be the lovely bread it should be.

The recipe is at Astrid's site and you can send her your links once you have baked it yourself to be a Babe Buddy. You have until the 29th for that and if you remember to use the correct oven temperature you will have a delicious, moist, fairly dense bread perfect for toast and open-faced sandwiches.

Be sure to check back next month on the 16th to see how the Babes celebrate their anniversary...three years! There will soon be some information on Facebook, too. Since I don't do Facebook (I know, Neanderthal!) you will have to visit another Babe...like Karen of Bake My Day...to find out all the deets. In the meantime you can use the links in the bar to the right to visit any of the other Babes and see how much better they did with the Spelt Bread. Thank you Astrid for choosing this bread. Even when twice baked the way I did it the bread is delicious if a little gummy.

Oh, in case you were wondering about the demo, Sweetie and I spent Saturday removing a decayed deck off the bedroom of the old farmhouse and then the old deck between the old farmhouse and the laundry room in preparation for termite treatment. The demo of the bedroom window deck was complicated by having to remove lots of ivy (uugh) and part of an overgrown rose bush. Which is worse...ivy snarls, rose thorns, or rotting wood?

Strangely enough I find I like demolition and have become quite good at pulling old nails from lumber. Moving soil, another part of the day, was less fun. The soil had become built up between the joists of the larger deck, due to our active gopher population. Since those joists are sound we wanted to dry them out so that we can re-use them for new decking later this year. Never a dull moment here!

Friday, January 14, 2011

Group Bread Baking is Wonderful

There are going to be a LOT of photos in this post...because there were a LOT of women baking yeast rolls together this week. If they see this post and look carefully, they might see their hands doing the work of making those delicious rolls!


While I very much enjoy baking bread by myself, it can be fun to bake in a group, too. This week a friend offered her kitchen for a group bread baking session (my kitchen being much too small and hers being gorgeous and spacious...with a proofing oven!) to raise money for our scholarships for women group, P.E.O. Although some of the women had baked bread before I was supposed to act as the teacher as needed, so I spent some time in advance working out how 7 of us would bake two kinds of rolls in one kitchen between 10 am and 4 pm. Seems like a long time until you put together all the rising and baking times needed!

The first shortcut was to make two of the dough batches ahead of time. The sesame seed rolls need to have the starter sit overnight anyway, so finishing them to the first rise stage in the morning, then letting them rise as I gathered my supplies and equipment and drove to the Baking Day site worked perfectly. I took photos to show them how the starter looked before it was mixed into dough


and it was fun to have some dough ready to shape to start off the day.

By starting this way (with clean hands) we were able to immediately handle the dough and to feel what dough that is smooth and supple and ready to go feels like.


That helped later when they were working with the second kind of dough that they had made themselves. It also meant that when we stopped for the delicious lunch provided by the hostess, with yummy cookies brought by one of the bakers, there were baked rolls to enjoy with lunch. Talk about a great incentive!

One of the best parts of this sort of day is there is lots of laughter and playfulness. I think the bread responds to that because these were really delicious rolls.

Some of the advantages of hands-on teaching is that I could show them how to adjust for too little water and to not get worried when the exact amounts given in the recipe don't quite make the dough we want. We were also able to feel the right temperature (not very hot) for the water, and to talk about how resilient bread dough is and how soothing it can be to knead the dough. I'm sure there were lots of other things that were learned that I'm not even aware of...I'm not a professional teacher and trust that a lot of things can be learned by doing and observing rather than being told stuff.

Each baker was provided with a sheet of baking tips I wrote up and with both recipes and they were encouraged to bake bread again soon to help retain what they learned...and because freshly baked bread smells SO good.


I'm going to send this over to Susan at Wild Yeast for her Yeastspotting event, a weekly carnival of awesome yeast breads and rolls and sweets.


Here are the recipes we used for our marathon roll baking:


Braided Sesame Rolls
from King Arthur Flour

Starter
• 1 cup King Arthur Unbleached All-Purpose Flour
• 1/3 to 1/2 cup cool water, enough to make a stiff ball of dough
• pinch of instant yeast

Dough
• all of the starter
• 2 cups King Arthur Unbleached All-Purpose Flour
• 1 1/4 teaspoons salt
• 2 tablespoons Baker's Special dry milk or nonfat dry milk
• 2 teaspoons instant yeast
• 2/3 cup lukewarm water
• 2 tablespoons olive oil

Topping
• 1 large egg white beaten with 1 tablespoon cold water
• 1/2 cup sesame seeds

Directions
1) To make the starter: Mix the starter ingredients together, cover, and let rest at room temperature overnight. Note: This is a dry, stiff starter. If it's too dry to come together, it may be that you measure your flour differently than we do here at King Arthur, or that you're in a particularly dry climate. Dribble in sufficient water to make the dough come together, and proceed with the recipe as directed.

(Note: In the morning you can see that the starter is good to go if it has gluten strands like those in this picture)


2) To make the dough: Combine the starter with the remaining dough ingredients, and mix and knead — by hand, mixer, or bread machine set on the dough cycle — to make a soft, smooth dough. You may need slightly more or less than 2 cups flour.

3) Place the dough in a lightly greased bowl or large (8-cup) measure; cover, and let it rise for about 90 minutes, till it's just about doubled in bulk.

4) Gently deflate the dough, and divide it into six equal pieces. Shape each piece into a rough log, and let the logs rest, uncovered, for about 10 minutes. This gives the gluten in the dough a chance to relax, which in turn will make the logs easier to roll.

5) Working on a lightly greased surface, roll each piece into a thin rope about 18" long.


6) Take three of the ropes. Whisk together 1 large egg white and 1 tablespoon water. Brush each rope with the egg white/water (this will be the “glue” to hold the seeds)and coat with about 1/2 cup sesame seeds rolling the ropes gently in the seeds to pick up as many as possible.

7) Grab one end of each rope, and squeeze the ends together firmly. Braid three 'snakes' together.

Repeat with the remaining three ropes. The resulting loaves will be about 18" long.


8) Cut each braided rope into six 3" rolls. Squeeze the cut ends together to seal, and tuck them under.

9) Space the rolls on a parchment lined baking sheet. (We used Silpat silicon mats).


Cover the loaf or rolls with lightly greased plastic wrap, and allow to rise till very puffy, about 90 minutes. Towards the end of the rising time, preheat the oven to 425°F.

10) The rolls will need to bake for about 25 minutes. Remove from the oven, and cool on a rack.


Don't these look beautiful?

Yield: 12 rolls.


We found the water amount given in the recipe for these rolls to be much less than needed for the amount of flour called for. We ended up using over 1 1/2 cups water instead of 1 1/8 cups.

Shaped Bread Rolls 101
based on a recipe found on the King Arthur Flour website

2 cups all-purpose flour
1 cup whole-wheat flour
1 packet instant yeast
1 ¼ teaspoons salt
3 tablespoons sugar
4 tablespoons (1/2 stick) butter at room temperature, cut into small pieces
¼ cup nonfat dry milk
1/3 cup potato flakes
1 1/8 cup lukewarm water (we needed 1 1/2 cups or more)

Combine all ingredients and mix and knead them together…by hand, mixer, or bread machine…until you’ve made a soft, smooth dough. Cover and let the dough rise for 1 hour, until it’s puffy (though not necessarily doubled in bulk).

Turn the dough out onto a lightly floured surface and divide into 16 pieces. (We used a scale and tried to keep the pieces of dough close in weight.)

Choose the shapes you want to create. For snails, roll each piece in a long snake,


then roll into a spiral shape, tucking the end under when finished.


For cloverleaf rolls, butter a muffin tin and for each roll take one of the dough pieces, divide it into three balls and place those three balls together


in the muffin cup
.
After shaping, let the rolls rise until puffy and almost doubled in size. We covered them with a piece of plastic wrap that we oiled on the side that touches the rolls. Preheat the oven to 350 degrees F. Bake for 15 to 18 minutes, until golden brown with an internal temperature of 190 degrees F.


NOTE: Risen unbaked rolls can be brushed with an egg white or egg wash (egg white beaten with some water, or egg beaten with some water) and sprinkled with seeds or sea salt. We used poppy seeds on some and sea salt on some. Both were yummy!

Finished rolls can be brushed with butter for a soft crust, but these are pretty buttery without that.


Sunday, January 09, 2011

A Snowy Cookie

Crescent cookies are a traditional holiday cookie, usually a gift from my Mom, a seminal part of the Christmas celebrations food-wise. These tender, delicate cookies combine lots of butter with finely ground toasted pecans and some sugar, plus a few other ingredients. They are hand formed into logs, then the ends are tapered and curved in to create a shape like a crescent moon. Once baked they get a snowy drift of confectioners' sugar on top. Although they are fine by themselves, they go really well with a hot cup or tea or coffee.

I've just returned home from my Mom's. She is recovering nicely from major surgery and we had some fine times with conversation and tea. Due to her illness the crescent cookies, usually baked in quantity, were almost missing this Christmas. I put together some crescent dough a few days after I arrived but there was no time to shape and bake them. One chilly day this week we sat together at the dining room table and shaped some,

then warmed up the kitchen (plus made it smell SOOO good) by baking a few dozen crescents. Mom added the powdered sugar to the first ones.


They were excellent with tea and it was great fun to bake with Mom.

If you want to make some yourself here is the family recipe. They are very similar to Mexican Wedding Cookies but I like the way the crescent shape sits at the side of the saucer if you have your tea in a fancy tea cup with saucer.

The recipe may have come from somewhere else originally, but I got my copy from my Mom and reprinted it in Family Food, 1994.

Crescent Cookies

1 ½ cup butter, softened
¾ cup sugar
3 cups flour
1 ½ - 2 cups finely chopped pecans
1 ½ teaspoons pure vanilla extract

Cream butter, add the rest of the ingredients, and mix thoroughly. Chill. Shape into 1 inch by 3 inch crescents on a buttered baking sheet. Bake for 20 – 25 minutes in a preheated 300 degree F oven. Cool. Roll in confectioners’ sugar and store airtight. Makes 4 dozen.

To prepare in a food processor: Put the butter, cut into chunks in the bowl of the processor. With metal blade, cream butter on high about half a minute. Add rest of ingredients and process until a ball of dough forms. Chill. Continue as described above.

Oh, I forgot to mention, we had SNOW while I was there. Yesterday morning it snowed for about an hour and a half. Since it has only snowed twice since I moved to California, it was fun to see the white stuff coming down, especially since it wasn't supposed to accumulate very much. Here are a couple of photos I took once it stopped:


Tuesday, January 04, 2011

Still Time for Suggestions

Come on...there is still time for you to have YOUR suggested bread baked for the Bread Baking Babes 3rd Anniversary. Now I'm a relatively new Babe and I don't want to look bad with my new bread baking friends, so PLEASE help me out here.
Tanna of My Kitchen in Half Cups is the kitchen of the month and here is what she said:

(includes her address):
"February is our BBB three years. We’d love to have you pick the BBB bread to bake for that month. If you will send me your recipe suggestions - only one per person please - send to: comments my kitchen at mac dot com you know to leave out spaces and about the dot put February Anniversary Bread in the subject line by January 7th ."

Remember, this doesn't have to be any bread in particular...the Babes like to bake all kinds, both offbeat and traditional and everything in between. I'm counting on you to send in a suggestions dear readers...don't let me down! XO, Elle

Sunday, January 02, 2011

A Royal Almond Cake for New Years

King Cake, or Galette des Rois is a traditional sweet eaten in Paris for the feast of Ephiphany, Janury 6th, but also is eaten for most of January as too much of a good thing is, indeed, wonderful. I decided to make mine for New Years Eve since there would be Champagne and enough people to make it worth baking.

This recipe is from the Tartlette blog if I remember correctly, so I thank Helene for it. It is not her fault that mine was less than stellar...if you read through you will find the unusual thing that happened to me.

Happy New Year y'all!


Galette des Rois

- 500 grams (17 2/3 ounces) all-butter puff pastry, thawed if frozen
For the crème d'amande:
- 125 grams (9 tablespoons) unsalted butter, softened
- 125 grams (1/2 cup plus 2 tablespoons) sugar
- 110 grams (1/2 cup plus 3 tablespoons) almond meal (= finely ground almonds - see notes at end)
- 8 grams (1 tablespoon) corn starch
- 2 large eggs
- 1 drop almond extract
- 1 tablespoon rum

For the eggwash:
- 1 egg yolk beaten with 1 tablespoon water

Accessories:
- 1 porcelain trinket or dried bean
- a paper crown

Serves 6 to 8.

1. Prepare the crème d'amande.
Beat the butter until creamy, but avoid incorporating air into it. In a bowl, combine the sugar, almonds, hazelnuts, corn starch, and salt. Stir with a whisk to remove any lump. Add to the creamed butter and mix until smooth. Add the almond extract and orange flower water, then the eggs, one at a time, mixing well between each addition. Cover and refrigerate for an hour or overnight.

2. Roll out the puff pastry.
Divide the puff pastry in 2 equal pieces, and roll each one out to form a rough circle a little larger than 30 cm (12 inches) in diameter. Use a sharp knife and an upturned plate of the right dimension to cut a neat 30-cm (12-inch) circle out of one, and a slightly larger one with the other, adding, say, 6 mm (1/4 inch) all around the edge of the plate.

3. Assemble the galette.
Place the smaller of the two circles on a piece of parchment paper or a silicone baking mat. In a small bowl, combine the egg yolk with a tablespoon water (or milk, if you have it handy) until smooth. Using a pastry brush, brush the outer rim of the dough lightly with the eggwash by a width of about 2.5 cm (1 inch). Make sure not to wet the actual edge of the dough, or it will impede its rise.
Pour the crème d'amande in the center and spread it out inside the eggwash ring with a spatula.

Place a porcelain fève, a dried bean, or the trinket of your choice in the crème d'amande -- not in the center but closer to an edge, or your knife will keep running into it when you divide the galette. And if it is an elongated shape, make sure to orient it straight toward the center of the galette, again, to minimize the possibility of you hitting it with your knife. Press it down gently to bury it.

Transfer the second round of dough precisely on top of the first, smooth it out gently over the crème d'amande to remove any air pocket, and press it down all around the sides to seal.


4. Score the galette.
Using the back of the tip of your knife (i.e. the dull side), draw a decorative pattern on top of the galette: a diamond-shaped grid, optionally with double or triple lines, a flower pattern. I chose to make a sun pattern ...sort of like parentheses around the cake... you start from the center and draw an arc to reach the edge of the galette in a single, smooth gesture, exercising just enough pressure to score the dough without piercing it. You then turn the galette ever so slightly, draw a similar arc nested in the first one, and repeat until the entire galette is scored.

Brush the top of the galette lightly with the eggwash: again, make sure it doesn't drip over the edges, or the eggwash will seal the layers of the puff pastry in this spot and it won't develop as well. Let it rest a minute then brush it lightly again with the eggwash.

Using the tip of your knife, pierce holes in the top dough in the center.
Transfer to a rimmed baking sheet or a tart pan with a removable bottom, and refrigerate for 1 hour. (Alternatively, you can place the galette in the freezer at this point, on the baking sheet or pan, and bake it the next day. Although I haven't tried it, I'm sure you could prepare it up to a week or so in advance: once the galette is thoroughly frozen, transfer it to a tightly sealed bag to avoid freezer burn.)

5. Bake the galette.
Preheat the oven to 180°C (360°F); if the galette was in the freezer, take it out while the oven preheats. Insert the galette in the middle of the oven and bake for 30 minutes (35 if it was frozen), until puffy and golden brown.
Place on a rack to cool completely (it will settle as it cools) and serve at room temperature. (Some people prefer it slightly warm, so they reheat it slightly in a warm oven before serving.)

The traditional pairing is with Champagne or hard cider. We had Champagne for toasting the New Year, so this cake went well with the Champagne. It would have been even better if I hadn't turned off the oven by mistake when I put the cake in. One of the joys of baking in a strange (to me) kitchen with a new and completely unknown stove! I also didn't put it on parchment paper (nor foil) and put it on a baking sheet without a rim, so the filling melted and spilt on the oven bottom, causing lots of smoke. My brother-in-law took a video of me and his daughter fanning the smoke out the window...she with a kitchen towel, me with a paper grocery sack...called it the new areobics! Once the oven was hot again, along with the smoke, the cake rose some and browned on top but it was far from the puffy, flaky pastry that I had been anticipating. I had used some of the left over filling and scraps of puff pastry to make little scrap cakes. They actually became puffy and flaky and were quite good.

Cut the galette into servings...we cut it into 9 pieces...and be sure to mention that there is a bean or other feve in one of the servings so that they will know what to expect. If your guests are unfamiliar with the tradition I think it makes it even more fun for them to look for the fève which may be hiding in their slice.

It helps if they know to look. Our winner wasn't in the room when the slices were passed around and said that if we had used a whole almond as she sometimes did when making the New Orleans version that she would have eaten it and never mentioned it...so no one would have known who to crown as king or queen! Good thing it was a kidney bean which seemed odd to her.

Whoever finds it is king/queen for the day, receives a paper crown. My older sister was our queen for the night and looked lovely in the gold paper crown I created from cardboard and wrapping paper. Hopefully I'll have photos later in January (now added). I didn't want to wait until I was home because the offical day to do this cake, the Epiphany, is in just a few days (January 6th).

Note: You can also grind your own almonds to make almond flour or meal and that's what I did. I used sliced almonds and 2 tablespoons of the sugar in a food processor and it worked well.