

The lucky denizens of the Land of St. Honore' are probably
born with the knowledge of how to bake and bake well. The rest of us have to
learn as we go along. I was lucky to have picked up a lot of baking lore from
my Mom as I grew up. I also love to read cookbooks and I read it all, not just
the recipe or three that interests me. Some stuff I've known so long that I
don't even think about it.
One of those long known things is to let your ingredients
come to room temperature before you bake. Now some recipes will tell you to
used a chilled ingredient or ice water, or to melt butter and either use it
while it is still warm or to let it cool to room temperature, but it the recipe
doesn't specify, you are usually safe to have ALL of your ingredients at room
temperature. That might require planning ahead so that you can set out the
butter or eggs, or even flour if you store yours in the fridge, well in advance
of your baking time.
You might wonder what difference it makes. Sometimes it
might not make any difference, but a good example of where it can is when you
are making something like Chocolate Fudge Pie. The filling needs to almost
emulsify in order for it to bake up as
homogeneous fudginess. If you
use, say, cold eggs, you may end up with a fudgy layer on top and another layer
that is sticky and almost clear (similar to pecan pie filling) at the bottom,
as in this photo. It might also be the result of using melted butter that is still too warm from melting.
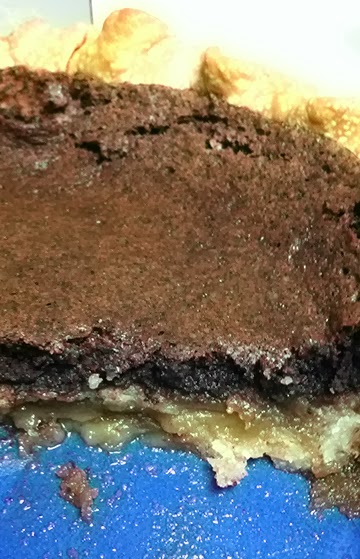
Thanks for the photo Natashya!
Room temperature eggs combine with the butter and sugar in a
different way than cold eggs. The same is true of creaming butter, a standard beginning
for everything from cookies to cakes. Room temperature butter creams
beautifully, letting air mix with the butter as it lightens. Then the sugar
gets added and the crystals cut into the fat of the butter as they are creamed
together, resulting in a lighter textured cake or cookie.

I recently made some Persimmon Nut Quick Bread using the
persimmons from our tree. This is the perfect example of a recipe where all of
the ingredients need to be at room temperature, except for the butter. It gets
melted, but then needs to cool back to almost room temperature so that, when
added to the batter, it doesn't cook the eggs.
Do try this recipe if you can get fresh persimmons. You want
the heart shaped Hachiya persimmons, the ones that have very soft fruit when ripe.
The persimmon flavor is delicate, but this is a great bread, if made with a
light touch. Not too sweet, a little persimmon flavor, a lot of nut flavor,
with a moist crumb. I made one batch with walnuts and one with pecans. I think I like the one with pecans slightly better, but they were both delicious. This recipe makes two loaves...one to eat and one to give as a gift (or freeze for later)!

Persimmon Nut Bread
from Baking in America by Greg Patent
from Baking in America by Greg Patent
6 fully ripe Hachiya persimmons (about 2 pounds)
3 cups (about 12 oz.) walnut or pecan large pieces or whole halves
3 1/4 cups all-purpose flour
2 teaspoons baking powder
1/2 teaspoon salt
4 large eggs
1 cup sugar
1 cup firmly packed light brown sugar
1 cup (2 sticks/ 1/2 pound) unsalted butter, melted and cooled
3 cups (about 12 oz.) walnut or pecan large pieces or whole halves
3 1/4 cups all-purpose flour
2 teaspoons baking powder
1/2 teaspoon salt
4 large eggs
1 cup sugar
1 cup firmly packed light brown sugar
1 cup (2 sticks/ 1/2 pound) unsalted butter, melted and cooled
Adjust oven rack to lower third of oven. Preheat oven to 375
degrees F. Butter two 8 1/2 X 4 1/2 X 2
3/4 -inch loaf pans; set aside.
Pull the leaves and stem off of the persimmons. Cut each in
half and scoop out the flesh onto a cutting board. Use a pastry blender or
small knife to cut the persimmon flesh into small pieces. Put cut up persimmon
in a large measuring cup. You should have some small pieces of persimmon mixed
with pureed pulp and you need 2 cups. Use any extra for another recipe.

Toast the nuts in a shallow baking pan until fragrant,
stirring once or twice, 6 - 8 minutes. Be careful not to burn the nuts. Set
aside to cool completely.
Sift the flour, baking powder and salt together; set aside.
Whisk the eggs in a large bowl until thoroughly combined and
slightly frothy. Add both sugars and beat in thoroughly with the whisk. Whisk
in the butter. Stir in the persimmon pulp and nuts with a rubber spatula. Add
the flour mixture and stir only until the batter is smooth. Divide batter
between the prepared pans and smooth the tops.
Bake for about 1 hour and 5 minutes, until the loaves are
well browned and a toothpick inserted into the center comes out clean. The
loaves will be quite dark, especially on the edges, but if they start to brown
too much before they are done, lay a piece of aluminum foil, shiny side up,
loosely on top during the last 30 minutes of baking.
Cool in the pans on a wire rack for 20 minutes. Run a small
sharp knife around the sides to release the loaves, and carefully unmold them.
Set them right side up on a rack to cool completely. Wrap airtight. The loaves
can be frozen for up to 2 months.


Wow thats amazing that you grow our own permissions. They are so delicious. That pie/tart looks good too.
ReplyDeleteHave a wonderful Christmas
Great advice! Next time my fudge pie will be perfect. That persimmon bread looks delish! Love and hugs, Natasha
ReplyDeleteThis is a great post. I only started paying attention to this kind of information about eggs, butter, temperature, etc and you explain it all so well.Lesson learned! And the persimmon bread looks wonderful and very seasonal! Happy Holidays to you and yours, Babe!
ReplyDelete