Friday, May 30, 2025

A Sweet Surprise in the Muffin


Most muffins are OK, but sort of boring. Fortunately there are small things that you can do to make them more interesting, like substituting some rolled oats for part of the flour, adding citrus zest to take them from stodgy to zippy, and adding mix-ins like dried or fresh fruit for additional flavor, texture and fun. An added surprise is putting in a teaspoon or so of flavored ricotta, then covering that with the batter that included fruits. It isn't until you are well into eating the muffin that you discover the lovely tangy and creamy center that goes so well with the soft muffin and sweet fruit. These are very similar to a muffin that I invented over 40 years ago when I had a muffin business in the East Bay. I only had a few café outlets and it was before retail muffins became popular. They were called MegaMuffins because I overfilled the baking cups so that the excess spread out over the pan. You had to cut them apart before serving, so you had circular muffins with sort of square tops where the pan had been, and then a mound in the middle.

This Strawberry-Lemon-Oat-Surprise Muffin recipe brings lots of flavor, plus the surprise, to a dozen muffins.  There is oat enriched batter, a secret center of sweetened lemon flavored ricotta cheese, and sweet, fresh strawberries baked into the top layer. If you like you can add a bit of crunch and more sweetness with some sanding sugar sprinkled on right before you bake them.


You don't need added butter or jam...or anything really...for these because they are delicious just as they come from the oven. Unless you are feeding a crowd, that means some for now and some for later! If you're keeping these, I recommend an airtight container and that they live in the fridge. That way the secret ricotta cheese part will stay delicious. You can wrap a muffin or two in foil the next day and warm it for 10 minutes in a 300 degree F oven and it will be almost like having a freshly baked muffin.

As with all muffins, there are a few tips to remember. Everything should be at room temperature. This helps the ingredients blend together as they should. This means setting eggs and buttermilk and cheese out before baking time to allow them to warm up. The melted butter also needs to cool off. It might be a little warmer than room temp, but it shouldn't be by very much...don't want to scramble the eggs when you add it to the egg mixture.

Another tip for this recipe is to be generous with the lemon zest. The zingy lemon flavor really helps the strawberry flavor pop. This is important because cooked strawberries are not quite as flavorful as fresh ones.

The last tip is to be fairly gentle with the batter when you are mixing the dry and wet ingredients. You want to mix it so that there aren't any clumps of dry ingredients, but only mix until just combined. This will keep your muffins nice and tender.

It might seem like a lot to have batter, cheese mixture, then the berry/batter mixture having to be put into 12 cups. I have found that if I use a 1/4 cup measure and only half fill it for the first batter layer, and also put that into all the cups quickly, then a tablespoon of the cheese mixture roughly in the center of the cut, also into all 12 cups one right after the next, then pretty much fill the 1/4 cup measure for each of the cups for the final better/berry mixture that it comes out right. Each cup should be about 3/4 filled.

You are going to love these muffins! The secret filling is also the secret to their popularity. Try it and see. If you are like Sweetie, you won't want to stop at one muffin. 


Strawberry-Lemon-Oat-Surprise Muffins
Makes 12

1 1/2 cups all-purpose flour
1 cup rolled oats (not instant)
1 teaspoon baking powder
1 teaspoon baking soda
1/2 teaspoon salt
1/4 cup granulated sugar
finely grated zest of 1 1/2 Meyer lemons (or regular lemon if Meyer unavailable), divided

2 eggs, beaten 
1/4 cup unsalted butter or margarine, melted and cooled
juice of 1 Meyer lemon, seeds removed
1 cup buttermilk

1/2 cup ricotta cheese
2 teaspoons milk or soy creamer
2 teaspoons powdered sugar

1/2 pint fresh strawberries, washed and drained, hulled and sliced
about 1 tablespoon clear sparkling or sanding sugar (optional)

Preheat the oven to 400 degrees F. Spray a 12 cup muffin pan with baking spray. Set aside.

In a bowl, sift or whisk the dry ingredients together. Add half the lemon zest and stir or whisk to distribute.

In a second bowl, whisk together the egg, cooled butter, lemon juice and  buttermilk.

Prepare the filling by stirring together the ricotta cheese, milk, powdered sugar and the remaining half the lemon zest in a small bowl until completely combined. Set aside.

Add the wet ingredient mixture all at once to the flour mixture and stir together with a fork, just until all the dry ingredients have been moistened. Don't overmix.

Scoop enough of the batter into the prepared muffin tins to cover the bottom - about 2 tablespoons. Dollop about a tablespoon of the ricotta mixture on top. Stir the sliced strawberries gently into the remaining batter, then top the ricotta mixture in the pans with the berry-rich batter, distributing evenly. Sprinkle with sanding sugar, if desired, distributing evenly.

 Bake in preheated oven for 17 - 25 minutes until tops are golden brown and the center springs back when pressed down with a clean finger. Remove from the oven and cool on a rack 3-5 minutes, then removed carefully from the muffin tin and serve.

Saturday, May 24, 2025

Small Batch Dutch Baby with Spring Fruit


Some mornings, usually on a Wednesday, Sweetie and I head to the Washoe House for breakfast. It has a long history for the West, having started life as a stage coach stop and then going through different parts of the journey, as a hotel, as a brothel, as a speakeasy, as a bar and restaurant with an small event space upstairs...the latter now describes it pretty well. It's not a white table cloth place, but it was recently purchased by a new owner and the food has improved. Whomever is in the kitchen knows what they are doing and they have a lot of great breakfast items, sandwiches and salads and burgers for lunch and the lunch items plus some dinners like a lovely plate of fish and chips or pork chops with seasonal veggies and fries. As with most restaurants, the pandemic was a challenge, but they tented over a large part of the parking lot and brought in musicians on the weekends and spaced picnic tables far enough apart to be OK, so they are OK. I like the Senior Platter on weekdays and Sweetie loves their crepes with blueberries. Sometimes, though, we want to eat at home, so I figured out a dish that is a bit like the blueberry crepes, but better.

Those crepes are first cousins to a Dutch Baby pancake, especially if you add fresh fruit, like blueberries, to the pancake when you put the batter into the oven. That's what we did last week, using a recipe for a 9-inch cast iron skillet (that's the small batch) and adorning it with both fresh blueberries and fresh strawberries. It was wonderful! There is the fragrance of butter and cooked berries, the puffy pancake when it comes out of the oven, then the tender pancake and soft, almost melty fruit. I like mine with a small amount of maple syrup drizzled over. This serves 4 if you each have a quarter as shown in the photos, but often we find room for a half each. Good thing for my waistline that we don't make these often!


German Pancakes with Blueberries and Strawberries  (smaller version)

Serves 2-3

3 tablespoons butter (or non-dairy margarine or 'butter')
3 large eggs
1/2 cup milk (or nut milk)
1/2 cup all-purpose flour
dash salt
1/2 teaspoon vanilla extract
a few drops lemon oil (optional)
1/4 cup fresh blueberries, washed and drained and picked over for stems or over-ripe berries
1/4 cup fresh strawberries, washed, hulled, and sliced
1/2 tablespoon granulated sugar (optional)

Preheat oven to 425 degrees F.

As oven preheats, put the butter in an ungreased 9 or 10-inch cast iron skillet (or a 9-inch cake pan with high sides) and place in the oven, just until the butter is melted. (Mine started to brown slightly at the edges)

Place the eggs, milk, flour, salt and vanilla, (and lemon oil, if using) in a blender and process until smooth. Scrape down the sides, if needed, and process again for a few seconds.

Pour the batter into the hot baking pan, over the melted butter. Sprinkle with the blueberries, strawberries and with the sugar (if using).

Bake, for 16-22 minutes or until edges are golden brown. Pancake will puff up, but will sink down again as it cools once removed from the oven.

Serve at once. Can sprinkle with powdered sugar, with lemon juice, or serve with maple syrup and/or more berries.

Note: you can make this without berries, too, and it will still puff up gloriously and taste wonderful.

Wednesday, May 21, 2025

It's the Season for the Garden


 Every April and May, especially, I struggle to blog about food as much as I do the rest of the year because the garden calls to me. If I'm out in the garden I'm not in the kitchen baking.

We've had a long, cool spring which has meant more time to be able to pull weeds and trim things and then, the soil finally warmed up, so I could plant the seedlings that had been waiting...and waiting...and waiting.

This year Sweetie really helped me so much getting new irrigation to the area between the house, driveway and studio. That allowed me to plant more veggies since that is one of the sunnier spots. Since we are gopher city very few things get planted in the ground. That means a lot of work filling planters and pots with potting soil before you can even do the irrigation or plant the seedlings.


In February when I was weeding an area near the iris raised bed near the barn I decided to plant some red poppy and golden California poppy seeds since I had some and that area gets sun for most of the day. Life got in the way, so I never did pull out the seedlings that I should have to allow space between plants. Same with a rectangular planter opposite heading toward the studio. Imagine my delight when they didn't seem to care and I now have bunches and bunches of scarlet poppies and lots of California poppies! Of course there are still some weeds...I never seem to get them all. Added to the charm are the nasturtium that self-seeded last fall and are now overrunning the edges of most of our sidewalks.


The roses and iris have also been a delight and some sweet pea plants that I bought at a nursery in February are blooming, too.

Here are some photos of the different areas of the garden, all taken about a week ago in mid-May. Don't worry, I'll get back to posting cooking and baking adventures soon!

                                                    roses and iris


new veggie area


this photo and the one below are near the front steps


This photo shows the Just Joey rose and one of the irises near the barn

Saturday, May 17, 2025

A Perfect Time for Scones


I love scones year 'round, but spring is really a perfect time to have some baked and ready to serve with berries. For Mother's Day we had some for dinner dessert as a shortcake, with local strawberries and Strauss Dairy (also local) whipped cream...heavenly! We ate it up quickly - no photos.

To go with tea in the afternoon, it doesn't get much better than a warm scone with some home made lemon curd (recipe HERE) and some more of those delicious, juicy strawberries as shown in the photos.


Scones are easy to make as long as you remember that the less handling the better, especially once the butter in blended into the flour mix. I tend to make a well, add the liquid, then stir gently with a fork. Once you turn it all out onto a lightly floured board or work surface, you'll be able to see if you need a bit more buttermilk once you've gently pushed the dough together. I just pour a few dribbles of buttermilk over the places that seem to have a lot of undampened flour bits. Gently knead there just to dampen those bits and push them into the dough mass. Knead, again gently, only two or three turns and you should have a cohesive dough to divide and shape into two rough circles.

The only other tip is to watch them carefully and to remove them from the oven once they are just golden brown. That way you will have moist and tender scones, full of buttery flavor and ready to pair with any spring fruit you desire...or just some fruit curd or jam.


Simple Scones

Heat oven to 425 degrees F. Grease two cookie sheets.

½ cup sugar
1 tablespoon grated lemon peel
3 cups all-purpose flour
2 ½ teaspoons baking powder
1 teaspoon salt
½ teaspoon baking soda
¾ cup unsalted butter, at room temperature (no substitutions)
1 cup buttermilk


Glaze: 2 tablespoons heavy cream
2 tablespoons sugar (I used white sanding sugar)

In a small bowl use your fingers to rub together the sugar and lemon peel until fragrant.
Combine flour, lemon-sugar, baking powder, salt, and baking soda in a large bowl. With pastry blender or two knives, cut in butter until mixture resembles coarse crumbs. Pour buttermilk over crumb mixture. Stir together with fork just until mixture comes together. Gather dough gently into a ball; knead 4 or 5 times. Cut dough in half and transfer pieces to prepared cookie sheets. Shape each piece into two 6 inch x 1/4 inch thick circles, 2 inches apart. Using floured knife, cut each circle into 8 wedges.

For glaze, brush tops with cream and sprinkle with sanding sugar.

Bake 20 – 25 minutes until toothpick inserted in the center comes out clean. Serve warm or at room temperature.

Makes 16 scones.

If you are going to freeze these to re-heat later, bake them just short of golden brown and re-heat, thawed, for 5 minutes at 425 degrees F.


Friday, May 09, 2025

Cookies for Breakfast


 The little kid that still lives inside me became very excited when I saw this recipe on Dorie Greenspan's Substack newsletter. Cookies for breakfast just sounds like fun. These are full of all kinds of good-for-you things, but they are still delicious. Sweetie loves them because they are moist and chewy in the middle, not dry or crisp, although the outer edges are crisp enough for me to enjoy them.

As I usually do I made a few changes, mostly because I had millet flour but not millet and I also had flaxseed flour but not the whole flaxseeds. Because the millet is part of the topping and meant to be crunchy, I substituted some white sesame seeds for the topping part, then used the flour in the part that became the dough. The flaxseed flour became part of the dough, too. Below is a photo of an unbaked cookie. You can't really see the sesame seeds but they are there, along with the sunflower and pumpkin seeds, the dry unsweetened coconut, and a piece of dry fruit, probably a dried cherry.


The flavors are reminiscent of a granola that includes banana. When I make them next time I'm going to try substituting unsweetened apple sauce for the banana and maybe up the cinnamon a bit to see how that goes. It's not that I don't like banana, but I find it fun to see how things change with different ingredients. For part of the batch I also added some small M&Ms for the times when these would be afternoon tea cookies and so could use a bit of chocolate. Obviously you can change these up to suit your preferences...prefer dried apricots to dried cherries? Chop up the apricots and swap them out for some or all of the cherries. Like golden raisins better than dried cranberries? Same deal. For any of the dried fruit, just remember to refresh them if they are dry by soaking them for a few minutes in boiling water, then drain and towel dry. 

If you use a 1/4 cup measure to dollop out the dough, each cookie should probably be all you need for breakfast. I decided to freeze the extras so that I can have a cookie for breakfast whenever the spirit moves.


Nutty Seedy Breakfast Cookies, adapted from Pastry Love by Joanne Chang

3/4 cup (90 gr) walnuts, roughly chopped
1 cup (2 sticks) butter at room temperature
1/2 cup (170 gr) maple syrup
1 teaspoon vanilla
3 large eggs at room temperature
1 ripe banana, thoroughly mashed (about 1/3 cup, 100 gr)
3/4 cup (100 gr) raw unsalted pepitas (pumpkin seeds)
3/4 cup (40 gr) unsweetened flake coconut
1/2 cup (45 gr) raw shelled sunflower seeds
1/2 cup (45 gr) flaxseeds (I used 1/2 cup flaxseed flour in the dough mixture)
1/4 cup (50 gr) millet (I used 1 tablespoon raw sesame seeds in the seed mixture for the top and 2 tablespoons millet flour in the dough mixture instead)
1 1/2 cups (150 gr) rolled oats
1 cup (120 gr) dried cranberries
2/3 cup (100 gr) whole wheat flour
1/2 cup (100 gr) dried cherries
1 teaspoon baking soda
1 teaspoon salt
1/2 teaspoon cinnamon
1/4 teaspoon freshly grated nutmeg

Preheat the oven to 350 degrees F. Toast the walnuts on a baking sheet for 6-8  minutes in the preheated oven until light golden brown and fragrant. Set aside to cool and turn off the oven.

Melt the butter in a medium bowl. Whisk in the maple syrup and vanilla until well combined. Whisk in the eggs and the banana until totally homogeneous. Set aside.

In a large bowl stir together the pepitas, coconut, sunflower seeds, and sesame seeds (or millet and flaxseeds). Remove 1/2 cup (50 g) and set aside.

To the large bowl with the most seeds add the toasted walnuts, oats, dried cranberries, whole wheat flour, dried cherries, baking soda, salt, cinnamon and nutmeg. Stir well to combine.

Make a well in the center of the seed and flour mixture. Stir the egg mixture to make sure it is fully combined, then pour into the seed and flour mixture. Stir well to combine. It will be a soft batter, not stiff like cookie dough.

Cover and refrigerate for at least 30 minutes up to overnight. The flours and seeds will soak up some of the liquid and the batter will be stiffer after refrigeration.

When ready to bake, preheat the oven to 350 degrees F and remove the batter from the fridge. Line a baking sheet with parchment. Wet your hands and scoop 1/4 cup of cough from the bowl. Roll dough in your wet hands into a rough but tight ball, dip the top of the ball into the reserved seed mixture (I used a pie pan to hold the seed mixture to make the dipping easy), and plop it seed side up on the prepared sheet. Repeat with the remaining dough, placing balls about 2 inches apart on the sheet.

Press each cookie ball down with the palm of your hand to make them flat. See the second photo down to see how they should look. These make fairly large cookies...but you only need one.

Bake in the preheated oven for 20-22 minutes until golden brown at the edges and firm when pressed in the middle. Cool 1 minute on the sheet, then transfer to a rack to cool.

Using a cool baking sheet, repeat with the remaining dough.

Can be stored for 2 days in an airtight container.


Friday, May 02, 2025

Puff Pastry Tops a Chicken Pot Pie


There's a restaurant in Graton...the Willow Wood Market...that makes a delicious chicken pot pie with a pie top that I think is puff pastry. I've been known to make a delicious chicken pot pie myself, but I usually top it with a pie dough crust. A few nights ago I decided to try the puff pastry topper.

First I made the chicken filling part. Since I had already grilled chicken thighs, it was just a matter of chopping a few veggies like onions, celery, garlic, and mushrooms, and sautĂ©ing them to get things started. If you can make a white sauce from scratch then you'll have no trouble with that part. A key thing to remember is to add all the liquid at once and then stir like mad. The stirring allows the liquid to combine with the partly cooked flour/oil bits so that it all can turn into a thickened, silky sauce. When you first add the liquid it looks like lumps in a thin liquid, but keep stirring...a lot!...and you, too, will end up with a nice sauce to hold your bite-sized chicken pieces and the rest of the veggies. Don't forget to season the sauce and taste to make sure you have enough salt and pepper. I even added a bit more thyme to mine since it didn't seem to have enough herby flavor. 

The rest of the filling ingredients is up to you. I like the combination of cooked Yukon potato chunks, frozen mixed veggies, and some roasted red pepper (and extra frozen green peas!), but you could also use fresh or frozen green beans, asparagus cut into bite sized pieces, blanched broccoli florets, or even sautéed greens. Just keep the proportions similar. Rice could be substituted for the potatoes, too, or you could use boiled chunks of red potatoes or Idaho potatoes. See what you have on hand, then go with it to make this your own!

So we're down to the topper. Already made pie dough from the refrigerator section of the market is the easiest. You can make your own puff pastry or rough puff, but I found frozen puff pastry to be just fine for other projects, so decided to try that.

It was defrosted so I could unfold it, but I didn't roll it out any. I cut out a circle that would fit just inside of the baking dish. If I were to do it again, I would bake it until puffed on a baking sheet, then transfer to the baking dish with the chicken mixture to finish browning (as shown in the directions below!). The reason is that I put the raw puff pastry right on top of the hot chicken filling in the baking dish and returned it to the oven right away. The temperature was 425 degrees F and it should have puffed up fairly quickly. Instead I think that the filling kept it from puffing very far by making the bottom of the pastry too wet. It was still browned and lovely, but not as airy, nor crisp, as I would like. This is one reason why baking continues to fascinate me...I keep learning. The instructions below are how I should have done it!


Chicken Pot Pie with Puff Pastry Topper

1-2 yellow Finn potatoes, washed and cubed
3/4 cups chicken broth
1/2 yellow onion, chopped
2 stalks celery, sliced
2oz. cremini mushrooms, sliced
1/2 teaspoon, or to taste, minced garlic
2 tablespoons butter
2 tablespoons olive oil
1/3 cup flour
1/4 teaspoon poultry seasoning
1/4 teaspoon dried thyme
salt and pepper
about another 1 1/2 cups chicken broth
1/2 cup milk I used evaporated milk, undiluted)
2  - 2 1/2 cups cooked, cubed chicken (I used grilled skinless thighs)
1 cup frozen peas
2 cups frozen mixed vegetables
2 tablespoons roasted red pepper, cut into small pieces
1 sheet (half package) frozen puff pastry, thawed
1 egg, beaten with 1 teaspoon water

In a medium pot with a lid, add the chicken broth to the cubed potatoes. Place over high heat, bring to a boil, reduce to a simmer and cover. Continue to simmer for about 20 minutes, until potatoes are tender when pierced with the point of a sharp knife.

Meanwhile,  prepare the onion, celery, carrots and mushrooms. When potatoes are cooked, drain them, reserving the cooking liquid for another use.

Preheat the oven to 425 degrees F.

Melt the butter in the pot the potatoes were cooked in. Add the onion, celery, mushrooms and garlic. Over medium heat, cook, stirring often, for 5-8 minutes or until onion is translucent. Be careful to not have the garlic burn. If this has been an issue for you in the past, add the garlic after the first 4-5 minutes.

Add the flour, poultry seasoning, dried thyme and salt and pepper to taste to the sautéed veggies. Stir for 1 minute to allow the flour to cook a bit.

In a large measuring cup, add chicken broth to the 1 3/4 cups mark (OK to use the potato cooking broth as part of this, or to just use fresh broth). Add the milk. Over medium heat, stir this mixture, all at once, into the veggie/flour mixture and continue stirring over medium heat until the mixture thickens slightly. It's OK if mixture bubbles a bit once it has thickened.

Add the cubed chicken and stir to combine.

In a microwave safe container, cook the peas and mixed vegetables for 1-2 minutes to warm. Add warmed peas and mixed vegetables to the pot with the chicken and sautéed veggies. Add the cooked and drained potatoes and the roasted red pepper pieces. Stir to combine everything, then spoon mixture into a greased 9" x 13" casserole or 9" round deep baking dish.

Cut the sheet of puff pastry into 9 rectangles, or one 9-inch circle if using round baking dish. Place pieces on a parchment lined baking sheet. Leave at least an inch between them (if using squares). Use a small pastry brush to paint the top of the puff pastry with the egg wash, being careful not to have the egg run down the sides. If using the 9-inch round, cut a 1-2-inch slash in the top in 4 places with a sharp knife to let steam escape.

Bake puff pastry in preheated oven. When pastry has puffed but is not yet brown, put the casserole into the oven to heat (put it on a lower shelf if you can).

When puff pastry rectangles are puffed and golden brown, remove them from the oven. Remove the casserole from the oven. Place the rectangles on top of the casserole mixture. Serve at once.

Makes 4-6 servings.

Tuesday, April 22, 2025

Pesto in a Quiche


I love making quiche for dinner and Sweetie loves eating it. The great thing about quiche is that you can put lots of different things in it and so it's a creative kind of pie.

This time I had some grilled chicken leftovers to use up, plus a few spears of fresh asparagus. I decided to do a flavor combination that has worked well for me in the past for a sandwich...chicken and pesto with roasted red pepper and Swiss cheese. I put all of those things in, plus some caramelized onion, the asparagus, and a couple large bella mushrooms, sliced. It was delicious, so I want to share with you! 

Pesto Quiche with Grilled Chicken and Roasted Red Pepper Serves 4 - 6

1 9-inch pie shell, blind baked at 425 degrees F for 10-12 minutes (use favorite pie dough recipe or pre-made)
1/3 cup caramelized yellow onion
1 cup Swiss cheese, cut into ¼ inch dice
1 cup grilled chicken thighs, cut into 1-inch cubes
4 stalks fresh asparagus, ends snapped off, spears cut into 1-inch pieces
2 large mushrooms, sliced

3 eggs (or equivalent egg substitute)
1 ½ cups evaporated milk  or light cream
1/3 cup prepared pesto
¼ teaspoon salt
dash pepper
5 or 6 strips prepared roasted red peppers
2 tablespoons pine nuts

Blind bake the pie shell in a preheated 400 degree oven, then set aside to cool.

Reduce heat setting on oven to 350 degrees F.

Caramelize the onion with a light coating of olive oil in a small crock pot or in a skillet and let cool .

Sprinkle the bottom of the pie shell with the onions and half the Swiss cheese, distributing evenly. Top with the chicken and the asparagus, then the rest of the Swiss cheese. Place mushroom slices around the outer edges of the quiche fillings. Set crust with fillings aside.

In a bowl, beat the eggs lightly with the pesto, then add the milk and beat with a fork to combine, add the salt and pepper and beat with a fork or whisk to combine.

Pour the egg/milk mixture over the ingredients in the pie shell.  There may be too much milk mixture if pie pan is shallow - don't overfill, to avoid filling running over.  Add the red pepper strips in a nice pattern on the top. Sprinkle with the pine nuts.

Put the quiche on a baking sheet. Place in the preheated oven and bake 30-45 minutes, or until set and lightly browned. (I find that setting on a parchment-lined small baking sheet is a good idea in case some of the filling spills over.) Cool for 10 minutes before cutting to serve.

Monday, April 21, 2025

Mocha


Our weekend included a lovely brunch on Sunday with long time friends and, in the afternoon, tea and a game of Rubicubes with an artist friend of mine. I've been wanting to bake so the tea gave me a good excuse to bake a mocha loaf cake. I'm afraid that I over baked it just a tiny bit, so it wasn't as moist as I would like, but otherwise it was delicious, a perfect example of a nice pound cake.

The recipe is based on one I baked a while ago, a chocolate and coffee marble cake, but this time I skipped the marble part and went for mocha. The espresso powder went into the flour mixture, but, this time, I also changed out the chocolate chips for cocoa powder. The cocoa powder also went into the flour mixture. I also added the vanilla to the milk which made it really easy to mix; butter beaten, butter and sugar beaten, eggs added one at a time and beaten after each, then three parts of the flour mixture divide by two of the milk mixture.

Do watch that you don't burn the top (which can be tented with foil if needed) and check it earlier than the recipe calls for so that you don't over-bake as I did. With care you will end up with a moist, tender, fine crumbed delicious mocha loaf cake, too...tea and a game are optional, but nice. 


Mocha Cake
base on Double Chocolate Marble Cake in Dorie Greenspan's  Baking Chez Moi
Makes one loaf cake

2 cups (272 grams) all-purpose flour
1 1/4 teaspoons baking powder
3/4 teaspoon salt
1 tablespoon espresso powder
6 tablespoons cocoa powder (dark if possible)
1 1/2 sticks (12 tablespoons, 6 oz. 170 grams) unsalted butter, at room temperature 
1 cup (200 grams) sugar
4 large eggs, at room temperature
1 1/2 teaspoons vanilla
1/2 cup (120 ml) milk, at room temperature (I used soy creamer)

Center a rack in the oven and preheat the oven to 325 degrees F. Stack two baking sheets or use an insulated baking sheet and on it place a 9x5-inch loaf pan that has been buttered and floured, with excess flour tapped out of it.

Whisk the flour, baking powder, salt and espresso powder in a medium bowl. Whisk in the cocoa powder. Set aside.

In a stand mixer bowl beat the butter on medium speed for 3 minutes, using the paddle attachment, or use a large bowl and a hand mixer to do the same thing. Add the sugar and beat for another 2-3 minutes. Scrape bowl and beater(s), then add the eggs, one at a time, and beat for 1 minute after each addition. Don't worry if the batter curdles.

 Make sure that the milk is at room temperature. Put into a small bowl and mix in the vanilla. Reduce mixer speed to low. Scrape bowl and beater(s). Again on low speed, add the flour mixture in three additions and the milk mixture in two additions, starting and ending with the flour mixture. Mix only until each addition is incorporated. Avoid over-mixing. Scrape batter into the prepared pan and use a spatula to spread evenly.

Bake the cake for 70-80 minutes, or until a tester inserted in the center comes out clean. do not overbake. Top may be cracked...that's OK. At about half way, check the cake and tent with foil if the top seems to be browning too quickly.

Cool the cake on a cooling rack for 10 minutes, then unmold it, then turn it right side up on the rack and cool to room temperature. Store at room temperature, wrapped well, for up to 4 days. Freeze for longer storage.


Saturday, April 19, 2025

Spring


If you've been a reader here for long, you know that my favorite season is Fall, but Spring is right behind it. We are having such a lovely spring, full of days with sun, days with rain and everything in between.


Because it's been cooler than average, the seedlings are still in the sunspace waiting for the soil to warm up a bit for planting time. They are getting bigger and the squash are, in a misguided abundance of hope, flowering already. I do hope to get them planted out soon. The irrigation system and lots of pots are almost ready, too. Our gopher and weasel populations make it impossible to plant them out directly in the soil.


Flowers have been great this year. The bulbs have produced beautiful daffodils (see photo at top of post), tulips and even a couple of hyacinths. The lilacs are at their peak right now. Some of the roses, like bright red Altissimo,

have bloomed and more are just starting. 

The calla lilies have been blooming for a few weeks.


Yesterday I saw the first poppy bloom, but there are a bunch of those almost ready. I planted a seed mix in the winter that included poppies and it looks like they did well, so sometime soon I'll post photos of those. Today the first iris of the season bloomed and it's just gorgeous!


We had rain when the plums bloomed, so there won't be many of those stone fruits this year to eat. Had some rain during the time of the early apple blossoms, but the largest and youngest tree is blooming now and the weather is fine, so fingers crossed that we get lots of Red Gravenstein apples. Hard to tell with the pears, quince and persimmons because there was some rain but not much during their bloom. We'll see.

The olallieberries are just starting to bloom down by the road. They bloom and produce fruit a few weeks before the regular blackberries, so I always get a thrill when I see their lovely white flowers decorating the shrubs.

I wish I could say that I've been getting eggs from neighbors, but here are some like I got a few weeks ago.


For those who celebrate it, Happy Easter!  Happy Passover!  Happy Earth Day (in a few days)!


XO Elle  

Tuesday, April 08, 2025

Rice and Spinach Pie


This dish is very similar to the Moosewood Cookbook's casserole recipe that has similar ingredients, but turning it into a pie creates a different delight. For one thing, the rice crust turns crispy on the side near the pan but is soft and delicious, too, where it meets the spinach filling. Because there are eggs in both the rice crust and the filling, it all slices well and holds together for serving. It is fine as the main dish, but we had some salmon that we'd bought the day before, so Sweetie grilled that and I made the pie.


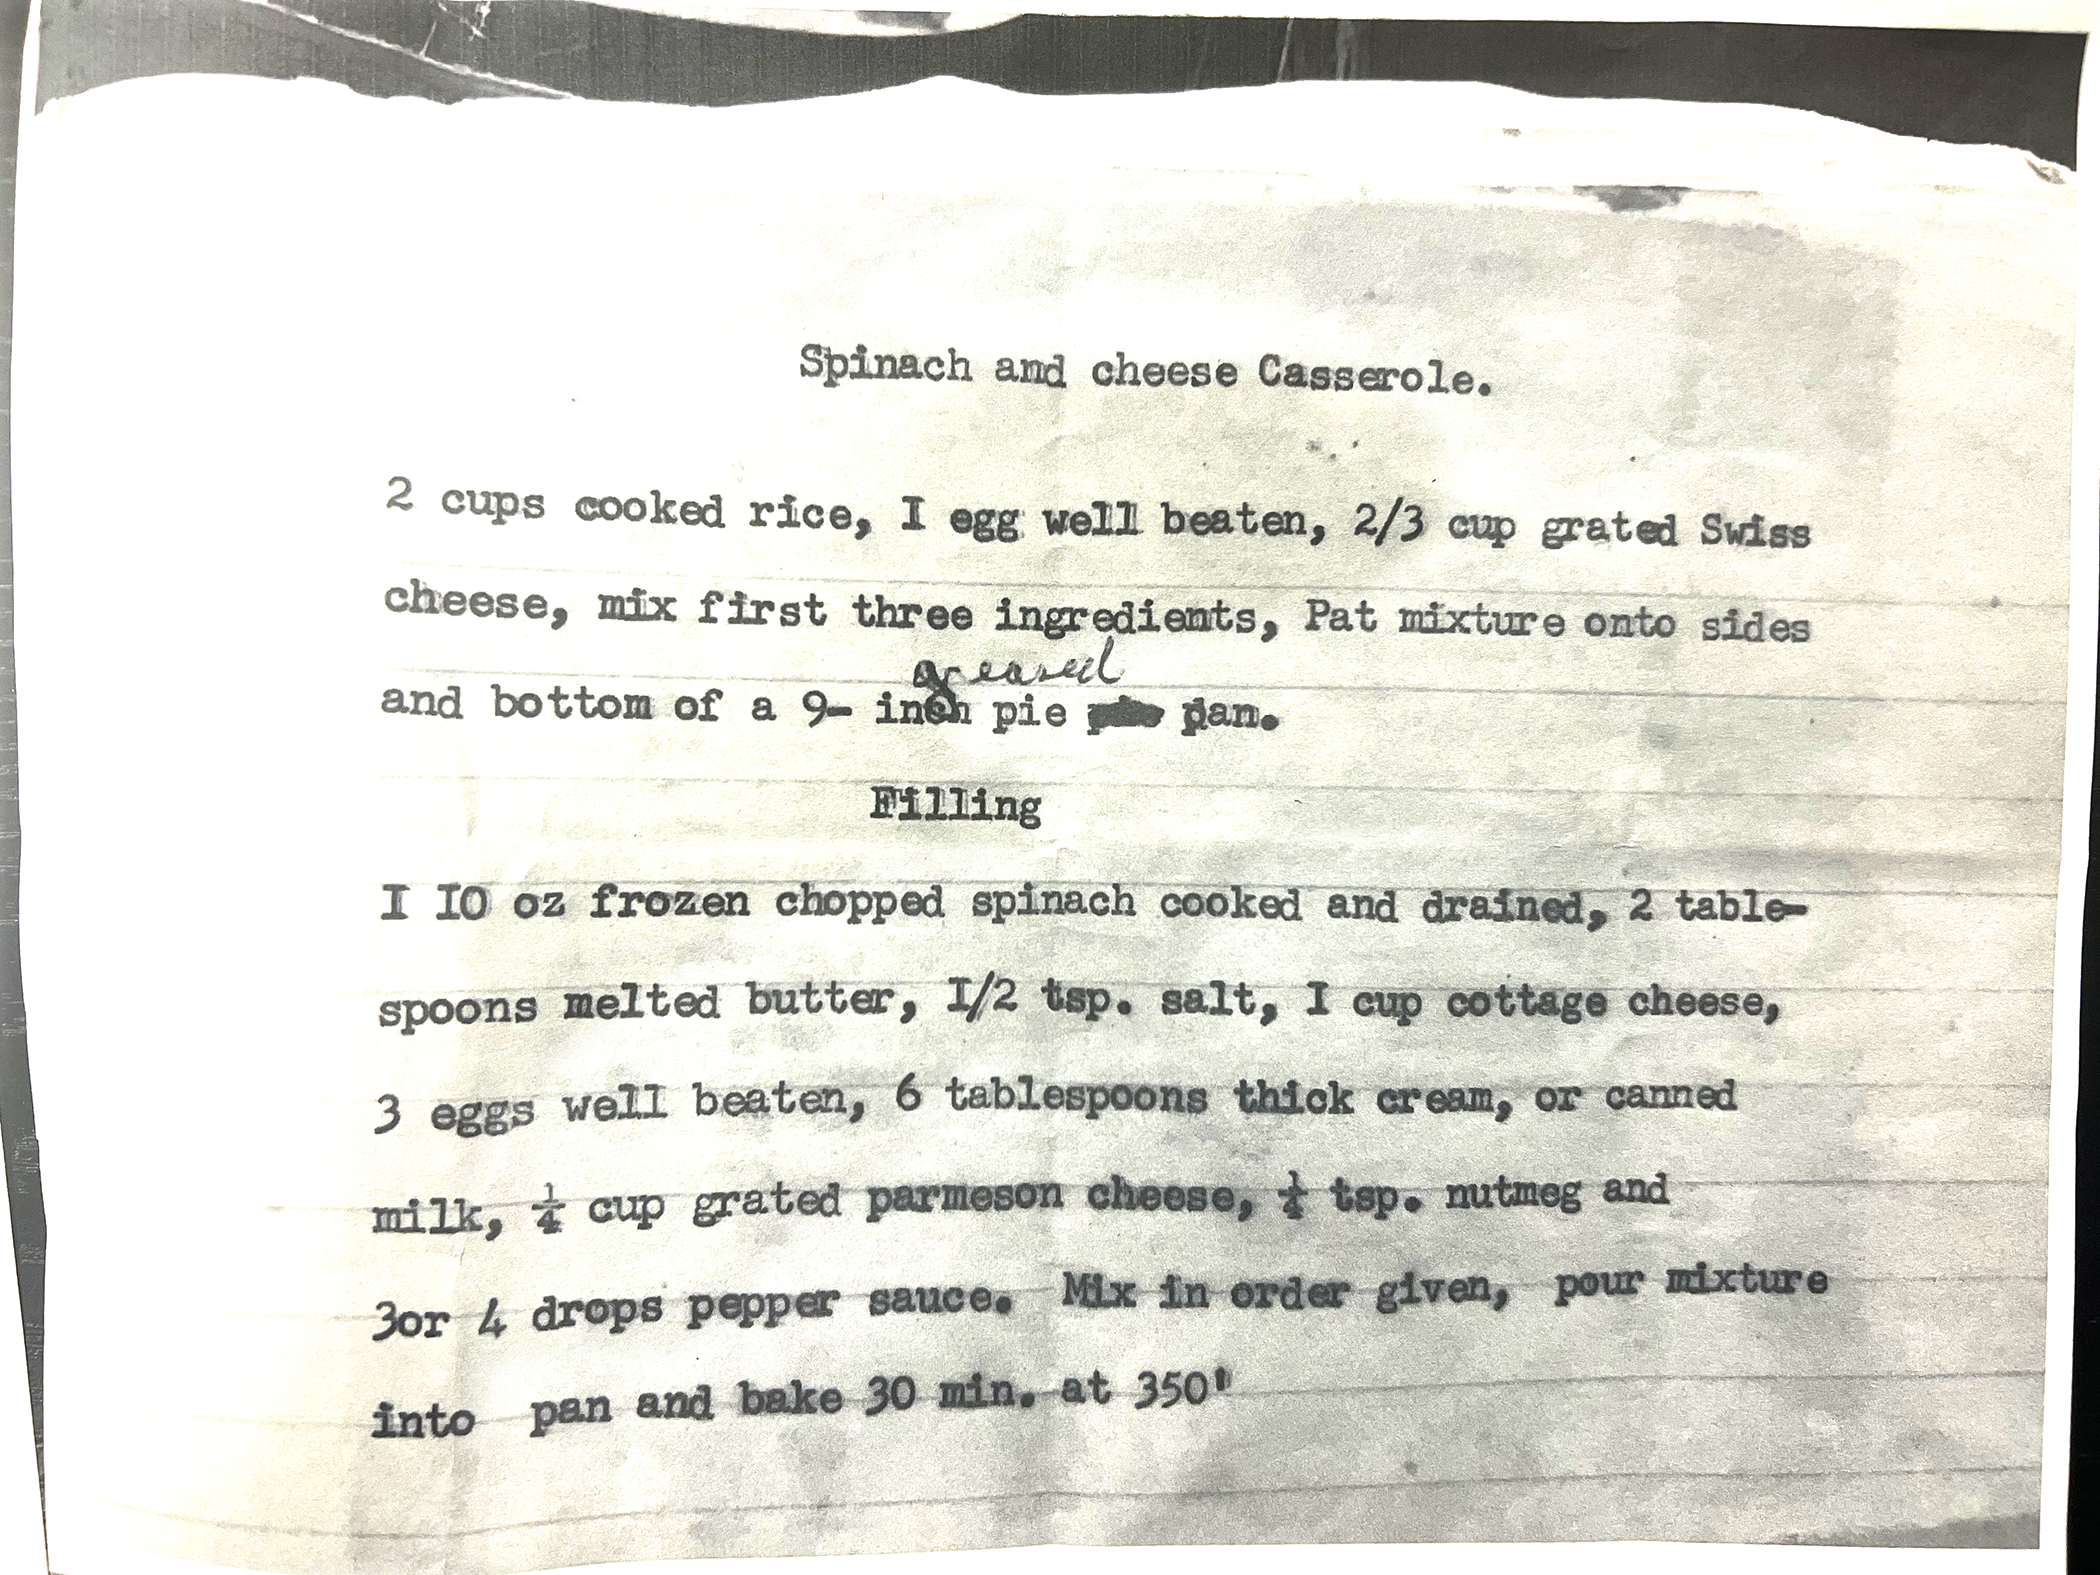
I was gifted this recipe from an old friend, Ginny, who is also my hairdresser. Her Granny Anne was an excellent cook and this was one of the family favorites...and one of the ones where the amounts were written out at some point. Like many cooks of her generation, Granny Anne was a skilled cook who often just threw things together, not measuring and not writing down a recipe. Ginny learned to cook from Granny Anne...her own mother was apparently a terrible cook! 

Granny Anne learned to cook in her late teens from a doctor's wife. It was the time of the Dust Bowl in the mid-West and Granny Anne's family were farmers in South Dakota. They lost their farm and, like many others, moved to California. Anne's father found her employment with a doctor's family. She was a hard worker, but her work up until then had been twelve hour days working the fields, not cooking. That's what she told the doctor's wife, who then asked her if she could read and write. Anne said she could, so the doctor's wife assured her that she could learn to cook...and then proceeded to teach her how! Anne became a fantastic cook and used to cook her extended family huge meals which included jellied salads, green salad, home made dressings, asparagus with hollandaise, broccoli with brown butter, freshly made Parker House rolls, plus a wonderful roast or a dish like this and also grilled chicken. And that's before serving dessert like a wonderful mocha pie. Ginny kept all her recipe books once she had passed and I hope to bring you more of Granny Anne's culinary delights in the future.

Some of the best recipes work by throwing things together...and it's sometimes impossible to go back and figure out all the measurements, ingredients, techniques and so on to recreate the most delectable ones. Glad that this one was a written down recipe, even if I wrote it up with more detail...but posted the original so that you can see how it was written by Granny Anne. Sweetie really, really enjoyed it! 

When I realized that I had better get going if this was going to be ready by dinner time, I also discovered that I didn't have time to cook the rice unless we were going to eat an hour late. Fortunately I had microwavable packets of already cooked rice...one of brown rice and one of long grain and wild rice. I heated both packets up, then mixed them together for the rice crust. I know that plain rice would have been fine, but I do think that the added flavor of the brown and wild rices just makes this even more wonderful. I couldn't find a chunk of Swiss cheese at the store, so I bought slices, then cut them thinly and cross cut them for the rice mixture. I had some left over, so I did the same thing and used that to top the spinach mixture before baking. The photo below shows the baked rice and spinach pie.


Granny Anne's Rice and Spinach Pie
8 servings

2 cups cook rice
2/3 cup shredded Swiss cheese
1 egg, well beaten
10 package frozen spinach, thawed and drained of all excess liquid
2 tablespoons butter, melted
1/2 teaspoon salt
1 cup cottage cheese
3 eggs, well beaten
6 tablespoons thick cream or evaporated milk  (I used soy creamer)
1/4 cup grated parmesan
1/4 teaspoon nutmeg (freshly ground if you can)
a few drops hot sauce or 1/8 teaspoon ground cayenne pepper


Grease a 9-inch deep (at least 2 inches) pie pan. Set aside.


In a medium bowl, mix together the rice, cheese and egg. Place in the greased pie pan and use a flexible spatula (or clean hands) to spread the rice over the bottom and up the sides of the pan. Set aside.


In a medium bowl combine the spinach, melted butter and salt. Then stir in the cottage cheese. Add the 3 eggs and combine with the spinach mixture. Add the creamer or milk and stir to combine well, then do the same with the parmesan cheese. Add the nutmeg and hot sauce or cayenne and stir to combine.

Pour the spinach mixture into the pie pan over the rice mixture. Use a spatula to smooth the mixture into an even layer, leaving the rice at the top of the pie pan edges exposed.


Bake in a preheated 350 degree F. oven for 30-40 minutes, or until the crust is browned and the filling is cooked through.

Cool 5 minutes, then cut into wedges and serve.

Below is the recipe as written by Granny Anne


Tuesday, April 01, 2025

It's NOT An April Fools Day Joke


Sweetie is so proud of my blogging that he has been telling people for a few months that I've had over 2 million pageviews. While that is flattering, it hasn't been true...but today it is. I checked just before I wrote this post and the analytics/stats showed 2 million and 91 pageviews!

It's pretty amazing that people are still looking at blogs given the huge number of other social media choices that they have. Blogs are now sort of old fashioned, but I'm very flattered that you readers are still turning to Feeding My Enthusiasms for great recipes, especially for bread and baking, and some fun fairy tales about baking plus a bit here and there about my life, kitchen implements, and my garden.

Please keep coming because it encourages me to continue writing, photographing and putting it all together for you. If you haven't used the Index, you're missing out on a great 'recipe box' because I have over 1,000 recipes. Don't know how to access the Index? Be sure you are in web view (which you can find on you phone by scrolling down to the last post and clicking on Web View), then look on the right side of the blog and you'll find the link just below the Welcome paragraphs where it says Recipe Link. Just click the photo. No photo? Try clicking in the middle where the photo should be. If you have trouble, you can always email me at plachman 'at'sonic'dot'net.

Thanks for being a reader of Feeding My Enthusiasms! Try a new recipe...be creative in the kitchen...have fun and be kind to yourself.


XO, Elle