Showing posts with label caramel. Show all posts

Monday, October 01, 2018

Fall Skillet Apple Spiced Caramel Pie


My favorite season has come...Fall!...and I have finally been home long enough to bake with some Gravenstein apples from our trees. I saw this recipe online a while ago and saved it until I had time and reason to make an apple pie...and then I changed it significantly (so what else is new?).

Sweetie has been losing weight on purpose for the last couple of months and I've been cooperating by baking far, far less than usual. It's been good for us both (I'm lighter too...funny how it works that way) but I miss the creativity of baking. This one required a lot of creativity, plus knowledge of the ingredients, but the resulting pie was fabulous! If at all possible, use a cast iron skillet to make this. A pie pan will work, I suppose, but the cast iron gives you a lovely bottom crust.


Last night we celebrated the birthday of a good friend so I had an excellent excuse to bake and to bake this amazing apple pie. I highly recommend that you bake it. Sweetie is not a big fan of apple pie, but he really liked this one.

One of the major changes to the recipe came about because Gravenstein apples, the kind we grow, tend to bake up very soft and they throw off plenty of juice, too. I also added some pie spice because an apple pie without spice just seems wrong. It doesn't fight with the vanilla and bourbon, but enhances each.

If you are using Gravenstein apples, you need to do the microwave part because with heat they shrink and also give off a lot of juice. If you skip it you will likely get a top crust that is high over a void before you get to the apple filling and the bottom crust will likely be soft and swimming in juices as you cut the pieces.

If you are using apples like MacIntosh, Braeburn, Granny Smith, etc., that keep their shape and don't exude lots of juice, just skip the microwave part and only use 1/3 cup of the caramel sauce to mix in with the apples...keep the rest to serve with the pie. The sauce is lovely all by itself and would be great over ice cream or fruit and pound cake.


The resulting pie when made with Gravenstein apples is fairly dense, not high, just sweet enough and there is a lovely, flaky crust that is browned on the bottom because of the cast iron skillet. The aroma of apples and spice is intoxicating and the flavor of apple is enhanced by the caramel sauce. You will likely have trouble eating only one piece...but that leaves some for breakfast!


Skillet Caramel Spice Apple Pie
a variation of a recipe on myrecipes.com
Serves 8

1 cup light brown sugar
1/2 cup non-dairy margarine (or butter)
3 tablespoons non-dairy creamer (I use Original Silk Soy Creamer) or 1/2 & 1/2
1 teaspoon Kosher salt
1/4 teaspoon Penzey's Pie Spice, or cinnamon
1 teaspoon vanilla
1 tablespoon bourbon (optional)
1 set of prepared pie crusts (I uses Pillsbury ReadyCrusts)
3 pounds apples, peeled and cut into 1/2" thick slices
4 1/2 tablespoons cornstarch, divided (only 2 1/2 needed if not doing microwave part)
1 lg egg yolk, lightly beaten (reserve egg white for sealing crusts)
1 tablespoon water
1 teaspoon sanding sugar (optional)

In a medium pot melt the margarine or butter. Stir in the brown sugar, , soy creamer or 1/2 & 1/2,  salt and pie spice or cinnamon. Over medium-high, cook the mixture, stirring until it bubbles. Continue cooking, stirring for 2 more minutes until mixture begins to thicken. Remove from the heat. Stir in the vanilla and, if using, the bourbon. Cool almost to room temperature, about 30 minutes, stirring at about 10 minutes to keep a skin from forming.

Fit one pie crust in the bottom and press up the sides of a 9" cast iron skillet. Put in the refrigerator to chill.

Preheat the oven to 425 degrees, making sure that one rack is in the bottom position in the oven.

Toss apples with 2 1/2 tablespoons cornstarch in a large bowl. Pour 1/3 cup cooled caramel sauce over the apples and toss to coat.

Microwave part: Put the apple slices that have been coated with cornstarch and 1/3 cup caramel sauce and microwave on full power for one minute, with bowl covered with a large piece of waxed paper or parchment paper. Stir then microwave again for one minute. Apples will have reduced in volume and there will be a lot of juice. Remove any cover and place bowl in refrigerator. Stir every 15 minutes and keep refrigerated until apples are cool to the touch. Remove from the fridge and use a ladle to remove 1/4 cup of the juices from the bowl. Add an additional 2 tablespoons cornstarch to the juices and stir or whisk until the cornstarch and juices are totally combined. Stir that mixture back into the apples. Stir in the rest of the caramel sauce and stir until apples are coated. Now you are ready to put the filling into the prepared pie-crusted skillet.

Note: If you are using apples that hold their shape and don't release a lot of juice when cooked, skip the microwave part. You will still toss prepared apples with the 2 1/2 tablespoons cornstarch and the 1/3 cup caramel sauce until coated, but the remaining sauce will be available to drizzle over the finished, served, pie. The additional cornstarch won't be needed.

Remove prepared crust from the fridge. Pour apple filling into prepared crust. Place remaining pie crust over apple filling. Seal by lightly coating the exposed side dough in the skillet with egg white and pressing the top crust to it. Crimp crust edges together.

Use a sharp knife to cut 6 - 8 one inch slits in top crust to let steam escape. Whisk together egg yolk and water and brush over crust. If desired, scatter sanding sugar over.

Bake on bottom rack of preheated over for 55 minute - 1 hour. After about 30 minutes, shield crust with foil if needed to prevent excessive browning.

Bake until crust is golden, apples tender, and filling bubbly. Transfer to wire rack and cool completely 3 hours. Serve & enjoy.


Friday, August 20, 2010

Seasonal Fruit in a Microwave Pud

A true sweet tooth like me will always find a reason to bake something sweet and if it is sticky too, all to the good. A friend brought me some small but ripe plums, both red and yellow flesh varieties. I also have some newly harvested Gravenstein apples. Since the plums were so ripe I had to find a way to use the, right?

Call in my Bread Baking Babe friends Lien and Lynn...well their blogs anyway. I remembered a delightful microwave pudding that I found at Lien's blog, Notitie van Lien which called for raisins and golden syrup.

I love golden syrup, but apparently I've been loving it too much because there was only about a tablespoon in the jar and this recipe calls for 4 tablespoons. Fortunately I also recently visited Lynn's blog Cookie Baker Lynn and followed her links to recipes with caramel and discovered that she uses caramel ice cream topping to top bar cookies before they are baked. Seemed that I could use the jar of caramel ice cream topping in the pantry to replace the golden syrup. After all apples and caramel are a natural combo. Thank you Lien and Lynn!

Now that I'd changed both the fruit and topping it was only fair to add some nutmeg to the pud batter and to suggest less orange zest...or that lemon zest would also be OK. A touch of extra salt was added to tone down the caramel. OK, ready to bake!

This went together fairly quickly and baked extremely quickly. Since I did all the molds at one time I ended up microwaving 2 minutes and then 2 minutes. I would recommend adding only one minute at a time because I think mine could have used just a bit less time in the microwave.

Fun...check, fast...check, uses up some of the plums...check, Sweetie liked it...check (although he liked the ice cream better, but then he always does when the choice is cake or ice cream). Cake and ice cream together...it's a party after a long work week.


Microwave Pud with Caramel, Apples and Plums

Adapted from Notitie van Lien’s recipe Microwave Pud with Raisins

35 g (finished weight) peeled, cored, sliced and finely diced apples
60 g (finished weight) peeled, pitted, sliced and finely diced plums
4 tablespoons caramel ice cream topping
100 g butter, room temperature, cubed
100 g granulated sugar
grated zest from a lemon or ½ an orange
2 eggs
100 g self-rising flour
1/8 teaspoon freshly grated nutmeg or ¼ teaspoon already grated nutmeg
¼ teaspoon salt


Grease and flour 4 – 6 (depending on the size) microwave proof pudding molds. I used ramekins but you could use custard cups or small coffee cups.

Mix together the diced apples and diced plums.


Divide the fruit mixture evenly among the prepared molds.

Divide the ice cream topping among the molds. (I used 4 molds and put a tablespoon topping in each mold.) Set aside.

For the batter cream together the butter and sugar in a mixing bowl. Add the citrus zest and one egg. Mix to combine thoroughly. Add the second egg. Mix to combine thoroughly. In a small bowl combine the flour, nutmeg and salt. Add the mixture to the egg mixture and combine thoroughly. You will have a smooth cake batter.

Spoon the batter on top of the fruit and topping in the molds. Fill about halfway…any more and it may go over the top of the mold. Cover with microwave foil (I have no idea what this is, but it was in Lien’s recipe) or plastic wrap that you pierce or vent to let some of the steam out.

Place 3 molds at a time in the microwave and nuke them on highest setting for about 2-3 minutes (or steam for 30 minutes). Start with two minutes and then add on another minute if needed. You will see the puds rise and dome above the molds. They are firm to the touch and come away from the sides a bit.

Take them out of the microwave to rest for 1 minute and microwave the rest of the puds.

Take the puds out of the molds after 1 minute resting time by running a knife around the edges of the mold to loosen and then invert over a plate, scooping the topping from the mold onto the top of the pud if it sticks in the mold. Serve with additional ice cream topping if desired. (I went even further and added a scoop of caramel ice cream…just like a party!) Serve while hot!

Makes 4 – 5 puds

Thursday, May 27, 2010

Cream Puff Dreams in the Land of St. Honore'

Return with me now to the land of St. Honore’ where a graduation party for a princess is taking place at the palace. Princess Rosebud’s fairy godmothers are here, contentious as usual.

“Arabelle, you know that giving her a trip to the Enchanted Forest is so passe’”, said Eleanora.

“Well, at least I was invited to be here…unlike you”, protested Arabella.

Caramona observed,”Who would invite someone who always brings bad spells along and never fails to insult everyone at a party?”

Eleanora was incensed and decided that a bad spell was just what the party needed. With a wicked smile she said, “I haven’t given dear Rosebud my gift yet, so my gift is a spell…she will fall asleep and everything she dreams of will come true, just for tonight.”

Princess Rosebud thought that was a nifty gift, even though she promptly fell asleep and missed the rest of the party.

“Couldn’t you at least have given her a spell that ended with being kissed and woken by a handsome Prince?” asked Caramona?

“Maybe if I’d been invited I would have, but now I’m off to a party where I was invited”, sniffed Eleanora, and she left with a swirl of her cape, in a puff of smoke.

Nothing interesting happened at first (other than the fact that the princess was smiling a lot) but after about 40 minutes someone noticed that the dessert table suddenly held a beautiful new dessert.

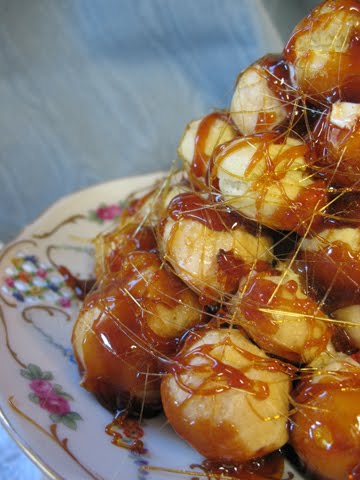
Small cream puffs had been dipped in caramel and stacked up on a pretty plate. The guest broke off pieces and popped them in their mouths. Delicious!

When Princess Rosebud woke at midnight Caramona and Arabella asked her what she had dreamed. She was very excited.

“I’m never allowed in the palace kitchens, but in my dream I was a pastry chef and I created the most wonderful dessert! It’s called a piece montee’ and is a ‘mounted piece’ so I made a pyramid of pastry cream filled cream puffs, hooked together with caramelized sugar and decorated with spun sugar. I had so much fun making it!

The cream puffs were made with a cooked paste that was piped on baking sheets and baked…that’s when they puffed up.


The pastry cream was thickened with eggs and took a long time to cook over low heat.

Making the caramelized sugar was a little scary because it got so hot and you had to work quickly once it was set in the pan of cold water to stop the cooking process. It looked so pretty once it was all put together. I wonder what happened to it?”

Her fairy godmothers had the good grace to look abashed as they admitted that the guests had finished off every last cream puff. The princess wasn’t upset, however, because in her dream the one that appeared in real life was her practice version and not nearly as nice as the one she made next. Once she finished making the second one she had eaten her fill, wearing a white chef’s coat and a big smile. Sometimes dreams are better than reality.

The May 2010 Daring Bakers’ challenge was hosted by Cat of Little Miss Cupcake. Cat challenged everyone to make a piece montée, or croquembouche, based on recipes from Peter Kump’s Baking School in Manhattan and Nick Malgieri.

If you want to practice your pastry chef skills and make this decadent dessert, you can find the recipe at Cat’s blog Little Miss Cupcake and probably at many Daring Baker sites across the blogosphere.

I had a good time making this, almost as good time as Princess Rosebud. I had never made the caramelized sugar with lemon juice but it worked well. I ended up with a nice dark amber color.


The cream puffs were similar to those I made for the Gateau St. Honore’ for the first Daring Baker's May challenge, but I made these very small.

I think I should have made them a bit bigger so they would hold more of the luscious pastry cream. I flavored the cream with vanilla and rum. Although the sweetness level was higher than I like, Sweetie and I managed to polish off this piece montee with great enjoyment. No need to dream when you have the real thing.

Thank you Cat for selecting such an inspiring challenge for this month!

Sunday, September 13, 2009

A Very Tasty Yogurt Cake for Fall

Mea culpa! In the spring, before my trip to Ireland, the lovely Kristina at Stonyfield Farms sent me some coupons for their organic Greek style yogurt, called Oikos. I had every intention of getting some and using it for recipes and blogging about it because I love yogurt, but somehow the coupons stayed in my old purse and everything else, just about, went into the new one for the trip, so they were never with me when I was at a store that carried the yogurt.

It has taken waaaaay too long, but finally I found the coupons, carried them with me, used them, and made a very tasty yogurt cake using the rich, creamy, tangy plain Oikos yogurt and the recipe in Dorie Greenspan's Baking, pg 224. Although this isn't the best photo, you can see how rich and creamy the texture of this yogurt is.

Because we have fresh Gravenstein apples and because it really feels like fall is coming (we even had rain this weekend) it seemed like a good idea to make a fall themed cake.

Apples and maple syrup are two flavors that remind me of crisp fall days and rich fall colors. The caramel for the apples is made with maple syrup, butter and some cream. When I was cooking some sliced apples one night this week to go with dinner, I started by sauteing them in a little butter, then pouring on some maple syrup and letting them simmer while I cooked other things. By the time I paid attention to the apples, the syrup had caramelized and I could spin caramel threads with a fork dipped in the syrup. The problem was that I didn't know how long that had taken.

Ever the explorer, when it was time to make the filling and topping for the cake, I tried to re-enact caramelizing the maple syrup. First I steamed the apple slices a bit so that I wouldn't over cook the syrup while trying to cook the apples. Using a slotted spoon I transferred the partially cooked apples to a frying pan full of melted butter. After sauteing the apples for a couple of minutes, I poured on a cup of maple syrup, stirred it all together, then let it simmer for about 3 minutes. Later I decided that it should have been longer since I ended up with a pretty soupy sauce. Again using a slotted spoon, I removed the apples and then 1/4 cup of whipping cream was whisked in. After more simmering I decided that it wasn't really going to thicken up, so the apples went back into the sauce, were coated with it, and then half the apple slices were removed...again....with a slotted spoon and placed on the bottom half of the yogurt cake (which I had sliced in half earlier). Because I wanted the maple flavor to sink into the cake, I drizzled a little of the sauce over those apples. I put the top cake layer over them, wrapped the whole thing in plastic wrap and let it sit overnight. The rest of the syrup and apples were stored in the fridge.

The next evening I carefully removed apple slices (the slotted spoon was getting a workout) from the sauce and arranged them on the top of the unwrapped cake. The cake had been set on a rimmed plate. Once the caramelized apple slices were in position on top of the cake, I spooned the rest of the sauce over them and over the top of the cake. Lots of sauce spilled down the sides and collected at the plate rim. A gooey, but very, very tasty mess.

I took the cake to a dinner party, but left the camera at home, so the plated cake photo was taken almost a day later and without benefit of the ice cream garnish we had at night.

The Oikos yogurt gives this cake a wonderful tang, very much appreciated as a foil for the very sweet maple-apple sauce. The cake is moist from the yogurt and from the syrup and apple juices, but holds together very nicely for slicing. It really does taste like fall to me. The last slice was even better this afternoon with a cup of tea.

This yogurt cake is super easy to make and goes together quickly. If not dolled up with maple-caramel-apple sauce, it would also taste great plain with a fruit compote and I suspect it would make a great base for strawberry shortcake, too. Go ahead, make a yogurt cake yourself and see. If you can find Stonyfield Farm organic Oikos yogurt in your store, by all means use that for the cake's yogurt. Plain generic yogurt just doesn't have the texture or tang that Oikos has, but if that is what you have available, go for it because this cake is worth making.


Need the recipe? E-mail me and I'll send it to you.

Friday, September 26, 2008

Sticky Turtles


The power of suggestion is often stronger than we realize. I see something on sale that I use occasionally and suddenly I'm reminded of a recipe using that ingredient that I just HAVE to make. Or I spot something already made that I just KNOW that I can make myself a half the price, so, indeed, I MUST go home and make it. Fortunately it doesn't happen often, but recently I was checking out at our local market and there was a box of Turtle Candies on sale, by the piece. The caramel, pecans and chocolate looked delicious, but I decided that I should try making the candies myself.

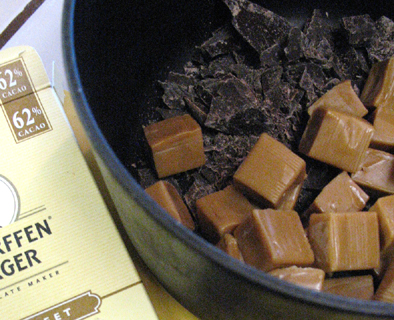
A well stocked pantry is a great assist for such silliness, so once I got the groceries I'd bought unloaded and put away, I looked in my supplies and found some pecan halves, some Scharfenberger semi-sweet chocolate and some caramel bits. What could be easier?

Well, first off I decided to melt the caramel bits in the microwave. Should have done it on the top of a double boiler. I ended up with lumps of caramel that were soft in places and crunchy in other places. Undaunted, I stuck the pecan halves into the soft parts of the caramel blobs, then let them cool while I played with the chocolate.

Finely chopped chocolate can be melted in the microwave by using short bursts of very low power, then stirring. That worked just fine and the melted chocolate was scooped with a spoon onto the cooled caramel/nut mounds. Then I put the mounds into the freezer to chill and firm up the chocolate.

Except for the inconsistent texture of the caramel, they were delicious and fun to eat. The chocolate got a little melted by my fingers, but then I got to lick my fingers...fun!

As you can see, there is really no recipe for this, just ingredients. I only made a few, too. To do a full plate of cute Sticky Turtles, use a full bag of caramels, melt them in the top of a double boiler, set over simmering water, stirring until smooth. Plan on 4 pecan halves per candy, so about 48 or so. Use a full bar of semi-sweet chocolate 8 - 9 ounces, chopped fine and melted in the microwave or in the top of the double boiler, set over simmering water. I put my candies in flattened cupcake papers.

Sunday, February 10, 2008

It Was So Good the First Time Around...

Almost a year ago, as part of my run up to Valentines Day (still can't believe that I posted for 14 days straight...and have not ever again), I posted a truly decadent and delicious chocolate fondue recipe. It used caramels, chocolate, and nuts...that is a combination that is hard to beat.

I'm posting it again because it makes a wonderful dessert for your Valentine...you can dip and feed each other pieces of fresh or dried fruit, cookie pieces, nuts, marshmallows...you get the idea.

The other reason I'm posting it again is that Holly of Phemomenon has invited us to post Art That You Eat with the theme of Chocolate and this Chocolate Caramel Nut Fondue fits very well. Try it and see if you don't agree.

If I were in the mood to make this fondue again, I'd so a few things differently. First of all I'd unwrap all those caramels before I chopped the chocolate so that if I cut my thumb, which I did, I wouldn't have to unwrap all those little devils almost one handed...a neat trick. Secondly, I'd combine the milk and caramels and cook them first until the candies had almost melted, then add the chocolate, melt, then the nuts. That way you can be sure that the candies are melted and smooth. With the nuts added before the melting, it's harder to tell what is smooth. Otherwise I'd do it the same. Having nuts and both dried and fresh fruits, plus the shortbread cookies meant that there were lots of different sizes and textures as well as flavors.


Turtle Fondue (With or Without the Pot)

Adapted from Perfect Recipes For Having People Over by Pam Anderson

8 oz. caramels, unwrapped
2 oz. semisweet chocolate, cut into small pieces
¼ cup finely chopped pecans, pre-toasted at 325 degrees for about 10 minutes until fragrant
¼ cup milk
Fresh fruit, such as apples, pears, bananas, strawberries, grapes or figs; larger fruit cut into bite sized pieces
Cubes of pound cake, pieces of shortbread cookies
Dried fruits like apricots, peaches or figs
(I added some almonds and macadamia nuts, too.)

Combine caramels, chocolate, nuts and milk in a small heavy saucepan (or a fondue pot) and heat over low heat, stirring frequently, until smooth and warm. Serve in small bowls with skewers (or fondue forks) for dipping fresh and dried fruits and pound cake. Dip cookies while holding end of the cookie.

If you have a fondue pot, use it. If you use the heavy pot, the fondue sauce retains the heat fairly well. If it starts to cool off, simply return the pot to the stove and reheat.

Serves 2 to 4.

Wednesday, August 29, 2007

Kings and Queens of Tarts

Another Daring Baker challenge my friends...a tart. Veron and Patricia have given us a most yummy challenge in the form of a Milk Chocolate Caramel Tart from Eric Kayser’s Sweet and Savory Tarts. The recipe can be found at the bottom of this post.

Due to lots of commitments at the end of the month, I baked this tart early in the month, so mine included the cinnamon in the crust (which became optional later) and the dry method of making the caramel (which also became one of two options later).

Learning new skill, or revisiting old ones is part of the joy of these challenges. I'd never made caramel using the dry method, so I learned how, with a little experimentation (see below). Since the recipe was brief and assumed some experience in making the various parts, we were instructed to "read between the lines" in making the tart. Very glad to have made this recipe. It was rich, but delicious and surprisingly light. Despite my best intentions to give some of it away, I'm afraid that Sweetie and I ate most of it ourselves over a period of 5 days. The tart tasted better to us each day, especially the caramel, which got more and more gooey.


The August challenge for the ever growing ranks of the Daring Bakers is a European style tart, thin and rich and elegant. The crust includes ground hazelnuts, cocoa, cinnamon, butter and confectioners sugar. Its texture is crisp and cookie-like. Inside this crisp, not too sweet crust is a layer of very sweet caramel topped with a frothy mousse of whipped cream and melted milk chocolate.

My caramel is soft but not runny and so the combination of textures works well. The flavor components are another matter. Both the caramel and the mousse are fairly mild and dairy flavored. The crust has a very strong cinnamon flavor and, less so, a cocoa flavor. The nuts give negligible flavor to the dish. If I were to do it again, I’d leave out the cinnamon, but maybe put some ground dark chocolate into the crust instead, or a good shot of vanilla. With some whipped cream decorations around the edge, the tart is pretty and perfect to serve to some favored friends.

I learned some new skills while making this tart and revisited some, too. I used a hand rotary grinder to grind the nuts, which is something I learned from a German friend of mine. It produced a finer texture, almost like a flour, than what you get with the food processor. One thing I made sure to do was to really beat the dough mixture well at each point. That resulted in a nice, plastic-like texture which made it easy to form into a crust in the tart pan. The recipe makes enough dough for 4 tarts, so if I were to do it again I’d cut the recipe for the crust in half. Blind baking by pricking the dough with a fork, then lining the tart with parchment, then filling it with dry beans (which I save for this purpose) resulted in a nice thin crust. Once I removed the beans and parchment, I put the tart crust back into the turned off oven for 15 minutes to crisp up the bottom.

The caramel presented even more of a challenge. I made my tart early in the month before a different version of making the caramel had surfaced. In some ways I’m glad, because I learned so much this way.

I had no trouble turning the sugar into caramelized sugar, but when I added the cream, which had been warmed a bit, the whole mixture seized up. Panic would have ensued without prior assurances by another Daring Baker that if this happened, to keep stirring and cooking until it all was smooth again. Well, I added the butter and tried that, but grew impatient. After straining the liquids from the solids, I returned the solids to the pot and, over high heat, let it liquefy again. Once that happened, still over high heat, I whisked the liquid into it, a little at a time. That worked well. The mixture thickened up a bit. When it came time to do the eggs, I added a tablespoon of flour to the eggs and saw that there were lots of lumps. I strained that mixture, too. Learning from my mistakes, I ended up incorporating some of the mixed eggs into the rest of the flour rather than adding the flour to the eggs. The resulting mixture easily mixed into the cooled caramel mixture. Then I poured it into the cooled tart pan and baked it 15 minutes. It looked perfect.

I let the tart cool overnight in the fridge and made the mousse the next day. Melting the milk chocolate in the microwave was easy. One minute at a time at half power, stir, another minute at half power, stir, and so on until its all melted. The cream whipped up in the chilled Kitchen Aide mixer just fine. I folded some of it into the slightly cooled melted milk chocolate to lighten the chocolate, then folded that into the rest of the whipped cream. Even so, I had a few little flecks of unincorporated milk chocolate, but that didn’t affect the taste. I suspect that if I had cooled the chocolate just a bit more that there would not have been any flecks.

I smoothed the mousse over the caramel as well as I could, then refrigerated it for about 4 hours. Then I removed the tart from the pan and decorated it with little whipped cream starting around the rim and a few in the center. For serving, I used a serrated small knife to make sure that I could cut the crust. It was a hit, aside from the strong taste of cinnamon. When I just tasted the caramel and mousse together, it was even clearer that I didn’t care for the cinnamon flavor at all with this tart.

Glad that Veron and Patricia chose this luscious Milk Chocolate and Caramel Tart for August. I learned that my idea of incorporating something was the exact opposite of what the recipe said. I stayed cool when my caramel turned bad and celebrated when it was saved. I barely resisted eating all the left over mousse in the bowl and did not resist having a second piece. Delicious! Even more delicious the next day.

Read all about how each King and Queen of Tarts (Daring Bakers) made their tart by visiting the blogroll

Milk Chocolate and Caramel Tart
Daring Bakers Challenge #9: August 2007
Hosts: Veron (Veronica's Test Kitchen) and Patricia (Technicolor Kitchen)
Post Date: Wednesday, August 29
Quantity: One (1) 9" Square or one (1) 10" Round tartChocolate Shortbread PastryNote: The Chocolate Shortbread pastry can make 3 tart shells. So, if you want to cut that recipe into thirds then do so but Veron and Patricia are not promising it will scale down properly.
Preparation time: 10 minutes
Refrigeration: overnight
To make 3 tart shells: 9 ½ inches (24 cm) squareor 10 inches (26 cm round)

Ingredients:
1 cup (250g ) unsalted butter, softened
1 cup plus 2 tablespoons (150 g) confectioners’ sugar
½ cup (50 g) ground hazelnuts
2 level teaspoons (5 g) ground cinnamon
2 eggs
4 ½ cups (400 g) cake flour
2 ½ teaspoons (10 g) baking powder
1 ½ tablespoons (10 g) cocoa powder

A day ahead
1. In a mixing bowl of a food processor, cream the butter.
2. Add the confectioners’ sugar, the ground hazelnuts, and the cinnamon, and mix together
3. Add the eggs, one by one, mixing constantly
4. Sift in the flour, the baking powder, and the cocoa powder, and mix well.
5. Form a ball with the dough, cover in plastic wrap, and chill overnight.

Milk Chocolate and Caramel Tart
Preparation time: 40 minutes
Baking Time: 30 minutes
Refrigeration time: 1 hour

Ingredients:
½ lb (250 g) chocolate shortbread pastry (see recipe above)
1 ½ cups (300 g) granulated sugar
1 cup (250 g) heavy cream (30-40 percent butterfat) or crème fraiche
¼ cup (50 g) butter
2 whole eggs
1 egg yolk
2 ½ tablespoons (15 g) flour
1 ¼ cups (300 g) whipping cream
½ lb (250 g) milk chocolate

1. Preheat oven to 325 °F (160 °C).
2. Line the baking pan with the chocolate shortbread pastry and bake blind for 15 minutes.
3. In a saucepan, caramelize 1 cup (200 g) granulated sugar using the dry method until it turns a golden caramel color. Incorporate the heavy cream or crème fraiche and then add butter. Mix thoroughly. Set aside to cool.
4. In a mixing bowl, beat the whole eggs with the extra egg yolk, then incorporate the flour.
5. Pour this into the cream-caramel mixture and mix thoroughly.
6. Spread it out in the tart shell and bake for 15 minutes. Remove from oven and allow to cool.
7. Prepare the milk chocolate mousse: beat the whipping cream until stiff. Melt the milk chocolate in the microwave or in a bain-marie, and fold it gently into the whipped cream.
8. Pour the chocolate mousse over the cooled caramel mixture, smoothing it with a spatula. Chill for one hour in the refrigerator.

Alternate Caramel Method:
If you have problems with the dry method, you may use this method.
1 cup sugar
1/2 cup water
1 tablespoon corn syrup
Set mixture in a pot over medium-high heat and stir slowly. When the mixture comes to a boil, stop stirring and leave it alone. Wait till desired color is attained. Proceed with the rest of the recipe.

Caramel Fragments:
Melt ½ cup (100g) granulated sugar in a saucepan until it reaches an amber color. Pour it onto waxed paper laid out on a flat surface. Leave to cool. Break it into small fragments and stick them lightly into the top of the tart.