Showing posts with label flax seeds. Show all posts

Sunday, August 13, 2017

A Hearty Bread


I'm not baking bread as often as I used to. Lots of things getting in the way of it, but mostly it's because Sweetie asked me to not tempt him with warm bread quite so often...he has no resistance to bread hot from the oven but wants to continue to fit in his clothes.

Still, I have a sourdough starter and it seems a shame to waste the 'toss off' that comes with feeding it. Before I went to LA I used it to make some pizza dough, which I then froze. One day soon I'll make pizza for dinner, but for now the calories are held at bay.

I fed it again a couple of days ago and decided that it had been a long time since I've made a hearty, seedy bread. If I give half of it away then Sweetie and I can still have some and feel virtuous at the same time. After doing a half-feeding of the toss off (1/2 cup each all-purpose flour and water, instead of a full cup of each), I let that sit in the fridge over night. The second day I fed the mixture with a feeding of 1 cup graham flour (Bob's Red Mill brand) and 1 cup water. It made for a soupy mixture since the last time I fed the starter I added extra water knowing that it would be well over a week before I could feed it. The reason I mention this is that I started with more hydration in the dough than usual. If you have 100% hydration starter, you won't need as much flour for the bread.

The graham flour mixture sat on the counter for about 20 hours before I started the dough and it was nice and bubbly, plus there was a great yeast fragrance, but I knew I would be adding a lot of things needing a bit of extra lift, so I whisked in 1 teaspoon active dry yeast.

In a bowl I mixed together dark rye flour, flax seed, all-purpose flour, and salt. These were added to the sourdough mixture using my stand  mixer and the dough hook, letting everything come together and finishing with some all-purpose flour to stiffen the dough a bit. Once the machine kneading finished, I did some more on a floured board. The dough was just a bit tacky, so I used my bench scraper to lift the dough up and over for kneading.

After kneading a few minutes, I flattened the dough out into an oval, then sprinkled on 1/4 cup chopped pecans and 1/4 cup of Salad Toppings, a mixture I found at Costco that contains pumpkin seeds, sunflower seeds and dried cranberries. Rolled up the dough, folded the ends over, then flattened it again to allow for the remaining 1/4 cup chopped pecans and 1/4 cup Salad Toppings to be worked in. More kneading until all was evenly distributed, then into the rising container for a few hours to rise. I like to spray the bottom and a bit up the sides of the container with spray olive oil, then turn the dough in it to coat surface of the dough with oil. Probably not necessary, but I like the dough to stay soft on the surface and that takes care of that.

After the dough doubled in bulk, I turned it out on a floured board, punched it down, used the bench scraper to cut it into three pieces, then weighed them so that they were each about 14 oz. Rolled each into a snake shape and put them, lined up, on a baking sheet. After braiding them loosely, I covered the braid with a clean tea towel and let it rise. All that was left was preheating the oven, painting the plait with beaten egg, and baking it until golden.


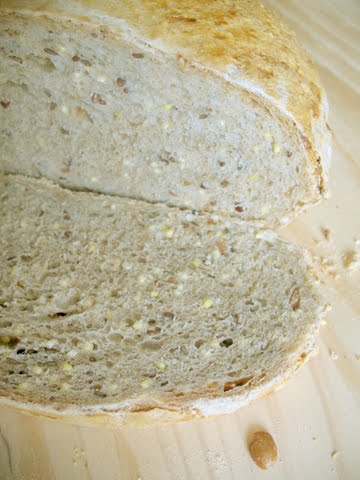
This makes a hearty bread. It has a fairly fine grain and is studded throughout with seeds, nuts, and the occasional cranberry piece. I served it with dinner and one guest described the variety of flavors and 'lots of musical notes', but they all work well together. This is not a sweet bread since the proportion of cranberries in the Salad Topping is small. It has lots of seeds, which is lovely, and makes great toast.

I had a couple slices today for lunch as Avocado Toasts with some smoked salmon on top. Yum!


Hearty Seedy Braid
my own creation

1 cup sourdough starter, plus about 2 tablespoons water if your starter is 100% hydration
1/2 cup all-purpose flour
1/2 cup water
1 cup graham flour
1 cup water
1 cup dark rye flour
1/2 cup flax seeds
1 cup all-purpose flour, plus additional (about another 1/2 cup or so)
1 teaspoon salt
1/2 cup chopped pecans
1/2 cup mixed sunflower seeds, pumpkin seeds and dried cranberries
1 egg, beaten

Take the 1 cup sourdough starter and put into a large bowl. In a smaller bowl whisk together the all purpose flour and the water. Whisk into the sourdough starter until well combined. Leave on counter, uncovered for 2 hours, then lightly cover and refrigerate.

The next day whisk together the graham flour and the water in a small bowl. Add it to the sourdough starter mixture and let sit, uncovered, on the counter until the next day.

The next day, whisk together the rye flour, flax seeds, all-purpose flour and salt in a medium bowl. Put the sourdough mixture into a stand mixer bowl. Attach the dough hook to the mixer. Stir about 1/3 of the flour mixture into the sourdough mixture with a wooden spoon or a spatula. Put the bowl on the mixer base and start up the dough hook on low speed. Slowly add the remainder of the flour mixture. If needed, add additional all-purpose flour as the mixer kneads the dough for at least 8 minutes. When kneaded, dough should clean the sides of the bowl and be tacky but not sticky.

Remove the dough from the dough hook and bowl onto a lightly floured board or clean work surface. Knead the dough a few turns, then flatten into a large oval or circle. Sprinkle half the pecans and half the seed mixture over the dough, roll up jelly-roll fashion and flip end up over the log. Press down to flatten the dough again, sprinkle on the remaining pecans and seed mixture, roll up again, then knead until the pecans and seeds are well distributed in the dough.

Oil lightly a rising container. Place the dough in it, then turn dough over so that all is coated with oil. Flatten the dough in the rising container, cover with a clean shower cap or with plastic wrap and set in a warm, draft-free place to double in bulk.

When dough has doubled, turn out onto a lightly floured board or work surface. Using a bench scraper, cut into three pieces (weigh if necessary to keep about the same weight), then roll each piece into a snake shape. Place the three snakes next to each other in a baking sheet, braid loosely, tuck ends under, cover with a clean tea towel and let rise until about doubled.

Preheat oven to 350 degrees F. When braid has almost doubled, use a pastry brush to paint the plaits with beaten egg. Bake for about 40 minutes, until golden brown. When you tap the bottom of the loaf, it should sound hollow. Cool for at least 10 minutes on a rack, then slice and serve.

Wednesday, December 16, 2015

The Babes And An Old New England Bread


This month I have the honor of being the Kitchen of the Month and have asked my fellow Bread Baking Babes to gather around the kitchen table and to have fun with Anadama Bread, an old New England favorite. Sweetie enjoys this bread because of the molasses and I enjoy the seeds and the fact that it makes great toast. It has corn meal in it for body and mine was a fairly compact bread which rose well enough as it was proofing, but didn't have much oven spring either time I made it. You can have fun with this bread by changing out the seeds. The first time I made it I didn't have many seeds on hand, so I used mostly flax and poppy seeds. 


The second time I used those, but also used sesame seeds and sunflower seeds, plus I used regular flour and just a bit of millet flour. I'm pretty sure that traditional Anadama Bread doesn't have much in the way of seeds, so this is a good recipe to have fun with, knowing that you are giving and old New England bread a new way of being.

Anadama bread is an old time bread, baked at least since 1850. This recipe is from the March 2015 Bon Appetit magazine.
 
 I tried it out in a semi-gluten free version, replacing 1/2 cup of the wheat flour with buckwheat flour and the King Arthur Flours gluten free flour mix so I could actually try a slice and not suffer for it. I also used a non-dairy butter substitute instead of the butter. For seeds I used 3 tablespoons whole brown flax seeds and 4 teaspoons poppy seeds.  I baked it in a long, thin bread pan, which is usually good for gluten free baking, so it made a long, narrow loaf. I think a regular sized loaf pan would make nicer bread for sandwiches. 

This dough made a pretty dense loaf with wonderful flavor and fragrance. I would recommend using regular flour (unbleached or whole wheat), real butter and whichever seed mixture you like, staying pretty close to the same seed proportions. Do allow time for the three risings.
 
No one really knows how this bread got its name. Wikipedia says, "An apocryphal story told about the origin of the bread goes like this: Every day a local worker would find cornmeal mush in his tin lunch pail, despite asking his wife for an occasional piece of bread. One day, because of weather or other circumstances, he came home just prior to lunch time. His wife, Anna, was out. He sat down and opened his lunch box to find the usual cornmeal mush. He sighed and said, "Anna, damn her," as he resolutely reached for the flour, molasses and yeast which he added to the cornmeal mush. His resulting bread became a local favourite."
 
 King Arthur Flour has this explanation: "There are many versions of how this bread came into being. They're all similar, but each varies slightly. The general consensus is that a New England woman named Anna provoked her husband — some say through laziness, others say from baking the same bread daily, or for not finishing her bread-baking. The husband either threw a bag of cornmeal at her and missed, but spilled it into the dough; or he grabbed cornmeal instead of flour and tried to finish her bread. He muttered, "Anna, damn her!"
 
So you can freely swear while making this bread (it's tradition, right?), have some wine while it rises and rises again...and again, and enjoy it as the weather grows ever colder.

Be sure to visit the other Babes sites to see what their version is and since this is a wonderful bread to go with a pot of hot soup, there is likely to be a good day to make it between now and December 29th. Make the bread, send me an e-mail with a photo and a note about your experience with it, and I'll send you a Buddy badge created by our talented Babe Lien. My e-mail is elle dot lachman at gmail dot com. Looking forward to seeing your beautiful, seedy Anadama Bread.


Anadama Bread - Makes one loaf

2 tablespoons unsalted butter, room temperature, plus more for the pan
1 - 1/4 oz. envelope active dry yeast (about 2 1/4 tsp.)
1 cup stone ground medium cornmeal
1/4 cup mild-flavored molasses
2 tablespoons help seeds or white sesame seeds
1 tablespoon nigella seeds or black sesame seeds
2 tsp. golden flaxseed
2 tsp. brown flaxseed
2 tsp. poppy seeds
1 1/4 tsp. kosher salt
2 cups all-purpose flour, plus more for kneading, etc.
1 large egg, beaten to blend
Salted butter, for serving

Preheat oven to 375 degrees F. Lightly butter an 8" x 4" loaf pan and line with parchment paper, leaving a generous overhang. (I skipped the parchment and baked the bread in a narrower and longer pan.)

Place yeast in a medium bowl or the bowl of a stand mixer. Add 1 cup warm water; stir to dissolve the yeast. Add the cornmeal, molasses, help seeds, nigella seeds, golden and brown flax seeds, poppy seeds and salt. Stir to combine using a wooden spoon. Continue stirring with the wooden spoon or use the dough hook if using the stand mixer. Add 2 cups of flour and 2 tablespoons of butter and mix until no dry spots remain.

Turn the dough out onto a lightly floured surface and knead until the dough is smooth and elastic, 10-15 minutes OR mix in stand mixer on medium speed 8-10 minutes.

Lightly butter a medium bowl. Transfer dough to bowl and turn to coat. (Elizabeth might skip the butter part.) Cover with plastic wrap or shower cap and let rise in warm, draft-free spot until almost doubled in size, about 1 hour.

Punch down dough to deflate; cover. Let rise again until about doubled in size, about 1 hour.

Turn dough out onto a lightly floured surface and pat into and 8' x 4' rectangle. Starting at the short side furthest from you, roll up dough, pinching the seam as you go to create a tight roll. Pinch seam to close and tuck ends under, pinching to seal. Place seam side down in the prepared loaf pan. Cover with plastic and let dough rise. Uncover before it crests the top of the pan and wait for it to spring back slightly when pressed, about 1 hour.

Brush top of dough with egg. Bake, rotating halfway through, until bread is baked through and the top is a deep golden brown, 45-50 minutes. Let cool slightly in the pan on a wire rack before turning out. Let cool on the rack before slicing (if you can wait that long). Serve with salted butter.

Bread can be made 5 days ahead. Store tightly wrapped at room temperature.

Saturday, July 16, 2011

BBBabes Love Burger Buns

Almost everyone loves a burger or something from the grill that can go in a burger bun. The ever lovely and clever Bread Baking Babes are no exception.

Although Sweetie loves grilling year 'round, when the summer months hit we find that we turn to grilling most evenings of the week. He loves to make pulled pork from a slow cooked fresh piece of picnic pork and I've figured out a soy-based marinade for chicken thighs that's delicious and which I'll post one of these days, but a standby that never disappoints is the ever popular hamburger. Good quality beef and a light hand in making the patties are my only tips since Sweetie usually does the actual cooking.

We sometimes skip the rolls but not this last month. Thanks to the lovely Sara of I Like to Cook, our never boring Kitchen of the Month, the Bread Baking Babes made burger rolls!

This recipe, like the last one for Soda Bread, acknowledges that summertime baking can be different than baking during the rest of the year. There are so many fun things to do away from the kitchen, so 'quick and easy' is often the requirement for summer cooking and baking. These great Burger Buns from Williams-Sonoma fit that description. No overnight preferment, no triple rise, and just about two hours from the idea to the finished warm and crusty roll! If you want to make the popular mini version called sliders, Sara has kindly included directions and Karen of Bake My Day baked up a huge number of sliders so check out her post once it's up.

I enjoyed making them and eating them! I topped mine with a seed mix from King Arthur Flour and it looked like bird seed but tasted wonderful. (I guess bird seed tastes good to birds...but I'll never be a bird my friend.) I also used Irish wholemeal flour for half the flour which gave the rolls a nice nutty taste.


Because my buns usually have too much bread on top, for these I rolled out the dough and cut the buns using a 9.5mm round cutter. As a result my buns were just the right size around and not too tall but nicely rounded...perfect for that 'birdseed' topping.


Half the rolls were enjoyed with burgers at a 4th of July bbq, I used one for a turkey sandwich for lunch,


and the rest (which had been in the freezer to stay fresh) were split and grilled and enjoyed with local turkey sausages (Italian flavored and some with tomato-basil flavor) this week. I found that the ones that had been frozen were a little bit crumbly so I'll probably freeze them unbaked next time and bake them at the time I'll use them.

Don't forget to check out the other Bread Baking Babes' posts (links to right) and to make these delicious rolls yourself to be a Buddy... and feel free to change the size, shape, flours, toppings, etc. Remember, to be a Buddy, you need to e-mail Sara (iliketocookATshawDOTca) the link to your post (or a description of your baking session/results) and a photo by July 29th. That way you can be included in the round-up.

Sara wrote:
"Summer will soon be here and who doesn't like to bbq a burger or hot dog in the summer? And you just know that it will taste even better on a bun you've made yourself. The recipe gives directions to make regular sized burger buns as well as slider sized buns." Thanks Sara for a perfect challenge for July fun.


Homemade Hamburger Buns
Williams-Sonoma

1 1/2 cups (375 ml) milk
8 Tbs (1 stick/125 g) unsalted butter, cut into 8 pieces
4 1/2 tsp active dry yeast
4 cups (625 g) all purpose flour, plus more for dusting
(Note: I used 2 cups all-purpose flour and 2 cups Irish wholemeal flour)
5 Tbs sugar
1 Tbs kosher salt
1 egg beaten with 1 tsp water
sesame seeds for sprinkling (optional)or use the seed or seeds you enjoy

In a small saucepan over medium heat, combine the milk and butter and heat until the butter is melted, about 7 minutes. Remove from the heat and let cool to 105-155'F (40 to 46'C). Add the yeast and stir until the yeast is dissolved. Let stand for 10 minutes.

In the bowl of a stand mixer fitted with the dough hook, combine the 4 cups of flour, the sugar and salt and beat on low speed until combined, about 30 seconds. Add the milk mixture and knead until the dough forms a ball, about 1 minute.

Increase the speed to medium low and knead until the dough is smooth and elastic, 4 to 5 minutes. Remove the dough from the bowl, oil the inside of the bowl and return the dough to the bowl. Cover tightly with plastic wrap and let the dough rise in a warm place until doubled in volume, about 1 hour.

Line a baking sheet with parchment paper. On a lightly floured work surface, roll out the dough into a 10 by 7 1/2 inch (25 by 19 cm) rectangle. Using a ruler as a guide, cut the dough into 2 1/2 inch (6cm) squares. Transfer to the prepared baking sheet, spacing the buns evenly apart, and cover tightly with oiled plastic wrap. Let rise in a warm place for 30 minutes.

Preheat oven to 400'F (200'C)

Remove the plastic wrap from the baking sheet. Brush the tops of the buns with the egg mixture (I brushed the tops with milk) and sprinkle with sesame (or other) seeds if using.

Bake until the buns and golder and an instant read thermometer inserted into the center of a bun registers 190'F (88'C), 14 to 16 minutes. Transfer the buns to a wire rack and let cool completely. Cut in half and use as hamburger buns. Makes 12 hamburger buns.

For slider buns:

Follow the instructions above but roll out the dough into a 9 inch (23 cm) square. Cut into 1 1/2 inch (4cm) squares and place on 2 parchment lined baking sheets. Cover tightly with plastic wrap and let rise in a warm place for 30 minutes. Position one rack in the upper third of an over and one rack in the lower third and preheat to 400'F (200'C). Brush the tops with the egg mixture and sprinkle with sesame seeds if using. Bake for about 14 minutes, rotating the baking sheets from top to bottom and 180 degrees halfway through baking. Makes 36 slider buns.

Wednesday, June 23, 2010

Buddy Gets Korni

Those rollicking, creative and determined Bread Baking Babes have two new things going this month.


First off they have decided on a posting schedule. As a sometime Buddy I really appreciate that. Now I know when to check for the latest bread challenge (the 16th of each month) and when I have to have baked that bread challenge by...and post about it...to be a BBB Buddy (the 29th of the month). It's great to have so many days to bake, too. Some months the turnaround was a week and sometimes that is too short a span for me. Thank you Tanna!


The second new thing is a delightful bread suggested by Lien of Notitie van Lien called Korni Bread. It has lots of interesting ingredients including a new one for me...soy nuts. The recipe called for cooking and then baking coarsely chopped soy beans but some of the Babes substituted soy nuts, so that's what I did and it worked very well. They added great texture and flavor to the bread. Grains include rye, whole wheat and unbleached white flours and the crunch of millet. Flax seed and caraway seed complete the list and both added flavor and color.

I enjoyed making this bread. You start a sponge the night before and then the next day add more flour, the seeds and soy nuts and millet plus a little more yeast so this doesn't become a heavy bread, although it is still dense and chewy. I weighted the dry ingredients and found that I needed about another 2 tablespoons of water to bring the dough together. It was fun to knead because of the tiny lumps of millet and flax seed and larger chunks of soy nuts.

I made a round loaf and a torpedo shaped one and both look great! We had some with dinner and the flavors were an excellent blend of grains and seeds. I'll bet it will make great toast, too! Will try that tomorrow.

You, too, can bake this wonderful bread (and become a Buddy). The recipe can be found at Lien's blog (thank you Lien for a great choice!) and you still have a few days before the deadline. Let's bake!

Sunday, May 03, 2009

Somthing New for Arcadia


It’s easy to get into a rut.

Many Fridays I eat lunch with my friend Arcadia at a place that has wonderful stir frys over brown rice.

Last Friday was rainy and cool and the kind of day where it’s nice to stay home and have soup. In an effort to break out of our rut, and so she could see how my garden was shaping up, Arcadia came over for lunch. I made chicken soup and a nice green salad. It seemed like we needed one more thing, so I mixed together some cheese biscuits. Arcadia was quite taken with them and said that they were unlike any biscuits she had ever tasted…perhaps something new under the sun.

That morning I had opened my shipment from King Arthur Flour. I’d received a gift certificate and was like a kid in a candy shop when I went through the catalog and then online. So many wonderful things! One of the items that I had to have was their Harvest Grains Blend, an interesting mix of whole oat berries, millet, rye flakes and wheat flakes, plus flax, poppy, sesame and sunflower seeds. I added a quarter of a cup to the biscuits and it made such a difference!

The grains added depth of flavor and the seeds contributed more flavors and crunch. If you don’t have the blend, you could substitute two tablespoons of rolled oats, and some seeds you might have on hand, such as poppy, sesame, sunflower and/or pumpkin…about another 2 tablespoons if you have that.

The ‘surprise’ here isn’t the savory and delightful cheese, nor the seeds and flakes because you can see those in the finished biscuits. The ingredient that pulls it all together and gives it snap is cayenne pepper…just enough to lend a nice warmth. Without it the biscuits might seem too sweet.

Do try these with soup or green salad or even chili or chicken salad. I used packaged biscuit mix, but if you don’t want to do that, use your favorite biscuit recipe and then add the cheese, cayenne and seeds/grain flakes.

These were so popular that only one was left for the photo!

Spicy Seedy Cheesy Biscuits – or Something New Under the Sun Biscuits
Makes about 8 biscuits

1 ½ cups Bisquick Heart Smart mix or similar biscuit mix
1 cup finely shredded cheddar cheese
¼ cup King Arthur Harvest Grains Blend or substitution as suggested above
½ teaspoon cayenne pepper
½ cup plus 1 tablespoon fat-free milk ( I used reconstituted fat free condensed milk)
Preheat oven to 450 degrees F. In a bowl, stir all the dry ingredients together. Make a well in the center and add the milk. Stir just until combined and soft dough forms. Turn out onto lightly floured surface and knead 10 times.

Roll dough ½ inch thick. Cut with a 2 inch cutter dipped in flour. Place on ungreased cookie sheet or silicon mat.

Bake 7 – 9 minutes or until golden brown. Watch carefully the last minute so that they don’t burn.

Serve hot.

Sunday, February 17, 2008

Snack Points

It's well past football season, but we still have months of basketball ahead for the sports fans, so there is still a need for snacks.

This one is a variation of one I saw sometiime in the past two months, but don't remember where. I apologise to the author in advance. Should have written down who created it, but didn't even write down the recipe. Why? Because it is so simple.

In my version, I used egg substitute, right from the carton, to act as paste for the little seeds on the snack points. I think in the original it was either an egg white wash or an egg yolk wash. With any of them, the seeds stick to the tortilla and they get golden when they bake and those are good things.

I used a flour tortilla made with olive oil, (zero trans fats) which are pretty tasty all by themselves. With the addition of the flax seeds (do I get extra points for including popular flax seeds?), poppy seeds, and sesame seeds, they taste delicious.

The dip is made from black beans (another one of those foods we are supposed to eat more of to stay healthy), some shredded cheddar cheese (a food to stay away from in quantity, so I guess that balances the beans or something). On top I put diced avocado, non-fat sour cream dabs for zing, and a sprinkle of cayenne pepper for even more zing. If I'd had tomatoes, they would have been included, but, sadly, it is far from tomato season, so best to skip them.

Warm beans and cheese, cool avocado and sour cream, some heat from the cayenne and the crisp, seedy snack points all add up to an addictive and relatively healthy snack.

How's our team doing? The dip is gone. I'll get some more...

Snack Points

For each dozen points:
1 flour tortilla
1/4 teaspoon egg substitute, egg white, beaten, or egg yolks, beaten
Sprinkle (about 1/8 teaspoon) flax seed
Sprinkle (about 1/16 teaspoon) poppy seed
Sprinkle (about 1/8 teaspoon) sesame seed

Preheat oven to 225 degrees F.

Lay tortilla on the work surface - a cutting board works well. Using a pastry bursh, brush the egg wash (whichever kind) over the tortilla, all the way out to the edges. Sprinkle at once with the seeds.

Cut the tortilla in half, cut those halves in half, then cut each quarter in three. Place the snack points on a baking sheet lined with parchment, leaving room around them. Bake for about 25 minutes, until the points are crisp and just golden. Don't overbake or the seeds might burn.

Bean Dip with Avocado

1 14 oz can black beans, drained
1/2 cup finely shredded cheddar cheese
1 ripe avocado, peeled, pit removed, diced
1/3 cup non-fat sour cream
Ground cayenne pepper to taste

In a microwave safe shallow bowl or plate, place the drained beans. Mash them well with a fork. Spread the mashed beans out into a thin layer and sprinkle the cheese evenly over. Top the dish with waxed paper or vented plastic wrap. Microwave on half power, a minute at a time, until beans are hot and cheese is melted. Immediately top with the avocado dice, distributing it over the bean mixture evenly, then, using a spoon, dab on small globs of the sour cream all around the bean mixture, then sprinkle with as much cayenne as you enjoy. Serve immediately with at least two tortillas worth of snack points.