Thursday, July 15, 2010

Bread Baking Babes Bootcamp

Being invited to be a Bread Baking Babe is awesome! I have long admired the women in this group and their passion for bread, friendship and hilarity. Besides, I finally get to be a Babe! How could I say ‘no’ to the invitation?

Turns out that the first bread of my babehood is a kind of boot camp bread. No flour, only a little yeast, some salt and honey…and that’s it! Well, that and the cute little hard wheat berries. Sprouting them and then making a dough with the sprouted wheat, the water, yeast, salt and honey was the challenge and it was an act of faith most of the way. Guess newbies need a good challenge to toughen them up.

Sarge Lynn of Cookie Baker Lynn (if you know Lynn you may be laughing now...not really Sarge material) was the hostess this month and I’m actually glad that she chose this bread from Laurel’s Kitchen Bread Book. One of the best things about this group…now my group, too!.. is that we push the envelope, try new flours, pans, techniques and kinds of bread…never boring.

Soaking the berries was easy and I had too much success with the sprouting. Thursday morning they had nice little tails, although perhaps a shade too long. By the time I got home from work they were really hairy little devils. By the time they had sat in the fridge overnight the berries were swollen and they were really sprouted! Unfortunately that sometimes means they are past the point where they will make decent bread.


The next incomprehensible thing was that these sprouted beauties were going to turn into a nice ball of dough if I whirled them the right way in a food-processor…not too long, just long enough. Not sure if I even came close, but I ended up with a ‘dough’ that seemed liked cold cooked cracked wheat. No gluten strands that I could see, but what the hay, into the rising bucket with this mass!

A couple of hours later it had, indeed, risen about a half inch and gave the sigh when poked, so I turned it out onto a floured board, flattened it, rounded it off and let it rise again.


Fingers crossed! Where is that glass of wine? Who cares if it’s only 11 am?

Well, it rose about an inch in two plus hours, so I decided to knead it and shape it into a loaf. Since it was so wet, I used my bench scraper to knead with at first. Eventually it seemed more like a dough and I was able to knead it with my damp hands, but it never seemed to have very much in the way of gluten. Shaped it into a loaf and plopped it into the bread pan.

Now we get to see if it actually rises more than an inch.

Left it to rise in the pan and it did rise from about an inch and a half below the pan edge to just over the pan edge. Into the preheated oven with this puppy!

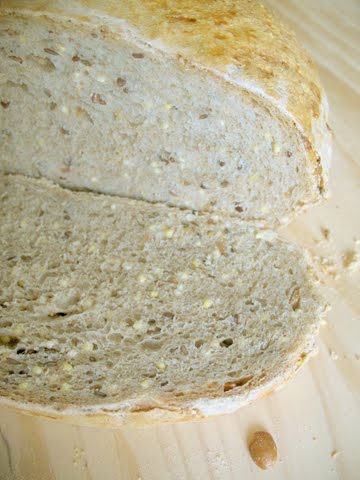
Sigh, no oven spring at all. Even with interior registering 205 degrees F, the center …actually most of the loaf!...was wet and gummy, even when the edges of the crust were starting to burn.

Cooled it down completely, then sliced some. More like cooked cereal with a thin crust than bread Babes

Sweetie loved it warmed with butter, but I fed most of my slice to the dog.

Due to paid work and unpaid work (the remodel ) I didn’t really have time to try this again, but I will. The flavor was great and I love the idea and I know some of the Babes had success, so it can be (and will be) done. This is a sad Babe, but determined, too. Do check out the other Babes and see how this bread should look. The links are on the sidebar.

If you'd like to be a Buddy...and I do encourge you to show me up and make a great version of this bread as some of the Babes have...go to Cookie Baker Lynn's blog for the details. The recipe is below.

Still in Babe Boot Camp I guess. Off to sip some wine and contemplate the next challenge.


Lynn wrote:"We are the mighty Babes. In the kitchen, we are invincible. We can bake without gluten, we can bake without yeast. Can we bake without flour? Yes!

In July we're going to tackle making bread straight from the grain. Sprouted Wheat Bread. It makes me feel a bit like a hippie, but I'm excited to try it. This recipe is from Laurel's Kitchen Bread Book. I've included directions for using a food processor. If you need different directions, let me know.

Yeasted Sprouted Wheat Bread
- from Laurel’s Kitchen bread book

makes 1 loaf

3 cups hard spring wheat berries (1-1/4 lb or 575 g), about 6 cups sprouted
1 tsp active dry yeast (1/8 oz or 3.5 g)
2 Tbsp warm water (30 ml)
2 tsp salt (11 g)
3 scant Tbsp honey (40 ml)

To sprout the wheat:

Rinse the grain and cover with tepid water, letting it stand 12 to 18 hours at room temperature. Allow the longer period in cooler weather, the shorter period in warm.

Drain off the liquid, rinse the grain with fresh, tepid water, and store in a dark place with a damp cloth over the top of the container. Rinse at least every 12 hours, just until the tiny sprout is barely beginning to show and the grain itself is tender - about 48 hours, then refrigerate until they are cool, overnight or longer, but not more than a day or two.

Dissolve the yeast in the warm water.

Put the regular cutting blade into a standard-size food processor and measure just over 2 cups of the sprouted wheat, a third of the total, into the bowl. Pour about 2 tsp of the dissolved yeast liquid, a scant Tbsp of honey, and about 2/3 tsp of salt over the wheat in the bowl. To protect the yeast, use separate measuring spoons for each of the ingredients.

Process until the ground wheat forms a ball, about one minute. Scrape the sides of the bowl, and process about two more minutes. Stop processing before the ball completely falls apart; if your wheat is not exceptionally high in protein a minute and a half might be all it can handle. If it falls apart, check the time, and with the next two batches, stop a little sooner.

Repeat with the remaining two-thirds of the ingredients, in two batches. Knead the three dough balls together.

Form the dough into a ball and place it smooth side up in the bowl. Cover and keep in a warm draft-free place. After about an hour and a half, gently poke the center of the dough about 1/2 inch deep with your wet finger. If the hole doesn’t fill in at all or if the dough sighs, it is ready for the next step.

Press flat, form into a smooth round, and let the dough rise once more as before. If the dough is cold, the first rise will be fairly slow, but as the dough warms up, the rising will telescope.

Gently knead into a round. Use water on your hands to prevent sticking, and keep the ball as smooth as possible. Let it rest until it regains its suppleness while you grease a standard 8 x 4-inch loaf pan, pie tin, or a cookie sheet.
Deflate the dough and shape into a loaf. Place the dough into the greased loaf pan and let rise in a warm, draft-free place until the dough slowly returns a gently made fingerprint. Bake about an hour at 350 deg. F, though if your bread rises very high, it will take less than that.

CookieBakerLynn"

So the things that seem to be important are to only sprout the berries until they just begin to show white nubs at the tips, be sure to process long enough for gluten strands to form, try baking the bread at a lower temperature and/or remove the loaf from the pan about 10 minutes before it should be done, place it on a baking stone and keep baking! I wish you a hearty, delicious loaf and a good Buddy experience!

XO Elle

Sunday, July 11, 2010

Warm Raspberries

Being in the midst of berry season is a great place to be. Prices at the stores are reasonable, the blackberries in the lower field and by the apple tree are prolific this year due to all the spring rains, and Costco recently had 6 half pints of beautiful ripe red raspberries for a very low amount of dough so I have had more than enough raspberries to have fun with than ever!

I enjoy most berries both fresh and cooked but I have preferences, too. Strawberries taste best to me when they are fresh and untouched, although I enjoy them chilled, too. Blackberries are great either cooked or uncooked, especially combined with other fruits. Blueberries seem to expand their flavor when warmed…think blueberry muffin and you’ll know what I mean. And then there are warm raspberries, Mmmmmm!

Raspberries are most enjoyable (to my way of thinking) cooked. The heat releases that wonderful fragrance and intensifies their sweet, unforgettable flavor.

To celebrate my windfall of raspberries I got my warm raspberry fix. Just after July 4th weekend I baked some in a delightful fresh coffee cake with a crunchy streusel topping. The unbeatable Dorie Greenspan’s Baking: from my home to yours has a great recipe for Blueberry Crumb Cake and the same recipe can be played with using…tada!...raspberries…and fresh peach chunks for that Melba flavor combo.

I used orange zest to rub with the sugar and put some of the crumb topping inside the cake as well as on top, but otherwise it is as written in the book. If you haven't bought this wonderful book, or gotten it out of the library, this might be the time.

What you get is a rich buttermilk cake, lightly touched with orange. The raspberries and ripe and juicy peeled peach chunks are folded into the cake batter so every bite has some fruit and some of the nutty, crunchy sweet topping.

Served warm from the oven, this cake fulfils every warm raspberry desire…for now.

Sunday, July 04, 2010

Tall Berry Freeze

Heat wave, we're havin' a heat wave! But not as hot as some areas where family live, so I'm thankful for the late afternoon or evening breezes that cool things off at night and for the low humidity, too.

Still, it's warm enough to enjoy tall, frosty drinks. Grandma L joined us today for a 4th of July family meal and I made her a favorite drink...iced coffee with lots of ice and half and half.

Another favorite around here are smoothies. I like mine without banana added but most everyone else likes to add the bananas. Since this is berry season and there were leftovers from the sourdough waffles with berries and whipped cream that were a hit at our meal, it was easy to make a nice tall berry freeze beverage. The berry mixture included fresh ollaberries, blueberries, red raspberries and strawberries.


HERE'S HOW:
In a blender place about two cups of ice cubes, a cup or so of mixed berries, a scoop or two of vanilla ice cream, a cup of milk, and 1/2 cup of yogurt for some tang to offset the berries. Since these were dead ripe berries they were plenty sweet. If yours are less sweet, you may need to add some sugar.

Blend on high until everything is mixed and you get a nice, thick frozen beverage. Sure does cool things off!

Tuesday, June 29, 2010

A Tower of Sweetness in the Land of St. Honore'

Whoops! Missed the posting date for the Daring Bakers, even though the challenge was done and the post mostly finished...just blame it on the bathroom remodel. Things progress, although slowly. Will post a photo when all is finished...at this moment it seems like that will be Christmas, but actually will be much sooner.

So, return with me now to the Land of St. Honore' for the delayed, but still delicious Daring Bakers challenge for June, 2010....

Once upon a time in the land of St. Honore’, the duchess had guests coming for dessert. First she said, “I think I’ll make a lovely, light, luscious, delectable cake.” But the thought about it and decided she was tired of cake. “There must be some other treat that I could bake” she thought. Since she had a nice new bottle of dessert port and a yen for chocolate, plus a sturdy stand mixer, she decided to focus on eggs, cream and chocolate.

“Well given those things, I think I will try, a lovely, light, luscious, delectable pie.” She found a recipe for Angel Pie with a meringue crust and chocolate mousse filling. Still, it somehow still didn’t sound like what she wanted to make.

“I think I’ll make something without any flour; a lovely, light, luscious, delectable tower…with strawberries since it’s Spring.” Now she had the idea for the perfect dessert…and a showstopper, too.

First she made pavlovas, crisp discs of cocoa infused meringue. Three egg whites worth made four good sized discs. Her stand mixer got a good workout. The chocolate being folded into the whipped egg whites and sugar looked so pretty!

Then she made a luscious chocolate mousse, giving her stand mixer a good workout again with all the whipping she did.

There was some heavy cream in the fridge, so some of that got the stand mixer whipping treatment for embellishment.

Most important of all were the two pints of glorious freshly picked strawberries, sweet, juicy, fragrant, the soul of spring. She hulled them and sliced them into a bowl and let them sit and release their juices.

Now the fun began! On a footed cake plate she placed a chocolate pavlova disc. On top she spread chocolate mousse quickly covered with a generous amount of the fresh strawberries. The same process was repeated three times which gave her an impressive stacked tower of chocolate-strawberry goodness. A dollop of whipped cream on top finished it off.

She had invited friends over for dessert. The port wine perfectly complimented the decadent dessert and there was coffee, too, to ward off the evening chill that began at sunset. With the garden setting and half moon rising in the sky it was hard to imagine a better way to end the day, cheered by stories and laughter, warmed by wine and friendship, and delighted by chocolate pavlovas and strawberries.

The June 2010 Daring Bakers’ challenge was hosted by Dawn of Doable and Delicious. Dawn challenged the Daring Bakers’ to make Chocolate Pavlovas and Chocolate Mascarpone Mousse. The challenge recipe is based on a recipe from the book Chocolate Epiphany by Francois Payard. You can find the recipe at Dawn's blog. You can check out the Daring Baker's blogroll to see all the amazing pavlovas created this month!

I had a great time making this dessert, although I wasn’t entirely faithful to the challenge. I made the pavolova discs exactly as described in the recipe. In case you were wondering, it doesn’t help to have added the confectioners sugar to the regular sugar and then try to whip the egg whites with added sugar mixture. I didn’t read the recipe well and that was my first batch…the egg whites never did rise or get firm. Second time worked like a charm.

Amazing how using the recipe helps with the results!

Where I went off track was the mousse. Not a big fan of mascarpone and since I already had a go at making it with the Daring Bakers, I decided to do a different chocolate mousse. Unfortunately time got away from me and the duchess’s guests were going to arrive and expected a dessert toot sweet. I was feeling frantic, so I threw together some ingredients I thought would produce a mousse like texture, although I had never made whipped ganache before now.

The ‘save’ consisted of chocolate ganache which I chilled in the freezer, then whipped. Whipping cream was whipped as well. Another egg white was whipped until stiff. (So glad I have a stand mixer!) The whipped cream and egg white were folded into the whipped ganache and that mixture was used as mousse to fill the layers of chocolate meringue discs. It was wonderful!...light but intensely flavored…a perfect foil for those berries and crispy pavlovas. There was absolutely no time for a sauce of any kind, but turns out it didn’t need one.
The biggest challenge was cutting the dessert into servings. A serrated knife worked pretty well, but most servings were still pretty messy. No one seemed to care…every morsel was eaten. Of course it could have been the result of sipping port with the pavlovas.

Many thanks to Dawn for a lovely, light, luscious, delicious, decadent, drool-worthy dessert! Yay for chocolate!

Check out the other Daring Bakers’ versions of Chocolate Pavlovas, with links found on the Blogroll.. You don’t have to be a duchess to make Chocolate Pavlovas with Chocoalte Mascarpone (or my) Mousse and Crème Anglaise sauce.

Au revoir from the Land of St. Honore’! xoxo Elle

“Quick” Chocolate “Mousse”
6 oz. semi-sweet chocolate, chopped
2 cups heavy cream, divided
1 egg white

Place the chocolate in the bottom of a stand mixer bowl. In another small, microwave-safe bowl place 1 cup heavy cream. Heat in the microwave until very hot, about 1 minute on full power. Pour the hot cream over the chocolate and let sit 2 minutes. Stir with a spatula, to mix the melted chocolate with the cream. Make sure mixture is smooth. Place mixture in a bowl and put into the freezer for 10 minutes.

Clean the stand mixer bowl. Beat the egg white with the whisk attachment in place until the egg whites are stiff but still moist. Set aside in another bowl. Beat the remaining 1 cup heavy cream until soft peaks form. Set aside in another bowl.

Return the chilled ganache to the mixing bowl. Whip at high speed with the whisk attachment in place until the ganache is whipped, lightened and holds soft peaks. Remove bowl from mixer and fold in the whipped heavy cream and the egg white. Use as filling at once for the Pavlovas.

Thursday, June 24, 2010

Savory and Blueberry

Although strawberries continue to be a daily fruit that brings so much enjoyment, let's hear it for blueberries, just now finding their way to market at a reasonable price.

Lately we hear a lot about the wonderful health benefits of blueberries, but, really, isn't it the intense and sweet tart flavor that brings us back for more?

When I was a kid the usual way to enjoy blueberries was with cream, with cereal and milk, in pancakes and muffins and in pies. These days people are more willing to experiment with this versatile fruit.

I saw a recipe a while back in Bon Appetit magazine (winter of 2007) for game hens cooked with a cranberry sauce. It was very appealing but I never actually made the recipe. Today I decided to see if I could change it up so that I could use fresh blueberries instead, plus other things that I already had in my freezer and pantry. As usual I made a lot of changes...whoever created their recipe wouldn't even recognize it if they look at mine.

Since I am very comfortable with recipe substitutions in baking and less so in cooking when it is this sort of recipe (a savory recipe with fruit is still pretty new territory for me) I'm declaring this one of my High Five recipes.

I felt a bit of trepidation that this would be icky sweet or too fruity for dinner or something, but after I added the pinch of cayenne, it all came together and was wonderful!

The combination of lemon thyme, lemon and blueberry flavors worked so well with the chicken. The brown sugar and jam and lemonade were sweet, but the broth, thyme, and chicken were savory and the hint of heat from the cayenne kept them all friendly. I found that the lemon thyme was less assertive than regular thyme, so I added some dried thyme to reinforce that flavor note. It was great to bite into the warm chicken with sauce and feel the warm blueberry release its juices in my mouth, too. Sort of startling, too because usually that blueberry burst comes with muffin or pancake sweetness as well. Blueberry and savory go together well. I'll be making this recipe again.


Chicken Thighs with Double Blueberry Lemon Thyme Sauce

3 tablespoons butter, divided
1 tablespoon brown sugar
3 teaspoons chopped fresh thyme, divided (I used lemon thyme)
½ teaspoon dried thyme
6 boneless, skinless chicken thighs (but OK to use ones with skin on if that’s what you have)
1 tablespoon all purpose flour
1 cup low-salt chicken broth
½ cup lemonade
zest of one lemon – yellow part only
juice of ½ lemon
2 tablespoons blueberry jam or fruit spread
pinch cayenne pepper
salt and pepper to taste
1 cup fresh blueberries (or frozen, not thawed)

Preheat the oven to 375 degrees F. Line a rimmed baking sheet with heavy duty foil and have a matching piece ready to cover everything with.

Blend 2 tablespoons butter, brown sugar, and 2 teaspoons chopped fresh thyme in a bowl. Sprinkle chicken thighs with pepper. (I rinsed and dried the chicken thighs first.) Spread some of the butter mixture over each thigh on one side only.

Heat a large nonstick skillet over medium-high heat. Add the thighs, butter side down. Let cook for 4 minutes, then turn and sear for one more minute. Remove to the prepared baking sheet. Retain the mixture in the skillet and set aside. Cover the baking pan with the extra piece of foil and bake the chicken thighs in the preheated oven for about 20 minutes, or until juice run clear when pierced with a fork.

While the chicken is cooking prepare the sauce. In a small bowl blend the remaining 1 tablespoon butter and the 1 tablespoon of flour to make a paste. Set aside.

Add the broth, lemonade, lemon zest and juice blueberry jam , the rest of the thyme, the dried thyme and the cayenne pepper to the skillet with the browned bits still in it. Use a wooden spoon to scrape up the browned bits and mix them with the other sauce ingredients. Stir over high heat and boil until the sauce is reduced by 1/3. Whisk in the flour mixture and cook for 2 minutes to allow the sauce to thicken. Add the blueberries and stir to combine with sauce. Lower heat and simmer for a few minutes to warm the berries. Taste and correct for seasonings with salt and pepper.

When the chicken is finished cooking, remove from the baking sheet and place each piece in the sauce, turning over to nap both sides with the sauce. Repeat until all chicken pieces are in the skillet. Serve while hot, making sure to include some of the sauce and berries in each serving.

I served mine with mixed vegetables and orzo pasta. Delicious!
Serves 3-6

Wednesday, June 23, 2010

Buddy Gets Korni

Those rollicking, creative and determined Bread Baking Babes have two new things going this month.


First off they have decided on a posting schedule. As a sometime Buddy I really appreciate that. Now I know when to check for the latest bread challenge (the 16th of each month) and when I have to have baked that bread challenge by...and post about it...to be a BBB Buddy (the 29th of the month). It's great to have so many days to bake, too. Some months the turnaround was a week and sometimes that is too short a span for me. Thank you Tanna!


The second new thing is a delightful bread suggested by Lien of Notitie van Lien called Korni Bread. It has lots of interesting ingredients including a new one for me...soy nuts. The recipe called for cooking and then baking coarsely chopped soy beans but some of the Babes substituted soy nuts, so that's what I did and it worked very well. They added great texture and flavor to the bread. Grains include rye, whole wheat and unbleached white flours and the crunch of millet. Flax seed and caraway seed complete the list and both added flavor and color.

I enjoyed making this bread. You start a sponge the night before and then the next day add more flour, the seeds and soy nuts and millet plus a little more yeast so this doesn't become a heavy bread, although it is still dense and chewy. I weighted the dry ingredients and found that I needed about another 2 tablespoons of water to bring the dough together. It was fun to knead because of the tiny lumps of millet and flax seed and larger chunks of soy nuts.

I made a round loaf and a torpedo shaped one and both look great! We had some with dinner and the flavors were an excellent blend of grains and seeds. I'll bet it will make great toast, too! Will try that tomorrow.

You, too, can bake this wonderful bread (and become a Buddy). The recipe can be found at Lien's blog (thank you Lien for a great choice!) and you still have a few days before the deadline. Let's bake!

Friday, June 18, 2010

Tender Peas and Snappy Pod

Strawberries aren’t the only sweet seasonal food that you can find at the market and farmers markets right now. Cherries and apricots have their short space of springtime ripeness. Sugar snap peas are starting to show up, too.

Why eat sugar snap peas? These crunchy green delights are practically non-fat, have no cholesterol, lots of fiber, are very low in sodium and very high in iron, thiamin, vitamin A & C and high in vitamin B6, manganese, magnesium, pantothenic acid, phosphorus and potassium. Beyond that they taste so good!


Sugar snap peas are easy to grow, too. This spring I grew some for the first time and I chose a variety that doesn’t climb too tall. Unfortunately I gave the seed packet to my sister-in-law so she could grow some, too, so I don’t have the name…something with ‘gray’ in it I think. Peas of all sorts are heavy feeders, so be sure to fertilize them regularly. I use Miracle Grow crystals which I mix into gallon water bottles. Our cool, damp spring also likely helped since most peas prefer cooler weather to hot days. That’s why they have a shorter season, being at their absolute best in the Spring.

Pick the pods once they have started to form peas inside the pod. If you pick them early they are like snow peas and if picked later when they are mature, you can open them up and remove just the peas like English peas. In between is the way that sugar snap peas are usually grown and harvested for market. The pods are snappy crisp but still supple enough to eat raw and the peas inside are still tiny and tender.

These are great eaten raw, out of hand, for a snack, or dipped in something like the roasted garlic bean dip or some ranch dressing. For a nice side dish, lightly steam and add a small amount of butter which can be stirred in to just lightly coat the pea pods. They are also wonderful in stir-frys, great in salads, adding a wonderful crunch and ‘green’ taste, and you can use them in any recipe calling for snow peas if they are still in their very young and tender stage.

There is no recipe in this post because fresh goodies like this need only the lightest of preparations. Last night I served a pint of them, just picked, lightly steamed and buttered. Before I steamed them I removed the stem end and the string along the top of the pea. The flavor of fresh peas, including these wonderful, crunchy sugar snap peas, just says ‘Spring’ to me. Try them while the season is right.

Thursday, June 17, 2010

Hearty Fresh Blueberry Muffins

As we head toward the longest day of the year it gets light earlier and earlier and stays light long into the evening. One of the side effects is that I often wake up much earlier than I do when days are shorter. The birds around here start singing about 5 am these days, including the annoying peacocks a few blocks over. Despite being tired from all the unusual physical labor necessary for the remodel my eyes seem to pop open sometime between 5 am and 6 am with little hope that I'll be able to get any more sleep.

That's what happened yesterday, so I decided to make good use of the early hour by baking something for breakfast. There were fresh blueberries on sale at the market and we had not had fresh blueberry muffins for a long time, so I scrounged in the baking pan cupboard and came up with an 8 hole muffin tin. Further search would have waken Sweetie, so the recipe would have to be adjusted to the smaller pan.

I love blueberry muffins! The lemon zest perks up the flavor, they have less sweetness than some for the batter so that when you bite into a warm, juicy berry you really taste that awesome blueberry flavor.

I've been reading a great cookbook called The Sweeter Side of Amy's Bread and decided to jump off from their recipe for French Blueberry Muffins. I like oatmeal and brown sugar in breakfast foods, plus whole wheat flour for flavor and heartiness, so the dry ingredients changed a fair amount. Since I had brown sugar, I also included some baking soda not in the original recipe. The molasses in the brown sugar interact with the baking soda to make the muffins lighter. Egg substitute was easier to measure for the reduced amount of egg, but I think that 2 medium eggs would also work. Their recipe called for whole milk but I had 2% in the fridge, so that was changed, too.

Finally, I had fresh blueberries. Having never tried this recipe with frozen ones, I'm recommending that if at all possible, go with the fresh ones. Think of the flavor and anti-oxidants!

These don't need additional butter or anything else, really. They are moist, bursting with blueberry flavor and heartier than some muffins because of the whole wheat flour and oats. They are hardly like the French ones in the book, but the proportions remain the same, for which I thank authors Amy Scherber and Toy Kim Dupree.


With a bowl of fresh fruit and a cup of coffee these muffins make getting up with the sun a fine way to start the day.

Hearty Fresh Blueberry Muffins
based on French Blueberry Muffins in The Sweeter Side of Amy's' Bread

1 cup all-purpose flour
¼ cup whole wheat flour
¼ cup rolled oats
½ cup granulated sugar
½ cup brown sugar
½ tablespoon baking powder
½ teaspoon baking soda
½ teaspoon salt
½ cup unsalted butter, melted and cooled a bit
¼ cup plus 2 tablespoons egg substitute (or 2 medium eggs)
¾ cup milk (I used 2%)
Grated zest from ½ a lemon
1 cup fresh blueberries

Preheat the oven to 400 degrees F with rack in the middle of the oven. Grease 8 muffin cups or line 8 cups with cupcake papers.

In a large bowl combine the flours, oats, sugars, baking powder, baking soda and salt with a whisk.

In another bowl whisk together the melted butter, egg substitute or eggs, milk and lemon zest.

Add the wet ingredient mixture to the dry ingredient mixture, stirring with a fork for a few strokes; just enough to incorporate 90% of the dry ingredients into the wet.

Add the blueberries and continue gently mixing just until ingredients are combined. Immediately scoop the batter into the prepared muffin tin, dividing the batter as evenly as possible among the cups.

Bake for about 20 minutes, rotating the pan half way at 10 minutes. Muffins are done when the tops are golden brown and when a toothpick inserted in the center of a muffin comes out clean (well, there may be blueberry juice clinging to it, but no uncooked batter, OK?)

Allow the muffins to cool in the pan for 5 minutes, then remove from the pan and cool some more if you can wait that long. Enjoy these muffins while still warm or serve within 12 hours for the moistest muffins. Wrap any remaining muffins airtight and store in the fridge.

Makes 6-8 muffins

Saturday, June 12, 2010

Strawberry Variations

One of the fun things about baking is that once you learn about proportions and how acids like buttermilk react with bases like baking soda and similar 'chemistry' you can enjoy experimentation.

Sometimes I mull over ideas for days before coming up with something that seems likely to work and to make good use of the seasonal ingredient I have on hand or the flavor I've been longing to taste. This time I had both fresh rhubarb and juicy strawberries ready to be combined (don't you just love that flavor combo?) and I wanted to capture the copious juice they would make when heated. I considered a compote and a fruit fool, but wanted something warm. Eventually it seemed that if I combined a layer of cake to act as a sponge and soak up those juices, plus a topping over the fruit that it would be just what I wanted.

For a lark I took the brown sugar buttermilk cake recipe I had used for shortcake and changed it a bit, used the cake as a base for a mixture of cooked rhubarb and strawberries and then used part of the batter to create a crisp topping. It was a fab experiment!

Sweetie and Straight Shooter razzed me before dinner about the buttermilk sitting on top of the microwave. They were convinced it would spoil. When they tasted the cake-fruit-crisp combo with some whipped cream on top they knew that the buttermilk was just fine and had helped with moistness and tang in the cake. The juices of the rhubarb-strawberry mixture seeped into the cake below which gave it a great flavor, too. The crispy topping was a great textural contrast. They decided that second helpings were in order.

Keeping track of time for baking is essential with this recipe. The cake bakes part of the way without any topping for just 10 minutes to allow the cake structure to develop...along with it's ability to be a sponge for the juices. After topping with the hot fruit and with the oatmeal laced topping it baked another 15 minutes, allowing the cake part to finish baking and for the topping part to get nice and crisp. I added pieces of the soft topping mixture with my fingers for irregular islands of topping on the sea of fruit, but you could also use a spoon to scoop on tablespoon sized pieces.

The same layered technique would work well for other stewed fruits or juicy fruits like stone fruits or other berries, too. Cake-blackberries and peaches-crisp will be the perfect combo around the beginning of July.

(In case you were wondering, the bathroom project is about half done and my 'vacation' is about 2/3 done, but it's going to be beautiful...light and airy and a huge shower! If you just are dying to see photos of Sweetie using a drill or me with a runaway belt sander send me an e-mail and I can send you some photos. Most just look like fairly generic construction photos, but a few give a hint of what the end results will look like.)

If you do make this recipe, even with fruit variations, do let me know. I've never seen one like it exactly and would love to know if it works in your kitchen, too.

Three Layer Fruit Crisp with Rhubarb and Strawberries
Serves 6 – 8

1 deep 9" cake pan or, preferably, a deep skillet
1 ½ cup all-purpose flour, divided
1 teaspoons baking soda
½ teaspoon baking powder
¼ teaspoon salt
½ stick (4 oz) unsalted butter, at room temperature
1 cup brown sugar, packed, divided
2 large eggs
1 teaspoon pure vanilla extract
½ cup buttermilk
1 cup diced fresh rhubarb
2 pints fresh strawberries, hulls removed, then sliced
½ cup rolled oats (old-fashioned are best)

Butter a 9 inch round baking pan or skillet with deep sides.You will be baking this on a baking sheet to catch any juice drips. Center a rack in the oven and preheat to 350 degrees F.

Whisk together 1 ¼ cup of the flour, the baking soda, baking powder and salt. Set aside.

In the bowl of a stand mixer, fitted with a paddle attachment, beat the butter on medium speed until soft and creamy. Add ½ cup of the brown sugar and beat for about 2 minutes, until sugar is completely blended into the butter.

Add one egg and beat for one minute. Scrape sides of bowl and beater. Add the second egg and beat for 2 minutes. Beat in the vanilla until incorporated.

Reduce mixer speed to low and add the dry ingredients alternately with the buttermilk; add the dry ingredients in 3 portions and the buttermilk in two (begin and end with dry ingredients). Mix only until each addition is barely blended in to the batter. Scrape down the bowl and take a few turns with the spatula to finish mixing the batter quickly.

Put the batter in the prepared pan reserving ½ cup of the batter in the mixing bowl . (I put all the batter in the pan, then removed ½ cup and put it back into the mixing bowl, then used a spatula to gently level the batter in the pan.) Place on a baking sheet and put into the preheated oven.

Bake for 10 minutes.

While the cake is baking, stew the fruit. Combine the rhubarb and strawberries in a saucepan. Cover. Place over medium heat and cook about 10 minutes or until the strawberries release their juice and are soft.

While the fruit is cooking, combine the remaining ½ cup cake batter, and additional ½ cup brown sugar and ½ cup rolled oats to make the crisp topping. Batter will be soft.

Once cake has baked for 10 minutes, remove from the oven, top with the hot fruit, and scatter pieces of the topping fairly evenly over the hot fruit. The topping will not completely cover the fruit…there will be lots of fruit showing but the batter will spread out some as it bakes.

Return the pan to the oven and bake an additional 15 minutes. Let cool at least 10 minutes because fruit is very hot and could burn you.

To serve, scoop large spoonfuls of the dessert into bowls, making sure to include cake, fruit and topping. Garnish with heavy cream, vanilla ice cream or a dollop of whipped cream. Serve while warm.

Thursday, June 10, 2010

Strawberry Shortcake If You Really Like Cake

I love cake. It's not that I don't enjoy cookies, pie, ice cream and other treats, but I really, really like cake.

When strawberries are at their peak of perfection each year I make every effort to have strawberry shortcake. Some years I go with the cream scone or sweet biscuit type of base but my favorite is always a cake base. The cake soaks up the glorious berry juices and mixes well with rich, freshly-whipped heavy cream and provides another texture as well. Some years if I'm in a hurry I go with a yellow cake mix. Mostly I try out different white or yellow cake recipes. This year I think I've figured out a recipe that will be my go-to for future years when strawberry season rolls around.

My friend Green Thumb was being the hostess for a meeting of the Ways and Means committee. We needed to plan ways to raise money this coming year for scholarships. She had the great idea of serving Strawberry Shortcake, even though we were meeting at 10 am! I guess if we can have strawberries, whipped cream and waffles and call it breakfast that Strawberry Shortcake can be a seasonal coffee cake, too.

She provided the strawberries...those local, sweet, juicy ones, all sliced and ready to go. I provided whipped cream...only the real stuff with fresh strawberries, please...and squares of a moist and buttery buttermilk cake flavored with vanilla and brown sugar. It started as a Dorie recipe but, as is often the case, I played with it so much that she might have trouble recognizing it. I'll give my recipe below and you can check out her recipe for Cocoa-Buttermilk Birthday Cake in Baking:from my home to yours and see what changed. The reason I chose to make this cake, aside from the fact that I had buttermilk in the fridge (often I don't) was that I wanted to make a cake with the dry-wet-dry mixing method because I usually like the results.

So we finished our business meeting and then put squares of this springy cake that hinted of brown sugar and lemon into bowls. On top we spooned on generous servings of those sweet berries and their juice. A dollop of whipped cream and a whole strawberry on top finished each serving. This dessert was such a hit that a couple of the ladies who always are careful about what they eat even had seconds!

Try it while strawberry season is here, but remember it will work just as well as a base for sliced fresh peaches, juicy blackberries or blueberries or raspberries or even add some cocoa powder and top with fresh pitted cherries and a swirl of chocolate sauce over the whipped cream for a take on Black Forest cake.

Buttermilk Shortcake Cake
A moist and buttery single layer cake using the dry-wet-dry mixing method
1 ¼ cup all-purpose flour
2 teaspoons baking soda
¼ teaspoon salt
1 stick (8 oz) unsalted butter, at room temperature
¾ cup brown sugar, packed
1 large egg
1 egg white
½ teaspoon pure vanilla extract
grated zest from ½ a lemon
½ cup buttermilk

Butter a 9 inch square baking pan and dust the inside with flour, tapping out any excess. Center a rack in the oven and preheat to 350 degrees F.

Whisk together the flour, baking soda, and salt. Set aside.

In the bowl of a stand mixer, fitted with a paddle attachment, beat the butter on medium speed until soft and creamy. Add the brown sugar and beat for about 2 minutes, until sugar is completely blended into the butter.

Add the egg and beat for one minute. Scrape sides of bowl and beater. Add the egg white and beat for 2 minutes. Beat in the vanilla and lemon zest until incorporated.

Reduce mixer speed to low and add the dry ingredients alternately with the buttermilk; add the dry ingredients in 3 portions and the buttermilk in two (begin and end with dry ingredients). Mix only until each addition is barely blended in to the batter. Scrape down the bowl and take a few turns with the spatula to finish mixing the batter quickly.

Put the batter in the prepared pan and level the top. Place on a baking sheet and put into the preheated oven.

Bake for 25 -30 minutes, or until the cake feels springy to the touch and starts to pull away from the sides of the pan.

Transfer cake to a cooling rack and cool 5 minutes. Run a knife around the sides of the cake and turn out onto a plate. Place an inverted plate over the cake and turn right side up. Cool to room temperature.

Cut the cake into 9 squares if using for strawberry shortcake or similar dessert. This cake will keep, wrapped air tight, overnight or you can freeze it for up to 2 months for a quick dessert.

Friday, June 04, 2010

Strawberry Tart

This tart was actually made last weekend for a dinner party but this week has been full to the brim with the bath project so it had to wait to be posted here.

Strawberry season has arrived meaning that our local strawberry farm has lots of these gorgeous red beauties for sale at reasonable prices. They are juicy and very sweet since they are grown a stones throw away from the farm stand and picked a number of times a day in response to demand.

Contrast that to the ones in grocery stores that are picked when almost green and shipped long distances, being out for sale days later in some cases. The berries look pretty most of the time but are rarely juicy, often woody and even hollow inside. Sweetness varies, too. If you can find local strawberries, do use them...it makes a difference! Often farmers markets will have local berries and other fruits in season.

Last month the Daring Baker challenge allowed me to produce a nice stack of cream filled cream puffs liberally coated with dark caramelized sugar. There was plenty of pastry cream left, so I used it as the filling for the tart with that pastry cream as a base. The strawberries were sliced in half and arrayed around the tart in a nice pattern. Some seedless raspberry jam, melted in the microwave and then brush over the berries, gave a nice finishing sheen. A little time in the fridge firmed it all up. For the tart base I chose Dorie Greenspan's cookie like Sweet Tart Dough from her book Baking:from my home to yours.

This tart was heavenly! The crust provided some crispness, the juicy berries went perfectly with the smooth, rich cream filling. Every mouthful was a delight. Do try this while berry season is here. You could easily substitute blueberries or raspberries for the strawberries...or use all three and you have the perfect tart for the 4th of July.

Have a slice!

Quick Chiboust Cream Filling for the Tart

1 envelope unflavored gelatin (7 gr.)
1/4 cup cold water (60 ml)
1/2 cup + 2 Tablespoons sugar (130 gr)
½ cup all-purpose flour (70 gr)
1/4 teaspoon salt
5 egg yolks
2 cups whole milk (500ml)
1 Tb. rum
¼ cup whipping cream (57 gr)
3 egg whites
dash of salt
1/2 cup sugar (105 gr)

Soak the gelatin in the 1/4 cup of cold water.

Put the sugar, flour, and salt into a saucepan and stir together with a whisk. Add the yolks and enough milk to make a paste. Whisk in the remainder of the milk.

Place over low heat and stirring constantly, cook until thick. Remove from heat and stir in the vanilla and the gelatin. Stir until the gelatin is completely dissolved.

Stir in the whipping cream.Set the mixing bowl in cold water and stir until the cream is cool. Place the egg whites in a clean bowl and using clean beaters, whip them with the dash of salt. As soon as the whites begin to stiffen, gradually add the 1/2 cup of sugar and beat until they are very stiff. Fold the egg whites into the cooled cream.

The above recipe is from the May 2007 Daring Baker's challenge...Gateau St. Honore'.
You will need about 2/3 of it as filling for the tart. Since it has gelatin in it, a bit of time in the fridge after putting the tart together is a good idea...it will firm the cream up nicely for tart slicing.


Almond Sweet Tart Dough - fully baked
1 1/4 cups all-purpose flour
1/4 cup finely ground almonds
1/2 cup confectioners sugar
1/4 teaspoon salt
1 stick plus 1 tablespoon (9 tablespoons) very cold butter (frozen is great), cut into small pieces
1 large egg yolk

Put first four ingredients in a food processor and pulse a few times to combine. Scatter the pieces of butter over the dry ingredients and pulse until the butter is coarsely cut in - you should have some pieces the size of oatmeal flakes and some the size of peas. Stir the yolk, just to break it up, and add it a little at a time, pulsing after each addition. When the egg is in, process in long pulses - about 10 seconds each - until the dough, which will look granular soon after the egg is added, forms clumps and curds. Just before you reach this stage, the sound of the machine working the dough will change - heads up. Turn the dough out onto a work surface and very lightly and sparingly, knead the dough just to incorporate any dry ingredients that might have escaped mixing.

Butter a 9-inch fluted tart pan with a removable bottom. Press the dough evenly over the bottom and up the sides of the pan, using all but one little piece of dough (which you save in the fridge to patch any cracks after baking the crust). Press gently. Freeze the crust for at least 30 minutes, preferably longer, before baking.

Preheat the oven to 375 degrees F and center a rack in the oven.
Butter the shiny side of a piece of aluminum foil and fit the foil, buttered side down, tightly against the frozen crust. (Since you froze the crust you can bake it without weights.) Put the tart pan on a baking sheet and bake for 25 minutes. Carefully remove the foil. If the crust has puffed, press down gently with the back of a spoon where puffed. If there are cracks, patch now with that piece of dough you saved, moistening it slightly before pressing on the cracked area.

Return the tart pan to the oven and bake another 8 - 10 minutes or until it is firm and golden brown. Watch it closely so it doesn't burn or turn too dark a brown. Cool the crust to room temperature before filling.