Sunday, August 05, 2018

Shrimp on the Barbie


Sweetie absolutely loves shrimp. When we go to Costco he always buys some cooked shrimp to have for lunch that week. They cook the kind he likes with garlic and butter, so I have something else for lunch, but I like shrimp, too, so sometimes we get the plain kind with cocktail sauce for dipping.

Last night we had a made-up recipe BBQ Shrimp. The marinade is the made up part, since the shrimp were purchased already cleaned and with all the shell except for the very last part of the tail removed.

The marinade used both regular and Meyer lemons because that's what I had on hand. I used Penzey's Spices Greek Seasoning blend, which contains salt and pepper, garlic, dried lemon peel, oregano and marjoram, all great flavors for shrimp. If you don't have that, season the marinade to taste with minced garlic, dried oregano and marjoram, salt and pepper as well as the lemon juice.

I marinated the shrimp for about a half hour, 15 minutes, then I turned the bag over for another 15. Much longer and you start 'cooking' the shrimp with the acid in the lemon juice, like with ceviche.

While the shrimp were marinating, I soaked wooden skewers in water. Once it was time to cook the shrimp, I threaded them on the skewers, starting with the tail end and going through the largest part last. The marinade also had olive oil in it, so all Sweetie had to do was put them on the barbie and make sure to not overcook them. Shrimp only needs a couple of minutes per side.

We had them with grilled zucchini from the garden, sliced tomato from the garden dressed with olive oil, garlic and pepper and balsamic vinegar, and store bought potato salad. It was close to 90 in our neck of the woods yesterday and still around 80 when Sweetie was barbecuing, so only having to be out in it for a short time was perfect.


The shrimp were moist and succulent and lightly flavored with the citrus and herbs. These would work well as an appetizer, too. You could have a thin slice of cucumber or zucchini, pepper, a dab of yogurt or smashed avocado and a shrimp on top.

Hope that you are staying cool (or warm the the Southern hemisphere) and enjoying the summer.


Shrimp with Citrus Marinade

1 pound shrimp, cleaned and shell removed except for tail, rinsed and drained
juice of two lemons
1/4 cup olive oil
1/2 teaspoon Penzey's Greek Seasoning blend
or
to taste: salt, pepper, lemon zest, garlic, dried oregano, dried marjoram

In a large ziploc bag place the lemon juice, olive oil and seasoning(s). Shake to distribute and let sit five minutes for the herbs to rehydrate.

Add the shrimp and shake to coat with the marinade. Lay the bag flat and make sure that the shrimp are in one layer. Let marinate for 15 minutes. Turn the bag over and marinate for another 15 minutes.

While the shrimp is marinating, soak 6-8 wooden skewers in water ( I used a broiler pan, but a rimmed baking pan would work, too) for at least 30 minutes. You can soak them longer if you like, but the shrimp cooks so quickly that 30 minutes seems to be enough.

Once the shrimp have marinated for 30 minutes, remove from the marinade. Discard the marinade. Thread the shrimp on the skewers, starting with the tail end, just above the shell and being sure to pierce the upper part of the shrimp. This will make curled shrimp, which is what they do when they cook anyway. I put five on a skewer, but you may do more or less depending on the size of your shrimp.

Grill on a preheated barbeque for about 2 minutes per side. Cooked shrimp will be opaque and pink. Don't overcook. Serve at once with lemon wedges and/or cocktail sauce, although we had them just as they came off the grill and they were delicious that way!

Saturday, August 04, 2018

The Deck and the Garden


Recipes have been scarce on this blog for a while and posts, too. I blame our work on the back deck. Sweetie and I have been spending every day for the last two weeks (minus, for me, the three days last weekend when I was in LA) taking apart the old deck and refurbishing it, then putting down new deck boards and putting in new posts for railing. As is normal in the summer, this has been hot work. By dinner time there is no energy for new recipes, either savory or sweet.

We have house painters coming on Monday, so we have stopped the deck work for a while (although we might work on railings) and our perseverance paid off. Both the lower and the middle deck are done, leaving only the steps, railings, and some of the upper deck! Exciting. Here is how it looks:


It might not look like much, but the larger deck is 11 x 16 feet.

The garden is the other thing that has my attention. The squash, cucumbers, beans and...finally!...tomatoes are gradually ready to harvest (see top photo for all but beans), but I find that I need to harvest the beans daily in  order to have beans that aren't huge and tough. The basil is getting big, too. The flowers are also a joy, but need deadheading and today I began the process of weeding out the old, spent wildflowers and trimming the tops off the iris leaves. Soon it will be time to put down more bark chip mulch, too. It's certainly needed near the potted zinnia and flax in the photo below. Someone gave me a sign that says, "A garden is a thing of beauty and a job forever" and they spoke the truth.


Tonight we are having grilled shrimp, grilled planks of zucchini squash, sliced tomatoes with balsamic, olive oil and basil chiffonade so maybe I'll have a shrimp recipe to post soon.

Sunday, July 22, 2018

Surf


When I first started to blog, waaaaaay back in 2006, a popular pastime was to 'surf the web'. There was a lot less on the internet and not so much in the way of social media that there is now...no Twitter, no Instagram or Snapchat for instance. People had more time to just wander around from link to link and check things out.

Recently when I was looking for a recipe on my blog (which is not easy since I have been truly terrible at keeping up any kind of current recipe index...sorry) I started really looking at, and in some cases reading, old posts from years ago. It was fun! My sister recently did the same thing and told me that she really enjoyed reading some of my old posts. So I checked my stats and found that only one post in the top 10 was older than 2018. Most people looking at this blog are only reading the most recent posts. I'm glad that you are visiting, but do consider wandering around and seeing what else is here. I've posted over 1,000 recipes over the years. A lot of them are for bread, cake, cookies and scones, but there are plenty of others, too.

Don't know how to check out the old posts? Find the 'view web version' link, usually at the bottom of the posts that your computer, browser, or phone shows. If you click on that it takes you to the version which included my flawed recipe index (which looks like a photo of a table set for dinner...just click on the photo to go to the index) on the right, plus a set of links for each year I've blogged. If you click on the triangle to the left of the year, all the months in that year are listed. Click on the triangle to the left of the month and all the posts in the month appear.


Here are some links...match them with the photos above and at the top of the post, then check them out if they look interesting and look at a few posts before or after to get your 'surf' going!!

96-Proof Chocolate Bundt Cake8 Ingredient Mediterranean Couscous SaladGrilled Cheese and Basil Polenta, Quiche with Swiss Chard, Swiss Cheese and Bacon, Stuffed with Berries Summer Pudding

So try it sometime; surf this blog and see what you find. Make a comment if you find something that has an error (I know there must be some) or that you really enjoy. I look forward to hearing from you!

Saturday, July 21, 2018

Lemon Sheet Cake #TheCakeSliceBakers

A little late to the party, but summer is never an easy time to find the right time to bake. As usual, we have a project for the house going on. This July it's a refurbishment of the back deck, which is a three level affair connected by steps. Sweetie and I built it together over 25 years ago, so it has aged enough to no longer be beautiful, nor totally safe.

Today we stopped early enough that I whipped up the Lemon Sheet Cake from The Perfect Cake cookbook (no 'buttermilk' in the title since I didn't use buttermilk). Except for using non-dairy margarine and soy creamer as substitutes for the butter and buttermilk, I followed the recipe exactly. Those substitutions are necessary if I'm going to eat any of the cake, and I soooo enjoyed this cake that I'm glad I did.


This cake is tender, moist and has a heavenly true lemon flavor. The crumb is fairly tight and the crust delicate. I love the lemon sugar glaze even though it does make the cake pretty sweet. The sprinkle of lemon zest enriched granulated sugar over the glaze adds just the right touch of crunch, and even more lemon appeal and sweetness.

Allow some time at the beginning to zest and juice the lemons...takes 5-10 minutes, but is well worth the effort. Otherwise this is a fairly basic cake recipe where you cream the butter with the sugar that has been enriched with the lemon zest, then you add eggs, then the dry ingredients in three parts and the wet ingredients in two parts, with the dry added last. Using cake flour is wonderful since it makes the cake delicate and tender.


I know that quite a few Cake Slice Bakers also make this recipe. Who can blame them? This cake if just fine by itself and even better with a few ripe strawberries or raspberries or blackberries or blueberries and since this is berry season that's easy to do. I added a few  strawberries from our garden and it was the perfect summer treat with the luscious lemon cake!


Do visit the other Cake Slice Bakers to see how their cakes turned out. There is at least on who did the cake pops and one who did the almond meringue layers with fruit. No recipe, but do consider buying the book because every recipe so far has been flawless.


Each month The Cake Slice Bakers are offered a selection of cakes from the current book we are baking through.  This year it is The Perfect Cake from America's Test Kitchen #atkcake.  We each choose one cake to bake, and then on the 20th - never before - we all post about our cake on our blogs. There are a few rules that we follow, but the most important ones are to have fun and enjoy baking & eating cakes!

Follow our Facebook,  Instagram, and  Pinterest pages where you can find all of our cakes, as well as inspiration for many other cakes. You can also click on the thumbnail pictures below to take you to each of our cakes, or visit our blog where the links are updated each month. If you are interested in joining The Cake Slice Bakers and baking along with us, please send an email to thecakeslicebakers at gmail dot com for more details.
The Cake Slice Bakers are baking from a new book "The Perfect Cake" from America's Test Kitchen.

Our choices this month are...
  1. Lemon Buttermilk Sheet Cake
  2. Apricot-Almond Meringue Cake
  3. Refined Strawberry Shortcake
  4. Party Cake Pops
Visit our members to see what cake choice they baked up! 

Thursday, July 19, 2018

Screwing Around


Time can be a destroyer or a healer...strange that it works both ways.

This month we are focused on the destroyer aspect as Sweetie and I have begun to rebuild the back deck that we first built together over 25 years ago. Many rainstorms and lots of sun have aged the wood and in some cases weakened it. It's sort of like a jigsaw puzzle. We take some of the old apart and figure out what can stay and what needs replacing and if anything can be improved on in the process. So far we have added a couple of posts for additional handrails,  a bow to our advancing age...the deck isn't the only thing that has been affected by time. We've also decided to try leaving off a railing on the lower level and to leave off a step connecting the middle level with the lower level. There are still steps to each, but we were often a bit anxious about it when we had folks seated at tables on the middle level...so easy to scoot a chair too far back and have it go lower unexpectedly. Now there will be railing around much of the middle level which will actually feel nicer.


Twenty five or so years ago the quality of redwood available for decks was far superior to what is around today. We checked out a number of suppliers and none of them had anything as clear or with few small knots like there was then. It's too bad, but I suspect that with the major fires last October, there has been a run on materials and it's hard to keep up with demand.


We have discovered that we can also only work about 4-5 hours a day on the deck instead of 7-9 when we were so much younger. Being retired means that it really doesn't matter. Pi doggie really enjoys having us there since hanging out on the upper back deck has been his preference for many months now. He is keeping an eye on us and making sure we do good work.

I do hope to post a lovely cake in the next day or two since the 20th of the month is reveal day for the Cake Slice Bakers. Probably won't have a ton of other posts on food since the project takes precedence over baking and most cooking, too.

The healing aspect of time has been in evidence lately, too. On Tuesday we remembered our son Max, lost 19 years ago on July 17th in an auto accident. The loss is still great and sometimes overwhelming, but the years have taught us how to deal with it and healing has happened, too. Come August 12th, his birthday, we will celebrate all that he meant to us and to others while he was alive. In the meantime, we miss you Max, every day.

Monday, July 16, 2018

Singing Hinnies with the Bread Baking Babes


This has been a hot summer for us. Lots of days in the high 80s, the 90s, even a couple triple digits ones. As you might note if you look at other recent posts, not a lot of baking is going on. When it was time for me to select a recipe for July as the Bread Baking Babes Kitchen of the Month, I decided to go with something that didn't require an oven. I'm not the only one of us contending with high temperatures!

One of the oddly named recipes that I have been meaning to try for a while is Singing Hinnies. So for July we will be making Singing Hinnies. What on earth are those you might wonder. Well, they are a scone-like griddled bread from Northumberland in Northern England.


"There are many thoughts about the derivation of the name but I’m sure it is the noise they make as they cook.  Apparently a mother explained to her daughter that they would soon be ready as she could hear them singing.  She then referred to her daughter as ‘hinnie’ – a Northumbrian term of endearment, hence the ‘singin’ hinnie’." Thus wrote Laura Fitzpatrick of the blog Hello Eco Living

I mainly used her recipe, with a few variations, plus there are suggestions below for making your own changes. If you are going to be a Bread Baking Buddy, and I hope that you do that, the only requirement is that they are scone-like and contain a fruit like currants or raisins and that they are cooked by griddling.


They are the perfect breakfast  or tea time treat and come together in less than 30 minutes using pantry staples. You can use all butter or margarine, or use part butter and part lard if you have a good supplier of lard. You can use a food processor to pulse the cold fat into the flour mixture before adding the currants and mixing the rest by hand in a bowl, or use the traditional method of rubbing the fat in by hand or cutting it in using a pastry cutter or two knives...your choice.

Another choice is to add 1/4 teaspoon baking soda to the flour mixture and then add 1 tablespoon of lemon juice to the milk before adding it to the flour mixture after the fat is cut in. This will probably produce a slightly higher singing hinnie, but it might take longer to cook. A key element here is a cast iron skillet or a griddle or similar cooking surface that is heated on a low heat. Mine was at the perfect temperature when, as I flipped the hinnies to the second side, they 'sang' from the fat particles hitting the hot griddle. That will happen if it is too hot, also, but not if the heat is too low (which is what I had at first...that's how I know).


Do handle the dough lightly and minimally as you would a scone or biscuit mixture to keep them from being tough. Cut straight down with your round cutter and don't twist so that they will rise well. I found that I needed a full 9 tablespoons of milk to wet the dry ingredients so that they would hold together to be rolled out. I rolled them to a half inch thickness. They do puff up a bit when they cook and thicker might make it harder to griddle them fully without burning the outsides.


These are delightful, rather like a rich but thinner scone. The griddled part gets a nice browned butter flavor and the currants give a bit of sweetness. I used a small fork to split a couple of them and added more butter, but decided that I preferred them unsplit, just as they are when they come off the griddle. They are very tender on the inside and just a bit crisp on the outside. Do eat them while still warm! Jam and butter are optional. Tea goes really well with these.


Be sure to check out the other Bread Baking Babes for their take on this rich little goodie. If you go to Web View of this blog, the links to their blogs are on the right, down a little way.

If you'd like to become a Buddy and get one the beautiful badges that Elizabeth created (similar to the one above), just email me at plachman at sonic dot net with a photo and the URL of your post, plus a brief description of your experience making these. The deadline is July 29th. I'll try to post the roundup on August 1.


Singing Hinnies

225grams (8ozs) plain flour
1/2 teaspoon salt
1 teaspoon baking powder
100 grams (4ozs) butter (or margarine)
50 grams (2ozs) currants
Milk to mix to a dough (about 6-9 tablespoons)


Sift the flour and baking powder (and baking soda if using) into a bowl.  Rub in the fat (or cut in with pastry blender or two knives) and stir in the currants.  Add enough milk to make a dough.  Roll out onto a floured tray or board and cut with scone or biscuit cutter into rounds of chosen size, usually about 3 inches wide.
Heat pan (griddle or cast iron skillet work well) and lightly grease.  Place scones onto griddle on a very low heat so that the scones can cook very slowly.  Turn once and cook on other side.  To check that they are cooked remove one of the scones and tap it gently – it should sound hollow. The top and bottom should be browned but not burnt.
Serve warm, either split and buttered, or not. Strawberry jam should be great with these.

Saturday, July 14, 2018

Finished Painting


Just realized that I never posted the finished sea painting that I did for K.  She was here just after the 4th of July for a visit, but taking it home on the plane (the plan) wasn't feasible once we factored in Uber for the ride home from the airport. Too many large items to juggle. The painting about three feet high and 54 inches wide, in three panels. One day soon Sweetie and I will attach the hanging wired to each of the three panels, snug it up in bubble wrap, secure it in a cardboard box and mail it UPS, with fingers crossed.

I'm really pleased with the way it turned out, especially since I struggled for so long to figure out how to make it a painting I could love.

Monday, July 09, 2018

English Muffins


Usually I give gifts to folks having a birthday...or at least a card...but I rarely receive a gift from the birthday boy or girl. I guess that just goes to show you that I know have the best friend ever. We met for coffee and tea for her birthday and she arrived with a charming packet, wrapped in a checked cloth, which was a gift for Sweetie and me. Of course I had a card and gift for her, but this was unexpected to also get a gift and it was such a great gift...homemade English Muffins.


K was home, so we enjoyed them for breakfast with a nice fruit salad and some tea and coffee and peach preserves. Delicious!


Since I didn't make them I don't have the recipe. Michele did a wonderful job. They had no dairy and were perfect after their time in the toaster after being split in half.


The sun was shining and we ate outside and enjoyed the summer garden with all the colors of the flowers. Thank you Michele!


Wednesday, July 04, 2018

Blueberry Muffins - #TheCakeSliceBakers extra


Since the late fall The Cake Slice Bakers have been baking from The Perfect Cake and posting on or after the 20th of the month. Often we have also had another cake cookbook to choose a recipe from with the rule being that it has to be posted by the 19th of the month. Something has always gotten in the way of my baking that extra recipe, but this month, July, I did!  Happy 4th of July!


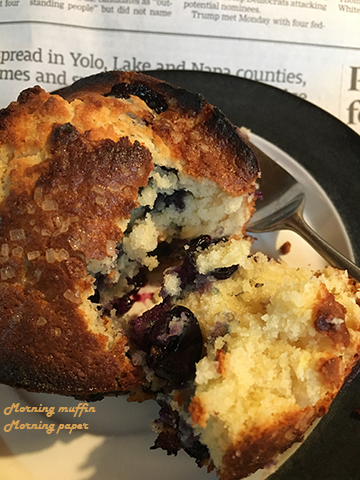
I love to bake with seasonal fruits. July is the season for blueberries and our market had them on sale, too. Lovely, purple-blue fat juicy blueberries seemed perfect for blueberry muffins. Our 'extra' cookbook, Maida Heatter's Cakes has a great recipe for blueberry muffins. Muffins are, essentially, small cakes. I made that even more apparent by baking them in giant muffin tins. The muffins came out of the pan looking like little cakes bursting with cooked blueberries and their juices, with a nice browned top and tender interior.


As I often do, I made a few changes. Besides the size of the pans, I also substituted 1/2 cup almond flour (finely ground blanched almonds) for the same amount of flour. Instead of adding the lemon zest with the wet ingredients, I rubbed the zest into the sugar before adding the sugar/zest to the dry ingredients. Since dairy is a no-no for me, I used soy milk instead of regular milk and non-dairy margarine, melted, instead of the melted butter. Finally, I sprinkled some sanding sugar over the tops of the unbaked muffins right before they went into the oven.


When I was younger and could burn off the calories more quickly, I would have blueberry muffins quite a few times in the summer when they are in season. Now I'll probably only have them this one time... a much appreciated seasonal treat. We'll still enjoy them with our morning yogurt or cereal of course and in a fruit mixture with other delicious summer fruits. But blueberry muffins this good should be baked often, so, dear reader, it's up to you. They do freeze well after all. Just remember, when mixing the wet into the dry ingredients, mix as little as possible and gently for the most tender, delicious blueberry muffins!


Blueberry Muffins
Makes 12 regular or about 5 super sized

1 cup plus 2 tablespoons all-purpose flour
1/2 cup almond flour (finely ground blanched almonds)
1 teaspoon baking powder
1/2 teaspoon salt
1/2 cup granulated sugar
finely grated rind of 1/2 lemon
1 cup fresh blueberries, rinsed and dried
1 egg, lightly beaten
4 tablespoons (half stick, 1/4 cup) butter or margarine, melted and cooled a bit
1/2 cup milk or soy milk or almond milk
about 1 tablespoon sanding sugar (optional)

Preheat oven to 400 degrees F. Oven rack should be in center of oven. Use paper liners if you desire, or butter the muffins cups, even if pans are nonstick.

In a very large mixing bowl, combine the flour, almond flour, baking powder and salt. Pour the granulated sugar in a mound over this combination and add the grated lemon zest on top of the sugar. Using clean fingers, rub the zest into the sugar. You will smell the lemon oils being released into the sugar and will see the sugar become moist. Once zest is rubbed in, whisk all the dry ingredients together until fully combined. Add the dry blueberries and use your finger to lightly mix them with the dry ingredients. Set aside.

In a small bowl place the lightly beaten egg. Add the butter and milk and use a fork to combine thoroughly. Gently make a well in the dry ingredients center and pour in the wet ingredient combination. Using the fork, gently and quickly combine the wet and dry using as few strokes as possible until just mixed.

Use a small measuring cup or disher to fill prepared muffin cups 2/3 full with the batter. If desired, lightly sprinkle the tops with sanding sugar.

Bake in the preheated oven for 20 minutes. Test for doneness. Pressing lightly on the tops in the center will cause them to spring back after pressing when done. If needed bake another 2-5 minutes.

Place baked muffins, in tin(s), on a cooling rack for ten minutes. Use a table knife or small offset spatula to carefully remove the muffins from the tin and set them right side up. Muffins in paper cups will be easy to remove, but you may need to use the knife if they have stuck to the tin.

Serve warm or cooled. Usually no additional butter is necessary.


Monday, July 02, 2018

Rice Shaped Pasta in a Salad


We had a neighborhood BBQ a week ago Saturday and the following Tuesday I was wondering what I was going to do with the big package of mulit-colored bell peppers that I had purchased at Costco. I'd been planning on roasting them and having that as a side dish, but I ran out of time (bet that has never happened to you!) so there they were in the fridge taking up space and getting older.

I decided to roast them anyway and use them in a side dish for Tuesday dinner. A nice onion was still in the pantry, so I peeled that and added it, plus there were some mini carrots and some sugar snap peas from the veggie tray to add. Since I had some freshly picked garden zucchini, a couple of those went in, too.

 My favorite way to roast veggies is to remove all necessary seeds and cores and ends (for zucchini for example), cut them into bite sized pieces and shake them all together in a plastic bag with olive oil, salt and pepper. This time I used my counter top oven since it was a hot day and heating up the whole oven to roasting temperature would be insane. That meant that the roasted veggies went into two foil lined shallow pans to roast at 475 degrees F. I cooked them for 15 minutes, then switched pans top and bottom and rotated them, too. After another five minutes I used a pancake turner to turn the veggies over. Then it was just a matter of keeping an eye on them and removing them once they had browned on the edges and were soft.

So what did I do with them once they were cooled? Half went into a storage container for a later meal.

The other half went into a pasta salad made with cooked orzo (rice shaped pasta) with a citrus based dressing. I also added a diced Roma tomato and some chopped cucumber for crunch. It was delicious! The recipe was loosely based on one by The Barefoot Contessa, Ina Garten. I included the basil, but left out the feta and changed the veggies some. Delicious and a great way to include veggies in your meal!

I've been spending quite a bit of time in the garden and also in my art studio. The painting that I've been working on...a seascape...is almost done!  Maybe I'll get back to baking soon. No time for it at the moment.


Friday, June 29, 2018

Pancakes and Berries


The big, fat olallieberries are almost finished and with the heat starting up today by tomorrow or Sunday they will all be overripe or dried up.

That was certainly an incentive to pick a few baskets of them to take to the trainers at the gym and a few more baskets to use here at home. I even froze a basket full on a cookie sheet, then transferred them after they were frozen to a storage freezer bag for later use.

One of the great things about them is that they are ready to use after being picked...just a quick rinse is needed. We also have strawberries from our garden (a few) and from the roadside stand on Hwy. 12 (a lot) so on Monday morning I made pancakes from the Joy of Cooking cookbook, changing it a bit to make it dairy free and to use some whole wheat flour. About a half pint of the olallieberries went into a pot with an equal amount of sliced strawberries and some brown sugar and water to make a sauce. It simmered away while I made the pancake batter and chopped some walnuts.


Because I was a little short of the needed amount of soy milk, I added some yogurt (yes, I know it is dairy but for some reason I can tolerate yogurt), so I also added some baking soda to the dry ingredients. That made for tender, delicious pancakes that became nice and puffy as they cooked. Each pancake had about a half dozen fresh olallieberries plunked on after I put the pool of batter in the pan. When the pancake was turned to cook the other side, those berries were cooked, too.

So to serve there were two good sized pancake with berries embedded in them, a topping of more fresh olallieberries and strawberries, a good dollop of the berry syrup, including cooked berries, and a nice sprinkle of chopped walnuts. It was amazing! Nothing else was needed. The pancakes soaked up the sweet-tart berry juices and the walnuts gave it all a little crunch. You could also use blueberries or raspberries or any combination that pleases you...peaches and blueberries anyone? Summer fruits really get the creative juices flowing.

Happy summer! Don't these look delicious? The syrup really added another dimension.


Wheat Pancakes with Berries
based on recipe in Joy of Cooking by Irma Rombauer and Marion Rombauer Becker

1 cup all-purpose flour
1/2 cup whole wheat flour
1 teaspoon salt
1 teaspoon baking powder
1 teaspoon baking soda
3 tablespoons sugar
1 teaspoon lemon zest
2 eggs, slightly beaten
3 tablespoons melted butter or margarine
1 cup milk
1/4 cup plain yogurt
1 pint fresh olallieberries, rinsed and drained
1 pint fresh strawberries, rinsed, drained and hulled, then sliced
1/4 cup walnuts, chopped
Berry Compote (recipe follows)

In a large bowl combine the flour, whole wheat flour, salt, baking powder and baking soda. Set aside.
In a small bowl rub the lemon zest into the sugar until the sugar looks damp like sand at the beach. Combine this sugar with the dry ingredients.

In another medium bowl combine the eggs, melted and cooled butter or margarine, milk, and yogurt.

Combine the wet mixture with the dry mixture, stirring only long enough to dampen all the dry ingredients. This short mixing will make the pancakes more tender.

Heat a cast iron skillet or griddle or heavy bottomed skillet over medium high heat and grease lightly with butter or margarine. When a water drop sizzles, use a 1/3 cup measuring cup to ladle batter onto the cooking surface, spreading it with the cup if needed to make a pancake about 4-5 inches in diameter. Place 5-6 olallieberries on each pancake circle. When the small bubbled begin to burst around the edges of the pancakes, use a spatula to look under the pancake at the edge. If it looks golden brown or browner, flip over with the spatula quickly so that the berries stay with the batter.
Cook on the second side for a few minutes until a peek under shows that the pancake is browned on both sides.

Serve at once with the berry compote, fresh berries and a sprinkle of chopped walnuts.

Berry Compote
In a small saucepan combine 1 cup olallieberries (or blackberries or blueberries), 1 cup sliced strawberries, 2 tablespoons brown sugar, and 1/4 cup water. Cover and bring to a simmer. Simmer for 2 minutes, then remove cover and simmer until syrupy. Watch once cover is removed and stir as needed to keep fruit from scorching. Serve with pancakes, waffles or over ice cream or yogurt.

Wednesday, June 27, 2018

Painting


Haven't been posting of late because I've been doing some art work...acrylic painting to be exact. It has been a long time since I've painted with acrylics (except for murals, but they also used wall paint) and I have been struggling trying to adjust to this different medium. Prior I was mostly painting with watercolors, where you go from light to dark. With acrylics it is the opposite...dark to light. There is also the issue of how the paints spread...or don't. In watercolor painting you add more water...easy. With acrylics apparently adding more water can make the paint tacky which is the opposite of what I was trying for. I took a class on Sunday at Riley Street and found out that there is a product which is used to thin the paint and make it easier to work. The Sennielier brand (and the class was taught with that brand - thank you Camille!) it's called 'binder' which is a strange term for something that helps loosen, but it works!

For quite a while I have been trying different things on a seascape that I'm painting for K. It's pretty large, with three canvas panels joined together for the painting, although they will be hung with a little space between them as far as I know. 

Nothing was working, which is unusual for me. I tried going to visit other artists (ArtTrails) which helped some. I tried viewing YouTube videos, which helped some. The class on Sunday was the best help. I'm truly grateful to other artist who share their expertise.

Below are some thumbnails size photos of the painting as it has been progressing since Sunday. Having fun now! I think I'm about half done. Will be posting some delicious food soon. I have made the food and have photos, but the paint is calling....


Friday, June 22, 2018

Strawberry Rhubarb Pie A Different Way


I love Strawberry Rhubarb pie. There is something magical about the combination of the sweet, sweet strawberries and the very tart rhubarb. I've made this pie many times, usually with a top and bottom crust.

This time I decided to only have a bottom crust and to do a streusel topping. I used the streusel recipe from the Fannie Farmer Cookbook by Marion Cunningham. It was early last week when a good friend gave me freshly cut rhubarb from her garden and when we purchased three pints of local, just picked strawberries at the farm stand. In the early evening I started cutting up the berries and rhubarb and realized that Sweetie, who had had gum surgery that afternoon, wouldn't be able to enjoy the pie (he healed well and is doing just fine).

Since Sweetie really loves pie I decided to figure out a way to make the pie later in the week. The problem was that I had already prepped the fruit and it would likely spoil if I waited. Normally I put the unbaked crust in the pie pan, put in the uncooked filling, top it with the second crust, seal the edges and flute it, cut a few vents in the top and bake the pie. This time I would need to make the pie a different way. A search of the Internet gave me the solution: cook the filling and use it later. That worked really well. I am indebted to the blogger on Bewitchin Kitchen for this cooked pie filling. You can find her post here.


We had guests on Friday from Hawaii and on Saturday I was getting ready for guests from Australia, but on Sunday morning after the local fire station pancake breakfast I was finally able to make the pie. I only made one error...I used a pie pan for a deep dish pie and only had filling for a standard depth pie. I had already blind baked the crust in the deep dish pie pan before I realized that. The solution I came up with was to put in the filling, top it with already baked streusel, bake it at 350 degrees F just long enough to finish cooking the crust and to heat up the filling, then use a sharp knife to cut the crust on the side, using the nice crisp edges to edge the pie at filling level. It looked a little bit weird, but it tasted just fine, so no one seemed to mind. When you make it, remember to do the pie shell in a shallow pie pan (unless you have doubled the filling recipe).

No only does this pie taste incredible, but the filling is really pretty. Expect raves. Use the freshest berries and rhubarb available. Because there is still some tartness to the filling, you could put a puff of freshly whipped cream on the side of each slice to tone it down...and that looks pretty, too. Alternately you could increase the sugar in the filling recipe. This is a full flavored filling. If you don't care for the flavor of rhubarb (I know some folks don't), just use more strawberries!


Strawberry Rhubarb Pie Filling 
Makes enough for one shallow 8-inch pie

Ingredients:
3 cups rhubarb, sliced into 1/2-inch pieces
 2 3/4 cups strawberries, hulled and chopped or sliced
1/3 cup sugar
1/3 cup brown sugar, packed
1/4 cup cornstarch
1/4 teaspoon salt
1 teaspoon vanilla extract
2 tablespoons lemon juice
1 tablespoon butter or margarine

Directions:
Combine all of the ingredients in a heavy bottomed pot.
Cook over medium heat for 5-10 minutes, stirring constantly so that it doesn't scorch on the bottom of the pot.
Simmer for another 5-10 minutes until rhubarb is soft and filling has thickened.
Cool and use right away, or put into a covered container and store in the fridge for up to 3 days. Bring slowly to room temperature before using in the pie.

Blind Baked Pie Crust

Use your favorite recipe for a single crust pie, or do as I do and use a single crust from a refrigerated pie crust. I like Pillsbury ReadyCrust.

On a floured surface roll the pie out (if needed) to fit an 8-inch pie tin. Transfer the crust to the tin by draping it over your rolling pin. Fit the crust into the pie tin and crimp the edges, trimming excess crust as needed. Cut a piece of parchment paper or foil to fit the inside of the pie tin and place it loosely over the prepared crust. Fill with pie weights, or do as I do and fill it with dried lentils. Save the lentils to use the next time you need pie weights. They are very inexpensive and sit close enough to each other to do a great job of keeping the crust from getting over bubbly. Bake in a preheated 435 degree F oven for 8-10 minutes, until light golden brown. Remove from the oven and let the lentils cool before removing them carefully and either discarding them or saving them for next time. If the crust still seems a bit raw, put it back in the oven for another minute, then cool crust in pie tin on a wire rack.


Streusel
1/4 pound, 1 stick, 4 oz, 8 tablespoons butter or margarine, very cold
1 cup flour
1/2 cup brown sugar
1/4 cup old fashioned oats

Preheat the oven to 400 degrees F.  Line a baking sheet with parchment,

In a large bowl mix together the flour and brown sugar. Cut in the butter until mixture forms clumps.

Put streusel on the baking sheet and break up the clumps a bit so none are bigger than bite sized. Bake in the preheated oven for about 10 minutes. Streusel should be medium to dark brown but not burnt. Remove baking sheet to a wire rack and let streusel cool .

Making the Pie

Preheat the oven to 350 degrees F. 
Put the pie filling, at room temperature, in the blind baked, cooled, pie shell. Level with an offset spatula. Liberally sprinkle the streusel over the filling. Bake the pie in the preheated oven for about 10 minutes, or until the filling is bubbling. Remove from the oven and cool on a wire rack.

Serve at room temperature or cold. Store leftovers, if any, at room temperature or in the fridge.

Tuesday, June 19, 2018

Old-Fashioned Chocolate Layer Cake #TheCakeSliceBakers


Chocolate cake with chocolate icing has always been my favorite cake flavor combination. Imagine how excited I was when I found out that an Old-Fashioned Chocolate Layer Cake was one of the choices for the Cake Slice Bakers for June. A grand chocolate layer cake! What could be better?


There were a few new techniques which took it out of the old-fashioned category in my mind, but the trick of making a sort of pudding for the chocolate part of the cake, by cooking the cocoa, chocolate and water together, then cooling it before adding it to the batter, was one I will use again. It seemed to make for a very moist cake with a tender but firm crumb. Buy or borrow the book and check out this cool technique!

The second non-old-fashioned thing was making the frosting in a food processor. Since mine was unavailable when I made the frosting, I used the exact same ingredients called for, but put them together in a different manner. I creamed two sticks of butter in the bowl of my stand mixer, added the cocoa and slowly beat it to make a paste, very slowly added the salt and confectioners sugar keeping the stand mixer on low speed, then added the vanilla and corn syrup and mixed them in. Once the chocolate mixture was cool enough I added it with the mixer on low and once that was incorporated I added the remaining butter, a tablespoon at a time. Once all the butter was incorporated, I turned up the speed for about a minute to completely mix the frosting. Of course there was a lot of scraping the sides of the bowl and the beaters throughout the process.


The frosting was creamy but didn't seem to get to filled with air and it was easy to work with when I applied it to the cake layers. I used the back of the spoon method to put swirls on the top of the cake, then used a pastry bag and tip to use some more frosting to decorate the bottom with flowers, with one in the middle of the top.


The resulting layer cake was lovely to look at and delicious, but I found it overly rich. (I write 'butter' but really used non-dairy margarine since I can't tolerate butter. Maybe real butter would have been less rich, but I doubt it.) Fortunately we were able to share this delightful cake with neighbors (who proclaimed it perfect for breakfast!), and with my sister and her family. Thin slices worked out well.


I decorated the final slice with strawberries from our garden. Celebrating summer!

 Next time I would do a ganache icing or the really old fashioned one with cocoa, hot milk and confectioners sugar, both of which would probably be less rich than the Test Kitchen chocolate frosting. I wouldn't change a thing about the cake itself. I baked the layers two full days before I frosted and served it and the cake layers stayed moist just wrapped in plastic and stored at room temperature. This is a wonderful cake, but it is expensive to make if you use (as you should) high quality chocolate and cocoa. Use a chocolate that you enjoy eating since you will really taste it. I used Scharfenberger and was glad I did.


Each month The Cake Slice Bakers are offered a selection of cakes from the current book we are baking through.  This year it is The Perfect Cake from America's Test Kitchen #atkcake.  We each choose one cake to bake, and then on the 20th - never before - we all post about our cake on our blogs. There are a few rules that we follow, but the most important ones are to have fun and enjoy baking & eating cakes!

Follow our FacebookInstagram, and Pinterest pages where you can find all of our cakes, as well as inspiration for many other cakes. You can also click on the thumbnail pictures below to take you to each of our cakes, or visit our blog where the links are updated each month. If you are interested in joining The Cake Slice Bakers and baking along with us, please send an email to thecakeslicebakers at gmail dot com for more details.


The choices this month were Old-Fashioned Chocolate Layer Cake, Rhubarb Ribbon Cake, Lavender Tea Cakes with Vanilla Glaze, and Summer Peach Cake.


The Cake Slice Bakers are baking from a new book "The Perfect Cake" from America's Test Kitchen.

Our choices this month are...

June 2018
  1. Old-Fashioned Chocolate Layer Cake
  2. Rhubarb Ribbon Cake
  3. Lavender Tea Cakes with Vanilla Glaze
  4. Summer Peach Cake

Visit our bakers too see what choice they baked up!