Tuesday, March 07, 2023

A Saucy Pasta Dish for Asparagus Season


I hope that you love asparagus as much as I do. We have been getting some for a few weeks, but the asparagus coming into the market now are thicker and really fresh. I like them just steamed al dente, but tonight I updated a dish that Sweetie and I enjoyed first in 2013, so ten years ago at asparagus time.

By the way, Sweetie has been going through a tough time for the past three weeks or so. His back has bothered him on and off over the years, but a bout this long and this painful hasn't happened for about 20 years. He finally agreed last Friday to go the his primary care doctor...but saw the Physician's Assistant, who is quite good...and ended up with some muscle relaxants, pain pills, and a referral to a back doctor.

Those meds knocked him out, so he has been sleeping a lot, even during the day (which is unusual for him), but it has done the trick. Along with frequent chiropractor visits, the rest and meds have finally worked so that he didn't need any strong meds today at all...just an ibuprofen.

This dish was sort of a celebration for a better back because I remembered that every time I made the old version that Sweetie loved it. To update it I've added butternut squash 'zoodles', fairly thin strands of the squash that I found in Whole Foods today, already prepared although still raw.

In the original recipe you stew pieces of asparagus and broccoli in garlic and oil. These veggies go on top of pasta that has been dressed with an almost cream sauce made with ricotta cheese and some of the hot water used to cook the pasta. Today I used some fresh linguine and some Kite Hill almond milk 'ricotta'. Don't forget to use freshly grated nutmeg, if possible, in the sauce...makes all the difference!

The updated recipe calls for tossing the asparagus and broccoli pieces in the garlic and oil, then removing them. The butternut squash noodles are then tossed with the remaining oil and garlic and spread over the bottom of the pan. Because they take a little longer to cook than the asparagus pieces and broccoli florets, having the squash on the bottom of the pan allows it to have more heat.  Since it's all cooked covered over low heat, all the veggies cook slowly and become flavored with the garlic.

Of course while the veggies are cooking you boil the pasta and make the sauce with the ricotta. Once everything is done it gets tossed together and makes a really delicious side dish or meal. I would imagine that you could make it with just the squash noodles and broccoli when asparagus isn't in season, but I do love asparagus and it shines in this recipe.


Fettuccine with Ricotta and Asparagus, Broccoli and Butternut Squash

from the Mediterranean Diet Cookbook
serves 4 - 6

3/4 lb tender young asparagus ( or 1/2 lb asparagus and 1/4 lb broccoli crown)
1/2 lb butternut squash 'noodles'
2 cloves garlic, finely chopped
3 -4 tablespoons olive oil
1 lb fettuccine
6 quarts water
1/2 lb fresh creamy ricotta 
dash nutmeg
salt and freshly ground black pepper, to taste
1/2 cup freshly grated Parmesan cheese

Trim touch ends off asparagus after rinsing them. Cut tender parts into 2-inch lengths. Cut broccoli crown into small florets. If needed, cut the butternut squash 'noodles' into 6-8-inch lengths.

In a sauté pan place 3 tablespoon olive oil and the garlic; stir to blend. Add the asparagus pieces and toss to coat, then remove and reserve. Repeat with the broccoli florets. Finally, add the additional tablespoon of oil if needed and add the squash 'noodles'; toss to coat and then spread over the bottom of the pan. Arrange the coated asparagus pieces and broccoli florets over the squash (do not stir) and, over low heat and covered, gently stew the garlic, squash, asparagus and broccoli in the oil until the vegetables are tender but not brown, about 15 minutes, stirring occasionally the last 5 minutes. Set aside.

Meanwhile, cook pasta in boiling water until tender. While pasta cooks, extract 1/2 cup of the cooking liquid and mix it in a small saucepan with the ricotta. Set saucepan over low heat and gently cream the ricotta and cooking water. When the ricotta is warm, taste and add salt and pepper to taste. Add the nutmeg and 1 tablespoon of the Parmesan cheese and stir to combine.

Drain the cooked pasta and combine immediately with the cheese sauce, tossing to mix well. Add the veggie mixture and toss with tongs to lightly coat the vegies and mix them with the pasta. If desired, plate or a warm platter. Sprinkle with the rest of the grated cheese and serve at once.

Saturday, March 04, 2023

Cupcakes and Buttercream


Not doing too much baking these days. I save it for special occasions like a recent birthday celebration. Didn't get the best photos, but they were truly outstanding cupcakes...I think it was the buttercream! If I share like this I'm not as tempted to eat them all myself. Would like to look OK in a bathing suit this summer...no, not a bikini...it would take forever to get that slim!

I decided to do cupcakes since they are easy serve and can be cut in half if the celebrants want a small dessert. The buttercream is a recipe that my daughter gave me. She has been baking amazing layer cakes as a hobby and giving the cakes to co-workers and this is the buttercream she uses. The cupcakes are from the book Perfect Cakes by America's Test Kitchen. On page 70 there is a cupcake recipe that produces a lovely yellow cupcake that is moist and fine textured. You can use it for cupcakes with any frosting, not just this buttercream. You use a stand mixer, start with the dry ingredients in the bowl, add the butter a piece at a time and the paddle combines it with the dry ingredient until it looks like sand, then you beat in the eggs and, finally the milk and vanilla extract. I added a bit of lemon oil, too, since I wanted lemon flavor. There was also lemon in the buttercream. Ignore the chocolate mini muffins in the photos...they were purchased and a lot were left over because, hello, buttercream!


Vanilla Cupcakes

Makes 12

1 3/4 cups (8 3/4 ounces) all-purpose flour
1 cup (7 ounces) granulated sugar
1 1/2 teaspoons baking powder
3/4 teaspoon salt
12 tablespoons unsalted butter, cut into 12 pieces and softened
3 large eggs at room temperature
3/4 cup milk
1 1/2 teaspoons vanilla extract

Adjust the oven rack to middle position and preheat to 350 degrees F. Line 12-cup muffin tin with paper or foil liner cups.

Using a stand mixer and paddle attachment, mix flour, sugar, baking powder and salt together on low speed. Add butter, 1 piece at a time, and mix until mixture resembles coarse sand, about 1 minute. Add eggs, one at a time, beating until combined and scraping beater and bowl as needed. Add milk and vanilla, increase speed to medium, and mix until light and fluffy, with no lumps remaining, about 3 minutes.

Portion batter evenly between the 12 lined cups. Bake until toothpick inserted in center comes out clean, about 18-20 minutes. Rotate pan about halfway through baking. Cool cupcakes in the tin 10 minutes on a wire rack. Remove cupcakes from tin and cool directly on the wire rack until fully cool, about 1 hour.

Frost with favorite frosting and decorate as desired.

Lemon Buttercream Frosting
from Kate  - enough for a layer cake - divide in half for 12 cupcakes
(Note: 4 sticks of butter and a 32 oz bag of powdered sugar will yield enough frosting to crumb coat and frost a 3-layer 6" cake. Use 1 cup powdered sugar to every stick (8 tablespoons) of butter.)

8 cups powdered sugar
4 sticks salted butter at room temperature (1 pound)
1/4 to 1/2 cup heavy whipping cream 
lemon extract to taste (for vanilla frosting use vanilla extract)

Use the paddle attachment for your stand mixer and whip the butter well, scraping down the sides as needed, until it is uniform and fluffy and light colored.

After the sugar is all mixed in, add 1/4 cup heavy whipping cream and about 2 teaspoons flavoring, then whip that together. If consistency doesn't seem right, add additional whipping cream 1 tablespoon at a time, whipping well after each addition. Use to ice cupcakes. Use pastry bag and tips to do decorative icing. Add color to buttercream if desired.

Gel or powder food coloring is best for coloring the frosting. A splurge is oil-based coloring brand Colour Mill - the best and some very cool colors...found on Amazon.


Tuesday, February 21, 2023

Snapshot


In a week we will be finishing off February. Time is certainly flying! I've just returned from a visit to Phoenix where I spent time with my daughter, her fiancé, and two of his sons. It was very relaxing and fun. Lots of time for the boys to hang out with each other and with a friend who lives in Phoenix.

The last time I was there we were working on the house, including doing a lime wash on the large fireplace in the room off the kitchen. This time there were a few things, like securing a wobbly electrical outlet, but mostly we spent time together enjoying ourselves, especially in the fireplace room. One evening we even hosted Aaron's sister Holly and her partner, plus a long-time friend of Aaron's and the friend's wife and daughters. It was so nice meeting some of Aaron's family and friends, including his cold plunge buddy on our final day.


I've been cleaning out my office space, too. The next part is my cork bulletin board, which has gotten so full that papers are pinned over other papers, and over cards and passwords and some artwork, too. I suspect that I'll have more than will fit, even after I sort and throw some of it out!


The garden has started to call to me. Right now there are daffodils just beginning to bloom and still some paper whites and grape hyacinths that began blooming earlier in the month. The rose bushes I pruned and sprayed are beginning to leaf out. To Sweetie's dismay the grass needs mowing. To my dismay the weeds are already taking hold. Yesterday I filled the green can with weeds and spent soil from some of the pots that don't have bulbs. Soon I'll plant some seeds in soil cells in mini-greenhouses and put them in the sunspace to sprout. Our weather has been unseasonably cool and we might even get snow this Friday, so I suspect that it will be late April or early May before tomato or squash seedlings can be planted. I like for nighttime temperatures to be 50 or above for a week to warm the soil before I plant seedlings out.


I'm still experimenting with printing with the Gelli pads and acrylic paint. The wonderful thing about prints is that you never know what you will get! Above is a photo of a print that I made recently.


The Sonoma County Airport is also the Charles Schultz Airport and they recently did a remodel. When I returned from Phoenix it was the first time that I was in the part of the 'new' airport that had the model of the Red Baron's plane up above. Soooo fun!


These are but some of the threads of the tapestry of my life at the moment. What threads are you experiencing dear reader?

Monday, February 20, 2023

Pretty Cookies with Raspberry Filling


A tea party can be fun, especially if you enjoy using pretty china tea things, including tea pots, cups and saucers, and little plates. I recently had tea with a very good friend and she loved the fact that I baked really pretty cookies to go with the tea, served on a tiered plate with all the nice china.


You don't really need to bake cookies to enjoy tea with a friend. I often use packaged cookies from the market, but this time I didn't. I baked a simple sugar cookie, cut it with a fluted round cutter, then cut the center out of half of them with a smaller fluted round cutter. Once baked and cooled, I piped vanilla buttercream just inside the edge of the whole cookies, filled the center with a thin layer of raspberry jam. Next I sifted a small amount of confectioners sugar over the cutouts. The final touch was top the raspberry/buttercream whole cookies with the cutout cookies. You could use another flavor of jam or some lemon curd instead of the raspberry jam for another take on these lovely cookies. The cookies themselves are crisp the first day, giving a nice contrast to the soft jam and buttercream. If you store them longer, the cookies soften a bit, but they are still delicious! You also don't need to have a tea party to enjoy these cookies!

When making the cookies, know that the dough tends to be soft, but you really don't want to overwork it. Be generous with the flour on your work surface and rolling pin so that the dough doesn't stick too much. I slid a small offset spatula under the cookies to make sure they were loosened before I moved them to the baking sheet with a larger spatula that supported them fully. I baked the cutout part, too, and iced small hearts with buttercream on them. A small bite is sometimes as good as a fancy one. Some of the filled ones ended up without powdered sugar since Sweetie doesn't really like powdered sugar.


Enjoy the cookies and do consider having a tea party. It's particularly nice during the winter to have a little party to lift our spirits and give us an excuse to invite a friend over.


Fancy Tea Cookies  

1 cup butter or margarine
1 cup sugar
1 egg
3 cups flour
1 teaspoon baking soda
¼ teaspoon nutmeg
about 2-3 tablespoons confectioners sugar
1 cup vanilla buttercream
1 - 1 1/2 cups raspberry jam (or other flavor jam or lemon curd)

    With butter or margarine at room temperature, beat butter or margarine in large bowl, then beat in sugar and egg until fluffy. Sift dry ingredients together and add to first mixture. Mix well. Roll dough to 1/8 inch thickness, cut with round cookie cutters. Place on lightly buttered cookie sheets. Use a smaller round cutter to cut out the middle of half of the cookies. Bake in a 400 F. oven for 7- 8 minutes. If dough sticks while rolling, chill briefly. 

    After cookies have cooled, use a small fine-mesh strainer to sift a small amount of the confectioners sugar over the cut-out cookies. Pipe a thin line of buttercream near the edge of the full cookies, then fill the center with a thin layer of the raspberry jam. Top with the cut-out cookies, pushing down gently to seal the layers together. Serve.  Makes 2 - 4 dozen cookies depending on the size of the round cutters.


Friday, February 17, 2023

Greek Easter Bread with the Babes


I'm really glad that my dairy allergy seems to have gone away because this month, the wonderful Kitchen of the Month Kelly of A Messy Kitchen invited us to bake Cypriot Easter Bread with Cheese, also known as Flaounes. Although the recipe calls for halloumi and I'm sure it would have been better with that cheese, when I tried to buy some I found that it was extremely expensive, so I went with mozzarella. Not my best idea because the cheddar was mild and so was the mozzarella. The ground cherry pits, also known as mahleb helped a little with flavor, but not alot. I was also unable to procure the resin mastic, but I did include some cardamom. All in all I found the bread to be nice but bland and the filling was also bland. The best thing was the sesame seeds.


It was a fun bread to make. I probably didn't roll it thin enough, but that made it easy to handle once I cut the dough into squares. First you paint one side with egg wash (an egg beaten with a little water), then the eggy side goes down onto sesame seeds spread in a pan - or in my case a paper plate. A scoop of the cheese mixture that was made the day before gets placed in the middle of the square, more egg wash is applied around the edges, then the edges are squeezed together to encase the cheese mixture. I had trouble with that, so I ended up with ones that looked more like boats than flowers or squares. Still, even the less pretty ones baked up to be golden with just a bit of char on top...usually where the raisins were. I made my squares 4 inches by 4 inches and reduced the amount of cheese a bit, too. Even so they were large. Next time I'll make the dough squares 3-inches square.

I still have some of the dough and some of the filling so I think that I'm going to add lemon zest to the filling and more of the mahleb, plus more sugar, to the dough. It will become a sweet roll and I'll serve it with some fruit. That's the great thing about trying new recipes...you can usually figure out how to improve on them. If I lived in Cypress I could probably find the halloumi, and the mastic easily and could have the real deal. If I ever visit it should be at Easter so I can try the authentic bread! By the way, when this is posted, which is mid-February, the hills around where we live look like the photo in the header...green fields, bare trees. Since I change out the header every now and then it won't always look that way, but right now it shows the effects of winter rain - green, green grass - and yet spring is still not even on the horizon.


Hope that you will try this and become a Bread Baking Buddy. Bake and post by February 27th and send the URL and a photo to Kelly and she will send you a Buddy Badge and include you in the round-up.

Also, be sure to visit the other Babes...I suspect that they will have done a more authentic version than mine.


Cypriot Flaounes (Greek Easter Cheese Bread)

makes 12 (3 inch x 4 inch) flaouna

 Filling

    1 tsp mastic *   
    1 tsp mahleb **   
    1 tsp sugar
    8 oz (228 g) halloumi cheese (I used all halloumi)
    8 oz (228 g) soft, mild cheddar
    1c (115 g) raisins
    1/2 c (84 g) semolina flour (I used fresh ground durum wheat)
    1 tsp baking powder
    1/2 tsp dry mint, crushed (I used fresh mint, twice as much)
    2 eggs

 Dough

    2 1/4 tsp active dry yeast
    1 1/4 c (300 ml) lukewarm milk, divided
    1 tsp mastic, optional   
    1 tsp mahleb *   
    1 tsp sugar
    4 c (512 g) flour
    1 tsp baking powder
    1/2 tsp salt
    1/3 c olive oil

For The Topping

    1 egg, beaten
    1/2 c (70 g) sesame seeds

Instructions
Day 1 - Make the Cheese Filling

    Using a mortar and pestle, combine the mastic and mahleb together with 1 tsp sugar and pound together until it is a fine powder.
    Grate the cheese and mix with the raisins, semolina flour, baking powder, pounded sugar and spice mixture, and crushed mint.
    Add the eggs, one by one, mixing until the cheese has come together as a firm mixture that can be shaped into a ball. (More or fewer eggs may be needed depending on the moisture level of the cheese used.)
    Cover the filling and refrigerate overnight, or at least 4 hours, to let the flavors come together.


Day 2 – Prepare dough, assemble and bake

    Remove cheese mixture from the refrigerator and let it come to room temperature while you prepare the dough.
    Mix yeast with 1/2 cup lukewarm milk. Set aside for the yeast to activate, 5-10 minutes.
    Pound the mastic and mahleb with 1 tsp sugar until fine.
    In a large bowl, mix together the flour, baking powder, salt, and sugar mixture.
    Add the oil and rub it into the flour with your fingertips, until the mixture has a sandy texture.
    Pour the yeast mixture into the flour and mix well with your hands.
    Add the remaining 3/4 cup of lukewarm milk gradually, kneading with your hands and adding just enough to incorporate all the dry ingredients and create a firm dough that does not stick on your hands.

    Cover dough and set aside to rise for 1-2 hours, until nearly doubled.

    Place the sesame seeds onto a wide plate or tray.
    Roll out the dough 1/8 inch thick (it should measure roughly 15x20 inches). Cut the dough into 5 inch squares. (Or cut the dough your desired shape and size.)
    Brush one side of the cut dough with the beaten egg and place it egg-side down onto the seeds.
    Place a heaping 1/4 cup of the cheese filling on top of the dough (on the un-seeded side).  (Don't compact it, so that it stays light and airy!

    Brush the egg wash on the outer edges of the dough and fold them up towards the center (leaving the top center of the filling uncovered). Pinch the un-seeded side of the corners of the dough together to keep the sides in place over the filling.
    Place the shaped flaounes on a baking tray lined with parchment paper. Brush the exposed filling with a little beaten egg.
    Let the pastries rise for 30-45 minutes, until slightly puffy.
    Near end of rising time, preheat oven to 375ÂşF.
    Bake the flaounes for 30 min, until deeply golden.
    

Serve with honey and cinnamon for a sweet treat or olives and sliced meat for savory.

*If you don't have mahlab, substitute 1 tsp with 1/2 tsp almond extract and 1/4 tsp cardamom (or a pinch of anise).


Tuesday, February 14, 2023

Happy Valentine's Day!


 Feeling grateful today for all of the love expressed by friends and family for my birthday and today, for Valentine's Day. Want to share the love with you, too, dear reader. Grateful that you come and read my blog and even, sometimes, leave comments!

Sunday, February 12, 2023

Sweet Roll Bread Pudding


In January I made a lovely whole wheat and cinnamon sweet roll using dough that had fresh persimmon in it. Even though it was delicious, Sweetie and I weren't able to finish the ring I made, so later in the month I made bread pudding using chunks of it as the bread part. Then I had a whole bunch of other stuff to do, so it never got posted. You can also make this just as written, using plain dry bread cubes. I didn't add the cinnamon since there was plenty in the sweet rolls, but otherwise the ingredients are almost the same. I added a diced apple along with the raisins. You really couldn't taste any of the persimmon, so if you make this with the bread you have on hand it will be great! This time I only made half the usual recipe (usual recipe is below) so Sweetie and I each had two servings. Yum!

I love bread pudding. I makes a great breakfast and a wonderful afternoon snack, plus is awesome for dessert in the evening. Along with chunks of stale bread, you use hot milk, some butter or margarine, some sugar, eggs, and flavorings. I often add fresh and/or dried fruit, especially raisins. It's not fast food because you soak the stale bread in the milk/sugar/egg mixture for a while so that the bread becomes softer and the custard is in every part of the dish, not just coating the outside of the bread. Still, it isn't difficult and you end up with a soft, custardy, sweet, fruity (if you used added fruit), flavorful comfort food. You can dress it up with some half and half or a scoop of ice cream, or if you are feeling decadent you can add some caramel sauce, but it is fine all by itself. I like it served warm, but Sweetie ate one of his two servings cold for breakfast. 


Bread Pudding with  Raisins and Cinnamon      

A recipe from 1971, from a Fredricksburg, Maryland friend, Gale 


4 cups dry bread cubes          1/4 teaspoon salt           
3 cups milk, scalded               1/4 teaspoon freshly grated nutmeg
1 tablespoon butter                1/2 teaspoon cinnamon
4 slightly beaten eggs            1 teaspoon vanilla
3/4 cup sugar                         1/4 cup raisins
½ teaspoon lemon zest                                  
                       
1) Preheat oven to 350 degrees.

2) Melt the butter in the milk. Add a little of the milk to the beaten eggs, then add eggs to rest of milk. Stir in the sugar, lemon zest, salt, nutmeg, cinnamon and vanilla.

3) Put the bread cubes in a large bowl. Pour the egg/milk mixture over, stir gently, and let sit 15-30 minutes.

4) Butter a large baking pan. A deep one will give a softer center, a shallower one will give more crispy crust. Gently stir raisins into bread mixture and pour into baking pan.

5) Bake in a pan of hot water until firm, about 1 hour. Serve warm.

Saturday, February 04, 2023

A Simple Roast Chicken

Because they are easy and fairly inexpensive, many of us pick up a rotisserie chicken when we want roast chicken. Every now and then I prefer to roast a chicken at home. If nothing else, that wisp of roast chicken fragrance when you lift the lid (if it's cooked in a Dutch oven as I prefer) is so delightful!

The good news is that a whole chicken cooked this way is amazingly easy and you can make it really simple or add to the flavor with additions like root veggies, herbs, and/or lemon or orange for a small addition of time and effort that pays off big time.

You start with a whole chicken, season it with salt and pepper, put a little water or wine in the bottom of the Dutch oven to keep it from sticking, cover it up and cook for 60 minutes. You get a cooked chicken with brown and fairly crisp skin, some yummy pan juices for sauce and clean up is easy.

One step more is to add things like peeled and sliced onion, whole or halved garlic, chunks of potato, carrot, rutabaga, turnip, etc., all shaken in a large plastic bag (like a produce bag) with a little olive oil, some herbs either fresh or dried, and some salt and pepper. The veggies get put into the Dutch oven after the chicken, all around the chicken. You can tuck some lemon wedges or orange wedges into the chicken cavity, too, for more flavor. The lid goes on, the pot goes into the oven and 60 minutes later you have a meal to die for. Add a green salad and maybe some crusty bread for soaking up the pan juices and you have such a great meal that is easy on the cook. I actually served mine (which included sliced mushrooms along with the onions and carrots and garlic) with mashed potatoes and mixed vegetables.

Leftovers can be used for sandwiches or chicken salad, or any dish that uses leftover chicken. You can also reheat it in the microwave for another meal if you also have leftover veggies. Of course the cooked poultry also freezes well for even later use.


Roast Chicken with Root Vegetables
 

1 whole butchered chicken, about 3-4 pounds, with anything inside removed
2 carrots, washed, ends removed, cut into bite sized pieces
2-3 baking potatoes, scrubbed and cut into bite sized pieces
any other root vegetable that you like, washed, ends removed and cut into bite sized pieces
and/or sliced mushrooms
1 onion, peeled, ends removed, sliced
whole or halved garlic, excess skin removed
salt and pepper to taste
fresh (1 tablespoon) or dried (1 teaspoon) thyme
2 tablespoons olive oil
lemon or orange wedges for inside the bird
salt and pepper to taste
optional: 1/4 cup dry white wine
optional: chopped Italian parsley

Preheat to oven to 375 degrees F.

Rinse the chicken (if you usually do) and place in a Dutch oven large enough for it and the vegetables.
Put the carrots, potatoes, other root vegetables if using, onion and garlic in a large disposable bag (I used produce bags from the market that I save for this purpose). Add the salt and pepper and thyme. Close the top securely and shake vigorously to distribute the seasonings. Add the olive oil and shake again to coat everything lightly with oil. Place the oiled veg all around the chicken in the Dutch oven. Place the orange or lemon wedges inside the bird. Season the outside of the bird with salt and pepper to taste. If using, add the white wine.

Cover the Dutch oven. Place in preheated oven and roast for 60 minutes. Remove from the oven and let sit for 10 minutes so the juices can migrate back into the bird.

Cut legs, thighs and wings into serving pieces. Slice the breast or cut into more serving pieces. Serve hot with pan juices spooned over. If desired garnish with chopped parsley

Tuesday, January 17, 2023

Well Past 17 - and a Land of St. Honore' update


Octobers of late have always had more excitement than one would like. This year it's when our 14+ year old lab suddenly couldn't walk, stand on his own, eat on his own and his poor body was twisted like a cooked shrimp. Our focus became one of keeping him alive and working to get him better. In all the upheaval I neglected to celebrate the 17th 'blogversary' of Feeding My Enthusiasms. Who knew that I would still be finding things to post about so many years and recipes later? Take a look at the bread I just posted for the Bread Baking Babes...a yeasted bread with fresh persimmon...never even thought to make that before. No telling what this year will bring...new recipes and techniques I'm sure.


I do occasionally check stats and discovered that someone had checked out a post from 2010 where I made glazed popcorn with cranberries and chopped almonds. That wouldn't be noteworthy especially, but I decided to check out the post and discovered that it was also one of my Land of St. Honore' stories...and not for a Daring Bakers post either. Then I checked the link I have on the sidebar to some collected Land of St. Honore' posts and discovered that I had put that one in, but that I had left out others from 2010.

The result is that I've updated that link on the sidebar (Land of St. Honore' posts found here) to include and additional 5 stories...with perhaps more to come as I discover them. 


I started writing about the imaginary Land of St. Honore' when the number of Daring Baker posts became so large that it was difficult to read them because post after post sounded so much alike. We are all making the same recipe and there is only some latitude for variations, so what can you say that stands out? The solution was to write little stories which included the dish being made. I had so much fun with writing the small fictions that I kept it up and even did some, like the candy corn, on days that had nothing to do with the Daring Bakers. Eventually the DBs became too large to be fun, so I stopped participating. Every now and then another Land of St. Honore' story was written, just because I enjoyed it. If I find more, I'll add them to the link.

To get to the link on the sidebar, make sure you are in 'web view'. When I look up my blog on my iPhone or iPad, I need to scroll to the bottom and click on 'web view'. When I do, the side bar includes a lot of things...A Welcome, A Recipe Link which is activated by clicking on the photo of the set table, Bread links for 2011, The Blog Archive (most recent at the top), Bread Blog link, then links to favorite blogs and followers, then the Bread Baking Babes, and THEN the Land of St. Honore' link!

The new links include a delicious orange dessert (top of blog post photo), which is great at this time of year,  


a Rhubarb-Strawberry Steamed Pudding which is great in April or May, somewhat exotic things like 


stacked Cream Puffs and chocolate Pavlova, and 

Brownies...with all of the ingredients in a jar for gift giving if you like. 

Once you get reading those, I'll bet you will enjoy the rest with things like 


Banana Bread and Vol au Vents, 


Bakewell Tarts and Chocolate Whiskey Cake, 


a Chocolate Valentino Cake and Tuiles (one of the funnier stories), plus savory bakes like Pizza and a 


Fresh Spinach Pasta Lasagna. Hard to believe I had that much energy nine or ten years into the 'new century'!

Hope you enjoy the stories and maybe find a new recipe or two to try.

Monday, January 16, 2023

Bread Baking Babes Try Something Different


Did you know that you can eat banana peel? Neither did I. The bread that many of the Bread Baking Babes are making today used a whole frozen banana, peel and all. I'm not eating bananas right now, so I substituted persimmon pulp...not nearly the same, but it turned out fairly well. Our Kitchen of the Month is the audacious and delightful Elizabeth of blog from OUR Kitchen blog. I do hope that you will make HER version!


If you would like to be a Buddy, contact Elizabeth and send her your URL and a photo, plus a brief description of your bake by Jan. 29th and she will send you the beautiful Buddy Badge. Be sure to see what the other Babes have done with this unusual recipe. They are all very experienced bread bakers, so it should be fun to see their iterations.

As you know if you have been reading this blog all along, I rarely follow a recipe the way it is written, even baking recipes. Substituting persimmon pulp for banana puree sounded straightforward, but turned out to be something else. I cooked the persimmon pulp to help evaporate some of the excess water but even so the recipe seemed to have a lot of liquid and I ended up adding a significant amount of extra flour (using bread flour because I have a lot of it) which sort of muted the persimmon flavor. It was still tasty and the addition of spices and the cinnamon filling helped, too, although there may have been too much cinnamon flavor...next time I would use less. I liked the nutty taste from the whole wheat flour and wheat germ used. Even though there was some brown sugar, this really isn't a very sweet bread.

This was a sloppy dough for much of the time I worked with it, but I knew that I wanted to make two medium wreaths with the dough and that I wanted some definition of the layers, so a truly slack dough wasn't going to work. Eventually I realized that I would need to knead in additional flour, but I was surprised that it was far more than a 1/2 cup. After a while I stopped measuring, so you won't be able to replicate my bread. Try the banana one instead if you can eat bananas. You may still need to add extra flour, but probably less if you use the loaf pan method of shaping. The recipe for the banana one is further below. You can make bread or buns.


For the persimmon one, scoop the flesh from two very ripe Hachiya persimmons (the kind that look kind of like a heart, not the flat-ish ones), mash with a close-tined fork or in a food processor, then cook, stirring constantly, for 5 minutes at medium-low heat to cook off some of the excess moisture. Let cool, mash again with a fork to break up into a puree, then use like the banana in the recipe (once the banana and peel have been pureed). Add 1/2 teaspoon cinnamon and 1/4 teaspoon allspice to the flour and whisk it in to that it is thoroughly combined with the flour mixture. You may need to add additional flour, but go slowly so that you don't add too much. If you are shaping to put into the loaf pans, you probably won't need too much additional flour. For the filling, use half as much cinnamon as described in the banana recipe. I made my dough stronger with bread flour for the additional flour, then when it was time to shape, I cut the dough in half, rolled the half into a rectangle, spread with half the cinnamon filling (leaving unfilled edges for sealing), then rolled up along the long side. I used a serrated knife to cut the roll in half long-wise, then 'braided' the two halves, keeping the cut sides up and then formed that 'braid' into a circle, tucking the ends under. Let rise again, then bake, just as in the banana recipe, but using less baking time than the loaf, but more than with buns. When cool, if desired, glaze with a combination of confectioners sugar and warm milk...just a tiny bit of milk.


Here is the actual January 2023 Bread Baking Babes recipe:

Wild Banana (peel and all) Cinnamon Bread (or Buns)
based on a recipe in the "Tassajara Bread Book" by Edward Espe Brown, with notes about the recipe from "Bread Alone" by Judith Ryan Hendricks, and the method for using ALL of the banana in the Washington Post's recipe for "Don't Peel Your Banana Bread" (quickbread)

  Bananas

  • 1 ripe banana, washed thoroughly, and frozen

Leavener

  • 50 grams (98 ml) whole wheat flour
  • 50 grams (50 ml) water
  • spoonful (~15 grams) wild yeast starter from the fridge

Dough

  • 410 grams (3+1/3 c) unbleached all-purpose flour, sifted
  • 10 grams (1 Tbsp) buckwheat flour
  • 12 grams (24 ml) wheat germ
  • 30 grams (30 ml) plain yoghurt
  • 170 grams (170 ml) water
  • 2 Tbsp (27 grams) vegetable oil (I used sunflower)
  • all of the leavener from above
  • banana from above, thawed
  • 14 grams (1 Tbsp) brown sugar
  • 1 egg, lightly beaten
  • 8 grams (generous 1 tsp) seasalt + 10 grams (10ml) water

Filling

  • 60 grams (4 Tbsp) unsalted butter, melted
  • 28 grams (2 Tbsp) brown sugar
  • 25 grams (2 Tbsp) white sugar
  • ground cinnamon (or a mixture of ginger and cinnamon), to taste
  • salt, to taste
  • handful or two of pepitas and/or raisins, optional
  1. prepare the banana: Two days before you plan to bake the bread, thoroughly wash a ripe bananas (ideally, the banana should be well-mottled with black spots). Just to be sure that any oil-based pesticides are removed, for washing, I use bio-degradable dish-soap (NOT antibacterial!) and water, plus plenty more water to rinse. Dry the banana, then cut the stem and bottom edge off (put those into the compost), and place the banana in a freezer bag to freeze. The next morning on the day before you plane to bake the bread, take the banana out of the freezer and put it (still in its freezer bag) into the fridge to thaw.
  2. leavener: The night before you plan to bake the bread: mix leavener ingredients in a smallish bowl. Cover the bowl with a plate and leave overnight in the oven with only the light turned on if it's cool at night, (or with the light turned off if it's warm in the kitchen).
  3. dough: On the morning of the day you will be baking the bread:
    • check the leavener: see if a small spoonful floats in a bowl of cool water. It probably will. But, if the leavener has a concave surface, sprinkle in a little more whole wheat flour and the same amount by weight of water. Stir, cover and let rest for about 30 minutes to check again. It's very likely that it will float. When it floats, proceed with making the dough.
    • dry ingredients and leavener: Sift the all-purpose flour into a mixing bowl large enough for the final dough to triple. Add the buckwheat flour and wheat germ, and all of the leavener from above. Add yoghurt, 120 grams of water [change that to 150 grams], vegetable oil, and all of the leavener to the bowl. Use a wooden spoon (or dough whisk) to mix everything in the bowl together to make a rough dough. Cover the bowl with a plate and leave on the counter for about 40 minutes.
    • banana: The Washington Post's "Don't Peel Your Banana Bread" recipe is based on the recipe for Zingerman's Bakehouse Banana Bread. That recipe has the best explanation for how to prepare the bananas for the dough itself:1. Prepare the bananas. [...] Defrost. As the bananas freeze and defrost they will turn black. They do not need to be black prior to freezing. [...] Puree until they are a smooth paste. You may see tiny dark specks of the peel. This is fine.
       
      - Zingerman's Bakehouse Banana Bread Recipe (pdf) (https://www.ypsilibrary.org/wp-content/uploads/2021/01/Zingermans-Bakehouse-Banana-Bread-Recipe.pdf)
      I found it easier to cut the banana into chunks before purĂ©eing it. I also left some all of the inside pulp in the bowl before pulverizing the rest.  Using a wooden spoon, stir the brown sugar into the pulp of the banana purĂ©e. Put the rest of the water (20 grams) in with the peels. Please don't be alarmed about the very dark colour that results from purĂ©eing. It will simply make the final dough a little darker colour. Put the purĂ©e into a smallish bowl.
    • Using a wooden spoon, mix the peel purĂ©e into the banana sludge. Dump this mixture on top of the dough that has been resting.
    • adding the egg and salt: in a small bowl, lightly beat the egg with the salt and 10 grams water. Pour this mixture over top of the banana mixture.
    • Kneading: Use one of your hands to squoosh the banana/sugar/egg/salt/water mixture into the dough; use the other hand to steady the bowl – this way you always have a clean hand. At first the dough might be a bit messy and seem like maybe it's coming apart. Persevere. Suddenly, it will seem more like dough than weirdly folded, slimy glop. Keep folding it over onto itself until it is relatively smooth. Don't be overly terrified that the dough seems to stay really gloppy and sticky. Cover with a plate and leave to rest for about 30 minutes.
      The dough will be kind of sticky and pretty loose. I added a couple of extra tablespoons of flour to bring the dough together, but it wasn't that easy to shape.
       
      - Karen K, Karen's Kitchen Stories | Yeasted Banana Sandwich Bread (https://www.karenskitchenstories.com/2022/07/yeasted-banana-sandwich-bread.html)
    • Repeat the above step 2 or 3 more times.
  4. filling: melt the butter and allow it to cool to room temperature. Combine the sugars and cinnamon in a small bowl. Cover and set aside at warm room temperature.
  5. shaping: when the dough has doubled, turn it out onto a floured board. Divide into 2 equal pieces.
    • loaves: Gently shape the dough into flat rectangles that are about 2 centimeters thick. Smear the filling over each rectangle and roll like jelly rolls, from the narrow side, to make 2 loaves. Put the rolls seam side down in parchment paper covered bread tins. Run your hands under water and gently wet the top of the shaped bread. If you're using them, scatter pepitas on top. Cover the tins with a damp clean tea towel and let rise at warm room temperature until almost double. To test if it has risen enough, flour your finger and press gently on the edge - it should very slowly spring back. For comparison, try pressing early on to see how it quickly springs back when the dough has not risen enough.
    • instructions for shaping and cutting buns
      buns: Using a lightly floured wooden rolling pin, roll one of the pieces, as thinly as you can, into a long rectangle. Evenly slather the top of the rectangle with half the melted butter and half the sugar/cinnamon mixture. Roll the rectangle up as tightly as you can to form a long tube. Cut diagonally and use a chopstick to press down the centers so that the spiral flares out. Place well apart on parchment covered cookie sheet. Repeat with the other piece of dough. Cover the shaped buns with a damp tea towel and let sit in a warm, non-drafty spot until they have almost doubled.
  6. preheat the oven: A half hour before baking, turn the oven to 400F.
  7. baking: Bake for 30 to 40 minutes until the loaves or buns are golden. But first:
    • bread: Just before baking, liberally spray the tops of loaves with water. Put the bread on the middle shelf of the oven, immediately turning the oven down to 375F (the sugar wants to burn...).
    • buns: Put the buns on the top shelf of the oven, immediately turning the oven down to 375F. Half way through baking, turn the buns around and turn the oven down to 350F; with all that sugar, the bottoms of the buns really want to burn.
  8. cooling: If you have made buns, place them still on the parchment paper on a footed rack on the counter to cool completely. If you have made bread, remove it from the pans, and place each loaf on its side to cool on the footed rack. Check to see that the bread is done by rapping it on the bottom; it should sound hollow like a drum. If you only hear dull thuds, put the bread back into the still hot oven - directly on the rack (there's no need to put it back into the tins - for 5 or 10 minutes more. Once it is done, place it on the footed rack to cool completely before cutting into it. It is still cooking internally when first removed from the oven! If you wish to serve warm bread (of course you do), reheat it after it has cooled completely: To reheat any uncut bread, turn the oven to 400F for 5 minutes or so. Turn the oven OFF. Put the bread into the hot oven for about ten minutes. This will rejuvenate the crust and warm the crumb perfectly.

Monday, January 09, 2023

Italian Sausage Meat Loaf


I grew up eating a meat loaf made with ground beef, enhanced with tomato juice and oatmeal and an egg. It fed the whole family until the next to the last kid was old enough for it but by then the older kids were often gone at dinner time babysitting, so I think that the recipe worked just fine my whole childhood, even though there were ten of us at dinner some of the time. Since it takes about the same amount of time to bake potatoes as to bake the meatloaf, the next oven rack down usually had the potatoes baking to be served with the meat loaf. 

I got the recipe from my Mom when I moved to California and made it myself but these days I can't eat beef, so I have to be creative. 

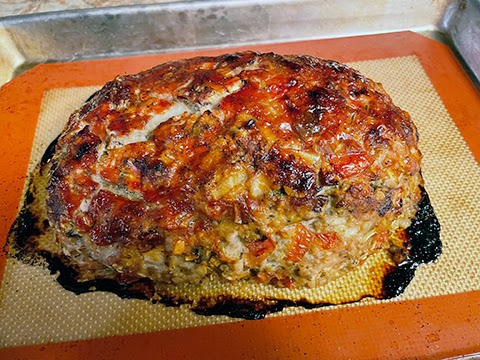
Tonight's version is made with Italian sausage and ground pork. Because the Italian sausage comes already seasoned, I didn't add salt and did add some extra mixed Italian seasonings to make it even more Italian in flavor. Beyond that I only sprinkled some black pepper over the ketchup to tone down the sweetness. Because I love mushrooms, I added finely chopped mushrooms to the mix, plus the usual onion and oatmeal. I added chopped parsley and tomato and skipped the tomato juice. I  forgot to put in the egg...but I did coat the top with the ketchup and a sprinkle of black pepper right before putting it into the oven to cook. 


Italian Meatloaf 

Serves 8

1 1/2 pounds ground meat - I used 3/4 ground pork and 3/4 Italian sausage
1/2 cup onion, chopped
1 cup finely chopped cremini mushrooms
1 diced tomato
2 teaspoons chopped parsley
1/2 teaspoon Italian seasonings
3/4 cup oatmeal (rolled oats), uncooked
2 tablespoons ketchup
a dash of ground black pepper

Preheat the oven to 350 degrees F. Line a small sheet pan with a silicone liner or foil or parchment paper.

In a large bowl place the ground meat, chopped onion, chopped mushrooms, diced tomatoes, parsley, Italian seasonings and the uncooked rolled oats (oatmeal). Use your hands to gently mix thoroughly. Form into a rough ball in the bowl, pour out onto the prepared pan, then use your hands to shape in an oval loaf. Spread the ketchup thinly over the top of the loaf and sprinkle with the black pepper. 

Bake in the preheated oven for 45 minutes. Check for doneness - thermometer should read at least 175 degrees. If lower, return to oven. Can take up to 1 hr 10 minutes.

Let stand for 5 minutes before slicing. Serve hot. 


Wednesday, January 04, 2023

Quiche For Sweetie


Sweetie wasn't feeling up to par on Jan. 1, but by the next day he was better. Since we didn't party on New Year's Eve, just toasted each other with Irish Coffee, I think he was fighting off a cold. Of course I wanted to bake something to cheer him up...it's what I do. Since we had left over ham and cheese from Christmas, I decided to make quiche, one of his favorite things.

A good quiche has a flaky crust, so I blind-baked my stand-by ReadyCrust and let it cool. For the filling I had sautĂ©ed onions and sliced mushrooms, cubes of ham, small cubes of brie, and frozen chopped spinach (well drained). I added an extra egg to the filling so that it would be a bit firmer than usual. Because of that, it cut cleanly and served neatly while still very warm. 

Leftover will keep in the fridge a few days, if you have any. A nice side with this is a fruit compote or a green salad.

By the way, my Christmas tree is still up, but I will be taking it down soon. Each of the ornaments will be carefully put away for next year. In a way, that's similar to planting seeds...there is the faith that there will be a next year, a spring, a harvest, a celebration in the future. Since I received art supplies for Christmas and just cleaned up my studio, my attention is being drawn to my art journal and the next painting...

Ham and Brie and Mushroom Quiche with Spinach

1 blind-baked 9-inch single pie crust, fluted
1 tablespoon olive oil
1/2 large yellow onion, chopped finely
4 oz. fresh mushrooms, sliced
1/8 teaspoon dried thyme
dash of pepper
1 cup diced cooked and cooled ham

1/2 cup brie cheese in small dice
1/2 cup chopped spinach...preferably frozen and thawed

3 (or 4 as I did) large eggs
1 1/2 cups milk (I used unsweetened oat milk)
dash ground nutmeg
1/4 teaspoon freshly ground pepper

Keep the pie crust warm while preparing the filling.

In a large skillet heat the olive oil, then sautĂ© the onions and mushroom 3 minutes over high heat, stirring often, until onion is lightly golden and mixture is losing its moisture. Stir in the thyme and pepper. Place this mixture into the bottom of the pie crust. Top with the ham cubes, distributing evenly.

Evenly distribute the brie cheese over the veggie mixture. Warm the chopped spinach in the microwave and then wrap in paper towels and squeeze the extra moisture out. Place clumps of the spinach evenly over the ham.

In a medium bowl beat the eggs lightly with a fork or whisk and then beat in the milk and nutmeg and pepper. Pour this mixture over all of the filling ingredients in the pie plate. The filling will just come to the top of the pan sides.  If desired, brush the fluted crust with milk (optional).

Place pie pan on a small baking sheet and bake in preheated 350 degree F oven for 30-40 minutes until knife inserted in center comes out clean. If necessary, cover the fluted crust with foil if it starts to brown too much.

Cool quiche on a rack for 5 minutes, then cut into wedges and serve.
Serves 4 - 6.

Sunday, January 01, 2023

Happy New Year! Some Tips

                            Mis en place and spelt flour...for two tips

 No, I didn't make any New Years resolutions per se, but I do plan on eating lighter and also I want to share some of my cooking and baking tips. You may (or may not) find something that you'll find useful next time you cook or bake.

The first tip is for baking. Don't stress about sifting flour. I understand that baking is really a lot of chemistry and that proportions matter, but today's flour only needs to be fluffed up in the bag or container before you measure. I have a scoop in my flour container, so I use that to lift up flour all around the container and then slowly let it fall from the scoop, which I'm holding a good six inches above the flour in the container. Once I've done that a few times...takes seconds!...I use the scoop to fill the measuring cup, then use a knife (or in a pinch my flattened index finger) to remove any flour above the measuring cup lip. The best recipes have you weighing the flour anyway, but this works for the recipes that only give measuring cup measures. 


Another tip is also mostly for baking. Having your ingredients at room temperature is really important for baking (unless the recipe tells you to chill an ingredient, or melt the butter, and so on). The ingredients will blend better, if you are creaming butter, it will aerate better, eggs will mix in to a butter/sugar mixture better, and so on. The tip is that if you have forgotten to warm your eggs, you can put them into a mug of really warm water for a few minutes. If the butter is cold, a microwave can help, but you do have to be careful. Put the butter on a plate, wrapped, then microwave it on half power for just 10 seconds. Turn the butter over and turn it 1/4 turn, then microwave another 10 seconds on half power. Check to see if it is less firm and ready to use. If not, half power for another 5 seconds should do the trick.


The most important tip is to get all of your ingredients out and prepped (mis en place)before you start any recipe or cooking project. This way you will find out before you start if you are out of an essential ingredient (so you can go buy it, borrow it, or find a substitution...or try another recipe!), and if you also make sure to lay out any tool, pot, pan, etc. called for you won't be flummoxed by not having that hand-held mixer or immersion blender when the recipe is half done. Imagine trying to make jelly, which needs hot, sterilized jars once cooked, if you forgot to check if you have jelly jars, and if they are clean and sterilized. I often run the dishwasher, with all the jelly jars in it, right before making jam or jelly. That way the jars are ready, hot, and clean right out of the dishwasher. 

Of course in order to do this prep work you will need to read the recipe all the way through...so read it again. When I read it the second time, I try to imagine myself actually making the recipe. Visualization works!

That's it for today. There will be more posts with tips coming later this month.