Wednesday, October 25, 2023

Another Blog Birthday


2006 seems like a really, really long time ago. That was the October when I began posting on this blog. If you had asked me at the time, I'm sure I wouldn't have expected to still be posting. 

Still, it has become over time what a blog is sort of expected to be, a place not only for writing and posting recipes and joining groups with similar interests, but a place that tracks the seasons, that records life events and, perhaps most unexpectedly from my perspective, a place that allows me to revisit the past and re-experience what I was feeling then as I read the older posts. 

 You, dear reader, have been the reason that it stays interesting and meaningful to me. You comment or at least stop by. Sometimes you don't comment but I hear from you other ways and I know that, for whatever reason, this blog is a place where you see what I am up to. 

 At the moment, we are not doing any projects, nor contemplating any, which is the first time since Sweetie retired. I'm still enjoying my watercolor and acrylic pieces, still having fun with friends and with my P.E.O. work, and still, most of the time, finding pleasure in cooking and baking new-to-me things. 

 Let's enjoy the coming year together! 

 P.S. You get extra points if you know what the photo means.

Sunday, October 22, 2023

Muffins with Quince and Pecans


When I realized that I still had poached quince in the fridge and that it needed to be used, I went to various cookbooks and then to the index for this blog. It's easy to access the Index...just click on the photo of the table set with a rust tablecloth. It's on the right in the web view of the blog.

In the section with the oldest recipes I found Playful Banana Muffins and, after reading the recipe, I decided that this recipe, which had already had a big makeover, would get another makeover...this time with quince!

This is a lovely muffin. It's moist from the fruit, laced with chopped pecans and small pieces of quince, fragrant with the quince and orange zest and vanilla, and it has a nice crumb. I'm so glad that I made this recipe. It makes a full 12 muffins, plus a small loaf pan's worth of deliciousness. One of these muffins and a cup of tea go really well together.

No quince? You can substitute ripe pear and it will work just fine. Peel and core the pear, making sure to also remove the stem parts. Dice the fruit and make sure you have 2 cups worth. Pears range in size so much that you will probably need about 6. The same is true for the quince...about 5-6 will work. I boiled mine for about 10 minutes to soften the skin, peeled and cored them, then poached at a simmer in water which also had 1/2 cup sugar, 1 cinnamon stick and two whole cloves. Be sure to drain and then chill the poached quince.

I do hope you make these muffins with either quince or pears for a celebration of fall bounty!


Quince Pecan Muffins
Based very loosely on Raisin Bran muffins in the King Arthur Flour Bakers Companion

2 cups poached quince, diced small (about 1/2-inch)
1 cup buttermilk at room temperature
1/2 cup vegetable oil
2 large eggs, at room temperature
3/4 cup brown sugar
2 tablespoons molasses
1/2 teaspoon vanilla
1/4 teaspoon freshly grated orange zest
2 1/2 cups all-purpose flour
1/2 teaspoon salt
1 tablespoon baking powder
1 teaspoon baking soda
1/2 cup rolled oats
1/2 cup roughly chopped pecans

Preheat the oven to 425 degrees F. Prepare a 12-cup muffin tin and a mini-loaf pan by spraying with baking spray or by greasing and flouring them. Set aside.

Check the quince for liquid. If necessary, dry with paper towels. Set aside.

In a large mixing owl, whisk together the buttermilk, oil, eggs, brown sugar, molasses, vanilla and orange zest. Add the quince and pecans and stir to combine.

In another bowl, mix together the flour, salt, baking powder, baking soda, and oats.

Quickly, with as few strokes as possible, us a large spoon, wooden spoon, or large flexible spatula to mix the dry ingredients into the wet ingredients, just until combined.

Fill prepared muffin cups with the mixture, filling each cup almost to the top. Pour the rest of the batter into the prepared mini-loaf pan, using a spatula to clean the bowl of batter.

Bake in preheated oven for 14-18 minutes for the muffins, or until they spring back when pressed lightly in the middle, and for about 25 minutes for the mini-loaf pan quince bread, until a cake tester inserted in the center comes out clean.

Remove when ready from the oven. Cool on a wire rack 5 minutes, then turn out of the pans and let cool until ready to serve, or serve at once. If desired, serve with butter, cream cheese, or apricot jam.


Thursday, October 19, 2023

Pumpkin Swirl Cake Decadence


Do you ever see a new recipe that you just know you have to try, as soon as possible? I do more often than you might think. A short while ago I saw this recipe from King Arthur Baking and knew that I had to make it soon, while pumpkin season is here. 

This is a lovely, moist, fragrant marble cake. The original recipe was for a cake made in a loaf pan, even a decorative loaf pan with pumpkins design on top. I needed a sheet cake for a luncheon I was going to, so I tripled the recipe and made it in two 9x13-inch pans. Then I truly made it decadent by topping the cakes with Lori's Cream Cheese Icing, which is the best cream cheese frosting you ever had.

The cake is a vanilla cake, but partway through the making of the batter, you divide the batter into two, then add pumpkin and pumpkin spice to one half and sour cream to the other half. Batter is dolloped into the pans alternately, then you swirl it with a skewer or chopstick. That way each piece has some dreamy vanilla-sour cream cake and some fragrant pumpkin cake. It is impressive looking and made quite a hit with the women who were at the luncheon. Of course I decorated the cakes with seasonal sprinkles and candy corn, but you can use whatever decorations you like.

If you'd like the recipe for just the loaf pan size cake, you can find it HERE on the King Arthur Baking site. The recipe below is for two 9x13-inch cakes plus enough Cream Cheese Icing to frost each of those cakes, plus a bit more for decoration if you like...or for putting between pumpkin cookies or between graham crackers...you get the idea!


Pumpkin Swirl Cake
Makes two 9x13-inch cakes
Recipe from King Arthur Baking

6 eggs
3 cups sugar
2 1/4 cups vegetable oil
3 tablespoons vanilla
6 teaspoons baking powder
2 1/4 teaspoons salt
6 cups cake flour
1 1/2 cups pumpkin puree (not pumpkin pie filling)
6 teaspoons pumpkin pie spice (See Note at bottom)
1 1/2 cups sour cream

Grease and flour two 9x13-inch baking pans...with at least 2-inch sides. Set aside

Preheat the oven to 350 degrees F.

Beat eggs and sugar until smooth. Add oil gradually, beating continuously. Stir in the vanilla, baking powder and salt. Gently mix in the flour, scraping sides and beaters as needed, until completely mixed. Batter will be stiff.

Transfer half of the batter  to another bowl...about 3 cups...and mix in the pumpkin puree and the pumpkin spice. Set aside.

To the vanilla batter, add the sour cream and beat to incorporate. Scrape down sides and beaters if needed and mix a bit more.

In the prepared pans, dollop about 1/4 cup one batter, then 1/4 cup the other batter and continue doing that to create a checkerboard effect in the pan. Repeat with the other pan. Once all of the batter is in the pans, use a skewer or chopstick to swirl figure eights across the checkerboard pattern. Only a few are needed...resist doing too many or you will lose the separation of the batters that makes the cake so lovely.

Bake for 20-30 minutes, until cake springs back when center is pushed gently. Tester inserted will come out clean. Cool on wire racks 5 minutes, then turn out of the pans, or, if preferred, leave in the pan and serve from the pan once frosted and decorated.

Note: No pumpkin pie spice? Make your own:
5 teaspoons cinnamon
1 teaspoon ginger
1 teaspoon cloves
1/2 teaspoon nutmeg 

Let cool completely before icing. Use your favorite buttercream or the following Cream Cheese Icing.


Lori's Cream Cheese Icing
Makes enough for two 9x13-inch cakes, plus extra for decoration or another use

2 sticks butter, softened
24 oz. cream cheese, at room temperature
1/2 cup sour cream
2 tablespoons vanilla extract
4-6 cups powdered sugar

Cream butter, cream cheese, sour cream and vanilla together until fluffy. Gradually mix in powder sugar. Towards the end, add 1/4 cup at a time until you reach you desired texture and taste.

Monday, October 16, 2023

Rolling with the Babes


Now that it's fall, the menu changes around here. There is less grilled food and more meals that are comfort foods, like stews and braises and soups. A great accompaniment to those kinds of dishes are bread rolls. Especially with stews and braises, the roll can be torn into pieces and those pieces used to capture the delicious stew gravy and braise juices at the bottom of the bowl or the edges of the plate.


The Bread Baking Babes are right in line with that seasonal change. This month our Kitchen of the Month is Cathy of Bread Experience and our challenge is to bake Sigteboller, Danish Salty Rye Rolls.

As usual, I’m making  changes to the recipe. Turns out that I don’t have any rye flour, although I really thought that I did. Instead I’m using barley flour, plus a small amount of Irish whole meal wheat flour, and a couple teaspoons of ground flax seed.


It’s seems odd to dip the bottoms of the rolls in rolled oats when there aren’t any in the rolls themselves, but I did follow that part. I used some French fleur de sel for the salt part on top, which I applied after scoring the tops.

I added a couple of tablespoons of water to the polish since I used yeast, not sourdough starter. I bake bread so rarely that it doesn’t make sense to have a starter going.

If you decide to bake these lovely rolls, and want to be a Buddy, e-mail Cathy and include a photo, your URL, and a short description of your bake experience. She needs that by Oct 30 to include it in the roundup.

Be sure to visit the other Babes websites to see their fun with Sigteboller!

These rolls are delicious- especially the tops with the extra salt. I like the chewy texture. Next time will probably skip the rolled oats - they didn’t seem to add much.


Sigteboller, Danish Salty Rye Rolls

Makes 8-9 rolls (70grams each)

Poolish

24 grams rye flour

40 grams all-purpose flour 

64 ml water

10 grams (1 teaspoon) sourdough starter or a pinch of yeast


Final dough. 

96 grams rye flour

160 grams all-purpose flour 

175-200 ml lukewarm water

3 grams instant yeast

6 grams sea salt

12 grams dark molasses 

Topping: Rolled oats, sea salt 

Mix the polish

The evening before you plan to bake the rolls, combine the flours, water, and yeast in a medium mixing bowl. Mix thoroughly to combine and allow to restart warm room temperature for 14-16 hours, or overnight. It should expand and have bubbles.

Mix the dough 

In the bowl of a stand mixer, or a large mixing bowl, add the rye flour, all-purpose flour, water, and poolish to the bowl.Mix on low until there are no dry bits of flour. Allow the dough to rest for 45 minutes (autolyse). Note: Start with 150 ml of water and add in additional water gradually, as needed.

Add the yeast, salt, and molasses. Mix until thoroughly incorporated. Sprinkle in additional water if necessary to distribute evenly.

Cover the bowl, and let dough rise in a warm place for 45 minutes. Gently punch the dough down to release the air. Form into a round and place back in the bowl. Let the dough rest an additional 45 minutes.

After the dough has risen during the 45 minutes, punch it down to release the air.Divide the dough into 8-9 equal portions, about 70 grams each. Shape each portion into a ball

Press the bottom (seam side) into a plate of rolled oats, then place on a baking sheet lined with parchment.

Cover the baking sheet with a kitchen towel and let the rolls rise another 40-50 minutes, or until doubled in size.

Preheat the oven to 375 degrees F.

Just before baking use a sharp knife to cut an x-shape, about 1/4 to 1/2-inch deep on top of each roll. Sprinkle coarse Kosher salt over the rope, for flavor and to be decorative. You can also use caraway seeds or sunflower seeds 

Bake the rolls in the preheated oven for about 20-25 minutes, or until they are golden brown and sound hollow when tapped on the bottom.

Once the rolls are baked, allow them to cool on the baking sheet. Enjoy warm with butter.


Wednesday, October 11, 2023

Using Fall Fruits and Nuts


 After our recent days of Indian Summer - three days in a row of temperatures in the mid to upper 90s!...we dropped 30 degrees day before yesterday and also had rain...and then more rain yesterday afternoon. Not a downpour, but soaking mist with short runs of medium raindrops. The good news is that it should be enough to keep autumn forest fires at bay for another week or two. The bad news is that it isn't enough to help the water table. The other good news is that it cooled things down enough for baking!

Fall fruits are some of my favorites. Pears are mellow and juicy, the fragrant quince at the foot of the driveway turn from fuzzy to golden and shiny, and the persimmons are just beginning to turn colors on their way to a deep orange. Walnuts and pecans also are harvested in the fall. This year the squirrels and crows have gotten almost all of the walnuts, but I haven't had time to shell them anyway, so that's fine. The walnuts and pecans in this recipe are from Costco. The pears are from in town, carefully ripened in a brown paper bag. I still have some of all of them, so who knows what recipes will show up her in the next little while?

The honey is a very special harvest. It came from the hives of some friends of Sweeties...he went to middle school and high school with one of the friends and they hadn't seen each other in a very long time, but we had a great lunch with them. The honey is full flavored and so delicious! I'm sure that this tart would not have been nearly as wonderful without this special honey.

I started with a recipe from almost the beginning of my blogging time, way back in February of 2007. The recipe for a Nut Mosaic Tart comes from Sunset magazine from 1983. I even got a comment at some point from someone who had lost the recipe and had been delighted to find it again.

As you know if you have been following this blog, I often take a recipe and play with it. This time I took the tart recipe and reduced the nuts but added poached and peeled Bosc pear and poached and peeled pineapple quince. I used a pre-made refrigerated pie crust in the tart pan, tucking the excess into the tart and pushing the doubled sides into the tart pan curves. Then I ran a rolling pin over the top to cut off any excess dough and neaten the top. That's all it took to have a tart shell ready to fill.

The most time-consuming part is poaching, peeling, and chilling the fruit. Be sure to pat off excess liquid with a towel or paper towel before chilling. I didn't do that with the pear and so the pear nearly fell apart plus it made the filling just a bit liquid where the pear was.


The taste of this tart is amazing! All of the elements go so well together. It is fragrant with the quince, honey and orange zest, plus the roasting nuts while baking. I does need to chill a bit before serving, but once you do you will be so glad that you made this delicious Harvest Mosaic Fruit and Nut Tart!


Harvest Mosaic Fruit and Nut Tart
Adapted from a Sunset Magazine recipe from around 1983

1  9-inch tart pan lined with pie dough

1 large Bosc pear, ripe, poached until tender, peeled, cored, tossed with lemon juice and chilled in an airtight container for at least 4 hours. 
2-3 large quince, ripe, poached until tender, peeled, cored, tossed with lemon juice and chilled in an airtight container for at least 4 hours

1 cup walnuts, chopped roughly
1/2 cup pecans, whole
3 eggs
1 cup honey
½ teaspoon grated orange peel
1 teaspoon vanilla
¼ cup butter or margarine, melted
Sweetened whipped cream (optional)


Press pie pastry evenly over the bottom and sides of an 9-inch tart pan with a removable bottom. 

Arrange slices of poached pear and quince, alternating, with small end in the middle and larger end of each slice toward the side. Set aside.

In a bowl, combine eggs, honey, orange peel, vanilla, and melted butter; beat well until blended. Stir in nuts. Pour over fruit into pastry-lined tart pan. If needed, move the nuts around with a fork to scatter them evenly around and over the fruit. 


Bake on the bottom rack of a 350 degree F oven until the top is golden brown all over, about 40 minutes.

Let cool on a wire rack. Remove pan sides. Offer wedges with whipped cream, if desired. Makes 10-12 servings.

Friday, October 06, 2023

Pancakes and Strawberries


You would think that since it is October that the strawberries would not be local, but you would be wrong. Our highway farm stand plants different varieties so that it can sell strawberries from spring through late fall. I like the ones that we are getting now...not too huge, but very flavorful.

It's been ages since I made pancakes, but I decided to make them from scratch, based on a recipe in the classic Joy of Cooking. For a change I have buttermilk in the fridge. I bought it for the cake that I never made due to illness, but it is still delicious and adds a wonderful tang to these pancakes.

You can, obviously, top your pancakes with anything you like, so don't turn away from this recipe if strawberries are out of season where you live. Sautéed apples are a good substitution for this time of year in the northern hemisphere. 


Pancakes

Based on recipe in Joy of Cooking

1 cup all-purpose flour
1/2 cup white whole wheat flour or whole wheat flour
1 teaspoon salt
3 tablespoons sugar
1 3/4 teaspoons double-acting baking powder
2 eggs, room temperature
3 tablespoons butter, melted, room temperature
1 cup buttermilk, room temperature
1/4 cup milk, room temperature

Sift together the two flours, salt, sugar and baking powder.

In a small bowl, beat the eggs. Add the melted butter, buttermilk and milk and whisk to combine.

Add the buttermilk/egg mixture to the dry ingredients and whisk just to blend.

Heat a skillet or griddle over medium-high heat. Grease lightly with butter. Pan is ready when a water drop sizzles when dropped onto the pan. Add batter when pan is ready and let cook undisturbed until small bubbles form around the edges of the pancake. Turn and cook until golden brown. If necessary, adjust heat a bit higher or lower if pancakes are burning before being cooked or are dry in the center.

Serve at once with desired toppings such as butter, maple syrup, and/or fruit. I love mine with sliced strawberries.


Saturday, September 30, 2023

Savory Polenta Squares with Pasta Sauce and Balsamic Mushrooms


 It must be the shorter days, but I'm starting to think about meals that are heartier. A few days ago I made my favorite Pasta Sauce, which uses fresh zucchini as a major ingredient. The recipe, found HERE, makes a lot, so I still had a fair amount to use, but I didn't want to combine it with pasta.

I remembered a dish that I really enjoyed that I had posted a while ago here on the blog. You can find it HERE. It consists of cooked polenta, enriched with a bit of butter and some Parmesan, poured into a buttered 8-inch square baking pan, with a ribbon of shredded mozzarella cheese and some fresh basil leaves sandwiched in the middle. 


top photo: half of polenta goes into the lined pan, then basil leaves are laid down
lower photos: after the basil, an even layer of shredded mozzarella cheese is added
After that the balance of the polenta is added and the layer smoothed to even it, and then the pan is refrigerated for at least 45 minutes.

You chill this 'sandwich' until it's firm, cut it into squares, then pan-fry it to warm the polenta up and crisp it, plus melt the cheese. Once plated, you spoon some of that lovely pasta sauce over the polenta square. Just like that, it's an amazing meal, but to make it even more special, I added some Balsamic Mushrooms. Any of these recipes are wonderful, but combined, it was a feast!


Balsamic Mushrooms
serves 2-4, but can be doubled 

Approximately 16 medium mushrooms, cleaned and quartered (I used brown criminis)
2 tablespoons olive oil 
1 tablespoons butter
2 cloves garlic, minced
1/4 teaspoon dried thyme
1/4 teaspoon dried rosemary
1/8 teaspoon ground black pepper
3 tablespoons balsamic vinegar (I used the Costco Kirkland brand)
1 tablespoon finely chopped fresh parsley

Clean and quarter the mushrooms. Remove any stems that seem too old to eat. Set aside.

In a skillet, heat the olive oil and butter over medium-high heat. Add the garlic, dried thyme, dried rosemary. Stir and continue to stir for 1 minute while the garlic cooks...do not burn. Add the quartered mushrooms and stir to coat with the herbed oil. Cover, lower the heat to medium, and cook for 3 minutes. Uncover the pan, return the heat to original setting, add the balsamic vinegar and stir to coat the mushrooms with the sauce, stirring for at least a minute. Garnish with the parsley and serve at once.

Tuesday, September 26, 2023

Tomatoes, Tomatoes, Tomatoes

When I was growing up back in Virginia, summer was tomato season, usually starting around July. Here in Northern California tomatoes are usually ready for harvest starting in August. Everything is about two weeks late this year, so it's only recently that we really started to get constant ripe ones.

Some years I've grown up to twelve different varieties of tomatoes, but my favorite is the Black Krim, a tomato that is sort of brown when ripe. When you cut into it there are parts that look chartreuse and parts that are bright pink, with the rest the dark red-brown color. The flavor is pure tomato...intense, with both tang and sweetness. The largest ones are a little smaller than a tennis ball and the smallest a bit bigger than a golf ball. This year I grew two from seed. Last year I bought a seedling, but I think the ones I grow from seed do better.

Sweetie and I mostly enjoy them as a side dish/salad, sliced, then anointed with salt, pepper, balsamic vinegar, a drizzle of olive oil and a shower of fresh basil, like in the photo above. I also really like them as part of a sandwich, my two favorites being grilled tomato and cheddar cheese and the classic bacon-lettuce-tomato on toasted sourdough with good a mayo.

This week I baked a new recipe to me, a ham and tomato pie (but forgot to take a photo!). The recipe includes sautéed red onions and zucchini pieces, the sliced tomatoes, ham, cheddar cheese and a milk and egg custard, all baked in a pie shell. Not only does it taste amazing, but it smells heavenly, especially when it is almost fully baked. My only complaint was that it did weep a bit after cooling. I think next time I'll bake it at a high temperature just long enough to firm up the crust, then reduce the heat to 350 degrees F for the last 15-20 minutes so that the custard has a chance to firm up without too much heat.

I made the pie long enough ago that I've had to look up the recipe I use. Here's the recipe.

It's a good one.

Ham and Tomato Pie

1 pie crust (I use Pillsbury ReadyCrust) in a shallow pie pan, edges turned under and crimped, unbaked
1 (8-oz.) package diced cooked ham
1/2 yellow onion
1 tablespoon Dijon mustard
1 cup shredded Cheddar cheese
2-3 medium fresh tomatoes, sliced thinly and drained on paper towels
2 large eggs
2/3 cup half and half (I used Silk creamer)
1 tablespoon chopped fresh basil
1/8 teaspoon pepper

Preheat oven to 425 degrees F.

In a large non-stick skillet over medium heat, cook the ham and onions until ham has browned and liquid has evaporated, about 5 minutes.

Brush the bottom of the pie shell evenly with the Dijon mustard. Sprinkle with half the cheese. Spoon the ham mixture over the cheese. Top with an even layer of tomatoes.

In a medium bowl whisk the egg then add the half and half, basil and pepper. Pour over the top of the tomatoes in the pie. Finish with the second half of the shredded Cheddar cheese.

Bake in the preheated oven for 12 minutes, then reduce the temperature to 350 degrees F and bake an addition 20-30 minutes (or more) until the filling bounces back slightly when you push with an index finger. The crust and places on top of the pie should be browned.

Cool 15 minutes on a rack. Serve warm.

Tuesday, September 12, 2023

As Local As It Gets


Over the Labor Day Weekend Sweetie and I visited our daughter, her fiancee, and his son in Redmond, WA. We had never been to their new rental and discovered that they have a nice big backyard with mature fruit trees. There is also a water feature with waterfall that Aaron has been working on. It was a muddy, overgrown mess but he re-lined it and with the help of his son they hauled rock and set up a set of pumps and fountains. Our last day there a new, more powerful pump arrived so the waterfall part worked! It really is beautiful and well designed and adds so much to the outdoor experience.

One of the fruit trees in the backyard is a Granny Smith. Sweetie and I decided to prepare the apples and make an apple galette for dessert. The apples had quite a few blemishes and signs of worms, but our own apples do, too, so we knew what to do. It happens if you don't spray the apples.

We also discovered that there was a small Asian pear tree. Sweetie loves Asian pears! Next year we will go back when cherries are in season since there is also a large cherry tree. Yay for local fruit!

Want to make your own? You can use your own apples or get some Granny Smiths from the market or farmers market. Then use the recipe found HERE, without the bourbon and add a teaspoon lemon zest.

Tuesday, August 29, 2023

Baked in Parchment


This is an absolutely wonderful way to cook fish with a deeply flavored Mediterranean vibe. This is based on a recipe by Ellie Krieger that I found in the Washington Post newspaper. Her version is with flounder and olives. I made mine with red snapper and no olives, but I did include capers. I also replaced the cherry tomatoes with large-ish chunks of Black Krim tomatoes from my garden. I found out that I didn't have any green beans, so I used red and yellow pepper strips. As you can see, the recipe is a long way from where it started.

Baking foods in parchment paper, or 'en papillote' as the French say, is a lot of fun and makes for easy clean up. You actually serve the dish in its paper packet in order to capture all the juices. When you are finished eating, the paper gets tossed and there are no pots or pans to wash up. Perhaps the best reason to cook this way is that the fish stays really moist. Don't forget to have some crusty bread on hand to sop up those captured juices!

finished fish surrounded by packet and juices

Snapper with Peppers and Capers en Papillote
Based on a recipe by Ellie Krieger in the Washington Post
Serves 4

1 medium lemon
2 tablespoons capers, drained and chopped
1/2 teaspoon dried thyme
1 clove garlic, minced or finely grated
1/2 teaspoon ground black pepper, divided
1/2 cup red and yellow pepper strips, with no stem or seeds or ribs
1 cup fresh tomato, cut into bite sized chunks
four (4-5 oz each) fillets of snapper (could also use flounder or sole)
1/4 teaspoon salt
1/4 cup thinly sliced red onion from onion that has been cut in half
2 tablespoons olive oil
1/4 cup lightly packed fresh parsley leaves (optional)

Place the oven rack in the middle of the oven and preheat to 425 degrees F.

Zest the lemon into a small bowl. Set zested lemon aside. To the small bowl add the chopped capers, garlic, thyme and 1/4 teaspoon of the pepper. Stir to combine. Set aside.

Cut the zested lemon in half. Capture the juice from one half in a small bowl. Cut the other half into wedges for garnish.

Place 4 sheets of parchment paper (12 x 18-inches) on a flat work surface. Fold each sheet in half  then open flat. Work in batches if needed if you don't have enough counter space.

fish over peppers and tomatoes

lemon zest-caper mixture over fish

On each piece of parchment, near the fold, place 1/4 of the red pepper strips. Then arrange the tomatoes on top. Sprinkle with the salt and the remaining 1/4 teaspoon pepper. Place a fillet of fish on top of the tomatoes then top each piece of fish with 1/4 or the caper mixture. Make sure the caper mixture runs along the whole piece of fish. Place 1/4 of the onion slices on top of each dressed fillet, then drizzle each piece with 1 1/2 teaspoon olive oil and 1 teaspoon of the lemon juice.

One at a time, take the parchment and fold the empty half over the top of the fish and roll the edges, crimping to seal tightly. Make sure to leave a little room around the fish for expansion in the oven.

Place the packets on a large, rimmed baking sheet and bake for 12 minutes, or until the fish is cooked through.


Open each packet, being careful to avoid the steam, and serve on plates in the packet, or, if desired, transfer the packet contents to a plate along with the juices. Garnish with parsley (optional) and the lemon wedges.


Sunday, August 27, 2023

Another Peach Pie


Sweetie can never have enough pie. I was lucky and found some ripe white peaches in one of our local markets, so I bought enough to make a pie, with a few left over for snacking. This recipe is a story one, but pretty simple.

This pie was a little different than some. I used only one disc of pie dough, rolled it out to about 12-inches in diameter on a large piece of baking parchment, then in the middle 9-inches or so I put a thin layer of flour mixed with dry bread crumbs, 1 tablespoon of each.

In a small bowl, I combined  2 tablespoons cornstarch, 2 tablespoons brown sugar, 1/4 teaspoon freshly ground nutmeg, and 1 1/2 tablespoons bourbon. I mixed this all together with a mini-whisk and poured it over the prepared (skinned, pit removed, each peach cut into 16 slices) peaches in their bowl.

I used a silicon spatula to gently turn all the peaches until they were coated with the cornstarch mixture. Then the peaches were arranged in the middle of the pie dough, right on top of the flour mixture.

The edges with no fruit were folded up and pleated with clean, wet hands. The extra moisture helps the pleats stick together to hold in the fruit since there isn't a pan to do that. A teaspoon of sparkling sugar went over the damp folds of the dough, with a few settling over the fruit, too.

This gallette pie went into a preheated 375 degree oven on top of a preheated baking stone. After 5 minutes I reduced the heat to 350 degrees F and baked until it was golden brown and the pastry was flaky, about 25-30 minutes more. I used a pizza peel, sliding the parchment paper and pie onto the peel, into the oven and off the peel, then onto the peel when it was done baking. 


The different part was dividing the thickeners, with the sugar part getting mixed with the bourbon and the fruit. It worked wonderfully well. The juices were thick, the bottom wasn't soggy, and the pie was delicious, if a little flat (because the peaches cooked down). You didn't really notice the bourbon as such, but it gave the overall pie a great taste. Try it!


Tuesday, August 22, 2023

The Lilies of Summer


The garden is going well, at least partly because of all the rain we had over many months this spring and early summer. The two Black Krim tomato plants are huge and the first ripe tomatoes have been picked. I used the first one to make bruschetta over the weekend. Didn't take any photos but they were just like the ones HERE. We did have the first of the yellow pear tomatoes today, in our dinner salad...or was that yesterday? It's like that right now.

We are not getting as many zucchini as usual, an unusual problem for zucchini growers. It's actually just enough to have a couple, grilled, every third day or so with whatever Sweetie is putting on the grill for dinner.

Those are the only veg I planted this year. A bit more than last year, but still far behind most years. I'm beginning to think that I need to hire a gardener or else to resign myself to weeds and tall grasses. I just can't get on my knees to weed anymore, so that discourages me from planting a lot, too.

Still, it has been a glorious summer for lilies. The pink 'naked ladies' are blooming by the farmhouse, but I don't have photos yet.

I've had the early earth tone ones


and the pink Orientals mixed in with daisies


and without daisies


plus one purple Oriental


then there have been drifts of gorgeous white Orientals with pink spots


with the most recent blooms being my favorites, the creamy Orientals with peach, apricot and orange markings.


Through much of July and still blooming there are always the day lilies


The roses have been blooming, too, on and off, but they start in the spring. The lilies are truly at their best in July and August, giving me a beautiful reason to appreciate summer.

Wednesday, August 16, 2023

Babes Bake Approachable Loaf

Starting something new is always a little scary...exciting, but scary. That holds true for bread baking, too. It's double if the bread is made with yeast. It's too easy to end up with a doorstop instead of the desired lovely, light, delectable loaf. This month our wonderful Kitchen of the Month, Kelly of A Messy Kitchen chose a recipe for an approachable loaf...one that isn't too hard, doesn't have a million ingredients, and, if all goes well, let's you have a nice loaf of wheat bread that makes great toast and sandwiches and French toast...you get the idea.

So the first thing that you do...and don't freak out...is you make a starter of sorts. That means that you take flour, water, and a little yeast and mix it together a day or two before you want to make that loaf of bread. This does two things: it gets you going and committed to making the loaf, and it allows for extra flavor as that mixture sits (part of the time in the fridge) and the yeasties get busy.

The recipe we were given assumes that you have a sourdough starter. I don't, but if you make this starter a few days in advance, it works just as well.

So one thing to remember is that you can't kill those yeasties with cold, but you can kill them with too much heat. Use barely warm water when you are making the starter and when you are making the loaf dough. You will need a warm place for the loaf to rise, but you don't do real heat until it goes into the oven. Another tip: knead a lot. I suppose you can knead too much, but if you are doing it by hand that is unlikely to happen because your muscles will complain before you over knead. The kneading creates these long elastic-like strands that help the loaf to rise in the oven. If you have kneaded enough, your dough in this recipe will feel very smooth.

So follow the recipe as given below. The top one uses my version of the starter (levain) and the one below it is the one we were given, which uses a sourdough starter. If you don't have access to Edison flour or a good white whole wheat flour, use regular whole wheat flour...it will be fine, just a bit darker.

Have fun with this. Allow the dough enough time to rise. Oh, by the way, you are in charge of the rising timing. I made my dough early in the morning, did the first 90 minutes with the fold half way through, then lightly oiled the top of the dough (I used a spray olive oil), put a clean shower cap over the bowl and put the whole thing in the fridge. About three hours before I wanted to serve it, I took the dough out, shaped it and put it in the greased loaf pan. By the time it rose and I baked it, it was just in time for dinner. If you want to make the dough one day and bake it the next day, no problem...just leave the covered dough in the fridge overnight. Remember...cold doesn't kill yeast. You do need warmth for rising, but cold allows you to bake when it works for you!


If you do bake this lovely bread and want to be a Buddy, simply email Kelly by the end of August to be included in the round-up and get a Buddy Badge. Include your URL and a photo for her for the round-up.

Be sure to visit the other Bread Baking Babes, too, to see what they have done with this great bread!


The Approachable Loaf - My Variation
from the WSU bread lab

Levain:
60g flour ~½ cup (I used all purpose)
60g water~½ cup + 1 tsp
dry yeast ~¾ tsp (I use RapidRise)
30g flour ~1/4 cup (I used all purpose)
27g water~1/4 cup 

Final dough:
290g white whole wheat flour ~2¼ cups (I used King Arthur Baking White Whole Wheat Flour)
247g water ~1 cup + 1 tbsp + 1¾ tsp
7g sea salt ~1 tsp sea salt
2.4g yeast ~¾ tsp + tiny pinch
23g honey ~ 1 tbsp
17g olive oil ~1tbsp + 1 tsp
80g levain ~generous ⅓ cup (Add the rest back to your starter)  (If you use all the levain, add another 50g or more flour to the final dough)

Levain:

A few nights before baking, mix levain ingredients until well incorporated. Cover and let rest 12-15 hours at room temperature.  After that, cover and put into the refrigerator for a couple of days. The morning you plan on baking, remove from the fridge, uncover, add a mixture of 1/4 cup all-purpose flour and 1/4 cup water and mix well. Let sit, uncovered for a couple of hours. You will have more than is required for the final dough.

Final Dough:

Add all ingredients to the bowl of a stand mixer, holding back about 10% water.  Mix on low for a few minutes to combine.  Increase speed to medium low and knead until the gluten begins to develop some stretch, about 5 minutes.  Slowly add in the remaining water and knead for another 5 minutes until the dough is well developed.


 Let the dough proof for about 90 minutes, folding after 45 minutes by bringing up the sides to the center all the way around.    

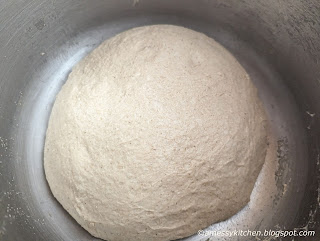
After a fold.


After rising a bit.


Shape into a loaf and place in a greased 8x4" loaf pan.

Let rise for 60-90 minutes until the dough has doubled and/or risen above the edge of the pan by about ¾-1".

Score if desired.

Preheat oven to 425°F.  Load the bread and reduce the temperature to 375°F.  Bake for 40-45 minutes. (If browning too quickly, lower to 350°F.)

Remove to wire rack to cool for 10 minutes, then remove from pan to finish cooling.  Slice when completely cool.


The Approachable Loaf - Original Recipe
from the WSU bread lab

Levain:
60g flour ~½ cup (I used all purpose)
60g water~½ cup + 1 tsp
2g starter  ~¾ tsp

Final dough:
290g white whole wheat flour ~2¼ cups (I used fresh ground Edison and reground the sifted bran a few times)
247g water ~1 cup + 1 tbsp + 1¾ tsp
7g sea salt ~1 tsp sea salt
2.4g yeast ~¾ tsp + tiny pinch
23g honey ~ 1 tbsp
17g olive oil ~1tbsp + 1 tsp
80g levain ~generous ⅓ cup (Add the rest back to your starter)  (If you use all the levain, add another 50g flour to the final dough)

Levain:

The night before baking, mix levain ingredients until well incorporated. Cover and let rest 12-15 hours at room temperature.  You will have more than is required for the final dough.
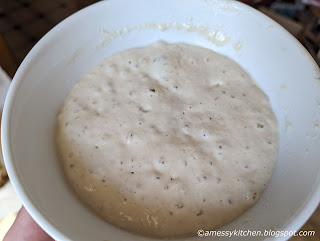
Flexible: this was pushing 18 hours.


Final Dough:

Add all ingredients to the bowl of a stand mixer, holding back about 10% water.  Mix on low for a few minutes to combine.  Increase speed to medium low and knead until the gluten begins to develop some stretch, about 5 minutes.  Slowly add in the remaining water and knead for another 5 minutes until the dough is well developed.


 Let the dough proof for about 90 minutes, folding after 45 minutes by bringing up the sides to the center all the way around.    

After a fold.


After rising a bit.


Shape into a loaf and place in a greased 8x4" loaf pan.

Let rise for 60-90 minutes until the dough has doubled and/or risen above the edge of the pan by about ¾-1".

Score if desired.

Preheat oven to 425°F.  Load the bread and reduce the temperature to 375°F.  Bake for 40-45 minutes. (If browning too quickly, lower to 350°F.)

Remove to wire rack to cool for 10 minutes, then remove from pan to finish cooling.  Slice when completely cool.