Monday, December 31, 2007

Looking Forward, Looking Back

Gadzooks! Already the last day of 2007...amazing! This year just flew by, although a check of posts from the year show that at least I showed up a little over 11 times a month on average.

This blog has been a blast to do, and I've 'met' wonderful people virtually, especially the Daring Bakers, plus met a few people in person. Anna of Anna's Cool Finds lives near enough that we have been able to meet and enjoy a few restaurants this year together here and here and here and here and here. I met Peabody of Culinary Concoctions by Peabody last year in Seattle at Christmas time and have visited her blog the most often of any just to see what she is baking today. Her humor is stellar, her photos mouthwatering, and her recipes pure delight. There are dozens of other blogs I visit regularly. You can find them to the right of the posts at Likely Links. Check 'em out for food blogging fun.

When many people around the blogosphere were posting every day in November 2006, I was too new to blogging to attempt such a thing. In February I did my own version, blogging each day from February 1 through Valentine's Day. To up the ante, I also themed the posts toward love, and added another numeral each day. By the end I was lining up teapots and mugs, just to have enough things to meet the number, ending up with a wheel of spices.

Belonging to the virtual community of the Daring Bakers has been an inspiration. Almost every challenge brought a new skill and I was able to try something I wouldn't have tried before. The support and fun that this group has is a wonder and just as valuable as learning to make cream puffs or the best buttercream for the Buche de Noel. This year I've also made a Red Velvet cake, suffered through the Chocolate Crepe Cake, enjoyed the whole process of making the Gateau St. Honore, found out that making real Bagels isn't hard to do, and that Potato Bread is delicious. The layers of the Strawberry Mirror cake and the Bostini probably make them the most fun to photograph. My favorite to eat was probably the Chocolate Caramel Tart

As far a cooking goes, I really enjoy putting two or more recipes together and seeing what I come up with. A good example is the fresh fig with Italian prune plums and dark chocolate made into a clafouti.

The garden was also an inspiration this year and it has been fun to photograph the vegetables, especially those heirloom tomatoes. In fact, photography is one of the driving forces of doing the posts. If I couldn't photograph the food, I doubt that would enjoy blogging very much. Might be silly, but still feels true right now. I'm also happy that some of my graphic arts training is being used as in the post for the Bostini cakes and even a graphic for Chard nutritional information.

Probably the best part of blogging is reading the comments from those who choose to comment, and hearing from others who 'lurk' that they enjoy the blog and sometimes find a recipe on the blog that they make themselves. The sharing is special. I look forward to more of that in 2008. Thank you for reading, commenting, making the recipes when you do, and lurking, too.

Happy New Year! Here's to a new year full of new taste experiences, learning new techniques in cooking and baking, new friendships and lots and lots of photos!


Saturday, December 29, 2007

Gift Cookies

By now almost all of my family have probably opened their gift from Sweetie and Elle. Since I have quite a few sisters and brothers, it can be a challenge to decide on what to do each year for a gift. Some years each family gets something different. Some years it is all the same. Last year I had a fair amount of time, so the elf got busy and the cookie tins were filled with different kinds of cookies. This year cookies came into it, but in a different way.

When we visited my Mom in Virginny in the fall, I came across a nutmeg grater that was so cute I had to ask her about it. Mom said that it was a souvenir of a trip she and Dad took to Canada...she saw it in a store and had to have it. It grater is metal, curved, with sort of star shaped burrs for the grating part. What is so cute is that on top there is a little holder for a whole nutmeg, complete with a swinging lid. Since that trip was when I discovered the Penzey's spice store, too, I made sure to get her some fresh whole nutmegs to use for the upcoming holiday cooking. She said that she had never seen a grater like it.

It wasn't more than a few weeks after we returned home that I spotted the exact same grater in a store in Sonoma. I was amazed! Driving home I decided that I could make a great Christmas package with the grater, some Penzey's whole nutmegs and some kind of cookie that had nutmeg as a key ingredient. After a fun time looking at cookie recipes online, I found one on the Land O'Lakes site for Eggnog Cherry Biscotti that seemed just right. Since my stash of dried cherries was lower than I had thought, I decided to replace some of them with dried cranberries.

It made a great gift: the grater with a nutmeg in the little compartment, the recipe card for the biscotti tied to the grater with a red ribbon, a snack Ziploc bag with some more whole nutmegs, and another, larger Ziploc bag with the cookies. If I were not going to ship them, I might have drizzled some icing on the biscotti, but the ones I shipped were plain but fruity with a faint eggnog flavor, dry, crunchy and delicious.

Eggnog Cherry Cranberry Biscotti
makes about 3 dozen cookies
a variation of a recipe from the Land O'Lakes website

2 1/4 cups all purpose flour
3/4 cup sugar
2 teaspoons baking powder
1 teaspoon salt
1 teaspoon ground nutmeg
6 tablespoons butter, softened
3 eggs
1 teaspoon rum extract
1/2 cup dried cherries, chopped
1/2 cup dried cranberries

Heat oven to 325 degrees F. Line ungreased cookies sheet with parchment paper.

Combine flour, sugar, baking powder, salt and nutmeg in large bowl. Add butter; beat at low speed until mixture resembles coarse crumbs. Increase speed to medium; add eggs and 1 teaspoon rum extract. Beat until well mixed. Stir in the dry fruit by hand.

Turn dough out onto lightly floured surface; knead 10 to 15 times with lightly floured hands. (I found that the dough was sticky enough that the surface needed a fair amount of flour to keep the dough from sticking while kneading). Divide dough in half; roll each half into 14-inch log. place logs 3 inches apart onto prepared baking sheet; flatten each log to about 2 inches wide. They will spread a bit during baking. Bake for 20 - 25 minutes or until set. Cool 10 minutes on cooling rack covered with parchment paper.

Reduce the oven temperature to 275 degrees F. Remove logs from parchment to a cutting board; cut into 3/4 inch diagonal slices. Lay slices onto same cookie sheet, cut-side down. Bake for 13 minutes. Turn over to other cut side. Continue baking an additional 12-14 minutes or until lightly browned. Remove from cookie sheet. Cool completely.

Thursday, December 27, 2007

Sneaking in the Chard

Hope y'all had great holidays in December like I did. Now it seems like a few healthy foods would be welcome in our house. Right now I have some chard, also known as Swiss Chard, growing in the garden. It is related to beets, but is grown for the leaves, not a root.


Sweetie claims he doesn't like chard. For a long time we never had chard, but then I discovered Rainbow Chard, with those bright red and yellow and orange stems, along with the white and pale yellow ones. The leaves also have some of the brighter colors to match. They just look like a party when those colors and the deep, deep green are all together when the chard is in a bunch.

So I made Rainbow Chard and Spinach as a side dish for a recent party I cooked for a friend (for pay), accenting the chard and spinach flavors with onion, currant and lemon zest. But Sweetie wasn't there to taste it. He did sound interested when I described it later. Unfortunately, no photos.

Then a couple of weeks ago I decided to use the chard in the garden in a quiche for dinner. The sauteed chard was hidden on the bottom of the blind baked pie shell, along with caramelized onions and mushroom slices and some diced Swiss cheese. On top I put broccoli florets . A savory egg custard was poured over all of it. Once baked up nice and golden, it was lovely and smelled wonderful. Sweetie really enjoyed that quiche, even after I admitted that I had sneaked in some chard, too. You really can't tell from looking at the baked quiche that there is chard in there.


It really is a delicious vegetable, especially if you don't over-cook it. Fresh tasting, good for you, only a touch of bitterness to pique your taste buds. Chard.

Can you spot the chard hiding out with the other vegetables?

Swiss Chard and Spinach with Onions, Currants and Lemon Zest

1 large bunch chard, well rinsed...regular or Rainbow. If you can, buy organic for this recipe.
10 oz fresh baby spinach, well rinsed
1 small to medium onion, finely chopped
1 tablespoon garlic flavored olive oil
1/4 cup dried currants
2 teaspoons freshly grated lemon zest

Chop the chard across the leaves in one to two inch strips, removing most of the chard stems if they are tough. If they aren't tough, chop a few into a small dice and include them. Leave the rinse water on the leaves. If any of the baby spinach leaves have very long stems, remove the stems. Leave the rinse water on them.
In a large saute' pan with a lid, heat the garlic flavored olive oil and saute' the onions until translucent, about 5 minutes.
Add the chard strips, stems, and the spinach leaves. Using tongs, stir and turn the leaves to coat them with the oil. Reduce the heat to medium, cover and let steam for a few minutes until just wilted. Add the currants and lemon zest, cover, and cook one more minute. Serve at once. Serves 4-6.

Chard and Other Vegetables Quiche

One pie crust, blind baked for 10 minutes at 400 degrees F., then cooled. (Line the pastry-lined pie pan with parchment, fill with pie weights, dried beans, or rice, then bake and cool. Remove the pie weights, beans or rice and store for another blind baking experience). I use a ready made pastry round available in most grocery stores in the refrigerator case.

1/2 bunch fresh chard, well rinsed
1 medium onion, chopped
1 clove garlic, minced
6-8 oz. sliced mushrooms
2 tablespoons grape seed oil (or olive oil)
4 oz. Swiss cheese, in 1/2 inch dice
1 head of broccoli, in small florets
2 large eggs
1 cup whole or low fat milk
1/2 teaspoon dried thyme
pepper

Slice the chard leaves in 1-2 inch strips, discarding the stems. Set aside Preheat oven to 325 degrees F.

In a saute' pan, cook the onion, garlic, and mushrooms in the grape seed oil over medium-low heat until caramelized, stirring often, 10-15 minutes. Add the chard, turn the leaves with tongs to coat them with the oil, cover, and steam for 5 minutes. Set aside.

Sprinkle the Swiss cheese dice over the bottom of the partially baked pie shell. Over the cheese, spread the chard mixture. Over that evenly sprinkle the broccoli florets. Beat together the eggs and the low fat milk. Stir in thyme. Pour the mixture over the vegetables and cheese in the pie shell. Grind a few grinds of fresh pepper over all (or shake a bit of pepper from a shaker).

Place pie in the oven and bake for 50-55 minutes, or until center just barely moves when pie is shaken. Cool for 5- 10 minutes, then serve warm. Serves 6-8.

Wednesday, December 26, 2007

Boxing Day Gathering

The day after Christmas is traditionally called Boxing Day in England, Canada and other British countries. The concept is that goods for the poor, of those of lower social status would be boxed up and the lord and lady of the manor would distribute them in their area. In feudal times, Christmas was a reason for a gathering of extended families. All the serfs would gather their families in the manor of their lord, which made it easier for the lord of the estate to hand out annual stipends to the serfs. On 26 December, after all the Christmas parties, the lord of the estate would give practical goods such as cloth, grains, and tools to the serfs who lived on his land. Each family would receive a box full of such goods, hence "Boxing Day." According to this tradition, the lord of the manor did not volunteer, but was obliged to supply these gifts.

In American December 26th is one of the biggest sales days of the year, so things are still boxed up, plus many people use that trip to the mall to return Christmas gifts that didn't suit. That shopping scene is not my cup of tea. Our dog, above, would rather stay home, too.

Our boxing day this year was more like the British in that we had a gathering of the extended family from Sweetie's side of the family and had a finger food party at our house. My daugter finally met her cousins' two little ones, we got to visit with the Oakmont and Cloverdale family members, plus the Healdsburg, the L.A., and San Francisco folks, even my daughter's best friend who is an honorary family member of long standing. There were even a few boxes of gifts exchanged.

Great conversation and lots of food and drink were abundant. The Yule log was finally eaten and was a hit, especially with Sweetie's namesake. Junebug's mom helped me with the mulled apple cider. In some ways, the fact that everyone gathered on this day at our house was her gift to us all. *Thank You*

Here she is serving up some the the cider...a welcome and warm libation today when the cold wind was blowing and the windchimes were ringing. It is just a little spicey and not too sweet with lemon and orange flavors along with the apple...good with a jot of rum, too.

Happy Holidays to everyone!

(Yes, the back is better...thank you to all who left kind and sympathetic messages...you are all great!)

Mulled Apple CIder
1 gallons apple cider
3 whole cinnamon sticks
1 can frozen lemonade concentrate
2 cups orange juice or 1 can frozen orange juice concentrate
6-8 whole cloves
1/2 teaspoon ground allspice
1/2 large orange, sliced in 1/4 inch slices
In a large pot bring all of the ingredients to a boil. Cover and lower heat to a simmer. Simmer for 1/2 hour to mingle flavors. Serve warm. It can be kept at a simmer for hours and will only get better. Some people like to add a tot of rum or brandy.


Sunday, December 23, 2007

A Yule Tale for Daring Bakers

Once upon a time in the land of St. Honore’, far off in the woods of the west country, lived a woodcutter. One day as he headed for home after a day of gathering wood, he came upon the largest, oldest, most amazing looking log you can imagine, half buried in moss and old leaves, surrounded with ferns and tiny mushrooms, and dusted with snow. He left the wood he had gathered and, with a mighty heave, pulled the huge log to his home. The days were growing short and the nights long as the Winter Solstice drew near. A good, long burning Yule log was a most welcome find.

It was not the easiest log to get started, but soon he had it burning and discovered that it had a wonderful unexpected charm…no matter how long it burned, it never seemed to get smaller.

As the days grew shorter and the night longer, the woodcutter became sadder and sadder. He missed the sunlight. Sitting in front of the Yule log, he took a nap. Hoping to cheer him up, his goodwife gathered her bowls and spoons and flour and sugar and eggs and butter and began to bake something wonderful.

First she made a flat layer of a cake like a sponge…called a genoise. Here she is sifting in the flour mixture, then folding it into the beaten eggs and sugar mixture.


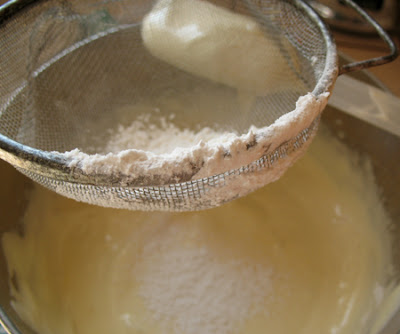
While it was baking she made a delicious chocolate and Amaretto flavored buttercream. Once the cake had cooled enough to handle, she laid it on parchment and brushed it with more Amaretto liquor.

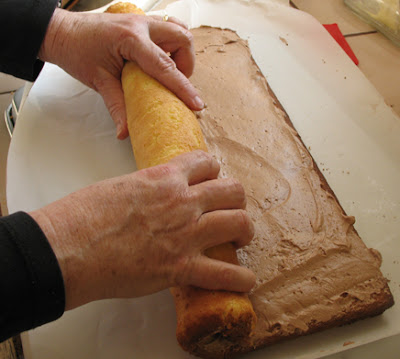
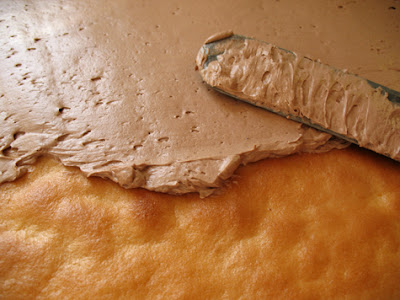
Then she spread half the buttercream over the cake and rolled it up like a jelly roll. A quick chilling soon had it firm enough so that she could work the magic she had in mind.

She cut off the ends at an angle, showing the swirl of light cake and darker buttercream. One of those ends was placed on the side of the roll. Oooh now do you understand? She is making a charmed log of her own!
The log and branch were then swirled with the rest of the buttercream. Now it really looked like a single piece of wood, especially when she took the tines of a fork and pulled them through the buttercream to look like bark.

For the final decoration, she had planned to create meringue mushrooms to place in tiny clusters about the log. Unfortunately she slipped on a mossy step and hurt her back, so no mushrooms. A dusting of confectioners sugar gave the appearance of a light snowfall.

When her husband awoke from his nap, she took him gently by the hand and brought him to the sideboard where the beautiful log she had made was sitting. Smiling sweetly she told him that this log, this Buche de Noel, was her Christmas gift to him. It would be gone much, much faster than the magic Yule log he had brought home, but it would carry memories of their time together this Christmas tide and the joy of sharing the cake with friends and family. She told him that she would make another one each year to remind them of the light returning to the world that Christmas brings.

The woodcutter was wonderfully cheered by the cake, impressed with her baking skills and with his goodwife’s kindness in making it. He knew that it would be a merry Christmas indeed.

As a Winter Solstice gift to you, Gentle Reader, the Daring Bakers from all over the globe have made many, many Buche De Noels. Our hostesses Lis and Ivonne, also the founders of the Daring Bakers, have chosen a superb recipe that reminds us of the presence of light during the darkest time of the year. Thank you Lis of Mia La Cucina and Ivonne of Creampuffs in Venice for this holiday gift, for all of your work in the background making this baking group such a wonderful online community, and for starting it all with a recipe for pretzels a little over a year ago.


I had never made a Buche de Noel and had such a good time playing with it that I again used the convention of a fairy tale to tell about making the cake. Unfortunately, the slip and fall is true, so that is why no mushrooms. *Sigh* Gentle Reader, the story is my own (as is the last one), but there are many stories today around the blogosphere. Check out the other Daring Bakers’ Buche de Noel’s by going to the Daring Baker Blogroll here. The recipe can be found at the bottom of this post if you want to make your own to capture your own winter memories.
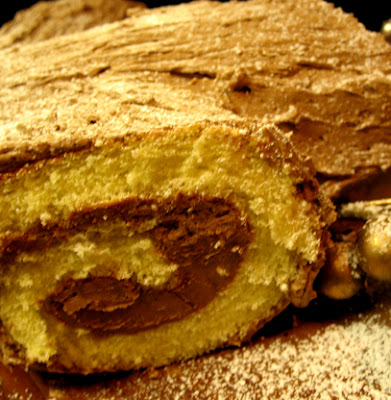


Yule Log
(from Perfect Cakes by Nick Malgieri and The Williams-Sonoma Collection: Dessert)
Daring Bakers Challenge #14: December 2007

Hosts: Daring Baker Founders Ivonne (Cream Puffs in Venice) and Lisa (La Mia Cucina)

Posting Date: Saturday December 22, 2007 or Sunday December 23, 2007 (Note: To accommodate the fact that some of you want to serve this for Christmas, for the first time we're allowing you to choose your posting date. You can post on the Saturday or the Sunday.)
Recipe Quantity: Serves 12

Cake should be stored in a cool, dry place. Leftovers should be refrigerated

Challenge Requirements:

1. A genoise cake using the recipe below
2. A coffee buttercream frosting using the recipe below (Note: For those of you that have an aversion to coffee, you can use another flavour for your buttercream, however, the buttercream must be dark in colour. We don't want any white or cream-coloured Yule Logs!
3. Meringue or Marzipan mushrooms using the recipes below

Additional Information about Challenge:
If you are not going to use the coffee buttercream to fill your log, be sure to have the filling ready once the genoise comes out of the oven. If you do fill your Yule Log with fruit or with soemthing other than buttercream, please note that you may not be able to freeze the Log because the filling may not last.

Recipes:
Plain Genoise:

3 large eggs
3 large egg yolks
pinch of salt
¾ cup of sugar
½ cup cake flour - spoon flour into dry-measure cup and level off (also known as cake & pastry flour)
¼ cup cornstarch

one (1) 10 x 15 inch jelly-roll pan that has been buttered and lined with parchment paper and then buttered again

1.Set a rack in the middle of the oven and preheat to 400 degrees F.

2.Half-fill a medium saucepan with water and bring it to a boil over high heat. Lower the heat so the water is simmering.

3.Whisk the eggs, egg yolks, salt and sugar together in the bowl of a heavy-duty mixer. Place over the pan of simmering water and whisk gently until the mixture is just lukewarm, about 100 degrees if you have a thermometer (or test with your finger - it should be warm to the touch).

4.Attach the bowl to the mixer and, with the whisk attachment, whip on medium-high speed until the egg mixture is cooled (touch the outside of the bowl to tell) and tripled in volume. The egg foam will be thick and will form a slowly dissolving ribbon falling back onto the bowl of whipped eggs when the whisk is lifted.

5.While the eggs are whipping, stir together the flour and cornstarch.

6.Sift one-third of the flour mixture over the beaten eggs. Use a rubber spatula to fold in the flour mixture, making sure to scrape all the way to the bottom of the bowl on every pass through the batter to prevent the flour mixture from accumulating there and making lumps. Repeat with another third of the flour mixture and finally with the remainder.

7.Scrape the batter into the prepared pan and smooth the top.

8.Bake the genoise for about 10 to 12 minutes. Make sure the cake doesn’t overbake and become too dry or it will not roll properly.

9.While the cake is baking, begin making the buttercream.

10.Once the cake is done (a tester will come out clean and if you press the cake lightly it will spring back), remove it from the oven and let it cool on a rack.

Coffee Buttercream:

4 large egg whites
1 cup sugar
24 tablespoons (3 sticks or 1-1/2 cups) unsalted butter, softened
2 tablespoons instant espresso powder
2 tablespoons rum or brandy

1.Whisk the egg whites and sugar together in the bowl of an electric mixer. Set the bowl over simmering water and whisk gently until the sugar is dissolved and the egg whites are hot.

2.Attach the bowl to the mixer and whip with the whisk on medium speed until cooled. Switch to the paddle and beat in the softened butter and continue beating until the buttercream is smooth. Dissolve the instant coffee in the liquor and beat into the buttercream.

Meringue Mushrooms:

3 large egg whites, at room temperature
¼ teaspoon cream of tartar
½ cup (3-1/2 ounces/105 g.) granulated sugar
1/3 cup (1-1/3 ounces/40 g.) icing sugar
Unsweetened cocoa powder for dusting

1.Preheat the oven to 225 degrees F. Line 2 baking sheets with parchment. Have ready a pastry bag fitted with a small (no. 6) plain tip. In a bowl, using a mixer on medium-low speed, beat together the egg whites and cream of tartar until very foamy. Slowly add the granulated sugar while beating. Increase the speed to high and beat until soft peaks form when the beaters are lifted. Continue until the whites hold stiff, shiny peaks. Sift the icing sugar over the whites and, using a rubber spatula, fold in until well blended.

2.Scoop the mixture into the bag. On one baking sheet, pipe 48 stems, each ½ inch (12 mm.) wide at the base and tapering off to a point at the top, ¾ inch (2 cm.) tall, and spaced about ½ inch (12 mm.) apart. On the other sheet, pipe 48 mounds for the tops, each about 1-1/4 inches (3 cm.) wide and ¾ inch (2 cm.) high, also spaced ½ inch (12 mm.) apart. With a damp fingertip, gently smooth any pointy tips. Dust with cocoa. Reserve the remaining meringue.

3.Bake until dry and firm enough to lift off the paper, 50-55 minutes. Set the pans on the counter and turn the mounds flat side up. With the tip of a knife, carefully make a small hole in the flat side of each mound. Pipe small dabs of the remaining meringue into the holes and insert the stems tip first. Return to the oven until completely dry, about 15 minutes longer. Let cool completely on the sheets.

Marzipan Mushrooms:

8 ounces almond paste
2 cups icing sugar
3 to 5 tablespoons light corn syrup
Cocoa powder

1.To make the marzipan combine the almond paste and 1 cup of the icing sugar in the bowl of an electric mixer and beat with the paddle attachment on low speed until sugar is almost absorbed.

2.Add the remaining 1 cup of sugar and mix until the mixture resembles fine crumbs.

3.Add half the corn syrup, then continue mixing until a bit of the marzipan holds together when squeezed, adding additional corn syrup a little at a time, as necessary: the marzipan in the bowl will still appear crumbly.

4.Transfer the marzipan to a work surface and knead until smooth.

5.Roll one-third of the marzipan into a 6 inches long cylinder and cut into 1-inch lengths.

6.Roll half the lengths into balls. Press the remaining cylindrical lengths (stems) into the balls (caps) to make mushrooms.

7.Smudge with cocoa powder.


Assembling the Yule Log:

1.Run a sharp knife around the edges of the genoise to loosen it from the pan.

2.Turn the genoise layer over (unmolding it from the sheet pan onto a flat surface) and peel away the paper.

3.Carefully invert your genoise onto a fresh piece of parchment paper.

4.Spread with half the coffee buttercream (or whatever filling you’re using).

5.Use the parchment paper to help you roll the cake into a tight cylinder.

6.Transfer back to the baking sheet and refrigerate for several hours.

7.Unwrap the cake. Trim the ends on the diagonal, starting the cuts about 2 inches away from each end.

8.Position the larger cut piece on each log about 2/3 across the top.

9.Cover the log with the reserved buttercream, making sure to curve around the protruding stump.

10.Streak the buttercream with a fork or decorating comb to resemble bark.

11.Transfer the log to a platter and decorate with your mushrooms and whatever other decorations you’ve chosen.

Sunday, December 16, 2007

Remembering


Fair warning: This post is pretty emotional.

When the persimmons were ripe last year, I remembered Edith and the cookie parties she used to host for the holidays.

This year I'm remembering another cookie party guest who was claimed by cancer this week. Patti was full of life, always the one to get the laughter going at the party. I first knew her through the Parents Club...our version of the PTA at the local elementary school. Her daughter was a few years younger than my youngest, but we soon got to know each other through various Parents Club projects. Patti was a doer, a very hard worker, but she didn't like the spotlight. She had a huge heart and was the first to come forward to help when a family was in trouble due to a house fire or flooding or a death in the family.

She was an excellent cook and baker and entertainer. As our children moved beyond elementary school we only saw each other at the cookie party. At her funeral yesterday her brother mentioned that she always made family members Almond Roca and other candies for Christmas, so, instead of cookies, or instead of a braided bread as Peabody did, Patti will be remembered through a recipe for that crunchy, almondy, chocolate-rich candy.

Yesterday was also really, really hard for me. I don't usually do guilt and rarely self pity, but after the funeral there was a reception at the fire station since Patti worked there and the fire community is most generous. Eight and a half years ago they were generous and supportive and hosted the post-burial reception for my son. This was a different fire station, but it not only brought back a lot of memories, but a number of the boys that my son had played with were there, too, being supportive to Patti's family. It wasn't easy to see how these boys had grown...they are young men now...and to see how they have moved on with their lives...one will be a new father in a week or so. The most difficult part was that I remembered them as youngsters playing with Max. Since he had such a good heart, if he were alive I'm fairly certain that Max would have been there in support, too. The hole in our lives that exists since he has been gone is always there, but in that situation it was front and center and gaping. Overwhelming. Sweetie says that I'm a mother who lost her son and it's OK to still grieve. That's a good thing, because, suddenly, I am in a big way...grieving for the loss and the man he would have been and the friend he would have been to many, for the life he didn't get to experience.

The bottom line?... life can be short...16 years for Max, 50 for Patti...not long enough for either of them. Treasure your days, your family, your friends, your talents, your health, your life. (Notice I didn't include your things?...even though Christmas has become all about things, they really are small potatoes compared to the others listed). Oh, yes...remember to cook, bake, or do something else creative that you can share with others. It is a spirit lifter.

Wishing you a holiday where you take time to enjoy each day (and the beauty that exists in the world), your family and friends, your talents, your health. Hoping that you take time to share your time with those you love...it is the most valuable gift you can give. I wish you, precious readers, long and happy lives and a joyous holiday season. (Thanks for letting me wallow a bit and share...it really helps.)
Almond Roca Candy
Photo above from Simply Recipes

Ingredients:
1 cup butter
1 cup granulated sugar
3 tablespoons water
1 teaspoon light corn syrup
1 cup finely chopped toasted almonds
1 cup milk or dark chocolate chips

Directions:
Melt the butter in a saucepan. Add the sugar, water, and corn syrup. Cook the mixture over medium heat, stirring.
When the sugar dissolves and the mixture begins to boil, raise the heat and bring the mixture to 290 degrees on a cooking thermometer (soft crack stage.) It will be light brown in color, and syrup will separate into threads that are not brittle when dribbled into cold water.
Quickly stir in 1/2 cup chopped almonds. Immediately pour the mixture onto an ungreased baking sheet.
Wait 2 or 3 minutes for the candy surface to firm, then sprinkle on the chocolate chips. In a few minutes, when the chips have softened, spread the chocolate evenly over the surface. Sprinkle the remaining almonds over the melted chocolate.
When the chocolate hardens, crack the candy into pieces. Store covered.

This recipe from CDKitchen for Almond Roca serves/makes 1.5 lbs

Wednesday, December 12, 2007

'Tis the Season to be Jolly

Some people are generous by nature...some are not. It's all O.K.

But this is the season when generosity is in fashion, when we try to figure out just what others might like for their holiday gift(s), what their hearts delight might be. Sometimes inspirations just strikes, at other times it is a long journey to the right gift. Even those who are not usually generous make efforts beyond their usual comfort zone to please those they care about.

This is also the time of year that we try to be generous to unknown people who could use a little kindness. For years we gave gifts through the Giving Tree requests at Sweetie's work, usually picking hearts of older children since they seem to be the ones that get picked later...guess they are a little harder to shop for :)

This year we gave toys to the local fire department toy drive. There will be a few charities that will receive a modest check, too. This year I'm employed, so I can. Who knows about next year?

This year I'm also participating in the Pay It Forward Exchange. I made a promise to Tanna of My Kitchen In Half Cups that I would play along. I'll get something tangible, but if you read this and agree to participate, I'm also spreading that sense of giving out 'forward' and you will be too.

I'm going to use her excellent wording:

"Here’s the deal:
I will send a handmade gift to the first three people who leave a comment on this post requesting to join this Pay It Forward Exchange. I don’t know what that gift will be yet and you may not receive it tomorrow or next week, but you will receive it within 365 days, which is my promise! The only thing you have to do in return is Pay It Forward by making the same promise on your blog.

So, if you have a blog and you like the idea of giving away stuff you’ve made to folks who read your blog, then leave me a comment and I’ll start dreaming up what to make you. Just make sure you send me an email address so I can get in touch with you about how to get that gift into your possession.

Happy Giving!"

Monday, December 10, 2007

A Delicious Gift

This weekend we drove a couple of hours to finally celebrate Natasha's birthday. It was a beautiful, sunny, cold day in River City area, but the warmth of the welcome received made it a special day.

As a special birthday treat, we brought a Swedish Princess Cake made at nearby bakery, Village Bakery in Sebastopol. The owner is from Scandinavia and their version is light, rich and delicious. The traditional Princess Cake is covered in a pale green cloak of marzipan, but for the holidays the bakery is decorating the cake like a gorgeous present, right down to the bow. It was almost too pretty to cut into, but too delicious not to.

The Princess Cake is a Swedish national passion. It seems that the cake was created in the 1930s for the birthday of a Swedish princess. It is often served as a graduation cake, but apparently can be found throught the country and can be found as a treat to go with tea or coffee, usually as a slice of cake. The distinctive thing about this cake, other than the marzipan, is the rounded top of the cake, usually created by mounding pastry cream or whipped cream in the center of the top layer, then smoothing the cream to make a dome shape on the top.

Although we did reserve a piece to bring home to our nephew, somehow the four of us managed to polish off the rest. It was the small version, but still quite a dose of cake, jam, cream and marzipan. You would think that it would be very sweet, but it isn't. With some coffee and good conversation, it was the perfect dessert for celebrating the birthday of a wonderful sister.

Saturday, December 08, 2007

Perfect for a Party

At this, the holiday season, there seem to be more than the usual number of parties. I admit, I'm not a party animal and often R.S.V.P. and decline, but this past week there was a lunch party where I was the luncheon chairman, so not only was I there, I was in charge of the kitchen. Well, that's the theory. In practice I had a number of other women who did most of the organization and much of the work. They were more experienced and delightfully helpful. We had 35 people for lunch and it was a potluck.

Now I've been part of many, many potlucks over the years. This one was the only one I can remember, especially at Christmas time, where only one dessert was brought. We had all manner of salads and three sweet potato dishes, rolls, cranberry sauce, green bean casserole, ham, but only one basket of cookies. Perhaps healthy eating is becoming fashionable?

My contributions included a dolled up version of my favorite corn salad (another future post will include the recipe), plus a new recipe that I found in Southern Living Magazine's collection of recipes called Our Best Recipes, Volume 4.

This is the perfect thing to bring to a party. It can be made ahead, no pots and pans are required so it's no-mess, the ingredients are easily found and not too expensive, it is fairly healthy, it looks festive and colorful, and it is delicious. Who could ask for more?

The dish is called Mediterranean Chicken Couscous (although I made it with chunks of turkey). It would also make a great addition to your holiday buffet. Hope you find a chance to make this one.

Mediterranean Chicken Couscous
Serves 8 (more if part of a buffet or potluck)

1 1/4 cups low-sodium fat-free chicken broth
1 (5.6 oz.) package toasted pine nut couscous mix
3 cups chopped cooked chicken (or turkey)
1/4 cup chopped fresh basil
1 (4 oz.) package crumbled feta cheese
1 pint cherry or grape tomatoes, halved
1 1/2 tablespoon fresh lemon juice
1 teaspoon grated lemon rind
1/4 teaspoon freshly ground pepper
Garnish: fresh basil leaves

(Note: You'll need to buy a 2/3 oz. package of fresh basil and 1 rotisserie chicken to get the right amount of basil and chicken for this recipe. Substitute 3-4 teaspoons (I used 3) dried basil if you can't get fresh. 3 cups of leftover cooked chicken or turkey in large dice works fine, too.)

Microwave chicken broth and seasoning packet from couscous package at HIGH for 3-5 minutes or until broth begins to boil. Place couscous in a large bowl, and stir in broth mixture. Cover and let stand 5 minutes. Fluff couscous with a fork, stir in chicken and next 6 ingredients. Serve warm or cold. Garnish with fresh basil leaves or a sprinkle of toasted pine nuts, if desired.

Sunday, December 02, 2007

Let's Bake Cookies!

The Inner Elf has been slow to surface this year, but this weekend I had the the urge to bake cookies. Going to sleep at night after reading recipes in Dorie Greenspan's iconic book Baking, From My Home to Yours certainly helped. So many cookie recipes, so little time.


Chockablock is the whimsical name that Dorie gave to these everything-but-the-kitchen-sink cookies. Not only do they have molasses and oats, two of Sweetie's favorite ingredients for cookies, but they also allow me to throw in lots of dried fruits and nuts, which always appeals to me. Making them even more popular is a large dose of chocolate and some coconut. What's not to like?


This is my contribution to a great food event, Eat Christmas Cookies, at Food Blogga.


"Christmas just wouldn't be Christmas without ... eating cookies," is a perfect reason to get out the baking sheets and the mixing bowls and bake some great cookies. These would make a great addition to the cookie platter or a delicious gift. I'm taking a box of these to a Christmas Party on Wednesday and I know they will be a hit.

Chockablock Cookies
Dorie Greenspan, from Baking From My Home to Yours

1 ½ cups all-purpose flour
¾ teaspoon baking powder
½ teaspoon baking soda
¼ teaspoon salt
½ stick (4 tablespoons) unsalted butter, at room temperature
¼ cup solid vegetable shortening (I substituted 4 oz. unsweetened applesauce)
½ cup sugar (I used dark brown sugar here)
½ cup molasses
2 large eggs
1 ½ cups old-fashioned oats
1 cup coarsely chopped nuts (I mixed walnuts and pecans about half and half)
1 cup coarsely chopped dried fruit (I used a combination of diced apricot, dried pear, dried apple, plus some golden raisins and dried cranberries)
2 cups chocolate chips
½ cup unsweetened shredded coconut

Line two baking sheets with parchment or silicone mats. Position the racks to divide the oven into thirds. Preheat oven to 325 degrees F.

Whisk together the flour, baking powder, baking soda and salt.
Working with a stand mixer, or with a hand mixer in a large bowl, beat the butter until light and fluffy, about 2 minutes. Add the apple sauce and mix well, about two minutes. Add the sugar and beat for another two minutes. Pour in the molasses and beat for 1 minute more.
Add the eggs one at a time, beating 1 minute after each addition. Reduce mixer speed to low and mix in the oats, then add the dry ingredients, mixing only until they disappear into the dough. Toss in the nuts, fruit, chocolate chips and coconut and, turn the mixer on and off quickly a few times to incorporate.
Drop by rounded tablespoons onto the prepared pans, leaving about 1 ½ inches between the mounds.
Bake for 15 – 18 minutes, rotating pans from top to bottom and front to back at the midway point, until the cookies are golden and just about set. Remove the baking sheets to cooling racks and let the cookies rest on the sheets for about 5 minutes before transferring them to racks to cool to room temperature.


These cookies were so dark from the dark brown sugar and the molasses that it was a bit difficult to tell when they were done. They were moist and the nuts, fruit, chocolate and coconut were barely held together by the dough. The molasses flavor was strong when the dough was unbaked, but the fruits and nuts mellowed the molasses flavor when baked.