Monday, September 07, 2020

Two Kinds of Gluten Free Scones


Sometimes it's just too difficult to choose which flavor of a treat to make. I wanted to make gluten free scones for my dear friend Susan who came to visit, but I couldn't decide on lemon-raspberry scones or apple-spice scones...so I made both. The raspberry-lemon one is seen above and the apple-spice-walnut one below.


Making two flavors from one recipe is a bit tricky because you make the recipe to a certain point, then divide the mixture into two bowls and continue on. Mostly it requires some prep work and mis en place so that you have all the ingredients ready to go when it's their turn.

The base is a delicious cream scone recipe. I used King Arthur Flour Gluten Free flour blend instead of all-purpose flour (and no, I don't have stock in King Arthur Flour, now called King Arthur Baking Company, nor do I receive anything free from them). I added freshly grated lemon zest to the recipe for freshness and zing, and I used dairy-free soy creamer soured with fresh lemon juice, too. For the fat part I used dairy-free stick margarine, so these are also vegan scones.

The raspberry half of the recipe was mixed together before the berries were gently folded in and the scones were shaped. The apples and spice were mixed into the flour mixture after the margarine had been cut in but before the creamer was added.

These are pretty easy...just remember to handle the mixture and then the dough very gently and as little as possible. I shaped them on parchment rounds (9-inch - another King Arthur produce) and then put the dough covered rounds right onto pizza pans to bake, but you could put them on a sheet pan, too and bake them all at once. I cut the berry scones into wedges before baking, but I cut the apple ones after baking because that dough seemed wetter.

Do you know someone who would enjoy gluten free scones? Maybe yourself? Do give these a try. They have Susan's seal of approval...and Sweetie's too.


Raspberry-Lemon Scones and Apple-Spice Walnut Scones - all Gluten Free
Adapted from a Ladies Home Journal recipe March ‘97
Heat oven to 425 degrees F. Grease a  sheet pan or two pizza pans.

3 cups Gluten Free flour blend (I used King Arthur Baking Company blend)
2 ½ teaspoons baking powder
1 teaspoon salt
½ teaspoon baking soda
½ cup sugar
 zest from 1 medium lemon 
½ cup (1 stick) non-dairy butter or margarine, cold 
¾ cup fresh raspberries, rinsed and dried
¾ cup fresh tart apple, cut into 1/2-inch dice (peeled or unpeeled) 
½ teaspoon cinnamon,
½ teaspoon pie spice or more cinnamon
dash cloves
½ cup chopped walnuts
1 cup Silk soy creamer, soured with the juice from 1 lemon


Glaze: 2 tablespoons soy creamer
2 tablespoons sanding sugar

Combine gluten free flour blend, baking powder, salt, and baking soda in a medium bowl. Set aside.

In a large bowl add the lemon zest to the sugar and rub with your fingertips until the sugar resembles damp sand. Add the flour blend mix and stir until thoroughly combined.  

With pastry blender or two knives, cut in butter or margarine until mixture resembles coarse crumbs. Divide mixture into two bowls. Set aside both bowls.

Combine soy creamer and lemon juice, stir and let sit a minute or two to sour the creamer. 

In one of the bowls with the flour and sugar and cut in fat, add half the soured creamer and stir gently with a fork until most is moistened. Add the raspberries and very gently combine.

Turn the dough out onto a lightly floured surface or a large piece of parchment. Shape into a disc about 6-inches in diameter and 1/2-inch high. Using a floured knife, cut into eight wedges. Brush with 1 tablespoon creamer and scatter about 1 tablespoon sanding sugar over the disc. Put onto prepared baking sheet and bake in preheated oven until dark golden brown, about 20 minutes. Cool on a rack and serve warm or at room temperature.

In the second bowl of flour and sugar and fat, mixed, add the diced apple and the spices and mix to combine.  

Pour the rest of the soured creamer over crumb/apple mixture. Stir together with fork just until mixture comes together. Turn dough out onto a lightly floured surface or a large piece of parchment. 

Gather dough gently into a disc about 6-inches in diameter and 1/2-inch high. 

Using floured knife, cut  circle into 8 wedges.Brush with 1 tablespoon creamer and scatter about 1 tablespoon sanding sugar over the disc. 

Bake 20 – 25 minutes until toothpick inserted in the center comes out clean and crust is dark golden brown. Cool on a rack and serve warm or at room temperature.

Makes 16 scones.

Sunday, August 30, 2020

A Golden Bread With Scoring


I missed the original posting of the Bread Baking Babes because, mostly, it was too hot to bake the bread with pretty scoring patterns mid-month and the loaf that I baked earlier was just plain ugly. Since our challenge by Kitchen of the Month Elizabeth of blogging from OUR kitchen was to do some fancy scoring, I decided to try again.

It's cooler now, although unfortunately very smokey, so I baked a yeasted loaf using some pumpkin puree in it, which made the interior a lovely golden color. I found the recipe in Ken Haedrich's The Harvest Baker book. There were a lot of changes. He used delicata squash and I used roasted pumpkin from a neighbor's garden. He made his as dinner rolls, but I made on long (16 inches) batard. I used a linen cloth with both bread and rice flour for the rising and put some rice flour on the top of the loaf, too, to help show the pattern, but all the flour browned to about the same color as the crust of the loaf, so that didn't work out so well. The scoring that was deeper allowed the interior gold to show. Next time I'll score deeper if I make this bread.

This is a lovely, moist, brioche-like bread. The pumpkin mostly gives it color and a faint sweetness, but not a true pumpkin flavor. Of course there is only 1 cup of roasted pumpkin puree and over 5 cups of flour. I used bread flour instead of all-purpose because I wanted a true skin on the loaf so the scoring would go better. You can see that, especially in the middle of the loaf where the scoring looks almost like a flying bee. I also reduced the sugar to two tablespoons, eliminated the yolk, and added a cup of flour, stirred in to the yeast/water mixture, before I added any other ingredients. I find that coating the yeast with flour helps when you are also adding butter, milk and things like veg puree.

Do try making this bread, either as a loaf or loaves or as dinner rolls. It's really delicious!


Roasted Pumpkin Long Loaf
a variation of Golden Delicata Squash Dinner Rolls
by Ken Haedrich in The Harvest Baker

1 medium pumpkin
1 tablespoon olive oil, or olive oil spray, plus more for the bowl
1/3 cup lukewarm water
1 packet (1/4 oz) active dry yeast
1 cup lukewarm milk (I used soy creamer)
2 tablespoons sugar
3 tablespoons unsalted butter, softened (I used non-dairy margarine)
2 teaspoons salt
5 1/2 - 6 cups bread flour

Preheat the oven to 400 degrees F. Line a large rimmed baking sheet with foil. Cut the pumpkin in half at the middle, so there is one half with a stem and one half with the bottom of the pumpkin. Scrape and remove all seeds and stringy bits. Oil the foil/spray with olive oil spray. Put the pumpkin halves, cut side down on the prepared baking sheet and roast until the pumpkin meat is tender, about 50-60 minutes. Still in baking sheet, cool pumpkin on a wire rack. When it has cooled, scoop out the flesh and put it through a potato ricer, or press it through a fine wire mesh strainer to make a puree. You will use 1 cup of the puree. Save the rest, if any, for other uses, refrigerated.

Pour the lukewarm water into a large bowl. Sprinkle the yeast over the water and stir briefly with a fork. Wait 5 minutes for the yeast to dissolve. Yeast will look a bit puffy.

Add 1 cup bread flour to the proofed yeast and water and stir vigorously with a wooden spoon to combine. Add the warmed milk, sugar, butter and salt and stir again to combine. Add another two cups flour, a half cup at a time, stirring well after each addition. Cover the bowl with plastic wrap or a clean shower cap and set aside for 30 minutes.

If you have a stand mixer with dough hook, you can use that to add the additional bread flour until you have a soft, slightly sticky dough. If you don't have that, turn the dough out onto a well-floured clean work surface and knead the dough, adding flour as you go until the dough is soft and slightly sticky.

Coat a clean bowl or rising container with oil or spray olive oil. Form the dough into a ball and place in the container, turning the dough over to coat all with the oil. Cover with a damp tea towel or clean shower cap and let rise in a warm place until doubled in bulk, about 1-2 hours.

Turn risen dough out of the container onto a lightly floured clean work surface and knead once or twice to get rid of excess gas. Shape into dinner rolls (18) or one or two long batards, making sure to pull the dough to the bottom a number of times so that there is a skin of stretched dough on top. Set shaped rolls or loaves on a parchment lined baking sheet, leaving room between. Cover with a damp tea towel, or oiled plastic wrap and let rise to almost doubled, about 30-40 minutes. While dough is doing this, preheat the oven to 400 degrees F.

If doing scoring (probably not on the rolls!), chill the loaves if possible in the freezer for 10 minutes after sprinkling lightly with a mixture of flour and rice flour. Then score with a lame or very sharp knife to allow the bread to expand and to make a pattern.

Bake in the preheated oven. It will take about 30 minutes for the rolls and about 45 minutes or a little longer for loaves.

Let loaves cool until barely warm (better yet, cool completely) before cutting. Serve the rolls warm.

Makes 18 rolls or one 16-inch long loaf or two 8-inch long loaves


Friday, August 28, 2020

Fire Update


Although the Walbridge fire near Guerneville is still only about 25% contained, many of the people who had been evacuated in the area have been allowed to return home. We were never actually threatened, nor given an evacuation warning, much less told to evacuate, but we were staged by the front door, ready to pack up and leave if needed.

Thanks to those who were worried and let us know, sent good thoughts, prayed. Prayers are still needed (and good thoughts) for the firefighters who are still fighting not only this fire but others around the state.

Of course we all still have to worry about the Covid pandemic...which is still going strong in my county and many other places in the U.S. and around the world, unfortunately.

Stay safe and healthy!

Wednesday, August 26, 2020

Marble Loaf Magic


Sometimes things don't work out the way you have planned. While making the mid-August  layer cake, the buttercream became contaminated with grease while still in the meringue stage...which meant that it wouldn't whip up, so we started over. I saved the mixture, convinced that I could find a recipe that would work to used up that egg white and sugar mixture...with some butter added. I did find a recipe, but then it got too hot to bake and the mixture spoiled with the waiting. The thing is, I really liked the recipe that I found, so now that it is cooler, I made it anyway...starting from scratch.

As is often the case, I changed a few things, even though I'd never baked this recipe before. That's the magic part...proportions are the key in baking and if you keep the proportions, you can change the flavors to make what you like. The original cake had a white chocolate and orange or peppermint white part and a dark chocolate dark part.  I'm a big fan of coffee and chocolate flavor combined, so that's the two flavors in this marble pound cake loaf. I used some espresso powder and a tablespoon boiling water to dissolve it and mixed those into the 'vanilla' batter, along with 2 tablespoons of flour since I'd increased the moisture with that boiling water. I kept the chocolate part, but used melted chocolate chips since I was too lazy to chop up a darker chocolate. That part wasn't the best choice since it would have been a better cake with bittersweet chocolate, but it is still a tasty cake and very nice with a cup of coffee...or tea. The color contrast isn't strong with this combo, either, but it's a delicious one.


The key thing here is to allow enough time to really beat air into the butter, into the butter and sugar mixture and into the butter, sugar and egg mixture...then only beat enough to combine once you start adding flour mixture and milk. A few folds with a spatula will combine the coffee mixture with the 'vanilla' batter and the chocolate with it's batter. Light mixing once the flour goes in keeps the cake from getting tough.

The fun part is marbling. Restrain yourself when it's time to zigzag a knife through the mounded batters...less is more because then you will see...and taste...the two flavors.


You can, of course, go with a vanilla batter, a vanilla batter flavored with citrus oil, or mint or maple extract, etc. You can color a vanilla batter - chocolate and a mint green would be pretty and tasty, too.

This makes one big loaf. Top a slice with a scoop of ice cream and some syrup or topping or fruit and you have a decadent dessert.


Marble Mocha Cake
base on Double Chocolate Marble Cake in Dorie Greenspan's  Baking Chez Moi
Makes one loaf cake

2 cups (272 grams) all-purpose flour
1 1/4 teaspoons baking powder
3/4 teaspoon salt
1 tablespoon espresso powder
1 tablespoon boiling water
1 1/2 sticks (12 tablespoons, 6 oz. 170 grams) unsalted butter, at room temperature (I used non-dairy margarine)
1 cup (200 grams) sugar
4 large eggs, at room temperature
1 1/2 teaspoons vanilla
1/2 cup (120 ml) milk, at room temperature (I used soy creamer)
4 oz (113 grams) semisweet or bittersweet chocolate, melted and cooled

Center a rack in the oven and preheat the oven to 325 degrees F. Stack two baking sheets or use an insulated baking sheet and on it place a 9x5-inch loaf pan that has been buttered and floured, with excess flour tapped out of it.

Whisk the flour, baking powder and salt in a medium bowl. Set aside.

Mix together the espresso powder and the boiling water in a small bowl and stir until the powder dissolves. Set aside.

In a stand mixer bowl beat the butter on medium speed for 3 minutes, using the paddle attachment, or use a large bowl and a hand mixer to do the same thing. Add the sugar and beat for another 2-3 minutes. Scrape bowl and beater(s), then add the eggs, one at a time, and beat for 1 minute after each addition. Don't worry if the batter curdles.

Reduce mixer speed to low and mix in the vanilla. Scrape bowl and beater(s). Again on low speed, add the flour mixture in three additions and the milk in two additions, starting and ending with the flour mixture. Mix only until each addition is incorporated. Avoid over-mixing.

Put half the batter in another bowl. Add the reserved espresso mixture and, using a flexible spatula, combine the batter and espresso until mixture is one color.

In the remaining batter, using a flexible spatula, combine the batter and the cooled chocolate until mixture is one color.

Using a large spoon or a scoop, dollop the batters into the prepared loaf pan in a random pattern. Plunge a table knife deep into the batter at one end of the loaf pan and zig-zag the knife to the other end in 6-8 zags, no more. Don't go backwards. The fewer strokes with the knife will allow for a nice marble effect but not too much mixing.

Bake the cake for 80-90 minutes, or until a tester inserted in the center comes out clean. At about half way, check the cake and tent with foil if the top seems to be browning too quickly.

Cool the cake on a cooling rack for 10 minutes, then unmold it, then turn it right side up on the rack and cool to room temperature. Store at room temperature, wrapped well, for up to 4 days. Freeze for longer storage.

Tuesday, August 25, 2020

A Curious Carrot


Have been harvesting in the garden...squash for a while, beans almost finished, cucumbers almost finished and tomatoes really getting going now. A week or so ago I harvested my first carrot. Then, a few days later there were fairly tiny carrots, then I pull up a monster carrot which looked like about six carrots growing together with one top! From the soil surface it looked like one decent carrot, but once pulled you could see all the 'legs' of the other branches. Made it interesting to clean and prepare! I made roasted carrots which I tossed in a mixture of honey, sherry vinegar, dried thyme, pepper and garlic salt before roasting. They added a nice touch to the green salad we had for dinner last night. Didn't actually measure anything, so no real recipe.

Hope all is well with you, dear reader. The smoke has mostly cleared and the fire north of us is partly contained and improved weather probably means that the heroic firefighters will get it under control within a few days. Thank you for you good thoughts and prayers...they worked so far!


By the way, the tiled table under the carrots and tomatoes is one that I made with the help of a friend who showed me how to do mosaic tiling with bits of old plates and tea cups and other porcelain. It sits outside on our porch. I found the old tile for the center, the plates and mugs and things at the Recycletown at the county dump and only paid pennies. It was a fun process but I haven't made anything else since...perhaps I'll get back to it now that I have endless time...or so it sometimes seems.

Friday, August 21, 2020

We're OK


Friends and family have been contacting us because we live in Northern California and on the national news it might look like we are in danger from the wildfires currently burning in many areas of California due to lightning strikes a few days ago.

Not to worry...we are fine. The fires are at least 15 miles away from us to the north and the winds have shifted to be from the ocean (west of us) toward the east, so it is highly unlikely that the fire will come our way. The air is smoky so we are staying indoors. There is some ash filtering down but that has mostly stopped.

Do keep good thoughts for the thousands evacuated and the dozens, if not more, who have lost their homes. Normally August isn't fire season yet, but we rarely have summer thunder and lightning storms, either.

Thank you for your concern if you were worried. Sending virtual love!  Elle and Sweetie and Pi.

Thursday, August 20, 2020

Family Food August 2020


Travel isn't easy during a time of pandemic, but our dear daughter, her person, and his son drove a heroic 13 hours a few weeks ago to come visit us before Raine's school started up again. We all had self-quarantined for two weeks before the visit so that we could safely hang out together. That meant that we could hug, sit close together to talk, exchange phones to look at photos, have tea together, watch Hamilton together on Disney+ (an awesome experience!), and cook and eat together. Since I had injured my knee, the time on my feet at the beginning of the visit was limited, but by the second week I was able to do quite a bit of cooking and baking with Raine. He likes to make things and really enjoyed the process, too and I enjoyed the time with him and sharing something that is important to me.


The first week we were able to have a delicious berry crisp that included raspberries from Costco as well as home-picked blackberries and strawberries. The recipe can be found HERE. Just substitute berries for the apples, omit the cinnamon in the pie filling and use 1/4 teaspoon nutmeg instead of the cinnamon. Keep the crumble topping the same and you are good to go.


We also enjoyed personal pizzas, cooked on the BBQ grill. Each person's portion was formed on a half sheet of parchment paper and then there were an array of toppings so we each could choose what we liked best. Mine had some pasta sauce, pepperoni slices, crumbles of cooked turkey Italian sausage, thinly sliced fresh tomato from our garden, and some caramelized onion, plus non-dairy ricotta. A scattering of finely sliced fresh basil from the garden finished it off. The photo is from before it was baked...it was even nicer looking baked, but I ate it all before I even thought to take a photo. So delicious! The pizza dough recipe is HERE. Add your favorite toppings and bake on a preheated pizza/bread stone at 425 or 450 degrees F. in the oven or in a BBQ with a cover.


Another fun adventure was to make Asian flavored turkey burgers during a late morning session with Chef Anne Burrell as part of Rachel Ray's Yum-O Cooking Camp. I signed Raine up weeks before they came and we all at the finished burgers for lunch right after the class finished. The Cooking Camp folks did a great job and Raine learned how to properly hold a knife and other knife skills...which he practiced over the next few days as we made other dishes for dinner. It was a free class but donations are accepted. They sent an email with recipe and lists of ingredients and tools needed in advance of the class, which was taught on Zoom. Chef Burrell is a great teacher and has a light and encouraging way about her. I hope that it is OK to include the recipe that we used. Chef Burrell came up with the recipe and it is a great one because, unlike many turkey burgers, it is moist and juicy. I really like the Asian flavors, too, although a dill pickle didn't seem to go with it as suggested. The recipe actually made five burgers, which was perfect for our group.

Asian Turkey Burgers
by Anne Burrell, Food Network as part of Rachel Ray's Yum-o Cooking Camp


Ingredients

 Extra virgin olive oil
1 onion, cut into 1/4-inch dice
Kosher salt
 2 cloves garlic, smashed and finely chopped
1 1/2 pounds’ ground turkey (mix of light and dark turkey meat, or all dark turkey meat)
1-inch piece of fresh ginger, peeled and grated
1 eight-ounce can water chestnuts, coarsely chopped (not too fine-they add GREAT texture)
1/4 cup soy sauce
2 tablespoons sriracha (we omitted this because some of us don't enjoy heat/spice)
1/2 bunch of fresh cilantro, leaves finely chopped
4 burger buns (I like the seeded ones)
Optional Garnishes: 
·         4 slices American or Cheddar cheese (American melts better)
·         4 slices beefsteak tomatoes
·         4 slices red onion
·         4 leaves butter lettuce
·         ½ cup mayo mixed with 2 teaspoons sambal oelek
·         Your favorite Vlasic pickles

     Directions:

1      1) Coat a large saute' pan with olive oil and add the chopped onion. Season with salt and bring the pan to medium heat. Cook the onion until translucent and aromatic, 7-8 minutes. Add the chopped garlic and cook 1-2 minutes more. Turn off the heat and let the mixture cool.

2      2) In a large mixing bowl, combine the ground turkey, prepared ginger, chopped water chestnuts, soy sauce, sriracha if using, chopped cilantro and the onion and garlic mixture. Wipe out the saute' pan with a paper towel and set aside to use for cooking the burgers.

3      3) Make sure that all the ingredients are well combined. Squeeze a walnut-sized portion of the mixture into a small patty to test the seasonings, and cook it in the saute' pan over medium-high heat. Taste it. Season as needed...a little more soy?, some salt or more cilantro?. Once the mixture is to your taste, form it into 4-5 patties.

4      4) Coat the saute' pan with olive oil. Cook the patties in the saute' pan over medium-high heat. It's important not to crowd the pan, so you may want to cook the patties two at a time. Cook 5-6 minutes per side. The burgers will be browned and cooked through when done. If cooking in batches, tent the cooked burgers with foil while cooking the rest.

5      5) Serve the burgers on toasted buns with toppings as desired.

Sunday, August 16, 2020

When Life Gets In The Way


You may have noticed, dear reader, that there have been few posts the last few weeks. That is because of two things. First off the unpleasant, three weeks ago this coming Wednesday I injured my knee while gardening. Followed the usual RICE (rest, ice, compression, elevation) for a couple of days, then just the rest and elevation, but no improvement on the sort of balloon that had popped out on my knee cap. Got in to see the doctor after two weeks and was told that it is fluid leak from the bursa behind the knee cap and that it will go away eventually. The good news was that I can now stop rest and elevation!

At the beginning of that time I had made some sourdough dough for a boule (ball shaped bread) which I was going to also decorate with some clever slashes. Lacking time on my feet after the accident, I did some simple slashed with the intention of baking it again before today. It was so bad that I didn't even take a photo. Our Kitchen of the Month, Elizabeth of the blog from OUR kitchen challenged us to bake a loaf of a high-hydration bread and then decorate it with a design in scoring. This works best when the loaf has a good outer 'skin', some flour on the loaf to accent the design, and a baker who has confidence as they score the loaf.

Two weeks ago we experienced the very pleasant when my daughter and her person and his son (yes, they call each other their person) came to visit from Phoenix after we all had quarantined for two weeks. They drove something like 13 hours straight to avoid carrying the Covid infection. That way we were all able to hang out together and have fun. The amount of sightseeing possible was limited by the pandemic, but we did watch Hamilton together on Disney+.  Raine (the son) and I baked up a storm and cooked dinners, too. We also harvested summer squash, tomatoes and cucumbers (see photo at top of post). Hoping to post some of the food we made soon.
Sweetie taught Raine how to do electrical work and to ride a riding lawn mower and Pi had almost more attention and loving than he could stand...not really, he loves all attention.

So my plan was to bake the bread again once they left on Saturday...but we are in a severe heat wave, not the best time to bake bread.Plus we lost power Friday, and had a severe thunderstorm with high winds and lightening at 4:30 am this morning. Lost power again until just a little while ago. Posting while we still have power because it's likely they will turn the power off again this evening due to too many people using air conditioners and fans because of the heat. Not the best time to bake anything!

This is the long way of saying that my bread for the challenge for the Bread Baking Babes this month was to be a high-hydration loaf with excellent slashing...so I sort of failed the challenge. So sorry Elizabeth. Will try to accomplish the good design before the end of the month, when things are a bit cooler.

So be sure to visit the other Bread Baking Babes to see what wonders can be accomplished with a lame or razor or sharp knife and a steady hand and firm conviction.

To be a BBBuddy, visit Elizabeth's post for the details, but basically bake the bread with design by Aug. 29th and send Elizabeth an email with photo and deets.

Stay cool if you can!

Friday, August 07, 2020

Super Cinnamon Crumble-Topped Apple Pie


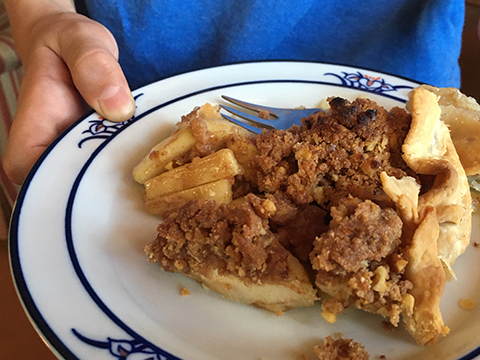
The Gravenstein apples are ripe and Sweetie and Raine picked a bucketful yesterday. Pie was promised. There is nothing quite like a Gravenstein apple pie. The apples cook down and become soft and moist and so delicious. They are the perfect balance of sweet and tart. We decided to use a crumble topping instead of a top crust.


This is really Raine's pie. I did peel and slice some apples and assist with advice, but Raine did all the work, including picking most of the apples, peeling and slicing the rest of the apples, rolling out the pie crust, measuring and mixing up the filling...including lots of cinnamon!...and measuring and putting the topping ingredients together, plus assembling the pie. Since we both really, really like cinnamon, we agreed that he could put extra into the filling and the topping, so it's a super cinnamon pie.

For the filling we used my Mom's apple pie recipe in the Classic Comfort Food cookbook, with a bit of brown sugar added, but not too much. She would usually do a two crust pie and would usually make her own pie dough, but this time our attention was on the crumble topping. For the bottom crust we used Pillsbury Ready Crust and we based the topping on a recipe we found online from Bon Appetit. We made enough changes that I'm calling this Raine's Apple Pie.


The crust is buttery, the apples sweet-tart and soft with some cinnamon and the topping is crunchy and rich and full of cinnamon flavor. A slice with some vanilla ice cream and you'll be glad that the Gravensteins have arrived.

No Gravenstein apples where you live? Substitute another favorite apple. Some good ones, although the texture will be different, are Granny Smith, Jonagold, and Honeycrisp.


Raine's Apple Pie

1 - Ready Crust pre-rolled dough for 1 crust (or your favorite pie dough for 1 crust)


6-7 cups (about 3 1/2 pounds) Gravenstein or other good pie apples, peeled and sliced, core and seeds removed
2 Tablespoons all-purpose flour
1 1/2 teaspoons ground cinnamon (we used Penzey's Vietnamese Cinnamon)
2 Tablespoons brown sugar
1-2 Tablespoons soft butter, in small lumps
1 cup all-purpose flour
1/2 cup brown sugar
1/4 cup granulated sugar
2 teaspoons ground cinnamon
1/2 teaspoon salt
6 Tablespoons butter, cold, cut into 6 pieces
1/2 cup chopped walnuts

Preheat oven to 450 degrees F. On a lightly floured work surface roll out the crust gently so that the crust will fill a 9-inch pie plate with an overhang of at least an inch all around. Fit into pie pan. Set aside.


In a large bowl toss the apples with the 2 Tablespoons flour, 1 1/2 teaspoons cinnamon,and the 2 Tablespoons brown sugar until thoroughly coated and mixed. Put apple mixture into prepared pan and dot with the butter lumps. Set aside.

In  a medium bowl mix together the flour, brown sugar, ground cinnamon, and salt. Use a pastry cutter to cut the cold butter into the flour mixture until it looks like we sand. Stir in the chopped walnuts.


Take a handful of the flour/butter mixture and squeeze lightly to make clumps. Distribute the clumps, which may come apart a bit as you distribute, over the top of the apple filling, completely covering the apples. Use all of the topping mixture.

Fold the extra dough up and over the filling and topping, pleating the crust as needed, giving a little pinch now and then to help it stay pleated.


Bake pie in the preheated 450 degree F oven for 10 (ten!) minues. Then reduce the oven temperature to 350 and continue to bake for another 35-40 minutes. Crust will be golden brown. It's a good idea to check on the pie about 10 minutes before it might be done and to tent the top with aluminum foil if the topping is browning too fast. I forgot to do that part, so some of the topping got a bit burnt...but it still tasted great.

Let finished pie cool on a wire rack until thoroughly cool. Serve in wedges with a scoop of vanilla ice cream on the side if you are feeling decadent.

Wednesday, August 05, 2020

Amazing Chocolate Cookie


As the pandemic continues, so does my perusal of old Bon Appetit magazines. About a week ago I was looking at an issue from 2001 and I came across an ad from Baker's chocolate that had a wonderful looking recipe for intensely chocolate cookies, which they called Death by Chocolate. Even though I had to translate the recipe a bit for another brand of chocolate which I had on hand, I knew it would be an outstanding cookie...and it was.

This is a moist, deeply chocolate drop cookie with walnuts. It's oversized and has chunks of chocolate that are still melted if you eat the cookies while still a bit warm. I had made up the batter in advance and baked up a dozen of these babies yesterday with my sous chef Raine. I scooped out the dough (still pretty firm from being in the fridge) and he made them into dough balls by rolling them in his palms. The second batch were flattened a bit after being put on the foil-lined baking sheet (we baked six at a time in my counter-top convection oven) because the first, round, batch were too tall. Since it was a new recipe I wasn't sure if they would spread, but they really don't.

Do make these if you really, really love chocolate and cookies! You could probably leave out the nuts but I love nuts and think they really add a great element to these cookies. Oh, yes, these cookies are made in one bowl and mixed by hand. Kinda old school, but less to clean up.


Death By Chocolate Cookies
based on a Baker's Chocolate recipe

8 oz. bittersweet chocolate (I use Scharfenberger but use your favorite quality chocolate)
4 oz. semisweet chocolate chunks or chips - chunks are better
1/4 cup butter
3/4 cup brown sugar, packed
2 eggs
1 teaspoon vanilla
1/2 cup all-purpose flour
1/2 teaspoon espresso powder
1/4 teaspoon baking powder
1/4 teaspoon salt
1-2 cups chopped walnuts (optional) - I used 1 cup

Preheat oven to 350 degrees F. Chop the 8 oz of bittersweet chocolate. In a large microwavable bowl, melt the chocolate on HIGH for 1 minute. Stir with a heatproof spatula (I use a small silicone one), then microwave again for another minute. Stir until smooth and completely melted.

Add the butter and brown sugar and stir to combine. Add the eggs and vanilla and stir to combine.

In a medium bowl whisk or stir together the flour, espresso powder, baking powder, and salt. Add the mixture to the chocolate mixture and stir just until combined.

Stir in the chunks or chips of semisweet chocolate and the walnuts if using. Stir thoroughly to combine. (At this point I refrigerated the mixture in a closed container for 4 days.)

Drop by 1/4 cupfuls or make similar sized balls of chilled dough onto lightly greased foil lined cookie sheets. Leave about an inch between dough mounds.  Flatten a bit.

Bake in preheated oven for 12-13 minutes. Cookies will be puffed and feel set to the touch. Cool for 1 minute on the sheet, then move to a wire cooling rack to cool completely...or as long as you can stand...they smell really good! Makes about 1 1/2 dozen (18) cookies.

Saturday, August 01, 2020

The Essence of Summer in a Sandwich


The first tomatoes are ripe! Started from seed in the early spring, planted with care in April, watered frequently and fertilized a few times, the bushes are full of tomatoes at all stages of development. It's been a while but the wait is worth it.


One of the first things I make with fresh, first of summer, home-grown tomatoes is the classic BLT sandwich. Good bacon is cooked until crisp, leaf lettuce is washed and dried, good bread is toasted, mayo and pepper are at the ready and I slice that first tomato with nice, thick slices. I only put mayo on the bottom slice of toast, followed by the tomato slices, some pepper...no salt needed because of the bacon..., the bacon, the lettuce and the top slice of toast. It's a thing of beauty and a nice, juicy lunch, full of the flavors of summer.


Wednesday, July 29, 2020

Carrot Salad and New Blogger


First, about the new Blogger...I'm not sure that I can stand learning this new version. I had to revert to the old version to do this post since I couldn't figure out how to do a new post! It may be that when using the old version goes away in late August that new posts will go away, too. The already written posts will stay up, but who knows if I have the bandwidth to learn the new version by then. I'm currently learning the ins and outs of Zoom so that I can be a host for two of my P.E.O. scholarship groups when they need to meet. That may end up being all the learning of tech stuff that I can handle. It's been a great run on Blogger...since fall of 2006! Fourteen years is probably enough.

Still, I have until late August to learn the new version, so maybe I'll keep going...come back in late August and find out.

Today the recipe is a lovely Shredded Carrot Salad with Orange and Pine Nuts. It's from the cookbook of Michael Volpatt, co-founder of Big Bottom Market in Sonoma County. I found it one Wednesday in June in the food section of the Press Democrat. That section of the paper has improved so much during the pandemic! Not sure why, but happy that they are concentrating less on wine and more on food.

This refreshing carrot salad makes 6 servings as a side dish and is a great, fresh dish to go with barbequed foods so ubiquitous in summer. If I were to make it for the rest of the year I think I would add some spices.  It keeps for a couple of days, too, so make the full recipe and you'll have leftovers for a nice lunch salad.

I used a bunch of organic carrots from the market that came with tops. I cut off the tops and fed them to the sheep. The carrots themselves were washed and rubbed to remove dirt, and then the top part that was greenish and the tail ends were trimmed before I shredded them all in the food processor.

Before I juiced the lemon, I made zest strips from the peel and added about two teaspoons of them because zest always brightens up dishes. I really enjoyed the citrus zing of the combined juices and the crunch of the carrots and nuttiness of the pine nuts... may have used more than 1/4 cup since I love pine nuts! This salad goes with lots of other foods. Give it a try!


Shredded Carrot Salad with Orange and Pine Nuts

1 1/2 pounds of carrots, cleaned, tops removed, shredded
1/4 cup fresh orange juice
1 tablespoon fresh lemon juice
1 tablespoons olive oil
1/4 cup pine nuts
1 teaspoon salt

Prepare the carrots by cleaning, peeling if desired, removing the tops and tails and shredding. You should have about 4 cups. A food processor works well for shredding this many carrots.

Place the shredded carrots in a bowl with the orange, lemon, (lemon zest, too, if using), and salt. Allow to marinate 10-30 minutes, stirring once.

Dry toast the pine nuts in a heavy frying pan, or heat the olive oil and saute the pine nuts, stirring constantly, until golden. Just before serving, toss the nuts with the carrots.

Saturday, July 18, 2020

Lentil Salad For Hot Weather


Mid-July is a good time to beef up the recipe list for warm weather. Although we are having morning fog now, so no heat wave, I know that hot weather will be coming in the weeks and months to come.

A really great dish to have on hand is lentil salad. It's great at room temperature by itself, or layered over salad greens and tomatoes as I did yesterday for lunch, or folded into a stuffing for zucchini or bell peppers, along with rice or quinoa and some extra seasonings.

You start by cooking rinsed lentils in water, with the addition of onion, bay leaf, and pepper. Once cooked just until tender, you mix the drained lentils with red wine vinegar, balsamic vinegar, lemon juice, olive oil and seasonings. I like to add the lentils while they are still warm because I think that helps with them soaking up the dressing. I also like to stir the mixture about every hour for a few hours and then cover the salad and let it sit on the counter overnight. This allows the flavors to meld nicely.

Although I did cook the lentils with a ham hock, you can also make them without it and then it's a vegan dish. The recipe calls for bacon, too, but I skipped it and didn't miss it a bit.

Do try this great summertime dish. It's perfect for a picnic since it doesn't need refrigeration. It supplies protein and lots of fiber and plenty of flavor. Enjoy!


Lentil Salad
based on a recipe by Alton Brown

1/4 cup balsamic vinegar
2 tablespoons white vinegar
2 tablespoons fresh lemon juice
(the above three ingredients can be replaced with 1/2 cup red wine vinegar)
1/4 cup olive oil
2 teaspoons Dijon mustard
1 teaspoon salt (kosher salt if you have it)
1/2 teaspoon pepper (freshly ground is best)
1/4 cup finely chopped fresh parsley leaves
1 teaspoon finely chopped fresh thyme leaves
1 recipe Basic Cooked Lentils (see recipe below)
2 strips bacon, cooked until crisp, cooled, and crumbled (or more, to taste - optional)

Whisk the vinegars, lemon juice, olive oil, mustard, salt, pepper, parsley and thyme together in a large mixing bowl. Add the warm lentils and bacon and stir to combine. Serve warm or at room temperature. If you will be serving this much later, save the bacon in a zip-lock bag and add it 1/2 hour or so before serving. (That way the bacon stays crisp.)

Basic Cooked Lentils
1 pound brown or green lentils, approximately 2 1/2 cups
1 small onion, halved
1 large clove garlic, halved
1 bay leaf
1 teaspoon kosher salt
1/4 pound salt pork, optional
1/4 teaspoon freshly ground black pepper

Pick over the lentils, rinse and drain. Place the lentils along with the onion, garlic, bay leaf, salt and pork into a large 6-quart saucepan and cover with water by 2 to 3 inches. Place over high heat and bring just to a rolling boil. Reduce the heat to low, cover and simmer until the lentils are tender, approximately 25 to 30 minutes. Drain any remaining liquid and discard the onion, garlic, bay leaf and salt pork. Stir in black pepper and taste for salt. Serve immediately or use in Lentil Salad.

Thursday, July 16, 2020

Torpedo Rolls With The Babes


July is always a challenging time to be a Bread Baking Babe because there are usually hot spells that make it unlikely that I'm going to be all jolly about heating up my kitchen to bake bread. This month was no exception, but fortunately I found a brief window with cooler temperatures and made the bread. It did mean that I used the fridge some to get the timing right and I baked the rolls in the evening when it had cooled down some. Sweetie ate one while it was barely warm...I think it was about 10 pm...and he pronounced it delicious.


Our Kitchen of the Month, Karen of Karen's Kitchen Stories, chose delicious Mexican Sourdough Rolls, or Birotes Salados, for our July bread.

She says," Birotes Salados are Guadalajaran, or Tapatio, which is what Guadalajarans call themselves. The bread is used for Tortas Ahogadas, which are sandwiches made with carnitas, pickled onions, refried beans, and two sauces, one for spicing things up, and one for drowning/dunking the entire sandwich."

You start with some sourdough starter (if you don't already have one, you can create your own first - with the pandemic, there are lots of places on the internet to find out how to do that...just Google sourdough starter!), make an expanded starter, then use a portion of that for the actual dough. I used the remainder of the expanded starter the next day to make sourdough waffles and they were delicious!

Back to the rolls. These have beer as well as the sourdough starter. I used Corona because that's what we had on hand. With the pandemic we have tried to use what's on hand as much as possible since most grocery shopping is being done by our kind neighbors.

 It's kinda fun to make the dough because you mix it up with your hands, squishing the more solid and the more liquid elements together...sort of like making mud pies as a kid, and then do the stretch and fold, returning the dough ball to the bowl a few times, with spaces of time in between. Eventually you will see the dough turn into a smooth mass.

Karen has a suggested timeline. The rolls take 20-30 minutes to bake. Here is the rest:
Day1:
10:00 am - Feed your starter to wake it up. If your starter is already very active, you can skip this step.

8:00 pm - Prepare the final feed of your starter and let it rest at room temperature overnight.

Day 2:
8:00 am - Mix and knead your final dough, including a few stretches and folds.
9:15 am - Let the dough rise at room temperature until doubled.
11:15 am - Shape the rolls and let them proof until puffy.
12:30 pm - Score and bake the rolls.

Of course this is an approximate timeline since the conditions in your kitchen/home can make it take longer or, a bit, shorter. If you use the fridge to store the dough between any one of the steps it will take longer but you'll be able to heat up the oven and bake when it is least likely to overheat your home.

I really enjoyed these rolls, although I didn't make the traditional sandwiches. The crumb was somewhat airy and mine were nicely moist, but not too moist. Because I was baking them on a preheated baking stone with an overturned foil roasting pan over to create a mini-oven, I had to bake these in my regular oven, unlike what I bake in my counter top high-end convection oven. I rarely get a good crust or deep brown color in my big oven unless I dry things out, so my rolls weren't as crusty nor brown as I would like, but that meant that they weren't bone dry, nor did they need to be dunked, either.


I filled them with pulled pork and coleslaw...non traditional but delicious. The rolls also were fine split and toasted and spread with non-dairy butter. I liked the slight saltiness of them, too.

If you'd like to be a Buddy, bake these and post about them by July 29th, then send Karen an email with a short description of your bake and a photo. She'll send you a badge.

Be sure to check out the other Babes to see what their birotes look like. Stay safe and healthy!


Birotes Salados - Mexican Sourdough Rolls

Wake Up Feed for Your Starter

200 grams (7 ounces) sourdough starter. Because you will be feeding it twice, it doesn't matter what hydration it is to begin with.
200 grams (1 1/2 cups) all-purposed flour
120 grams (1/2 cup) lukewarm water (90 degrees F)

Mix the "wake up feed" in a clean bowl with your fingers, cover with plastic wrap or a damp tea towel, and let ferment for 8 to 10 hours.

Final Feed

20 grams (1 tablespoon) of the "wake up feed"
270 grams (2 cups plus 1 tablespoon) of all-purpose flour
175 grams (3/4 cup) Mexican lager beer (I used Modelo)

Mix the final feed ingredients with your hand until well incorporated. Cover and let ferment at room temperature for 12 hours.

Final Dough

430 grams (3 1/3 cups) all-purpose flour
20 grams (1 tablespoon plus 1 teaspoon) granulated sugar
18 grams (1 tablespoon plus 1/2 teaspoon) salt
All of the starter
212 grams (3/4 cup plus 1 tablespoon) water

Extra flour for dusting

Whisk together the flour, sugar, and salt in a large bowl or dough rising bucket. Divide the starter into small pieces and add it to the dry ingredients. Add the water and blend everything together with your hands. "Stir, squeeze, and pinch" the dough ingredients together until the dough comes together. You can use your dough scraper to help incorporate everything. This process should take about 2 minutes.

Turn the dough out onto a clean work surface and stretch, fold, and flip the dough about 5 times.

Form the dough into a rough ball and place it back into the bowl. Cover and let rest for 15 minutes.

Lightly flour your work surface and place the dough, seam side up, onto the surface. Gently flatten the dough into a 2 inch thick circle. Stretch and fold the dough from all four "sides."

Flip the dough over and form it into a ball, return it to the bowl, cover, and let rest for 15 minutes.

Repeat the stretch-and-fold process three more times at 15 minute intervals.

After the final stretch and fold, place the dough back into the bowl, cover with a damp towel, and let rise in a warm place for about an hour, until doubled.

Turn the dough out onto a lightly floured work surface with the smooth side down. Gently flatten until the dough is about 2 inches thick. Gently stretch and fold one side of the dough about half way over the dough. Turn the dough, and repeat from all four "sides."

Flip the dough over, seam side down, and form the dough into a ball.

Return the ball to the bowl, seam side up, and cover until doubled, about an hour.

Lightly flour your work surface.

Divide the dough into 8 pieces, about 150 grams each. Form each piece into a ball. Press each ball into a rough rectangle and then fold fold each "side" over each other to create a cylinder. Using your hands, roll each cylinder back and forth until you have an eight inch long roll with tapered ends.

Heat your oven to 475 degrees F with a baking stone and steam pan.

Place the rolls, seam side up, side-by-side lengthwise, between the folds of a couche or flour dusted tea towel to proof. Cover with plastic wrap or another towel for about 60 to 90 minutes, until puffy and airy, but not doubled.

You will probably need to bake these in two batches unless you have two ovens.

Place the risen rolls onto parchment paper on top of a pizza peel, seam side down with space in between. Add 2 cups of boiling water to your steam pan and close the oven door to let it get steamy.

Score the rolls with a sharp knife or lame the length of the roll down the center with the blade at an angle.

Place the loaves on the stone, along with the parchment, and close the oven door. If you like, you can also spray the oven with more water to get it extra steamy.

Lower the oven temperature to 400 degrees F and bake the rolls for 20 to 25 minutes. They should be deep golden brown and hollow sounding.

Cool on a wire rack. Repeat with the rest of the rolls.


Friday, July 10, 2020

Roasted Veggies with a Marinade


It's just crazy to make roasted veggies when it's so hot, but I did last week when it was cooler here. During the summer there are just so many wonderful things to roast. I suppose you could also marinate these and then put them on the grill. Just be careful with the mushrooms and asparagus if you grill them because they dry out so easily and are then not terribly appetizing. It may be a bit crazy to make these during a heat spell, but they are a delightful thing to eat when it's hot. We served them at room temperature and that was perfect.

You can use any mixture of vegetables that appeals to you. I used some of the yellow summer squash and the zucchini that are starting to be ready to harvest in our garden, plus veggies from the market including sweet onion, asparagus, whole mushrooms, and a mixture of red, orange and yellow peppers. The marinade includes balsamic vinegar, olive oil, garlic, mustard, herbs and spices. The easiest way to marinade them is to put the prepared veggies into gallon ziploc bags with the marinade, then turn them a few times so that they are fully marinated in the delicious, aromatic mixture.

A key thing when roasting...and grilling...is to keep the vegetables in a single layer and not too close together. A little room between pieces will let the heat circulate nicely so that you get that delicious browning. These can be served warm or at room temperature. Any leftovers are even better the next day as is, or folded into an omelette, into pasta or a pasta salad, or into rice.

Sweetie and I are doing fine, staying home most of the time although we take the dog into town to walk him near the Laguna, and trying to enjoy The Pause, as my brother calls the pandemic. Hope that y'all are staying safe and healthy!


Marinade for Vegetables for Roasting or Grilling

1 cup olive oil
1/4 cup balsamic vinegar
1 tablespoon dijon style mustard
salt and pepper to taste
1/2 teaspoon dry thyme
1 teaspoon chopped fresh rosemary
3 cloves garlic, minced
1 tablespoon Italian parsley, minced

Place all ingredients into a jar with a tightly fitting lid. Secure lid and then shake briskly until well mixed. Use as marinade for prepared vegetables. Place vegetables in a Ziploc bag, add marinade and seal bag. Shake bag gently to coat vegetables. Lay flat. After 1/2 hour, turn bag over. Lay flat. Repeat another few times. Remove vegetables from marinade before roasting in a 425 degree oven or on a hot grill until cooked through and with brown spots here and there. Serve warm or at room temperature.


Friday, July 03, 2020

4th of July


My Dad served in the Navy during World War II as a captain. Now he is buried in Arlington National Cemetery and flags will be placed by each headstone in honor of our nation's birthday, July 4th.

When I was little it was an exciting day. We always had 'safe and sane' fireworks, starting during the day with the 'snakes' which were pellets that we lit with a match. As they burned, they left a snake shape of exploded ash. Then we would stomp on the snakes and they just became ugly dark marks on the sidewalk which we washed away with the garden hose.

There was usually a special cookout dinner with burgers or hot dogs, potato salad, and often strawberry shortcake for dessert. Once it was dark we had sparklers, hand held, which we waved around. My Dad always prepared for fireworks by having buckets of sand and water. The used sparklers went into the sand and the water was in case we had to put out small fires.

My favorite firework, besides sparklers, was the fountains. Once lit, they shot a fountain shape of sparks...WHOOSH....up into the air and the sparks had different colors.

Most of the time that I've been with Sweetie we have had dogs. Dogs are not happy with fireworks and sometimes are downright frightened by the noise. So, for a long time, July 4th has not included any fireworks and we play music and keep the windows shut to drown out as much noise as possible from the fireworks shows put on the the surrounding cities. Just to make it more interesting, the city closest to us has their show on the 3rd and two others nearby have theirs on the 4th, so two nights are spent shut up in the house, calming the dog.

This year it will be different. Due to the pandemic, none of the cities are having shows. There are still folks shooting off illegal fireworks in the neighborhoods, but the worry there is fire, not noise. It's dry enough now that even a small fire could spread. Unfortunately people are so upset about not having big shows (or perhaps they are just bored by having to stay home during the pandemic?) that they have already begun fireworks out and about and the fire departments have had their hands full.

For myself, I'll think of my Dad on the 4th of July, and I'll think of my siblings and the fun we had in the backyard with fireflies flitting around us as we celebrated...and got to stay up late! I'll be grateful that I live in a country that protects freedom of speech, even as I hope that we will progress so that there is less to protest. I love my country, even with all it's imperfections. Just like people, wouldn't it be boring if it were perfect?

If you are from the U.S.A. or just a fan, hope you have a happy, safe, and quiet 4th of July! Please stay home, practice social distancing and cover your nose and mouth so that we can have fewer folks sick in the coming months and fewer deaths. If you can find good strawberries, have some shortcake...life will seem sweet.