Friday, June 19, 2020

The French Toast...


My last post was of the Bee Keeper's Loaf. I knew that it would make stellar French Toast and it did! Served it with freshly picked olallieberries and some raspberries from the market, plus a syrup made from more of the freshly picked (literally 1/2 hour before, down the driveway near the road...the heat had ripened many, many olallieberries!) berries. It was very, very good French Toast!

Tuesday, June 16, 2020

Babes Bake Bee Keeper Loaf


In the middle of the week for each of the last three or four weeks we've had a heat wave. Even the days that are not super hot aren't really what we expect them to be like, here in the North Bay. Most summers we have a lot of fog and the chill that fog brings and a few hours of sun in the middle of the day and not much rain...often no rain after April. This year we've had some rain each month, thunderstorms (which used to be rare), and this warm to hot weather. At least there isn't much of the mugginess that I disliked as a child, growing up in Northern Virginia. Still, I would be happy with the usual fog.

Heat waves don't inspire me to bake, so little of that has been going on. I did bake some brownies from a mix on Friday but I added small chunks of bittersweet chocolate to make them more interesting. They were a tea treat from a good friend who loves chocolate. She and I sat far enough apart to qualify as social distancing and we consumed a lot of tea and a few of those brownies.

On Sunday it was cool enough to bake but I was tired from painting the floor in the farm house office, so all I did was start the biga for the Bread Baking Babes amazing June bread, brought to us by Tanna of My Kitchen In Half Cups. It's called Bee Keeper's Pain de Mie and it uses a good amount of honey! If you are adventurous you can also steep lavender, camomile or both in the warm milk that you mix the honey into. I had some really, really nice raw blackberry honey, so I skipped the herbs so that I could taste the honey.

This is one of those recipes that requires you to think and act ahead. You start both the biga and the milk mixture 12 to 18 hours before mixing the full dough. It's also fun because you use a pullman loaf pan (or you engineer something that works like a pullman pan...using bricks!) Of course that would be if you were baking in a regular size oven that allows space for both the loaf pan and bricks. Unfortunately, with the heat, I baked the loaf in my toaster oven so I didn't try for a pullman style, just a regular loaf. I also found that it was very slow to rise. That meant in my case that by bedtime it still hadn't risen enough, so I put the pan and dough into the fridge overnight, then let it sit at room temperature in the morning to finish rising. I only made one loaf since it's just the two of us. Sweetie really liked this bread, especially the buttery quality of it.

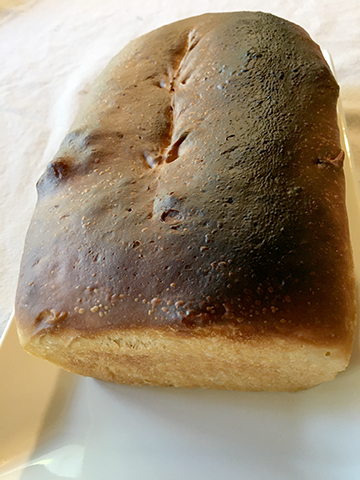
This dough browns easily. I actually burned part of the top crust on my loaf by not watching it as it baked. Perhaps baking in the toaster oven didn't allow sufficient space between the top of the loaf and the top of the oven. In the end, I turned the oven down to 325 degrees F for the last 5 minutes.


This is a lovely bread, soft and moist and very buttery. It is only slightly sweet and you taste a hint of sweetness, not the honey itself. I used a fairly strongly flavored blackberry honey, so it's interesting that not much honey flavor remains.

I think this will make wonderful French toast, regular toast, grilled sandwiches, etc. It's just as it it or with a bit of butter spread on it. The crumb is delightful. The crust is pretty thin, but that's OK. Do try this one yourself...just remember to start it the day before you want to bake it.

If you' like to be a Buddy, bake the bread, send an email to Tanna with a photo and a short note about your baking experience with this bread. She'll send you a Buddy badge. Do this by June 29th! Please use BBB Buddy w Bee Keeper’s Pain De Mis as the subject line.

Do visit other Bread Baking Babes sites to see how they baked the bee keeper's bread.


Bee Keeper's Pain de Mie
Martin Philip's book Breaking Bread: A Baker's Journey Home in 75 Recipes
Breaking Bread - 
two 9X5 pullman pans

******** TOTAL AMOUNTS USED IN BIGA + FINAL DOUGH

410 grams durum flour

410 grams AP flour

352 grams water
172 grams wildflower tea (lavender) 
17 grams salt, fine
16 grams yeast
123 grams butter


START HERE

******** BIGA******** 

410 grams AP flour  (205 grams for 1 loaf)

246 grams water (123 grams for 1 loaf)

pinch yeast

******** WILDFLOWER LAVENDER TEA********

170 grams milk (85 grams soy creamer for 1 loaf)
35 grams honey (subtracted 57 grams sugar, increased honey) (18 grams honey)
4 grams lavender  (omit)
2 grams chamomile flowers (omit)

******** FINAL DOUGH FORMULA********
172  grams wildflower tea (86 grams for 1 loaf)
656  grams Biga (all above) (328 grams Biga for 1 loaf)
106 grams water  (53 grams water for 1 loaf)
410 grams Durum flour or Bread flour   (205 grams bread flour for 1 loaf)
123  grams butter   (62 grams non-dairy butter for 1 loaf)
17 grams salt, fine  (9 grams salt, fine, for 1 loaf)
16 grams yeast   (8 grams yeast for 1 loaf)

Directions:

DAY ONE - BIGA 

Combine the flour and yeast in a large mixing bowl. 
Add tepid water (75-80°).  Mix briefly, then knead until a smooth dough forms.
Cover and set at room temperature for 12 to 16 hours.


WILDFLOWER LAVENDER TEA ~ I have not used the chamomile and lavender. I wanted to try it with just the honey the first time.

Combine milk, honey in a small pot.
Over low heat, warm the mixture so the honey mixes into the milk.
When there are small bubbles around the edges add the chamomile and lavender if using.
Turn off the heat.
Cover and allow to set at room temperature 12 to 16 hours.
Strain before using.
Warm the tea to 80° when ready to use.

DAY TWO FINAL DOUGH ~ I used a stiff spatula to break up the biga, then my hands, and did all the rest of the mixing with my hands. 
Ending desired dough temperature: 80°.
Combine strained Tea, all the BIGA and the water.
Mix until the biga is broken up.
Add very soft butter, flour, salt and yeast.
Stir until the dough forms a shaggy mass.
Resist the urge to add more flour.

BULK FERMENTATION 
Cover and allow to rise for about 90 minutes.

FOLD
Fold after 30 and 60 minutes; then leave untouched until divide.


DIVIDE AND PRE-SHAPE
Divide the dough into 2 pieces which will weight approximately 750 grams each. (Piece for 1 loaf will be about 750 grams.)
Pre-shape as tubes. Cover and rest 15 minutes.

SHAPE
Butter or spray two (one) loaf pans or two 9x5 inch pullman pans.
Shape as pan loaves.
With the long side facing you, fold the bottom third of the dough up to the center and the top third over (like a business letter). Fold the dough in half lengthwise, and seal the edges with the heel of your hand.
Place in pans seam side down. Press dough into pans to evenly fill to all corners.

PROOF
For loaf pans: Cover and proof until dough is about 1 to 1.5 inches above top of pan: about 60 - 90 minutes. (Mine took so long that I ended up putting the pan with dough into the fridge overnight and baking it in the morning.

For pullman pans: Place the dough seam-down into the pan, and press it evenly into the corners. Put the lid on the pan and close all but an inch or so in order to monitor the loaf as it rises.
Allow the dough to rise until it's just below the lip of the pan, 60 to 90 minutes.

Towards the end of the rising time, preheat the oven to 425°F.

BAKE
If using a loaf pan, score the loaf in the middle. Put in the oven.


Close the lid of the pan completely, and put the pan in the oven.

Bake the bread for 20 then remove the lid and bake for an additional 5-10 minutes. The loaf should be a deep golden brown on all sides.


Remove the loaf from the oven and, after 5 minutes, turn it out onto a rack to cool completely. Do not allow to cool in the pan as that will result in a soggy crust.

Thursday, June 04, 2020

Peach Pie with a Twist


Sweetie loves pie. I think he has favorites, like banana cream pie, but he will eat any pie and he really enjoys doing so.

I'm more of a cake girl, but I really love peach pie. The flavor of peach pie reminds me of summer and since we have had summer heat the last few days, a peach pie was calling my name. It didn't hurt that yellow peaches were on sale at the market a few days ago. The first day we had the peaches I was just too hot to bake anything. I had been working down at the farmhouse, painting trim. Early in the afternoon it was just warm, but by mid-afternoon it was really hot. Fortunately our downstairs stays fairly cool if we open the windows at night and then close everything up in the morning. I retreated to the living room and skipped the baking.

The next day I baked the crust in the morning while it was cool and then did the fruit peeling and slicing and the filling making and putting it all together, plus baking, in the late afternoon when we had turned on the air conditioner. We try to only run it if the temperature outside is over 85 and since it was 90 out that qualified.

This is sort of a mash-up of a traditional peach pie and a frangipane tart. Sweetie really, really loved this one and I think you will, too. The frangipane gives a nice almond flavor that enhances the peaches and raspberries and baking the crust before filling it means that the bottom crust stays crisp. Of course it helps to watch the crust towards the end of blind baking to pull it out of the oven if it bakes too soon. I missed that part and so the crust was pretty brown on the edges even before baking the filling, so I masked the edges with foil during the final bake. I'll bet you can do better than me on that score.

My original plan was to have more raspberries but I discovered that many of them had spoiled, so I used the good ones in the center of the pie. I've resolved that the raspberries will now sit front and center in the fridge so that they get used in a timely manner, instead of being shoved toward the back and forgotten for a few days. The lessons we learn in the kitchen!


Peach and Raspberry Frangipane Pie
Serves 8

Crust:
1 single pie crust, home made or purchased (I use Pillsbury ReadyCrust - 1/2 the package)
pie weights, parchment paper

Place the unbaked pie crust dough into a 9-inch pie pan and trim as needed, then flute edges or press down on edges with the tines of a fork. Place pie shell in freezer for 20 minutes.

Preheat the oven to 375 degrees F. Put the rack in the center of the oven.

Remove pie shell from freezer. Place a circle of parchment paper inside the pie shell, having the parchment go up the sides of the shell. Fill with pie weights (I use lentils that I only use for being pie weights).

Bake for 25 minutes. Let crust cool. Remove the lentils and reserve for the next use. Remove the parchment and discard. Cool crust completely.

Prepare the frangipane filling:
3 tablespoons soft butter or margarine
1/4 teaspoon salt
2/3 cup sugar
1 tablespoon + 2 teaspoons all-purpose flour
1/4 teaspoon almond extract
2 large eggs
3/4 cup almond flour or mixed nut flour
about 3 cups peach slices - used about 5-6 fresh peaches, peel them, remove the pit and slice

Directions:
Preheat the oven to 350°F.

To make the filling:  Beat together the butter, salt, sugar, flour, and almond extract.
Beat in the eggs, then add the almond flour, stirring just to combine.

To assemble the tart: Spread 1/3 the filling in the bottom of the crust. cover with peach slices, flat side down. Pour in the remaining filling and spread over the peach slices. Starting at the outer edge, place peach slices, thin edge down,pushing into the filling. Continue with more peach slices, until about half full. Fill in the remaining space to the center with raspberries, pointed side up, pushing down into the filling.

Bake the pie in the preheated 350 degree F oven for 35 to 40 minutes, until the top is lightly browned. Filling will puff up slightly around the fruit.  Cool slightly or completely before serving. 


Wednesday, May 27, 2020

Lots of Bread Flour So Fougasse


My favorite neighbor ordered a super sized bag of Sir Lancelot flour from King Arthur Flours. Since the smaller sizes of flour were out of stock, he figured that we could share and we did. He is most generous. This particular bread flour has wheat flour, unbleached, but also barley flour. It's a great bread flour, so I wanted to make bread as soon as he brought the bag over and left it on the porch.

He made bagels. I made fougasse, a leaf shaped bread that is a bit like focaccia. My original plan had been to knead in some chopped walnuts in half the bread dough, and knead in chopped mixed herbs into the other half of the dough, but I ended up just using a pastry brush to brush the top of each lightly with olive oil and then sprinkling on chopped fresh rosemary and then a sprinkle of coarse sea salt. Sweetie loved it that way!


This recipe makes four leaves, each about 10 inches on a side. Since the shape is a rough triangle, that gives you some idea of the size. I baked mine on parchment which was set on 12-inch pizza pans and that worked very well. You can also shape on parchment on a larger pan. You can shape it on parchment on a pizza peel, or, by adding some cornmeal under the dough to allow the dough to roll onto a pizza stone, shape it right on the peel. If not using a pan, bake on a preheated pizza stone.

I gave one loaf to a favorite relative for his birthday, and one loaf to the neighbor who gave me the lovely bread flour. Sweetie and I ate most of the first one on the day it was made, as part of our dinner. Our second one was baked four or five days later and enjoyed with a meal, too. Although this bread is delicious all by itself, it is also great dipped into a mixture of olive oil and good balsamic vinegar. Sort of gilding the lily, but so good.

You can bake the four loaves over time, or bake them all at once. I was using my toaster oven, so each baked by itself and two during each baking session seems right, but if you are using a full oven you may be able to bake all four at once. Just be sure to switch the pans out halfway through baking time...putting those on the top rack down and moving those on the lower rack up.

It's been pretty hot here for the last few days, so no baking going on at the moment, but I did enjoy local strawberries for the first time for breakfast. Stay safe and healthy dear reader.


 Fougasse with Rosemary and Sea Salt
Preferment:
1/4 teaspoon active dry yeast
2 cups lukewarm water (not hot), divided
2 cups bread flour, divided

Mix together 1/4 teaspoon active dry yeast, 1 cup lukewarm water and 1 cup bread flour in a bowl. Cover lightly and let sit for 1 hour. Add an additional 1 cup lukewarm water and and additional cup bread flour and mix until all new ingredients are incorporated. Let sit for at least an hour for flavor (or refrigerate overnight, then bring to room temperature).

Dough
all of Preferment
4 tablespoons olive oil, divided
1 cup water, divided
1/4 teaspoon active dry yeast
4 - 5.5 cups unbleached bread flour
2 teaspoons salt
2-3 tablespoons olive oil from brushing
1-2 tablespoons chopped rosemary
1-2 tablespoons sea salt for sprinkling

In the bowl of a stand mixer place the Preferment.  Add 3 tablespoons of the olive oil and mix briefly just until the oil is mixed in.

Make sure the water for the dough is lukewarm, not hot. Take 1/4 cup of it and add the dry yeast in a small bowl. Let sit 5 minutes until foamy.

Add the rehydrated yeast, the rest of the warm water, and about half the flour (2 cups) to the mixture in the stand mixer bowl. Mix with the paddle.

Switch to the dough hook. On slow speed add the remaining flour, a half cup or so at a time, adding only a few tablespoons at a time toward the end. The dough will be soft. Add the salt and then knead with the dough hook on low to medium low speed for about 6 minutes, until the dough cleans the sides of the bowl and is smooth. If necessary, add up to an additional cup flour so that dough is soft but firm. Turn kneaded dough out on a lightly floured board or counter and knead a few turn to make sure all flour is incorporated.

Form the dough into a ball. With the remaining tablespoon olive oil, oil a large bowl  and turn the dough ball in the oil to coat. Cover with oiled plastic wrap or a clean shower cap and place in a warm place and let rise until doubled in bulk. This usually takes a couple of hours, but check often. Dough is ready when a finger poked into the dough leave an indent that stays.

Shaping: About an hour before baking the fougasse, punch dough down, and turn the dough out onto a lightly floured board. Knead a few time to get rid of the extra trapped gas, and divide it into four pieces weighing about the same. Take one of the pieces and press it out into a leaf shape. Use your clean hands to press it to about 10-11-inches on a side and about 1/2 - 1-inch high. Wet hands if necessary so that dough doesn't stick. (I shaped it into a tall triangle.)

Place the shaped dough onto a piece of baking parchment which has been placed on a baking sheet. Using a bench scraper or stiff plastic scraper or something similar, cut into the dough to make leaf 'veins' - see photo at top of post. Use your fingers to gently spread out the dough to open up the cuts. Keep the leaf shape. Repeat if desired with the other pieces of dough, making four leaves, or store rest of dough, covered, in fridge, until ready to use.

Cover with lightly oiled plastic wrap, oiled side down, and let rise for about 30 minutes. Leaf will get puffy. If holes close up, gently open them again with your fingers after removing the plastic wrap.

While leaf is rising, preheat the oven to 425 degrees F. If you have a pizza stone, put it in to preheat too.

Use a pastry brush to lightly brush the surface of the leaf with olive oil, then sprinkle with rosemary and sea salt.

Bake in the preheated oven for 15-20 minutes until dark golden brown. Remove from oven, cool a bit on a wire rack after having removed it from pan and parchment. Serve while still warm, breaking off pieces of the leaf, or cutting into portions.

 To make focaccia instead of fougasse, follow this link

Saturday, May 23, 2020

Chocolate Lover's Brownies


If your really love chocolate, especially dark chocolate, you are going to love these brownies. The brownies themselves are almost velvety in texture, with an intense hit of chocolate and a hint of coffee, plus the pleasure of walnuts. The topping is deep, dark, rich ganache. The combination is every chocolate lover's dream.

Not surprisingly, these brownies use a lot of chocolate...not cocoa powder, but chocolate. I used Scharfenberger semisweet and bittersweet chocolates, combined because it's my favorite chocolate, but you should use your favorite because you really taste the chocolate in these brownies. These are nothing like you would find in a box of brownie mix. I actually love boxed brownie mix brownies, but these are richer and less chewy or fudgy. The addition of some espresso powder really brings out the taste of the chocolate without making them really taste of coffee. The original recipe called for cinnamon, but I do love the way that coffee intensifies chocolate flavor, so I left out the cinnamon and added espresso.

This recipe (minus the espresso but with cinnamon instead) is another discovery from old Bon Appetit magazines. It's been fun to see how recipes and what we are interested in eating has changed over the years. These brownies are from the February 2001 issue. This is a typical recipe for the time...very rich, and a bit time consuming because you have to chop all that chocolate and melt is over simmering water. These days they would probably say to use chocolate chips and to nuke the chocolate in the microwave to melt it, but I followed the instructions for technique, just to see how the brownies turned out. I have to say, it was worth the extra effort! Using top quality chocolate, even if it comes in blocks that need to be chopped, makes for better brownies. The photo below was in bright sunlight. The one at the top was in a dimmer room. The actual color is closer to the one below, but a bit darker.


Chocolate-Espresso Brownies with Chocolate Ganache
adapted from a recipe Feb 2001 issue of Bon Appetit magazine
Makes 16

Brownies
1/2 cup all purpose flour
1/2 teaspoon espresso powder (Original recipe used 1 1/2 teaspoons cinnamon instead)
1/8 teaspoon salt
6 ounces semisweet chocolate, chopped (I used 4 oz semisweet and 2 oz bittersweet)
Use your favorite chocolate since you really taste the flavor of the chocolate in these.
3/4 cup (1 1/2 sticks) unsalted butter, diced, at room temperature (I used non-dairy butter)
4 large eggs
1 cup sugar
1 1/2 teaspoons vanilla extract
1 cup walnuts, chopped

Ganache (Recipe follows)

Position rack in center of oven and preheat the oven to 350 degrees F. Generously butter an 8x8x2-inch metal baking pan; dust with flour. (I lined my pan with foil and then used spray oil and a combination of flour and cocoa powder to dust it.)

Mix flour, espresso powder and salt in a small bowl. Set aside.

Stir chocolate and butter in the top of a double boiler set over simmering water until melted and smooth. Turn off heat. Let chocolate stand over water...it will remain warm.

Using electric mixer, beat eggs and sugar in large bowl until mixture thickens and falls in soft ribbon when beaters are lifted, about 5 minutes. Beat in vanilla. Stir in flour mixture in 2 additions, blending well after each addition. Gradually add warm chocolate to egg mixture, beating until just combined. Stir in walnuts.

Pour batter into prepared pan. Bake brownies until top is set and tester inserted into center comes out with moist crumbs attached, about 35 minutes. Check at 30 minutes. Cool completely on a wire rack.

Pour ganache evenly over cooled brownies in pan.

Chill brownies until ganache is set, about 2 hours. Cut into 16 squares. If using foil in pan, use foil to remove brownies to cutting board before cutting into 16 squares. (Can be prepared 2 days ahead. Cover, chill. Serve at room temperature.)

Ganache
6 ounces semisweet chocolate, chopped
1/8 teaspoon espresso powder
3 tablespoons unsalted butter, room temperature (I used non-dairy butter)
2 tablespoons whipping cream (I used non-sweetened soy creamer)

Whisk all ingredients in small saucepan over medium-low heat until melted and smooth. Pour evenly over cooled brownies in pan.

Monday, May 18, 2020

Country Comforts - Polenta and Balsamic Mushrooms


With time on my hands, I've been going through bookshelves and throwing out what needs to be thrown out. One of the things I discovered were some old Bon Appetit magazines going back as far as 1991! Most of them are newer, with quite a few from around late 1999 and early 2000 when I was distracted by grief and probably never even read them. Perhaps that's why I saved them. Things have changed over the decades. Many of the recipes from the early 90s are very rich, with lots of sauces, including many with a lot of whipping cream. These were served with desserts with lots of chocolate and whipping cream. I'm glad that we have not gotten rid of the chocolate but moved a bit past so much whipping cream.

One of the recipes sounded really great, especially because we had a lot of mushrooms. Sweetie and I have been blessed with wonderful neighbors who ask what they can get us when they shop. That led to a double amount of fresh mushrooms through our miscommunication. Fortunately, we both love mushrooms! In making the Cottage Loaf, I had re-discovered the polenta in the extra fridge, so I knew that I could make the polenta.

In the recipe, from the October, 1991 Bon Appetit issue titled Country Comforts on the cover, the polenta was baked. It had a lot more dairy, including full fat sour cream (I substituted low fat yogurt and reduced the amount), lots of Parmesan cheese (I had none and Sweetie had a reduced amount) and lots of butter (again replaced with non-dairy and reduced in amount). I made it stove-top so that the mushrooms could take up the oven and it was just perfect. I re-wrote the direction for stove-top. If you make this with water, skip the yogurt and use plant-based butter and no Parmesan, it is a vegan meal.

The polenta is OK just a little salty since the mushrooms get a bit sweet with the roasting and the balsamic. It's a great combination! If at all possible, use fresh herbs. It makes a difference.

The recipe was found in an article on the Lark Creek Inn in Larkspur, CA, a pioneering restaurant, founded in 1989, which closed sometime in 2015. Who knows what magazine gems I'll find next.

Do try this delicious dish yourself. Except for prepping the mushrooms and stirring the polenta, it doesn't take much effort and the results are worthy of company...once we can have joint dinners again. In the meantime, make it for yourself...you are worth it!

Low-Dairy Polenta with  Thyme and Roasted Balsamic Mushrooms
A variation of a recipe from the Lark Creek Inn, Larkspur, CA

Polenta
1 3/4 cups water or chicken broth (I used broth)
1 teaspoon minced garlic
3/4 cup polenta (coarse cornmeal)
1/2 teaspoon salt
1/3 cup plain yogurt
4 tablespoons non-dairy butter
1/4 cup grated Parmesan (optional)
fresh thyme for garnish

Roasted Balsamic Mushrooms
6 garlic cloves, minced or thinly sliced (I used minced because that's what I had)
3 tablespoons olive oil
3 tablespoons balsamic vinegar or red wine vinegar
3 fresh rosemary sprigs or 1 teaspoon dried, crumbled
3 fresh thyme sprigs, or 1 teaspoon dried, crumbled
4 cups large fresh mushrooms, cleaned, dried, and quartered

Method:
Polenta -  Bring the water or broth and minced garlic to a boil in a large, heavy pot over medium-high heat. Pot will need a tight-fitting lid.

Gradually stir polenta into boiling liquid. Reduce heat to medium and cook 5 minutes, stirring constantly. Add 1/2 teaspoon salt and stir in. Reduce heat to simmer and cover. If needed, stir in hot water, a 1/4 cup at a time, to loosen mixture if it gets too thick to allow the grains to cook...up to a full cup extra water. Cook another 15-20 minutes , stirring frequently, until polenta is thickened and grains are tender (take a taste). Remove from heat and stir in yogurt and butter. If using, stir in Parmesan cheese and stir until melted. Season with salt and pepper as needed, to taste.

Spoon polenta onto plates or into shallow bowls. Garnish with thyme. Top with Roasted Balsamic Mushrooms. Serve at once.

Mushrooms - Preheat oven to 425 degrees F. Line 2 baking sheets with foil.

In a large bowl combine garlic, olive oil, balsamic vinegar and herbs. Add mushrooms and toss to coat. Season lightly with pepper. Toss again.

Arrange in single layer on prepared baking sheets. Roast until mushrooms are tender and slightly crisp on edges, 20 minutes or so. Serve over cooked Polenta.

Saturday, May 16, 2020

Bread Baking Babes Go Cottage Style


One of the side effects of the pandemic is that more people are baking bread...a good thing...and that yeast and flour are scarce...a not so good thing and probably a side effect of the first, good, thing. Fortunately I have some flours and grains stored in the fridge because today's challenge, brought to us by the lovely and talented Cathy of Bread Experience is to make a Early American Cottage Loaf, similar to ones that the pioneers, who settled America, would make. It uses a combination of grains.

Cathy says, "Since white flour is in short supply in a number of places, I thought using a mixture of grains would be more appropriate. Of course, things are changing daily.

Another thing I really liked about this cottage loaf is that it is made in a casserole dish which solves the problem of the top falling over.  However, that being said, after baking, my loaf stuck to the bottom of the dish so that’s something that needs to be mitigated if you go with the casserole dish.  I greased the dish really well, but I think it would benefit from some parchment paper on the bottom as well.

The mixture of grains gives it a wonderful flavor.  It was surprisingly very moist.  I enjoyed the sweetness, but I’m wondering if 3 tablespoons of honey may be a bit too much. " I used the full 3 tablespoons of honey and I think I would reduce it to 2 tablespoons next time I bake this loaf.


This is a delicious, fairly dense, moist loaf with a tight crumb and good flavor from the mixed grains. I used bread flour, white whole wheat flour, barley flour, flax meal, oats and the 2 tablespoons cornmeal, but mine was coarse corn meal...more like polenta. I left my dough to sit overnight in the fridge because it usually helps develop the flavors and because I wanted to bake it for dinner and that ship had sailed the day I made the dough. I used the dry yeast version, not the sourdough.

I served it, sliced and slightly re-warmed, with dinner on Wednesday, along with a chicken salad with lots of veggies. I also made a grilled chicken sandwich with it and that was excellent! It would make awesome French toast, too.

If you are new to bread making, just remember that because this has lots of grains and the uncooked oats, it will probably take longer than you think to rise. If you are looking for a loaf that has those artisan big holes, this isn't the recipe. If you are looking for a delicious, fairly healthy bread that looks great with that topknot and bakes up pretty within a casserole, this is one to try.

If you don't have wheat germ or flax meal or barley flour or any fancy flour, just go with bread flour and whole wheat flour and oats and corn meal and be sure to weigh the ingredients so that you can add the weight of the grains you left out, replacing them with one of the grains you are using. If you only have bread flour and oats, go with that, again using the full weight of grains in the recipe. I would definitely let the dough sit in the fridge overnight (with a light spray of oil on it to keep it from drying out, plus some plastic wrap. It will still be delicious with fewer grains. I suspect that there were times when the pioneer women and mountain men only had whole wheat flour and maybe a little corn meal. Have fun playing with this. As long as you keep the ingredients cool...no warmer than 110 degrees F...it will be hard to not have a wonderful Cottage Loaf.

If you bake this bread, please consider being a Bread Baking Buddy. Just send your URL, along with a photo and a short description of your bake, to Cathy. Her post also has some great photos showing how to shape and attach the top knot of dough. Check it out! Deadline is May 30th.

Also, please check out the other bakes that the Bread Baking Babes have done. Happy Baking!

Aparna - My Diverse Kitchen HERE
Kelly - A Messy Kitchen HERE
Karen - Karen's Kitchen Stories HERE
Elizabeth - blog from OUR kitchen HERE
Judy - Judy's Gross Eats HERE
Tanna - My Kitchen in Half Cups HERE

I'll add more as they post over the next few days.


Early American Cottage Loaf - Yeast version

Pioneers blended grains available to produce breads with interesting texture. These wholesome, unusual shaped loaves were baked in cast iron pots in the cottage fireplace. We can use the oven and a casserole dish or cast iron pot...easier!


Ingredients:

Yeast Version:

1¼ cups water
2 TBSP oil (I used olive oil)
3 TBSP honey
2¼ cups (286 grams) bread flour 
1 cup (120 grams) whole wheat flour (I used 90 grams white whole wheat flour and 30 grams barley flour) 
1½ tsp salt
2 TBSP wheat germ (I used an extra 2 tablespoons whole wheat flour instead)
¼ cup (30 grams) oat or wheat bran (I used ground flax meal)
¼ cup (30 grams) oatmeal (I used quick oats)
2 TBSP corn meal
1-½ tsp instant dried yeast 

Note: You may need to add more flour depending on the coarseness of your flour.


Sourdough Version:
120 grams sourdough starter, fed & active (or create a levain the night before with a tablespoon of starter + 50 grams flour and and 50 grams water to equal 120 grams and let it ferment overnight)
220 grams water
27 grams oil
63 grams honey
226 grams all-purpose or bread flour
120 grams whole wheat flour
9 grams salt
14 grams wheat germ
30 grams rolled oats (old fashioned)
30 grams oat or wheat bran
15 grams corn meal

*The method is the same for sourdough except you would add the sourdough with the wet ingredients and give it a longer ferment.
Method

In a large bowl, whisk together the dry ingredients, including the dried yeast and salt. 

In a separate container, mix together the water, honey, and oil.  Pour the wet ingredients over the dry ingredients and mix until thorough combined.  Knead until smooth and elastic.

Cover. Let rise 45 min to 1 hour; perform stretch and fold; then let rise an additional hour.  Perform the ripe test. 

Turn dough onto lightly floured surface; punch down to remove air bubbles. Cut off 1/3 piece of dough. Let dough relax for 15 minutes.  

Shape each section into a round ball. Place larger ball in greased 2 ½ -quart casserole or soufflé dish. Using a sharp knife or lame, cut a cross, about 1 ½ inches across, in the top of the larger piece of dough.  

Brush the surface with water and then place the smaller piece of dough on top. Press through the center of both pieces of dough using the handle of a wooden spoon or your finger.  

Cover; let rise until indentation remains after lightly touching dough.

Just before baking, stick handle of wooden spoon or finger into hole again.  And, using a sharp knife or lame, make 8 long slashes around the top and 12 smaller slashes around the bottom of the loaf. (I used fewer slashes and it turned out fine.)   

Bake in preheated 375°F oven 35 to 40 minutes. Remove from dish; cool on rack.

Note: You can substitute Instant (fast-rising) yeast for Active Dry Yeast. Traditional methods- replace 1:1. Expect your dough to rise faster; always let your dough rise until ‘ripe’. Bread Machines- use ½ tsp Instant yeast (or ¾ tsp Active Dry yeast) per cup of flour in your recipe.


Monday, May 11, 2020

Cookie 'Fries' Virtual Baking Party


Last Friday I had the pleasure of being part of a virtual baking party with our daughter and Raine in their Southwest kitchen and me in my kitchen here in Northern CA. We used FaceTime on our phones to connect and we each made the dough in advance so that it could chill. That meant that the baking party was really the cutting of the dough and putting the 'fries' onto the baking sheets and the baking. Then I enjoyed a few of the cookies on Sunday when I had a virtual tea party with our daughter to celebrate Mother's Day.

I found the recipe online and it is one from Disney World in Florida. The concept is that the cookies are like French fries, only sweeter and with mini-chocolate chips and they are cookies and not potatoes...so a strange concept, really. You serve them with sweet dipping sauces like chocolate fudge sauce and raspberry or strawberry jam and marshmallow cream. I didn't bother to have those ready since I was just going to eat them plain, but it turns out that the cookie fries themselves are pretty bland and are much tastier with embellishments.  Raine suggested ice cream and after we finished the baking party they had dinner and then used the cookie fries to make a delicious dessert with vanilla ice cream, chocolate sauce and some raspberry jam made by a neighbor.

These cookies are pretty easy to make. You mix the dry ingredients with soft margarine, then add warm water, egg substitute and molasses. Once the dough is mixed you fold in mini chocolate chips. I put my finished dough into a foil-lined 8-inch by 8-inch baking pan which I had sprayed with baking spray. I'm glad I did because otherwise I'm not sure I would have gotten the dough cut into anything like fries. As it was, the dough was too soft even after hours of chilling, and so my fries were more like batons with curved edges. Next time I would cut the water by a tablespoon or two. Also, be sure to sift the dry ingredients, including the powdered sugar. I didn't and I think that was a mistake because I had to beat the ingredients longer to mix, not a good idea for a cookie because it makes them tough. The directions are mine, taking this into consideration. You might want to consider making some of the liquid,maybe 1/4 teaspoon, vanilla extract. 1/4 teaspoon salt added to the dry ingredients would not go amiss, either.

These were a fun project to do with Raine, but I think I'd rather have my classic Toll House chocolate chip cookie next time. Your kids or grandkids will love these, especially if you have lots of dipping sauces!

Disney's Chocolate Chip Cookie 'Fries'

2 3/4 cups all-purpose flour
1/2 cup + 1 tablespoon powdered sugar
1/2 cup + 1 tablespoon margarine, softened
7 tablespoons (try 5 or 6) warm water
5 tablespoons egg substitute (more than 1 egg and less than 2 if you are using real eggs, beaten)
1 tablespoon molasses
1/2 cup mini chocolate chips

Combine flour and powdered sugar and sift into a stand mixer bowl. Add the softened margarine and mix on medium with paddle, until smooth.

In another bowl combine the warm water, egg substitute and blend. Add the molasses and blend. Add liquid mixture to dough and blend with paddle, until smooth. Run mixer as little as possible. If starting with less water, you can add water, 1 tablespoon at a time, if needed. You want a stiff but not crumbly dough.

Fold in the chocolate chips.

Line an 8-inch by 8-inch baking pan with foil. Spray with baking spray. Add the dough and press to smooth into an even layer. Chill in refrigerator for at least 30 minutes.

Preheat oven to 325 degrees F.

Line two baking sheets with parchment paper, silicone mat or greased foil.

Remove dough from pan and cut into sixteen 1/2-inch wide strips. Cut each strip in half. Dough strips are now 1/2-inch by 4-inches. Place an inch apart on prepared sheets.

Bake 20-22 minutes until crunchy.

Serve with sweet dips.

Saturday, May 09, 2020

Onion Tart with Freeform Puff Pastry


Had a wonderful FaceTime visit with our daughter yesterday...and baked something "together" which I'll post about later. One of the thing that struck me is that she uses 'quarentime' to describe the times we are living through right now. It often does feel like a different version of time than what we had before. I've started writing down on a calendar which days I wash my hair and do the laundry and things like that because one day is so like another that sometimes it's difficult to remember how many days ago I made a salad for dinner vs steamed broccoli, or which days we walked the dog in town and which we didn't. Yes, my mind is getting older, but before quarentime I could remember how many days ago I washed my hair.

Because our meals are usually pretty banal, I've decided that every once in a while I need to make something special. The onion tart I baked a few days ago is an example. In non-quarentimes I used to save it for taking to a dinner party as the appetizer or using it for a dinner party here for the same purpose. Having it for a weeknight dinner, with a nice big serving of plain freshly steamed asparagus (because fresh asparagus don't really need any dressing up!), was fun and unexpected. Still can't remember which weeknight it was, but I think it was Tuesday.

The difference between this tart and others is that I decided to go with an unsupported, freeform puff pastry shell and I cooked the onions in a cast iron skillet over low heat instead of roasting them in the oven. I think it made for a more evenly cooked onion filling, although it was a bit wetter, which was hard on the pastry. Next time I'll reduce the wine a bit. I also used non-dairy ricotta cheese instead of yogurt and I really like the cheese better. And....it has bacon! Who can resist a tart with caramelized onions and bacon?

Hope that you and yours are staying safe and healthy!


Onion Tart with Freeform Puff Pastry


3 slices bacon, cut crosswise into 1/2-inch pieces

1 sheet frozen puff pastry, thawed
egg wash of 1 egg white and 1 teaspoon of water, whisked together

1/4 cup honey
1/4 cup dry white wine
1 large yellow onion, peeled, halved and thinly sliced
Nonstick vegetable oil spray

1/2 cup ricotta cheese (I used a non-dairy ricotta by Kite Hill)
1/2 teaspoon fine sea salt
1/8 teaspoon freshly grated nutmeg
1/4 teaspoon dried thyme
Few sprigs fresh thyme leaves


Cook bacon in small skillet over medium heat until brown and crisp. Position rack in top third of oven and preheat to 375 degrees F while bacon is cooking. Transfer crisp bacon to paper towels to drain. Reserve 1 tablespoon bacon drippings from skillet.

Roll out the thawed puff pastry on a lightly floured surface to a 10-inch by 10-inch square. Use a sharp knife to cut 1/2-inch strips from each edge. Transfer large pastry square to a parchment-lined baking sheet. Use a pastry brush to brush a very light, thin strip of the egg wash onto the edges of the puff pastry square. Stack the 1/2-inch strips on top, cutting as needed, so that they line just inside the edges of the puff pastry square. Dock the inside of the square by gently poking with the tines of a fork all over. Chill for at least 20 minutes in the freezer. Then brush the egg wash over the thin strips on the edge of the pastry and bake in the preheated oven until light golden brown, about 8 minutes. Set baking sheet with pastry aside on a wire rack to cool.

Whisk honey, wine and reserved 1 tablespoon bacon drippings in large bowl. Add onions; toss to coat. Put into a heavy skillet (cast iron is wonderful!) over low heat and cook, stirring often, until mixture is light golden brown. Cool mixture to room temperature. (At this point, and without leaving the oven on, you can refrigerate the onion mixture, then bring it back to room temperature the next day for the baking part if you prefer to do it in two parts.)

Increase oven temperature to 400 degrees F. Return baked puff pastry shell to work area.


Mix ricotta cheese, sea salt, nutmeg and dried thyme in small bowl. Using offset spatula, spread cheese mixture over crust  to the edge pastry. Arrange onions atop cheese layer. Sprinkle with bacon. Bake tart until crust is medium golden brown and topping is bubbling, 20 to 25 minutes. Check at 15 minutes to make sure that crust isn't over browning. If it is, put strips of aluminum foil over the crust sides to shield until topping is done. Onions will have some very dark brown strands. Sprinkle with fresh thyme and serve.


Makes about 6 appetizer servings.

Thursday, May 07, 2020

Say It With Flowers


It's going to be Mother's Day soon, one of the most popular days to give and receive flowers. I'm fortunate that this year I already have lots and lots of flowers.

Most of the roses were gifts, so those are especially enjoyed. For my birthday my California sister gave me a Chihuly rose, named after the glass artist par excellance  from near Seattle. It blooms with a soft yellow interior, with petals edged with coral. As it matures, the yellow lightens to cream and the edges become closer to fluorescent pink. It's the rose in the photo at the top of the post.


 My dear niece from Sacramento gave me a Christmas present of a beautiful floribunda rose which is white with rosy stripes and very joyful. It's like having a whole bouquet at once.


Last year for my round number birthday my older brother NoHandle gave me a rose called Just Joey which is a lovely apricot color and very elegant in shape. When fully open it reminds me of a fancy party dress in shades of apricot from pale to intense. Since he is gone now, it will always be a link to my brother, as long as it lives.


My Sacramento area sister gave me, at the same party, a Mister Lincoln rose, which was my Mom's favorite. It's a deep red and also an elegant tea rose. Right now that one just bloomed and it's gorgeous! Below is how it looked in the bud stage in early morning light.


Twenty years ago the school district where I was a board member gave me a shrub rose that has delightful red and white striped flowers with a strong rose scent, called Scentimental. The photo is above. It's a floribunda, too and it's still doing well all these years later and is in full bloom now. I have other roses, but these have special meaning because they were gifts. Have you received rose plants as gifts? Want to share which roses they are?