Saturday, June 13, 2015
Repetition Can Be Good At Dinnertime
After I had been blogging a while, but still a long time ago, I decided that one use of this blog was as a digital recipe file and that I would avoid putting up recipes that I had made before. Now that I've been blogging well over eight years, and because I have not been very good at keeping the index up, now and then I do repeat a recipe that I love and cook over and over again.
One of these is the recipe for a creamy and easy to make cole slaw dressing, especially at this time of year since cold salads of all kinds are a staple. Toss it with some finely chopped cabbage and shredded or grated carrots and you have a fine dish to take to a pot luck, put over pulled pork, or enjoy with almost any grilled poultry or meat. The link to that recipe is HERE.
Speaking of salads, I don't really blog about those because I don't consider salads to be recipes. The amounts of ingredients I use vary depending on what is in the garden and in the crisper...and my mood. Because of my restricted diet we almost always start with either Romaine or iceberg lettuce, or both. After that I toss in carrots, snow peas, cucumbers, red pepper, squash, celery, hard cooked egg, cooked chicken, tuna, left over cooked beef, left over salmon, various nuts, flax seed, various cheeses, croutons, bacon, tomato, avocado, beans...in any number of combinations. Dressings vary, too. Rarely I'll add leftover broccoli or peas or corn. The best salad is fresh from the garden tomatoes, sliced, then sprinkled with a little balsamic vinegar and a little good olive oil, with a grind of pepper over it all being the finishing touch. Anyway, if you would like a salad recipe posted when I make them, let me know.
A recipe that I almost never think about, but then get a sudden yen for is the one which combines beef, mushrooms, onions and stout. I first made it with Guinness, but there are lots of new stouts in the market, so I vary which one I use now. This last time I made it, last week, I skipped the pastry topping and it was still delicious, especially since I served it over mashed potatoes and the leftovers over noodles. The recipe is HERE. The photos from the last time are at the top and below. Seeing the photo makes me want to cook it again. By the way, it's one of those recipes where it helps to make it the day before you eat it and let the flavors mellow in the fridge, but then the leftovers get better and better, too, each day that passes, for about 4-5 days.
Do you have a recipe you turn to over and over? If it's from this blog, let me know which one and I'll post it again. That is the one thing I do wish might happen now and again...folks letting me know if they have tried one of the recipes and how it turned out. That's what the comments section is for, in part, although I do love comments from y'all about the post...or yourself.
XO, Elle
Thursday, June 11, 2015
At Last
Yesterday was exactly three month since my cataract surgery on the second eye and a day past 16 weeks since the first cataract surgery. During those 16 weeks I couldn't really drive due to double vision, which is usually corrected with glasses. At first it was because I was healing from the surgeries, so no glasses could be ordered. It takes a little while for the eyes to get to the point where the eye doctor will write a prescription. I had figured on about three weeks for the glasses to be produced but instead they had to be sent back a number of times, so it ended up being 9 weeks on top of all those weeks of healing! Poor Sweetie had a lot of extra driving to do, even though I curtailed my social schedule a lot on optional visits and events.
At last the glasses I tried on this Monday were correct. Not perfect, but correct enough for driving and general wear. Not as good on the close work, but I have readers and, frankly, couldn't imaging sending them back again. The optometrist was probably even more upset than I was and did a terrific job of nagging the lab, but apparently the lab had new people who messed up, trouble with machines breaking and terrible quality control. The optometrist has switched now to a new lab for their current and future orders, thank heavens.
So here they are. They look exactly like my old ones. The new frames I picked out were part of the production problem, so the gave me, no charge, frames like my old ones, plus my old frame to keep (which is unusable because we messed up the screw area when we removed one of the lenses after the first surgery so I could use them for the other eye. Sorry if that doesn't make sense, but trust me, it's all good.
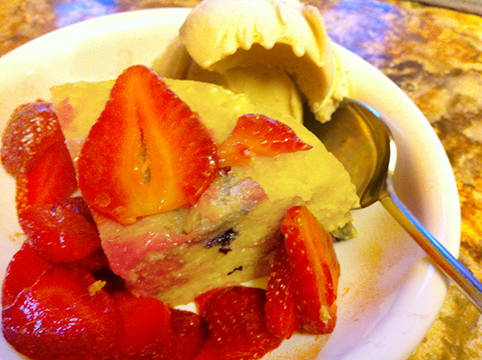
To celebrate I went to lunch and a movie with my good friend Barbara. Saw a sweet flick called 'I'll See You In My Dreams' about friendship, love, loss and karaoke. On the way home I though about all the lovely berries and apricots in the kitchen and decided to see if I could adapt the 5 Minute Chocolate Mug Cake to a vanilla cake with fruit. A surprise for Sweetie for dessert, right?
First I helped him with fitting and securing the second new post of the front porch, then watered a couple of plants in the garden which were wilting in the heat despite the overnight and early morning light rain (rain in June...so unusual for us), and checked out the color of the stain I'll use on the whole porch once the new section is installed. The new stuff will replace the 30 year old deck that has led to the old front porch since before we moved in. The joists underneath are dry rotted here and there, too, so it will probably be some time in July before all that stain goes on.
Finally I was able to get in the bake center and make the cake. Amazing how quickly it all went together. I diced an apricot and some strawberries into a small dice and added a handful of blueberries to the mix, then measured and stirred the dry ingredients and sprinkled some of that over the fruit and tossed it a bit. In another bowl I whisked together egg, oil and milk then added a splash of vanilla. The fruit was tossed into the dry ingredients, the wet mixture went on top of that and it was all stirred together with a fork. That batter went into a Pyrex bowl which I had buttered lightly. The bowl went into the microwave (on high) for five minutes.
That's it! Turned it out to cool, added sliced strawberries when it was time to serve and added scoops of vanilla soy ice cream to the bowl at the last minute. Delicious! You couldn't really taste the apricot because the blueberries and strawberries were more dominant flavors. The cake was a moist sponge and went perfectly with the fresh berries and ice cream. I'm going to try this again with other flavors. Sweetie had two servings, so I know 'he who doesn't like cake' will eat it anyway...and enjoy it.
5 Minute Apricot Berry Mug Cake
A variation of a recipe from Don
Fulton
Serves 1-2
Serves 1-2
(I doubled the recipe and cooked
it in a Pyrex bowl big enough that the mixture didn't go over the sides,
although it did reach the top edge during baking...then settled down to about
an inch below the edge)
4 tablespoons self-rising flour
4 tablespoons sugar
1/8 teaspoon orange zest
4 tablespoons self-rising flour
4 tablespoons sugar
1/8 teaspoon orange zest
dash ground nutmeg
dash salt
1/2 apricot, diced small
1/4 cup strawberries, washed and diced small
1 egg
3 tablespoons milk
3 tablespoons oil
a small splash of vanilla extract
1 large coffee mug
Add dry ingredients to mug, and mix well. Sprinkle some of the dry ingredients over the fruit and toss lightly. Add to the dry ingredients. Mix together in another bowl the egg, the milk and oil and mix well. Add the vanilla extract, and mix again. Pour the wet mixture into the dry mixture and mix well. Pour the batter into a lightly buttered large mug.
Put your mug in the microwave and cook for 3 minutes at 1000 watts (high). (If doubling the recipe as I did, use a larger container and cook for 5 minutes on high.) The cake will rise over the top of the mug, but don't be alarmed! Allow to cool a little, and tip out onto a plate if desired.
EAT! (this can serve 2 if you want to feel slightly more virtuous). And why is this the most dangerous cake recipe in the world? Because now we are all only 5 minutes away from apricot berry cake at any time of the day or night!
I served the cake in bowls with lots of sliced fresh strawberries and a small scoop of ice cream, but the cake all by itself is delicious!
The photo suffers from being taken at night, but I wanted you to see the inside to see how moist and spongy it is.
Labels:
apricot
,
fresh strawberries
,
mug cake
,
quick dessert
Wednesday, June 10, 2015
Spring Berries In A Cobbler
The blackberries are going to be amazing in about a month. The flowers are larger than usual and there are four or five times as many as most years. I might even make enough blackberry syrup to keep for the winter.
Right now we are enjoying the berries of spring which are either olallieberries or boysenberries or another similar berry. The vine grow down by the road and are mixed in with grape vines and mint, so picking them mean peeking under grape leaves as well as berry leaves and then a sudden rush of mint smell when mint leaves are bruised either underfoot or because they are in the way of nabbing that perfect, large, ripe berry nearby.
These berries are a dark raspberry red when ripe, the juice sacs are large and they come easily off the vine when ripe and don't leave any part behind like raspberries do. They tend to be a bit tart, even when very ripe. Last week I made a nice cobbler with a couple of freshly picked pints of them. It really is easy to make a cobbler, especially with fruit that has a lot of juice. The basic method is to bring the fruit to a boil, usually in the oven, then place dollops of cobbler batter over the hot fruit. The topping bakes into something closer to biscuits than dumplings, but the part where the batter sits on the fruit soaks up some of the juices as it cooks while the top of the cobbler gets nice and golden brown. You may want to taste the fruit before starting the recipe. If it's too tart you add some sugar at the beginning of cooking so it melds with the fruit by the time you top with the cobbler batter.
Fruit Cobbler
2 pints fresh berries, rinsed and drained
2 tablespoons all-purpose flour
Sugar to taste
Shortening or spray oil for greasing the baking pan
1/2 cup all-purpose flour
1/2 cup self-rising flour
1/4 teaspoon salt
3 tablespoons brown sugar
1 - 1 1/4 cups buttermilk
1/4 teaspoon almond extract
1 stick (1/2 cup) cold butter
Optional- sanding sugar and / or sliced almonds to top cobbler batter.
Preheat oven to 400 degrees F. Grease a 9x9-inch baking pan. Set aside.
Pick through the berries, discarding any that are falling apart or moldy.Put the berries in a large bowl and sprinkle with the flour and with any sugar being used to sweeten the berries. Toss gently with clean hands.
Put the berries in the prepared baking. Cover pan with foil and bake in oven until fruit is hot and released juices are bubbling, about 15 minutes.
While fruit is baking, in a large mixing bowl combine the flour, self-rising flour, salt and brown sugar.
In a smaller bowl combine the buttermilk and almond extract.
Cut the butter into about 10 pieces, then work the cold butter into the flour mixture with a pastry cutter, two knives, of your clean fingers. Worked mixture will have mostly very small particles of flour/ butter with some slightly larger, dried pea sized bits of butter. To this mixture add the buttermilk mixture, stirring quickly with a fork, just until liquid is absorbed. You should have a soft dough. Add a little more buttermilk if you still have dry flour mixture in the bowl.
Remove the hot fruit from the oven and remove and discard the foil. Place dollops of the cobbler over the surface of the hot fruit. If desired, sprinkle with sanding sugar or sliced almonds.
Return baking dish to hot oven and bake until cobbler is golden brown, about 12 - 15 minutes.
Cool on a rack at least 10 minutes. Fruit will be very hot! Serve warm or at room temperature. Garnish if desired with cream, custard, whipped cream, or ice cream.
Labels:
blackberries
,
cobbler
,
olallieberries
,
summer berries
Saturday, June 06, 2015
Black Rice Salad With Cherries And Snow Peas
At first there is something a bit forbidding about a bowl of black rice salad. It is so dark and mysterious looking and if you are not familiar with black rice it doesn't even look that tasty. Add to that the legend that it used to be forbidden rice...available in China only to the elite. It's a wonder anyone eats it.
If you do, you will know that this is a first rate dish. The rice is nutty tasting and it goes so well with the bright citrus notes of the lime and orange, with the sweet cherries, the delicate snow peas and the crunch of sliced almonds. It's an unusual combination, but delicious. I added grilled chicken, cut into bite sized pieces, to the salad to make it even more of a main dish. Sweetie at two portions and not just to get more chicken.
Surprise your family with this dish or take it to a pot luck or picnic. If you leave out the chicken it can sit at room temperature for quite a while. Black rice can be found at Costco according to a friend, or I/m pretty sure you can buy it at Trader Joe's. I've had my bag of rice a few years and I got it there, so it's likely they still have it. You can absolutely buy it on Amazon. This recipe makes enough for a crowd, but it keeps well, too, so it can make a couple of meals if your numbers are smaller.
So whats with the photo at the top? Well, I forgot to take any photos of the rice dish, so you get to see my photo from last week's trip to the redwoods. The photo below is from my 2012 post of a similar rice dish. Pretend that you see cucumber moons, snow peas and sliced almonds instead of celery, OK?
Serves 6 - 8
Rice:
3 1/2 cups water
2 cups black forbidden rice
1/4 teaspoon ground ginger
1/8 teaspoon dried orange zest or fresh orange zest
a few drops orange oil (skip if you use fresh orange zest)
2 teaspoons kosher salt
1 tablespoon olive oil
2 tablespoons finely chopped Italian parsley
1 green onion, sliced, white part only
3 1/2 cups water
2 cups black forbidden rice
1/4 teaspoon ground ginger
1/8 teaspoon dried orange zest or fresh orange zest
a few drops orange oil (skip if you use fresh orange zest)
2 teaspoons kosher salt
1 tablespoon olive oil
2 tablespoons finely chopped Italian parsley
1 green onion, sliced, white part only
1 small cucumber, peeled if peel is tough, cut into thin half moons
6 oz fresh cherries, pitted and halved
2-3 oz. fresh snow peas, ends trimmed and cut into 1-inch pieces
2 chicken breasts, grilled and cut into bite sized pieces (optional)
1/3 cup sliced almonds
6 oz fresh cherries, pitted and halved
2-3 oz. fresh snow peas, ends trimmed and cut into 1-inch pieces
2 chicken breasts, grilled and cut into bite sized pieces (optional)
1/3 cup sliced almonds
Dressing:
1/4 cup Champagne vinegar
1/4 cup olive oil
3 tablespoons honey
2 tablespoons fresh lime juice
1 tablespoon soy sauce
1 teaspoon grated lime zest
Directions
For the rice: In a medium saucepan, bring the water, rice, ground ginger, orange zest (and orange oil if using) and salt to a boil over medium heat. Reduce the heat to a simmer , cover the pan, and cook until the rice is tender, about 30 minutes. Remove the pan from the heat and set aside for 5 minutes. Fluff with a fork and place in a large serving bowl. Let cool to barely warm.
Add Italian parsley, green onion, cucumber, cherries, snow peas and
chicken breast pieces (if using) to the
serving bowl with the cooked rice. Stir to combine.
For the dressing :
In a medium bowl, whisk together the champagne vinegar, oil, honey, lime juice, soy
sauce and lime zest until smooth.
Pour the dressing over the rice and cherry
mixture and toss gently to combine. When
ready to serve, stir in the sliced almonds. Serve warm or at room temperature.
Labels:
black rice
,
cherries
,
cucumbers
,
forbidden rice
,
ginger
,
green onions
,
lime
,
orange
,
sliced almonds
,
snow peas
Saturday, May 30, 2015
Fruit Tart Season Is Here
I'm not a huge fan of summer, but one of the things that warmer weather brings are tarts with all sorts of fruit toppings.
It's been more than a week since I made one that had fresh apricots and cherries on top, but the memory of how delicious it was lingers. The crust uses olive oil and it was nicely crisp and flavorful. The fruit was wonderful and both had softened to tenderness. The topping was too sweet, so next time I"ll reduce the sugar quite a bit. I may lose a bit of the sugary crust that makes a nice textural contrast to the soft fruit, but the fruit flavors will shine more without the extra sugar making them taste more like candy than fruit.
We are just starting to get ripe ollaliberries down by the road, so I think the next time will be apricots and ollaliberries, with maybe some strawberries thrown in. It won't be too long before we have plums and other stone fruit that would be wonderful with this tart. The recipe was one I found online at Food52 via Facebook. The recipe is by Amanda Hesser and I think the topping (as a concept) is brilliant.
Peach (or
Apricot-Cherry) Tart
from Food52 blog, Amanda Hesser
Makes one
11-inch tart; serves 8
·
1
1/2 cups plus 2 tablespoons all-purpose
flour
·
3/4
teaspoon kosher salt
·
3/4
cup plus 1 teaspoon sugar (or less)
·
1/4
cup vegetable or canola oil (I used Meyer lemon olive oil instead)
·
1/4
cup mild olive oil
·
2
tablespoons whole milk
·
1/2
teaspoon almond extract
·
2
tablespoons cold, unsalted butter
·
3
to 5 small ripe peaches, pitted and
thickly sliced (about 1/2-inch wide) (I used apricots and cherries)
1. Heat the oven to 425 degrees. In a mixing bowl, stir
together 1 1/2 cups flour, 1/2 teaspoon salt and 1 teaspoon sugar. Stirring
enables the salt and sugar to sift the flour, so you don’t need to sift it in
advance. In a small bowl, whisk together the oils, milk and almond extract.
Pour this mixture into the flour mixture and mix gently with a fork, just
enough to dampen; do not over work it. Then, transfer the dough to an 11-inch
tart pan (you can use a smaller one if needed), and use your hands to pat out
the dough so it covers the bottom of the pan, pushing it up the sides to meet
the edge. This will work if you pat firmly and confidently, but not if you curl
your fingertips into the dough. It should be about 1/ 8-inch thick all around;
trim and discard excess dough.
2. In a bowl, combine 3/4 cup sugar (I would only use 1/2 cup and if the fruit is very sweet, 1/3 cup), 2 tablespoons flour, 1/4
teaspoon salt and the butter. (If your peaches are especially juicy, add 1
tablespoon additional flour.) Using your fingers, pinch the butter into the dry
ingredients until crumbly, with a mixture of fine granules and tiny pebbles.
3. Starting on the outside, arrange the peaches overlapping in
a concentric circle over the pastry; fill in the center in whatever pattern
makes sense. The peaches should fit snugly. Sprinkle the pebbly butter mixture
over top (it will seem like a lot). Bake for 35 to 45 minutes, until shiny,
thick bubbles begin enveloping the fruit and the crust is slightly brown. Cool
on a rack. Serve warm or room temperature, preferably with generous dollops of
whipped cream.
Labels:
apricot
,
cherry
,
fruit tart
,
Meyer lemon olive oil
,
olive oil
Wednesday, May 27, 2015
Birthday Greetings
If you have been reading this blog for any length of time you know that I like to celebrate birthdays. It is the day that the world welcomed a new person. Today, many years ago, the world welcomed my Mom as that new person. This is the first birthday where she won't be in the world to celebrate with us, cards lined up on the mantle, strawberry shortcake with candles, smiles all around.
Still, there is another tradition for celebrating those who have passed into the next life. A toast is raised (often with Irish Mist or Irish whiskey) to the person. Since her family and friends are spread out over a long distance, the toast follows the sun across the sky. I'll be toasting Mom at 5 pm my time, probably gazing over her favorite view from the back deck. Since at least some of you know her and some of you have read about her here, you are welcome to join the celebration.
I had hoped to write a tribute to go along with the invitation, but I'm finding it hard to keep from sobbing. Too little time has passed since she died to make it easy to write about her.
Know that she was an amazing woman, she brought amazing people into the world as a mother, she loved them and their partners and children and grandchildren well, and loved her own Dad, Mom, brother and sisters and cousins well, she contributed to her community and church, and loved my Dad most of all. Guess that isn't too bad of a tribute after all.
Happy Birthday Mom!
Monday, May 25, 2015
Pizza In A Hurry Without It Being Takeout
Facebook can really be interesting. One of the unsolicited things I found there recently was a link to a site (Chef's Toolbox) that showed how to make pizza on the stove top. Since my sound wasn't turned on I probably missed some vital information and definitely missed what pan they were using, but I still decided to try the recipe the other day for lunch.
One of the things I noticed was that the pan had a lid which sealed the contents, but could also be vented. I happen to have a wide and shallow waterless cookware pan which I've had for over 40 years. It no longer has a handle, nor a handle on the lid, but it still works well for a sealed environment. Since it is not non-stick, I sprayed olive oil spray on the bottom and sides. Good thing, too, because I had to un-stick some of the cheese topping in order to get it out of the pan for cutting.
Because I was having to use oil spray, I couldn't mix up the crust in the pan as they did on the video. I mixed it in a bowl, then plopped it in the pan and spread it. Poor idea. Next time I'll turn it out onto a floured board, knead it enough to roll it, then roll it thin. The part I liked the least was the thick crust.
Because I always have baking ingredients on hand, it was easy to throw together the crust ingredients. I did have to search my pantry for a bottle of pasta sauce before I began, but I did have some. The fridge yielded fresh mushrooms (which I sliced), shredded mozzarella and Parmesan cheeses, and sliced turkey pepperoni. The spice cupboard had dried basil and oregano. OK, ready to go.
Into a medium bowl I put the following ingredients, then stirred them together:
1/2 cup self-rising flour
1/2 cup all-purpose flour
1 rounded teaspoon dry yeast (use the rapid rising kind if possible)
pinch salt
1 teaspoon honey
2/3 cup warm water
Then I put that mixture into the oiled and heated pan. Burned my finger trying to spread out the dough. As mentioned above, next time I'll have a rolled thin dough to put into the oiled pan.
The dough was quickly topped with about 1/4 cup pasta sauce, 10 or so slices pepperoni, all the mushrooms, a small handful of mozzarella and a little less Parmesan. About 1/4 teaspoon each of the dried basil and oregano finished it off. I put on the lid, increased the heat for a minute to create the seal, reduced the heat to low and let it cook 5 minutes.
Then I removed the seal, set the lid, slightly ajar, over the pan and cooked it for another 5 minutes. The recipe called for 10 minutes, but I was worried about a burned crust. Turns out I should have left it cooking another 2-3 minutes because the crust was still a bit uncooked. Still the flavors were delicious and it was nice and hot with melty cheese!
Used a large spatula to remove the whole thing to a cutting board, then cut it into 6 pieces. That was lunch for Sweetie and I, along with some fruit and salad. Very tasty for something that took less than 1/2 hour.
You can top it with anything you desire, just like any pizza. This is a fine thing for those days when it is too hot to use the oven, although I suspect that using the grill and a pizza stone would be even better and still not heat up the kitchen.
Saturday, May 23, 2015
Short and Sweet Orange Cranberry Shortbread
There are cookbooks that are on my shelf which go unused for a long time and then I suddenly notice them and decide to make a recipe from them. That happened this week with a great little book Short and Sweet, by Melanie Barnard. I was looking for something else and spotted it, then fell in love with the shortbread cookie recipe.
The recipes are all pretty quick and many also have limited ingredients. The one I chose, Cranberry Orange Shortbread, met both of those criteria. Because you met the butter you can decide to make this at a moments notice...no softened, room temperature butter needed. I melted the butter in a large microwave safe bowl and finished making the batter in that bowl, but the recipe actually calls for melting the butter in a saucepan and finishing the batter in that. Either way you have quick clean up as well as the quick recipe.
Freshly grated orange zest is aromatic so these cookies smelled nice even before they baked. I was worried that it would be difficult to remove them from the pan because it's un-greased and the cookies are fairly thin, but they came out in one piece and I used a long bread knife to cut them into squares.
These cookies are not too sweet, perfect by themselves, with coffee or tea, or even on the side of a dish of ice cream. The texture is crisp and a bit sandy as a shortbread should be. The total time from start to finish is less than an hour. Hard to do better than that for a nice fruity cookie, right?
Cranberry Orange Shortbread Bars
Makes 16 cookies
8 tablespoons (1 stick, 4 oz.) unsalted butter, cut into 10 pieces
1 tablespoon grated orange peel
1/2 cup dried cranberries
1/2 cup powdered sugar
1 cup all-purpose flour
Preheat the oven to 350 degrees F. In a large microwave safe bowl (or in a medium sauce pan over medium heat if you prefer) melt the butter. Remove pan from microwave (or heat) and stir in the orange peel, cranberries, and powdered sugar. Then stir in the flour to make a stiff dough.
Spread and pat the dough into an uncreased 8-inch square baking pan. Bake unti the bars are golden and firm at the edges, about 20 minutes. Cool the pan on a rack for 2 minutes, then use a sharp knife to cut into 16 squares. (After cookie had cooled 10 minutes with pan on a cooling rack, I used a small sharp knife run around the outer edge to loosen the whole mass of cookie, then turned it out, turned it right side up on a cutting board and then cut the bars with a long knife.) Let the bars cool in the pan for at least 10 minutes before removing them with a small spatula.
The bars can be stored, tightly covered, for up to 5 days or frozen for up to 1 month.
Labels:
cookies
,
dried cranberries
,
orange zest
,
quick dessert
,
shortbread
Wednesday, May 20, 2015
Pink, Rich And Oh So Strawberry...What a Cake!
The traditional Mother's Day dessert when I was growing up was strawberry shortcake. There was yellow cake, fresh sliced strawberries and plenty of whipped cream. If we didn't have it for Mother's Day...sometimes the berries ripened a little late...we would have it for Mom's birthday toward the end of May. That combination of cake, strawberries and cream has always reminded me of my Mom.
This May the Cake Slice Bakers, baking from the wonderful The Southern Cake Book by Southern Living, had a number of choices but the immediate choice for me was the decadent Strawberry Mousse Cake. It has all of the features of the traditional strawberry shortcake, but in form that is more layered and more sophisticated. I baked it in a heart shaped pan to honor my Mom, who used to bake my birthday cake in a heart pan. The strawberry mousse filling was new to me and was really a key part of the recipe. I know that I'm going to use it again, maybe with a blackberry puree instead of the strawberries. That would make a great filling for a spice cake when blackberries are in season.
The cake if a butter cake made from scratch and because you leave out the yolks of the eggs, it is a white cake. In the photo in the book it looked a bit dry, but I tried half the recipe out early as a coffee flavored cake and it was very moist. When I made a half recipe for the layer cake it was just a bit dryer, but that may have been because it was made in thin layers instead of a thicker loaf cake. It was still delicious and went really well with the soft and just sweet enough creamy mousse filling. For the icing I went with a traditional buttercream instead of the icing given in the recipe. Once you have had the silky smooth, rich wonderfulness of true buttercream, an icing of butter and confectioners sugar just doesn't cut it unless you are in a hurry. My daughter was here, too, so she was able to see how easy it is to make real buttercream as long as you have enough time.
I loved this cake. It was very rich, so slices were thin. Half a recipe (which is what I have given below) worked perfectly. There were even left overs for later. The pink mousse matched the pink buttercream and it looked just perfect on my grandmother's fluted glass cake plate. This recipe is going into the keeper file for sure!
Be sure to check out the other Cake Slice Bakers posts (see below recipe for links) to see which cake they made and how they made it their own. Hope you had as happy a Mother's Day as I did.
Strawberry Mousse Cake
based on a cake in The Southern Cake Book
Serves 5-6
3/4 cup unsalted butter, at room temperature
1 cup sugar
4 egg whites
1 3/4 cups cake flour
1 teaspoon baking soda
2 teaspoons baking powder
1/4 teaspoon salt
1 cup buttermilk, at room temperature
1 teaspoon vanilla
1/2 teaspoon almond extract
Preheat the oven to 350 degrees F. Grease or butter two 8" diameter cake pans. Set aside.
Beat butter and sugar at medium speed with a stand mixer, until mixture is fluffy. Gradually add egg whites, on-third at a time, beating well after each addition.
Sift together the cake flour, baking soda, baking powder and salt.
Add the flour mixture to the butter mixture alternately with the buttermilk, beginning and ending with the flour mixture.
Pour the batter into the prepared cake pans, smooth the top with a spatula and rap the pans against the counter top twice, sharply, to dislodge any air bubbles.
Bake at 350 degrees F for about 20-25 minutes, turning the pans half way around about half way through the baking time. A toothpick inserted into the center will come out clean when cake is done. Remove to a wire rack to cool 5 minutes, then run a knife around the pans to loosen the cake and turn the cake out, cooling cakes right side up.
When completely cool, split cake in half horizontally, then fill with Strawberry Mousse (recipe below). Chill cake for 1 hour to firm up filling.
Frost top, then sides with Strawberry
Buttercream, then chill cake at least an hour to firm up buttercream. Let cake
sit at room temperature for about 1/2 hour before serving for best flavor.
Garnish with fresh strawberries, flowers, or your choice of decor.
Strawberry
Mousse
1 envelope unflavored gelatin
1/4 cup water
2 cups sliced fresh strawberries
1/4 cup sugar
1 cup whipping cream
1/4 cup water
2 cups sliced fresh strawberries
1/4 cup sugar
1 cup whipping cream
Sprinkle the gelatin over the water in a small
bowl; let stand 5 minutes to hydrate gelatin.
Process strawberries and sugar in a blender or
food processor until smooth. Scrape down sides as needed. Transfer strawberry
mixture to a small saucepan and bring to a boil over medium-high heat. Remove
from heat. Add gelatin to strawberry mixture, stirring constantly until gelatin
dissolves. Cover mixture and chill about 20 minutes, until mixture is
consistency of unbeaten egg whites. Stir occasionally to chill mixture evenly.
Beat whipping cream at low speed until foamy,
then increase speed to medium-high, and beat until soft peaks form. Fold
whipped cream into strawberry mixture until well blended. Chill, covered, for
20 minutes, or just until mixture is thick enough to hold its shape when
mounded. Use as filling for the cake above. Any leftovers can be enjoyed as a
dessert. Makes about 3 1/2 cups.
Strawberry Buttercream
2 large egg whites
1/2 cup sugar
12 tablespoons (1 ½ sticks) unsalted butter, softened
1 cup fresh strawberries, cap removed and finely chopped
1. Whisk the egg whites and sugar together in the bowl of an electric mixer. Set the bowl over simmering water (but don’t let the bottom of the bowl touch the water) and whisk gently until the sugar is dissolved and the egg whites are hot, about 3 minutes.
2. Attach the bowl to the mixer and whip with the whisk on medium speed until cooled, about 5 minutes. Switch to the paddles and beat in the softened butter a few small pieces at a time, and continue beating until the buttercream is smooth, about 6 – 10 minutes. Once the buttercream is smooth, add the finely chopped fresh strawberries, beating until everything is smooth again. It may take 5-10 minutes of beating.
3. Put half the buttercream in a piping bag fitted with a large star tip. Use an offset spatula frost the top of the cake, then pipe rosettes of buttercream on the sides of the cake and decorate as you like. Any leftover buttercream can be stored in the fridge for up to a week.
2 large egg whites
1/2 cup sugar
12 tablespoons (1 ½ sticks) unsalted butter, softened
1 cup fresh strawberries, cap removed and finely chopped
1. Whisk the egg whites and sugar together in the bowl of an electric mixer. Set the bowl over simmering water (but don’t let the bottom of the bowl touch the water) and whisk gently until the sugar is dissolved and the egg whites are hot, about 3 minutes.
2. Attach the bowl to the mixer and whip with the whisk on medium speed until cooled, about 5 minutes. Switch to the paddles and beat in the softened butter a few small pieces at a time, and continue beating until the buttercream is smooth, about 6 – 10 minutes. Once the buttercream is smooth, add the finely chopped fresh strawberries, beating until everything is smooth again. It may take 5-10 minutes of beating.
3. Put half the buttercream in a piping bag fitted with a large star tip. Use an offset spatula frost the top of the cake, then pipe rosettes of buttercream on the sides of the cake and decorate as you like. Any leftover buttercream can be stored in the fridge for up to a week.
This is a half recipe. If you prefer to skip the mousse, double
the buttercream recipe and use to both fill and frost the cake.
Here are the other Cake Slice Bakers posts to view:
Sunday, May 17, 2015
Slipper Bread for May Bread Baking Babes
As soon as I saw the recipe for the May Bread Baking Babes, brought to us by our Kitchen of the Month, Cathy of Bread Experience blog, I knew that Sweetie would love this bread. Although I usually change lots of things to suit myself when I bake from a recipe, even a new one, for this one I stayed really close to what was given, changing only one of the flours from rye to a 9-grain blend and changing the prunes to dried cranberries because he loves a bread he gets in Berkeley that has dried cranberries in it. I did use parchment as the base for baking them on preheated pizza stones, but otherwise stay close to directions, including a pan of ice cubes for steam on the top rack.
The bread in question is Flaxseed and Cranberry Ciabatti-Style Loaves (I think ciabatta means 'slipper' in Italian) and I had fun with it because
baking a ciabatta bread was on my bucket list of breads to bake. Check out Lien's beautiful badge!:
I measured the ingredients on my scale since amounts were given in grams. I let the flax seeds soak (longer than required but that didn't seem to harm anything), had the poolish sit out even longer than required for even more flavor and I chilled the dough while I went to the gym and brought it back to room temperature before doing the next fold because I did have to leave it for a while and didn't want the dough to stay warm too long without the folding. All of this, plus the ice cubes in a pan to give steam during the first part of the baking, worked really well.
I made three loaves and they looked fine and tasted even better. Would have been even better with the rye flour (which I discovered I was out of) but I really liked the dried cranberries. Sweetie ate half of the first loaf he liked it so much.
I measured the ingredients on my scale since amounts were given in grams. I let the flax seeds soak (longer than required but that didn't seem to harm anything), had the poolish sit out even longer than required for even more flavor and I chilled the dough while I went to the gym and brought it back to room temperature before doing the next fold because I did have to leave it for a while and didn't want the dough to stay warm too long without the folding. All of this, plus the ice cubes in a pan to give steam during the first part of the baking, worked really well.
I made three loaves and they looked fine and tasted even better. Would have been even better with the rye flour (which I discovered I was out of) but I really liked the dried cranberries. Sweetie ate half of the first loaf he liked it so much.
Thanks Cathy for an excellent recipe and one I might not
have tried on my own. That is one of the joys of belonging to this bread baking
group...we get to try new breads and techniques and are encouraged by our
fellow Babes to stretch our skills...and to have fun. Cathy has a really wonderful set of photos and tips, along with the original recipe on her blog, to help you make the best ciabatta ever!
Do visit the other Babes and see what they did this month
with this bread. Also, if you want to be a Buddy, bake the bread, take a photo
and send Cathy and e-mail with the photo, a URL to your blog post and a short
description of your experience baking the bread. Her email address is breadexperience (at) gmail (dot) com. You have until the May 29th and
she'll post a round up soon after that. Come bake with us!
Flaxseed and Cranberry Ciabatti-Style Loaves
Flaxseed soaker:
48 grams flax seeds
72 grams water
Mix all ingredients until well incorporated, cover and set aside.
Let it sit for at least one hour.
Poolish:
125 grams bread flour
125 grams water
pinch of instant yeast
Mix all ingredients until well incorporated with D.D.T. of 70°F.
Allow to ferment 12 – 14 hours at room temperature (65 -70°F)
Final Dough:
300 grams unbleached all-purpose flour
50 grams coarsely milled whole wheat flour
25 grams coarsely milled whole rye flour
278 grams water
10 grams salt
84 grams dried cranberries
2 grams instant yeast
Mixing: Hand Mix
First Fermentation: a total of 3 hours with 3 folds
45 minutes at room temperature; fold
Divide: Dough is not scaled. It is divided by measurement. Place loaves on a floured couche, or do as I did and put the dough from the bucket on a heavily floured board, use a bench scraper to cut into three loaves, then transfer the loaves with a very thin, large spatula to parchment paper. You can use a pizza peel to move the parchment paper with loaves onto the preheated pizza stone. I then used the edges of the parchment to turn the loaves 180 degrees in the oven about half way through baking.
Rest : 20 minutes at room temperature
Bake: Deck oven
450°F with 2 seconds of steam. Bake for 20 minutes. Vent an additional 10 minutes then remove from oven and cool on wire racks.
The Bread Baking Babes are:
Flaxseed and Cranberry Ciabatti-Style Loaves
Flaxseed soaker:
48 grams flax seeds
72 grams water
Mix all ingredients until well incorporated, cover and set aside.
Let it sit for at least one hour.
Poolish:
125 grams bread flour
125 grams water
pinch of instant yeast
Mix all ingredients until well incorporated with D.D.T. of 70°F.
Allow to ferment 12 – 14 hours at room temperature (65 -70°F)
Final Dough:
300 grams unbleached all-purpose flour
50 grams coarsely milled whole wheat flour
25 grams coarsely milled whole rye flour
278 grams water
10 grams salt
84 grams dried cranberries
2 grams instant yeast
Mixing: Hand Mix
- Mix together all the ingredients except the flax seeds, and plums.
- Once everything is thoroughly incorporated, mix in flax soaker and dried cranberries.
- Transfer the dough into an oiled container.
First Fermentation: a total of 3 hours with 3 folds
45 minutes at room temperature; fold
Divide: Dough is not scaled. It is divided by measurement. Place loaves on a floured couche, or do as I did and put the dough from the bucket on a heavily floured board, use a bench scraper to cut into three loaves, then transfer the loaves with a very thin, large spatula to parchment paper. You can use a pizza peel to move the parchment paper with loaves onto the preheated pizza stone. I then used the edges of the parchment to turn the loaves 180 degrees in the oven about half way through baking.
Rest : 20 minutes at room temperature
Bake: Deck oven
450°F with 2 seconds of steam. Bake for 20 minutes. Vent an additional 10 minutes then remove from oven and cool on wire racks.
The Bread Baking Babes are:
- Bake My Day – Karen
- blog from OUR kitchen – Elizabeth
- Bread Experience – Cathy
- Feeding my Enthusiasms – Elle
- girlichef – Heather
- Life’s a Feast – Jamie
- Lucullian Delights – Ilva
- My Diverse Kitchen – Aparna
- My Kitchen In Half Cups – Tanna
- Notitie Van Lien – Lien
- Thyme for Cooking – Katie (Bitchin’ Bread Baking Babe Bibliothécaire)
Labels:
dried cranberries
,
may 2015 BBB ciabatti breads
,
poolish
Sunday, May 10, 2015
May Is For Moms Today
May is one of those months that gets to celebrate a lot of great things...Graduations and (in my family) a birthday or two, Memorial Day and May Day and May 5th and of course Mother's Day.
I'm celebrating being a Mom, celebrating my awesome Mom who is rockin' heaven if there is any justice,
my daughter who began my motherhood journey with me,
and all the women who are moms, including those whose 'kids' belong in the animal kingdom. Come to think of it, some of the human kids sometimes seem to belong more to the animal kingdom.
Anyhoo, Happy Mother's Day.
I'm celebrating being a Mom, celebrating my awesome Mom who is rockin' heaven if there is any justice,
my daughter who began my motherhood journey with me,
and all the women who are moms, including those whose 'kids' belong in the animal kingdom. Come to think of it, some of the human kids sometimes seem to belong more to the animal kingdom.
Anyhoo, Happy Mother's Day.
Tuesday, May 05, 2015
Sweet Mocha Buttercream on a Fine Cake
I've been doing very little baking, well, little if you are me. It was a good idea while I was getting my digestion processes back on track. It would probably still be a good idea for my waistline, but the urge to bake is very strong now that I have a dedicated place to do it.
On Sunday I baked a half recipe of a very fine coffee flavored butter cake. I baked it in a loaf tin, which meant that for Sunday evening dessert Sweetie and I could have a slice of cake. It was moist and delicious and I think Sweetie would have loved to finish it off. I knew that I wanted to try it with Mocha Buttercream, so we restrained ourselves so that there would be cake to frost once the frosting was made. He assured me that it was better un-frosted. That might have been because I used a bit of bourbon to dissolve the espresso powder I used in the cake, plus I used strong cold coffee instead of water in the recipe, so there were some interesting flavors going on.
On Monday I made a half recipe of Mocha Buttercream, using some more espresso dissolved in bourbon, plus a nice rich cocoa powder for the chocolate part. I love this recipe, even though it is a bit more work than a butter and confectioners sugar buttercream. You start by whisking egg whites and sugar over simmering water. After 3-4 minutes the mixture has gotten white and very much like soft marshmallow cream. You transfer the mixture to a stand mixer and whisk it with the mixer until cool, about 5 minutes or so. Then you add small blobs of soft butter while the machine whisks. It takes a little while for the butter to be absorbed, but that also thickens up the mixture. Then you add the chocolate-coffee-bourbon mixture and beat it until it becomes the perfect, thick, creamy buttercream. I used an offset spatula to frost a layer in the middle of the split cake, then a layer on top. Switching to a pastry bag with star tip, I put rosettes all over the sides and as decoration on the top. It goes more quickly than you might imagine as long as you don't insist on the rosettes being perfect. Since the buttercream goes on pretty soft, I always follow up with letting the cake sit in the fridge for a while before serving.
Sweetie had to admit, the cake was even better with this decadent frosting. He isn't usually a cake loving person, bu this one may have changed his mind.
Cake With Bourbon and Coffee Flavor
based on a cake in The Southern Cake Book
3/4 cup unsalted butter, at room temperature
1 cup sugar
4 egg whites
1 3/4 cups cake flour
1 teaspoon baking soda
2 teaspoons baking powder
1/4 teaspoon salt
1/4 cup bourbon
1 teaspoon espresso powder
3/4 cup strong brewed coffee, at room temperature
1 teaspoon vanilla
Preheat the oven to 350 degrees F. Grease or butter a 9"x5" loaf pan. Set aside.
Beat butter and sugar at medium speed with a stand mixer, until mixture is fluffy. Gradually add egg whites, on-third at a time, beating well after each addition.
Sift together the cake flour, baking soda, baking powder and salt. In another bowl, mix together the bourbon and espresso powder, letting the espresso powder dissolve. Then add the brewed coffee and stir until thoroughly mixed.
Add the flour mixture to the butter mixture alternately with the coffee mixture, beginning and ending with the flour mixture.
Pour the batter into the prepared loaf pan, smooth the top with a spatula and rap the pan against the counter top twice, sharply, to dislodge any air bubbles.
Bake at 350 degrees F for about 30-35 minutes, turning the loaf pan half way around about half way through the baking time. A toothpick inserted into the center will come out clean when cake is done. Remove to a wire rack to cool 5 minutes, then run a knife around the pan to loosen the cake and turn the cake out, cooling cake right side up.
When completely cool, split cake in half horizontally, then fill and frost with Mocha Buttercream (recipe below). Serves 5-6.
Mocha Bourbon Buttercream
4 large egg whites
1 cup sugar
24 tablespoons (3 sticks or 1 ½ cups) unsalted butter, softened
2 tablespoons espresso powder
4 tablespoons bourbon
1 tablespoon best quality cocoa
1. Whisk the egg whites and sugar together in the bowl of an electric mixer. Set the bowl over simmering water (but don’t let the bottom of the bowl touch the water) and whisk gently until the sugar is dissolved and the egg whites are hot, about 3 minutes.
2. Attach the bowl to the mixer and whip with the whisk on medium speed until cooled, about 5 minutes. Switch to the paddles and beat in the softened butter a few small pieces at a time, and continue beating until the buttercream is smooth, about 6 – 10 minutes. While the buttercream is becoming smooth, dissolve the espresso powder in the bourbon in a small bowl, then stir in the cocoa until mixture is smooth. Once the buttercream is smooth, add the espresso-cocoa mixture, a little at a time and beat until everything is smooth again. It may take 5-10 minutes of beating.
3. Put half the buttercream in a piping bag fitted with a large star tip. Use an offset spatula to fill and frost the top of the cake, then pipe rosettes of buttercream on the sides of the cake and decorate as you like. Any leftover buttercream can be stored in the fridge for up to a week.
4 large egg whites
1 cup sugar
24 tablespoons (3 sticks or 1 ½ cups) unsalted butter, softened
2 tablespoons espresso powder
4 tablespoons bourbon
1 tablespoon best quality cocoa
1. Whisk the egg whites and sugar together in the bowl of an electric mixer. Set the bowl over simmering water (but don’t let the bottom of the bowl touch the water) and whisk gently until the sugar is dissolved and the egg whites are hot, about 3 minutes.
2. Attach the bowl to the mixer and whip with the whisk on medium speed until cooled, about 5 minutes. Switch to the paddles and beat in the softened butter a few small pieces at a time, and continue beating until the buttercream is smooth, about 6 – 10 minutes. While the buttercream is becoming smooth, dissolve the espresso powder in the bourbon in a small bowl, then stir in the cocoa until mixture is smooth. Once the buttercream is smooth, add the espresso-cocoa mixture, a little at a time and beat until everything is smooth again. It may take 5-10 minutes of beating.
3. Put half the buttercream in a piping bag fitted with a large star tip. Use an offset spatula to fill and frost the top of the cake, then pipe rosettes of buttercream on the sides of the cake and decorate as you like. Any leftover buttercream can be stored in the fridge for up to a week.
Labels:
butter
,
cake
,
coffee flavored cake
,
mocha buttercream
,
real deal buttercream
Friday, May 01, 2015
A Different Green Salad
Recently I was looking at a lot of restaurant menus online, trying to find a good place for Sweetie and I to have an anniversary dinner out. One of the things I noticed is that if you love kale you can always find a salad on contemporary menus. Arugula is also popular, and so are beets. The standard, at least around here, for salad greens seems to be field greens or spring mix. While I love all of those salad ingredients, they are all off the list of things that I can eat, along with spinach, Swiss chard and the like.
While I know that having salads more interesting than chopped iceberg with shredded carrots and maybe a few coins of radish is a good thing, I do know that there are lots of other kinds of salads that could be on the menus and maybe they will be once we all get tired of kale.
Years ago in Berkeley I came across a salad in a deli case that has been a favorite ever since. It's a pretty simple one, so it didn't take much effort to figure out how to make it at home. It is green, has some very healthy ingredients, goes together fairly quickly and uses an ingredient that seems to be available almost year round these days...broccoli.
Now I know there are folks who don't care for broccoli. To those folks I say...give it a chance! In this salad it gets dressed up in a nice creamy dressing, is complemented by sweet red bell pepper, salty feta cheese and nutty pecans.
The florets of the broccoli are cut into bite sized pieces. If you are frugal, and if you like the stems, include some of them, sliced. Put them in a microwave safe steamer, or in a steamer basket in a pot with a little water in the bottom. Before you start cooking them, dump a couple cups of ice cubes into a large bowl and add a few cups of water. That way the water will get icy while you deal with steaming the broccoli.
Steam the broccoli only long enough for it to become tender enough to bite in two. For my microwave that's 2 minutes on high. The color will be a fairly bright green. Immediately drain off any hot water and dump all the broccoli into the bowl with the ice water. Stir it around with a spoon or your clean fingers. The idea is to cool down the broccoli quickly. Then drain the broccoli completely.
While the broccoli drains, slice a half the fleshy part of a sweet red bell pepper in strips and cut the strips into bite sized pieces. Set aside.
In a small jar place 1/4 cup red wine vinegar, the juice and zest of one small or 1/2 large lemon, 2 tablespoons olive oil, salt and pepper to taste, some garlic powder or minced garlic (amount varies depending on how much you like garlic). Put a lid on the jar and shake briskly for a minute. Take off the lid, add 2 tablespoons plain Greek yogurt, put the lid back on and shake again. Taste and adjust seasonings as needed. You now have a creamy dressing.
Now you're ready to put together the salad. Place the broccoli, red pepper strips, a couple tablespoons crumbled feta cheese, and 2 tablespoons toasted, chopped pecans. Gently mix these ingredients together. Add the dressing and gently mix to coat the ingredients with the dressing. Cover with plastic wrap and chill at least 2 hours.
It's a good idea to serve this salad with a slotted spoon to keep your plate from having a pool of dressing, but if you forget, it's really delicious dressing. The salad is even better and has lots of vitamins and minerals and fiber and all those 'healthy' things, but mostly it's a nice green salad that is absolutely delicious...and different than kale.
Subscribe to:
Posts
(
Atom
)