Tuesday, March 27, 2018
Cake From Brittany - Gateau Breton - #TheCakeSliceBakers
Best laid plans and all that. This month I really wanted to be part of baking from The Perfect Cake cookbook and the choices sounded great...well except for the Crepe Cake...I'm forever scarred by making a Martha Stewart crepe cake with the Daring Bakers years ago. What I hadn't counted on was the one-two punch of an auto accident followed by the flu in short order. When the flu got me I had already gotten out the blender to start the recipe and had lemon juice squeezed...and then it all sat on the counter for a week until today. The lemon juice had spoiled of course, so I just squeezed more and then set about making the Gateau Breton, which is a delightful French butter cake with an apricot filling. It is rather like a pound cake in texture, but still moist and tender. The filling has a lovely apricot flavor and the cake has some rum, some vanilla, and (my addition) a touch of almond extract since it brings out the apricot flavor so well.
This is a fairly easy cake to make but you have to be patient. First the apricot filling is cooked, then cooled. The cake batter is divided in half, with the first half being set in the pan in the freezer for 10 minutes to firm it up for the addition of the filling. Then the filling is frozen the same amount of time and the second half of the batter is spread on top. I love creating the pattern with an egg yolk wash and fork tines. I used a farm egg from our neighbors, so the yolk was really, really orange!
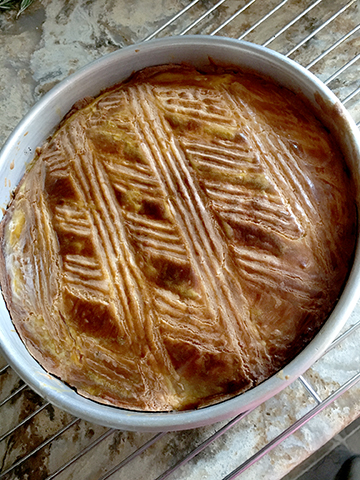
I very much like this cake. It's not too rich or too sweet. Since the area of Brittany in France uses salt in their butter it was strange to use unsalted, but I used fleur de sel from France instead of table salt for the salt in the recipe, which worked well...every once in a while a bite would have a nice nugget of saltiness.
Unfortunately I missed the deadline to post as part of the Cake Slice Bakers so the inserted text below isn't true...there are no linked sites with the other bakers. Turns out that this month the two favorites were this Gateau Breton and the Wellesley Fudge Cake. Hope to be on time next month! Have not typed this recipe up yet and probably won't now that the mail has come.
My copy of the book just arrived today, after I had baked the cake...it is an amazing compendium of almost any cake you might want to bake. I was honored to have been able to bake some of the recipes before the book came out. This book is clearly a keeper...and I have dozens and dozens of recipes to try from it yet & cn still say that. It looks like the kind of cookbook that you would choose if you knew you could only have one cake baking book on your deserted island. Of course that island would need a stove, lots of baking supplies and tools, so how deserted would it be anyway?
Each month The Cake Slice Bakers are offered a selection of cakes from the current book we are baking through. This year it is The Perfect Cake from America's Test Kitchen #atkcake. We each choose one cake to bake, and then on the 20th - never before - we all post about our cake on our blogs. There are a few rules that we follow, but the most important ones are to have fun and enjoy baking & eating cakes!
Follow our Facebook, Instagram, and Pinterest pages where you can find all of our cakes, as well as inspiration for many other cakes. You can also click on the thumbnail pictures below to take you to each of our cakes, or visit our blog where the links are updated each month. If you are interested in joining The Cake Slice Bakers and baking along with us, please send an email to thecakeslicebakers at gmail dot com for more details.
The choices this month were Wellesley Fudge Cake, Tahini-Banana Snack Cake, Hazelnut-Chocolate Crepe Cake, and Gateau Breton.
Saturday, March 24, 2018
Just Past the Ides of March
All you Shakespeare lovers know that the Ides of March (March 15) was when Julius Caesar was killed. A couple days later is Sweetie's birthday. This year that included Sweetie being stricken by a particularly virulent dose of the flu. Even being born on St. Patrick's Day couldn't save him! Fortunately I was feeling better so I was able to care for him...until...I was stricken as well three days later. Fortunately he was a little better by then, so he took care of me during the first three days, which are the bad ones. Didn't even turn on the computer for the better part of five days...some sort of a record for me! If you have noticed that this blog went silent and Facebook, too, well that is the explanation. Today the fever broke, so I'm on the mend and feeling more human than I was. Not sure what sort of creature I was the first couple of days, but hardly human. Thanks for all the Facebook good wishes. I managed to use my cell phone some and they make it easy to post photos to Facebook.
Hope to have some food posts up soon. While I was less than human we had a new lamb born in our pasture. Finally walked out to see it this afternoon...tiny and curly black coated and so cute! Of course the short walk did me in so I took a nap.
Hope that you, dear reader, have been having a better time of it than I. Stay safe, well, and as happy as you can manage.
XO, Elle
Wednesday, March 14, 2018
Update
Spring rains have come, along with the beautiful spring flowers, both brilliant bulbs near the front of the house and soft plum blossoms down the hill. As I come and go to chiropractic visits and trips to the gym, I enjoy the feelings of hope that they convey.
The accident was a week ago. I finally woke up this morning with no headache, the first time all week. I still am sore, especially my neck and shoulders, but the most debilitating part is that I tire very easily. I've had to cancel a number of social events because there was no way to enjoy the time and because what I really needed was another nap. Had hoped that by now that wouldn't be the case, but older bodies require more time I guess.
Maybe I'll be able to bake in time for the Cake Slice Bakers, but probably not for Bread Baking Babes day after tomorrow.
Sending you mid-week greeting on Pi Day! Had hoped to bake Sweetie a pie for Pi Day, but guess that won't happen. Soon I tell myself, soon.
Monday, March 12, 2018
Jerk Pork Braise
Keeping with the braised meats theme, another recent dinner was for a pork shoulder roast braised with jerk seasonings for a long time at low oven temperature. Not only does it taste wonderful, but your kitchen will smell great because first you rub the roast with the jerk seasonings and then you brown it. During the browning there is a lot of fragrant smoke. While it cooks more of those great smells drift out, making it hard to wait until the meat is truly cooked to falling apart.
I don't own stock in either King Arthur Flour or Penzey's spices, but maybe I should. They are my go-to sources for specialty flours (King Arthur) and the best spices around (Penzey's). I'm lucky that there is a Penzey's retail store in Santa Rosa, so not too far away, which means that I can buy a spice or herb the day I need to use it. They often have an additional small jar of spice that they give for free when you purchase some, which is a great way to find out about more of their products. The same is true for online purchases, so check them out if you prize excellence in herbs and spices.
When I visited our daughter in the LA area in mid-February, she wanted to invite the neighbors over and so we cooked this recipe in her InstaPot using the pressure cooker feature and the Penzey's Jerk Pork spice. I decided to try cooking the same recipe in a slow oven since I don't have an InstaPot and I do have wonderful cast iron dutch ovens. At her house we browned the beast of a roast (something like 8 pounds!) in her 10-inch cast iron skillet because it was too large to brown in the appliance. At home I was able to easily brown the much smaller (about 4 pounds) roast in my dutch oven on top of the stove, then add some broth and put on the lid. Easier clean up.
Do be patient and give the meat proper cooking time.As you can see from the photo, it is suppose to fall apart and be very tender. I served ours with coleslaw and baguette for sopping up the juices, but you can also serve it with rice or mashed potatoes or with rolls...just know that you are going to want to enjoy the juices along with the meat.
Jerk Pork
Serves 4-6
4 lb pork shoulder roast (if bone-in try for 5 lbs)
3-4 tablespoons jerk pork seasoning - I used Penzey's
1 cup broth - either beef, chicken, or vegetable - I used chicken
olive oil for browning
Preheat the oven to 325 degrees F.
Rinse and dry the pork shoulder roast. If there is a netting holding the roast together, remove the netting and discard it. Rub the roast all over generously with the jerk pork seasoning.
In a large dutch oven or other heavy oven-proof pot with tight lid, heat about a tablespoon olive oil until almost smoking hot. Brown the roast all over. Take care to keep the smoke away from you, especially your eyes and breathing since the browning spices are pungent. I used my over stove fan at the highest setting it would go.
Remove pot from the heat and add the broth. Cover and place in the preheated oven. Cook for 3 hours, checking halfway through (and as often as needed after that) to make sure that there is still enough broth in the bottom to keep it from burning. Add more broth as needed.
When meat is tender, remove from oven. Let sit 5 minutes. Remove from pot and either slice or shred. Serve at once with any juices still in the pot.
Friday, March 09, 2018
Lamb Shanks Savory Delight
I've had lamb shanks at restaurants, the last time being in Avignon in France, but have never made them myself...at least not that I can remember. Turns out that they are an easy braise and a savory delight. The key things are to brown the shanks very well before braising, and to start the dish early enough that you can allow it a nice, slow braise in the oven for tender meat.
So, what is braising, you may ask? It is slow cooking of something with additional liquid added. Pot roast is a well known example.
Sweetie and I provide pasture for lambs for our neighbors each year. As a thank you they usually give us some lamb. I was going through the freezer a week or so ago and noticed that they had given us a beautiful lamb shank, almost two pounds in size. This is the perfect size for a dinner for two. Although you can probably get lamb shanks that are boned by the butcher, for this braise a shank with the bone is best.
A quick review of online recipes revealed that you brown the shank, brown aromatics like onion, garlic, carrot and celery, then cook all of those with a liquid, often wine, and with aromatic herbs like rosemary and thyme. I also added a pinch of dried orange peel, a trick from Julia Child.
This was a most delicious meal. I served the shanks in low, wide soup bowls with cooked yukon gold potatoes, smashed, and with cooked peas. I sprinkled gremolata on top to add a bring note and spooned on some of the delicious broth and vegetables. It was the perfect dish for a chilly winter evening. Try it yourself and see!
For those who are keeping track of what I am up to beyond food, a couple of days ago I was rear ended shortly before noon. The good news is that, other than some muscle soreness on my right side, I am fine. I was pretty shaken up and very sore yesterday, but rest and fluids, some movement and stretching, and chiropractic and ice and some ibuprofen have helped. The poor car will take some time to repair but in the meantime I scored a nice rental SUV. Thanks to everyone who expressed their concern. Although sometimes injury doesn't show up right away, as far as I can tell I'll be fine.
Sweetie was, as always, a rock and I'm sure I would have fallen to pieces without him. I'm a blessed and lucky woman!
Lamb Shanks with Red Wine and Herbs
Serves 2
2 one pound lamb shanks or one two pound shank
salt and pepper to taste
2 tablespoons olive oil
1 large carrot, diced
2 stalks celery, diced
1 medium onion, diced
2 cloves garlic, peeled and minced
2 cups red wine
1 3/4 cups chicken broth
1 15oz. can diced tomatoes and juice
2 teaspoons fresh rosemary, chopped
1 teaspoon dried thyme
1/8 teaspoon dried, crushed orange peel
Preheat oven to 325 degrees F.
Rinse lamb shank(s) and dry thoroughly. Season with salt and pepper. Set aside.
Heat olive oil in heavy oven-proof covered dutch oven or similar large pot. Brown lamb on all sides. Remove to plate. Saute carrot, celery, onion and garlic in same pot, stirring often, until onion is translucent, about 5 minutes.
Add wine to the pot and stir to deglaze pan. Return the lamb to the pot, add the chicken broth, tomatoes and juice, herbs and orange peel. Cover pot and place in preheated oven. Cook for one and a half (1 1/2) hours, then turn pot 180 degrees and cook in oven at same temperature another one to one and a half hours, until meat is tender and falling off the bone.
Serve at once, with generous portions of the juices and vegetables in the broth. If desired, top with gremolata.
Gremolata
1 clove garlic, minced fine
lemon zest from one lemon
1 tablespoon finely chopped flat leaf parsley
Combine all ingredients. Sprinkle over cooked meats, poultry or veggies that need a flavor lift.
Friday, March 02, 2018
Best Oatmeal Cookies
I have a very thoughtful daughter. She knows that I love to bake. For my birthday she gave me the Zingerman's Bakehouse Cookbook and it is a treasure. The book combines great recipes, both sweet and savory, excellent baking tips and instructions, and an overview of their company both the people and the philosophy.
Finally had some time today to try a recipe from the cookbook. I chose to start with their oatmeal cookies, which they call the Big O Cookies. I'm past the time when a big-o should mean anything other than the best oatmeal cookie ever...and these really are. They are a generous size (although I was baking mine in my countertop oven, so I made them smaller than the recipe called for. They have chewy old-fashioned oats, a nice mixture of brown sugar and maple for sweetness, plus lots of raisins. There is just enough cinnamon and nutmeg and they are almost the right thickness.
I made half the recipe and couldn't figure out a way to halve an egg, so I added a little more flour...about 2 tablespoons...to make up for the added liquid. Turns out I should have only added 1 tablespoon or maybe none since they were slightly more cakey that I had been expecting. However, even with that they were the best oatmeal cookies that Sweetie has ever had (according to him) and I just loved them, too. I did stray from the recipe a tiny bit...I used a bit more cinnamon and used golden raisins instead of flame variety, plus I used less raisins. Of course also I used non-dairy margarine instead of butter.
Thank you K for this great book and thank you to my dear sister G and niece T for letting me know about Zingerman's...an Ann Arbor, MI institution.
Big O Cookies
From Zingerman's Bakehouse Cookbook, slightly revised by me
Notes: There are both cup measures and weights here. I used the weights as much as possible because bakers find that this works better. If you have a scale, please use the weights...you will be glad. Smaller amounts don't have weights. Brown sugar is always packed if measured.
margarine, room temperature 1 cup + 2 tablespoons 250 g
brown sugar 3/4 cup + 2 tablespoons 154 g
maple syrup 1/2 cup + 1 tablespoon 172 g
large egg 1
vanilla extract 1 teaspoon
all-purpose flour 1 3/4 cups + 1 tablespoon 255 g
baking soda 1 1/8 teaspoon
sea salt 1 1/8 teaspoon
ground cinnamon 1 1/8 teaspoon
ground nutmeg 1/4 teaspoon
old-fashioned rolled oats 3 cups 300 g
flame raisins (I used golden) 2 3/4 cups 390 g
Preheat oven to 350 degrees F (180C).
Prepare a couple of cookie sheets by lining with parchment paper. Set aside.
In a large mixing bowl use a wooden spoon or stand mixer on medium speed to cream the margarine (or use unsalted butter which will be even better) and sugar until light and fluffy. Add maple syrup in thirds to keep batter from curdling permanently. Add maple syrup slowly to blend it in easily.
Add the egg and vanilla extract and mix until thoroughly incorporated.
In another bowl, combine the flour, baking soda, salt, cinnamon and nutmeg...I used a whisk to mix it all together. Add the flour mixture to the butter mixer. Stir with wooden spoon or with electric mixer on low speed until evenly combined. Add the oats and raisins and mix to distribute evenly.
Scoop about 3 tablespoons of dough, or use a 1 1/2 oz.(48 ml) scoop (disher) onto the prepared cookie sheets, spacing far apart to allow for spreading. Press down so that dough rounds are about 1/2-inch thick.
Bake cookies for 15 -17 minutes, until golden brown around the edges and just set in the middle. Cool on a rack to room temperature.
Tip: Dough can be refrigerated uncooked and kept a week. Bake cookies right from the fridge. Expect to bake for and additional 2-3 minutes since they are cold.
Labels:
cinnamon
,
maple syrup
,
oatmeal cookies
,
oats
,
raisins
,
rolled oats
Thursday, March 01, 2018
A Different Take On Onion Tart
For the tea party last week I baked a version of my favorite onion tart. Usually I use puff pastry as the base, but the puff pastry I had in the freezer turned out to be spoiled, so I had to improvise.
Fortunately...since time was an issue...I had some already made pie crust dough. The tart shell was a long, thin, rectangle and the dough was a circle, but I just sliced off a little of the side dough and added it to the ends. Because I wanted the sides to be thicker than a single layer of crust, I also added an extra layer of the dough to the sides, then pressed the dough into the indents in the sides, rolled a rolling pin over the tart pan top to cut off the dough, and put the whole thing in the freezer for 20 minutes to firm up. Then I pricked the dough lightly all over and baked it briefly. No need to fully bake it since it would bake the rest of the way when the tart was filled.
The filling stayed the same as the previous recipe except that I used drained plain yogurt for the base instead of creme fraiche. Don't use Greek yogurt...it's difficult to drain. Don't use vanilla yogurt either...too much sugar and this is a savory tart. Do use a mellow honey, a dry white wine and freshly grated nutmeg.
It turned out really well. The crust sides were strong enough to hold up to cutting into portions and the filling was delicious. It made such a nice part of our savories for our Afternoon Tea.
Honey-Roasted Onion Tartbased on February 2011 Bon Appetit magazine recipe
1 single pie crust (I used Pillsbury ReadyCrust)
3 slices bacon, cut crosswise into 1/2-inch pieces
1/4 cup honey
1/4 cup dry white wine
2-3 large sweet yellow onions (about 1 1/2 pounds), cut into 1/4 inch thick rounds
Nonstick vegetable oil spray
1/2 cup drained plain yogurt (I used Russian low fat yogurt, drained briefly in a fine mesh strainer)
1/2 teaspoon fine sea salt
1/8 teaspoon freshly grated nutmeg
1/4 teaspoon dried thyme
Few sprigs fresh thyme leaves
1/4 cup dry white wine
2-3 large sweet yellow onions (about 1 1/2 pounds), cut into 1/4 inch thick rounds
Nonstick vegetable oil spray
1/2 cup drained plain yogurt (I used Russian low fat yogurt, drained briefly in a fine mesh strainer)
1/2 teaspoon fine sea salt
1/8 teaspoon freshly grated nutmeg
1/4 teaspoon dried thyme
Few sprigs fresh thyme leaves
Using lightly floured rolling pin, roll out pastry on lightly flour surface. Cut sides and piece at either end to make a rectangle to fit your tart pan, plus extra for the sides.I used a X by X-inch tart pan with removable bottom. You could also use an 8-inch round tart pan and roll the pie crust dough to fit, with enough to fold the dough back down the sides all around. Press doubled sides against the tart pan sides firmly. Roll a rolling pin over the top edges of the tart to trim off excess dough. Chill crust in freezer at least 20 minutes.
Cook bacon in small skillet over medium heat until brown and crisp. Position rack in top third of oven and preheat to 375 degrees F while bacon is cooking. Transfer crisp bacon to paper towels to drain. Reserve 1 tablespoon bacon drippings from skillet.
Whisk honey, wine and reserved 1 tablespoon bacon drippings in large bowl. Add onions; toss to coat. Coat another large rimmed baking sheet with nonstick spray. Spread onion mixture in even layer on sheet. Roast 30 minutes. Turn onions over, allowing rings to separate. Roast until onions are caramelized, turning often for even browning, 30 to 45 minutes. (I cooked them until the least colored ones were pale gold, which meant that some edges were charred, but mostly the mass of onions was medium gold, not darker because they will still be browning while tart cooks later.) cool onions slightly. (At this point, and without leaving the oven on, you can refrigerate the onion mixture, then bring it back to room temperature the next day for the baking part if you prefer to do it in two parts.)
Increase oven temperature to 400 degrees F. Remove tart pan from freezer and use a fork to lightly prick the crust all over. Bake for 8 minutes, then remove from oven and cool ten minutes.
Mix drained yogurt, sea salt,nutmeg and dried thyme in small bowl. Using offset spatula, spread yogurt mixture mixture over crust to the edge. Arrange onions atop yogurt layer. Sprinkle with bacon. Bake tart until crust is light golden brown and topping is bubbling, 20 to 25 minutes. Check at 15 minutes to make sure that crust isn't over browning. If it is, put strips of aluminum foil over the crust sides to shield until topping is done. Onions will have some very dark brown strands. Sprinkle with fresh thyme and serve.
Makes about 6 appetizer servings.
Tuesday, February 20, 2018
Boston Cream Cupcakes #TheCakeSliceBakers
You've probably heard the name Boston Cream Pie at some point in your life. The immediate visual that comes to mind if you have never had this dessert is a creamy pie in a nice crust with maybe some maple syrup for flavoring or something. In fact, a Boston Cream Pie is a cake. Vanilla cake is sandwiched with a vanilla pastry cream and then topped with a rich chocolate ganache. It's a great combination of flavors and textures and a classic for a reason.
This month the Cake Slice Bakers are baking again from The Perfect Cake from America's Test Kitchen, #atkcake, and our choices included Boston Cream Cupcakes. Being an iconoclast and not a lover of working with lots of pieces, I changed it to a small Boston Cream Pie cake, made using a 6-inch in diameter springform pan with tall sides, plus three smaller cakes made using mega-muffin pans- pretty close to Boston Cream Cupcakes. Two of those small ones were tall enough to split and fill, but the smallest on worked well for the original instructions for cupcakes, so I cut out a divot in the top, sliced off a bit of the point to make room for the pastry cream, then filled the depression with a tablespoon or so of the cream, topped it with the cake hat, then poured the chocolate glaze over it all. Here is what that one looked like:
I made this treat for Valentine's Day. Two of the little cakes went to a neighbor couple and the other went to another neighbor. Sweetie and I enjoyed ample portions of the large cake. It was delicious. This cake is not as fine crumbed as a pound cake, but still has a fairly tight crumb. It rose well and had a nice, mild vanilla flavor. The pastry cream, which I made with soy non-dairy creamer and non-dairy margarine, was wonderful...very smooth and creamy and strongly vanilla. I chilled it so that it would make a sturdy filling, which is especially important when you are cutting the cake. A too soft filling just squishes out as you cut.
The genius part of the ganache topping is the plain corn syrup. It really makes it easy to work with. Since I did use bittersweet chocolate as called for, the topping was a nice deep chocolate contrast to the vanilla in the cake and pastry cream.
I decorated the iced cakes with tiny sprinkles in heart shapes. It made a really pretty Valentine's Day gift for Sweetie, who loves Boston Cream Pie!
Because the book that this recipe comes from isn't in print yet, I'm not including the recipe. It should be published next month. You are probably going to want to buy this if you make a lot of cakes, or just want recipes for cake that are tested and perfect! Sometimes the instructions seem different, like cutting the fat into the flour for a cake like this. It's a technique often used for pie and biscuits, but not that often for cake. I'm sure it helped this cake rise so nicely and probably contributed to the tenderness, too.
Each month The Cake Slice Bakers are offered a selection of cakes from the current book we are baking through. This year it is The Perfect Cake from America's Test Kitchen #atkcake. We each choose one cake to bake, and then on the 20th - never before - we all post about our cake on our blogs. There are a few rules that we follow, but the most important ones are to have fun and enjoy baking & eating cakes!
Follow our Facebook, Instagram, and Pinterest pages where you can find all of our cakes, as well as inspiration for many other cakes. You can also click on the thumbnail pictures below to take you to each of our cakes, or visit our blog where the links are updated each month. If you are interested in joining The Cake Slice Bakers and baking along with us, please send an email to thecakeslicebakers at gmail dot com for more details.
The choices this month were Chocolate-Espresso Dacquoise, Blitz Torte, Bananas Foster Cake, and Boston Cream Cupcakes.
Friday, February 16, 2018
The Big Ten And A Crown
Ten years ago, a small group of beautiful, brave babes baked bread together and thus was born the Bread Baking Babes. To celebrate all of those years of friendship, fun, and baking all kinds and shapes of bread together, with some Babes taking a break and some new ones being invited to join in, this month we baked one of the earliest breads, the Royal Crown Tortano. Happy Anniversary to us!
This lovely artisan bread includes the humble potato. If you have never baked a yeasted, kneaded bread with potato in it, you may not know that often the potato leads to a sticky dough...at times it almost seems liquid and like it has a mind of its own. It also helps to make a flavorful, moist bread and one that seems to keep a bit longer, too.
Our Kitchen of the Month is Tanna of My Kitchen in Half Cups blog, one of the original Babes. The badge is by Lien of Notitie van Lien, another one of the original Babes. If you ask them, they might explain about the bottle on the back bench...or not.
I enjoyed making this bread and noticed that when I mixed in the potato, honey and salt that the fairly stiff dough became very loose, which was a pretty amazing transformation. I did get decent if not spectacular oven spring and also, because I baked it on parchment, but with a perforated pizza sheet below the parchment, the bread had a really nice lower crust. I put the pizza pan there because I was worried about some of the dough taking off and dripping over the side of the parchment. The dough, parchment, pizza pan sandwich was also laid directly on a preheated baking stone. That helps with a good bottom crust, too. As usual my skills in scoring need improvement. You can barely see where I scored the cross. I did use the potato water and I did weight the ingredients, using grams. A good scale with a tare feature is your friend if you like to bake.
Look at this bottom crust!
Delicious bread; a keeper. Makes a great base for avocado toast, among other things.
Be sure to check out the other Babes to see what their Crown looks like and to congratulate them on this round number anniversary!
To be a Buddy, bake the bread, take a photo, post about it and send Tanna an email with the URL, photo, etc. by Feb.28.
Now bake this bread, please! It is worth every moment.
Royal Crown Tortano - revisited
(based on Karen's (Bake My Day) 2008 take on Maggie Glezer's recipe)Recipe Synopsis
The Evening Before Baking: Make the starter and if you like the mashed potato.
The Next Morning: Mix the dough and let it ferment for about 4 hours. Shape it, proof it for about 1 1/2 hours, and then bake the bread for about 45 minutes.
The Evening Before Baking: Making the Pre-Ferment:
Pre-Ferment Ingredients
1 gm (1/4 tsp) instant yeast
240gm (1 cup) water 105 - 115 degrees F
100gm (2/3 cup) unbleached bread flour
85gm (1 small) potato
Stir the yeast into the water in a glass measure and let it stand for 5 - 10 minutes. Add 1/3 cup of this yeasted water (discard the rest) to the flour and beat this very sticky starter until it is well combined. Cover with plastic wrap and let it ferment until it is full of huge bubbles and sharp tasting, about 12 hours. If your kitchen is very warm and the pre-ferment is fermenting very quickly, place it in the refrigerator after 3 hours of fermenting. In the morning, remove it and allow it to come to room temperature 30 minutes to an hour before beginning the final dough
Preparing the Potato: For efficiency, you may want to prepare the potato the night before. Quarter it, then boil it in water to cover until it can be easily pierced with a knife tip, about 20 minutes. Drain; if desired, reserve the water for the dough. Press the potato through a ricer or sieve to puree it and remove the skin. Store it in a covered container in the refrigerator. You will need only 1/4 cup puree.
Bake Day: Mixing the Dough
Dough Ingredients
575gm (3+3/4 cups) unbleached bread flour
420gm (1+3/4 cups plus 3 Tbsp) Water, including the potato water if desired, lukewarm
all of the pre-ferment
11gm (2 tsp) honey
60gm (1/4 cup packed) Potato puree
16gm (scant 1 Tbsp) salt
By Hand: Use your hands to mix the flour and water into a rough, very wet dough in a large bowl. Cover the dough and let rest (autolyse) for 10 - 20 minutes.
Add the pre-ferment, honey, potato, and salt, and knead the dough until it is smooth, 5 - 10 minutes. It will start off feeling rubbery, then break down into goo; if you persist, eventually it will come together into a smooth, shiny dough. If you do not have the skill or time to knead it to smoothness, the bread will not suffer. This is a tremendously wet and sticky dough, so use a dough scraper to help you but do not add more flour, for it will ruin the texture of the bread.
By Stand Mixer: With your hands or a wooden spoon, mix the flour and water into a rough, very wet dough in the work bowl of your mixer. Cover the dough and let it rest (autolyse) for 10 - 20 minutes.
Fit the mixer with the dough hook. Add the pre-ferment, honey, potato and salt and the mix the dough on medium speed for 15 - 20 minutes, or until very silky and wraps around the hook and cleans the bowl before splaterring back around the bowl. This dough is almost pourably wet.
Fermenting and Turning the Dough:
Shape the dough into a ball and roll it in flour. Place it in a container at least 3 times its size and cover tightly with plastic wrap. Let it ferment until doubled in bulk and filled with large air bubbles, about 4 hours. Using plenty of dusting flour, turn the dough 4 times in 20 minute intervals, that is, after 20, 40, 60, and 80 minutes of fermenting, the leave the dough undisturbed for the remaining time. Do not allow this dough to over ferment or forment to the point of collapse, for the flavor and structure of your bread will suffer.
Shaping and Proofing the Dough:
Turn the fermented dough out onto a well floured work surface, round it and let it rest for 20 minutes. Sprinkle a couche or wooden board generously with flour. Slip a baking sheet under the couche if you are using one for support.
Sprinkle a generous amount of flour over the center of the ball. Push your fingers into the center to make a hole, the rotate your hand around the hole to widen it, making a large 4 inch opening. The bread should have about 12 inch diameter.
Place the dough smooth side down on the floured couche or board and dust the surface with more flour. Drape it with plastic wrap and let it proof until it is light and slowly springs back when lightly pressed, about 1 1/2 hours.
Preheating the Oven:
Immediately after shaping the bread, arrange a rack on the oven's second to top shelf and place a baking stone on it. Clear away all the racks above the one being used. Preheat the oven to 450 degrees (230 C)
Baking the Bread:
Unwrap the bread and flip it onto a floured peel or a sheet of parchment paper. Do not worry about damaging the bread as you handle it; it will recover in the oven as long as it is not overproofed. Slash it with 4 radial cuts in the shape of a cross. Slide the loaf onto the hot baking stone and bake until it is very dark brown, 40 -50 minutes, rotating it halfway into the bake. Let the bread cool on a rack.
Baker's Percentages
100% unbleached bread flour
74% Water, including the potato water
0.15% yeast
2% honey
10% potato puree
2.4% salt
Tuesday, February 13, 2018
Happy Birthday To Me
This year I was really able to enjoy my birthday, so I did things I love...going to the gym (I know, hard to believe that I'm addicted), walking the dog with Sweetie, picking out flower seeds at the Hardware store, talking with my daughter and others on the phone (they called me!), a little gardening, a little watercolor time, starting one of the parts of tomorrow's Valentine baking, a lunchtime visit from a dear friend, TV with Sweetie after a nice dinner with grandma, a little Facebook time and ending it with some fun with Photoshop. It was a very pretty day, too. Thank you to everyone who sent birthday wishes, brought flowers, gave cards, and to Sweetie for the perfect gift and day.
Monday, February 12, 2018
It's the Chocolate
As a kid my favorite kind of cookie was Toll House chocolate chip cookies. I like 'em with nuts and without nuts, with pecans, with walnuts, with macadamia nuts...but they have to have chocolate and lots of it.
Today I made a version of the Toll House chocolate chip cookie. Knowing my you are already waiting for the changes I made to the recipe, and you're right, I made changes.
First, I used some safflower oil in place of some of the butter. I also adjusted the sugar. Usually you use equal amount of white sugar and brown sugar, with the total being one and a half cups sugar. I went with 1/2 cup white sugar and a full cup packed brown sugar because I wanted some chewiness...and it worked. I also added a tablespoon of white vinegar. It reacts with the baking soda to lighten the dough a bit, which is important when you realize how much chocolate there is in proportion to the dough.
For the flour I decided to use a mixture, so I used a combination of all-purpose flour, Irish wholemeal wheat flour, barley flour, and ground flaxseed. It's not healthy (and cookies aren't health food anyway, right?), but you get a nice hit of fiber and good for you things from the wholemeal and flaxseed. The barley flour is milled very fine, which is great when you are also using fiber-rich flours. The all-purpose is a workhorse flour and evens things out nicely. You get a little crispy effect at the edges, but a nice, soft chewy center.
I combined regular semi-sweet chocolate chips with Scharfenberger chocolate semisweet chocolate chunks. For nuts I used chopped pecans. There is a lot more chocolate than nuts, but you could add more nuts if you really want them to show up.
All in all this is a great cookie recipe. Do let the batter sit for an hour. Do leave some space between mounds of dough because the cookies spread a bit. If you make these, eat one for me, OK?
I treated Sweetie to a nice plate of cookies. They were still warm from the oven, with melty chocolate. Yum! Tomorrow I'm taking some gift bags with a few cookies in each to the gym for the trainers. Early Valentine's Day gifts.
Classic Crunchy Chocolate Chip Cookies
King Arthur Flour website Makes about 33 cookies
¼ cup (1/2 stick, 2 oz.) unsalted butter (or, in my case, non-dairy margarine)
½ cup vegetable oil
Note: I used a full stick of soft margarine and ¼ cup safflower oil instead
½ cup granulated sugar
1 cup dark brown sugar, firmly packed
2 teaspoons vanilla extract
3//4 teaspoon salt
2 large eggs
1 tablespoon cider vinegar
½ teaspoon baking soda
½ teaspoon baking powder
¼ cup whole barley flour (If no barley flour available, substitute unbleached all-purpose flour) ¼ ground flaxseed flour
½ cup whole wheat flour, traditional or white whole wheat flour (I used Irish wholemeal flour)
1 cup all-purpose flour
1 cup (8 oz) semisweet chocolate chips
6 oz. semisweet chunks (or use 2 cups chocolate chips total)
Preheat the oven to 350 degrees F. Lightly grease or line with parchment or a silicon baking mat) two baking sheets.
In a large bowl, beat together the butter, oil, sugars, vanilla, and salt until smooth.
Beat in the egg to combine. Beat in white vinegar. In a large bowl combine the baking soda and baking powder, the barley flour and whole wheat flour, and the all-purpose flour and the ground flaxseed flour. Combine thoroughly, then add to the egg mixture and beat just to combine. Add the chocolate chips. It looks like too many chips, but don’t worry. Add the chopped nuts. Beat just to combine. Cover with plastic wrap and let sit for at least an hour and up to four hours. If room temperature is above about 68 degrees F, put dough in the fridge for the standing time.
Drop the dough, by tablespoonfuls, onto the prepared baking sheets, leaving room for cookies to spread a bit. Bake for 12 – 15 minutes, until the cookies are an even golden brown, with just a hint of softness in the center. Remove from the oven, and allow to cool for 5 minutes before transferring to a rack to cool completely.
If you manage to nudge a side of a cookie with the pot holder while turning the pan in the oven about halfway through (optional, but a great idea) like I did...that cookie is for you!
Friday, February 09, 2018
A Sweet Sister
Beth's Birthday was a couple of days ago. Her siblings toasted her, as did some other relatives, and I sent a photo collage to our siblings, too. Yesterday I posted the collage on Facebook, but realized today that not everyone does Facebook (or even blogs...but it's another venue for those who do), so here is the collage from when she was fairly young to recently. Her favorite was as Vina with the green face and the most recent was toward the left in the cowgirl hat. She was a sweet sister and will always be missed and loved.
Monday, February 05, 2018
Queen Mum Revisited
I've baked Maida Heatter's version of the Queen Mother Cake a number of times and it is always a hit.
After hearing a request for a chocolate cake, covered in chocolate...well, anything covered in chocolate actually, I had some fun paging through cookbooks and visiting online sources, too.
In the end the Queen Mother Cake sounded like the perfect thing to make, but with a slight variation. I decided to make it birthday worthy by including some sour cherries that had been bathed in cognac for awhile. It made for a surprise here and there in the cake rather than a dominant theme.
Of course the star of the dessert was the moist, dense but tender cake and that awesome ganache covering it. This is a flourless chocolate cake made with ground almonds instead of the flour. Spend plenty of time creaming the butter and the sugar and adding the eggs because that, plus the whipped egg whites, are what keeps the cake from being flat and too dense to enjoy. The finished cake was fragrant with chocolate and so rich that you only needed a small slice. To gild the lily (and provide a nice contrast to the intensity of the chocolate), those who enjoy dairy had a dollop of softly whipped cream with their slice. Decadent, and delicious. Happy Birthday G!
Queen Mother's Cherry Chocolate Cake with Ganache On Top
12 portions
A variation of Queen Mother Cake in Maida Heatter's Book of Great Chocolate Desserts
6 oz. almond flour (I used King Arthur Flour's)
6 oz. semisweet chocolate, cut into small pieces (I used Scharffen Berger's)
3/4 cup granulated sugar, divided
6 oz. (1 1/2 sticks) non-dairy margarine or butter, at room temperature
6 eggs, separated
1/8 teaspoon salt
1 teaspoon lemon juice
1/8 teaspoon salt
1 teaspoon lemon juice
1 cup pitted sour cherries, drained if needed
Enough cognac to cover the cherries, about 3/4 cup
Adjust a rack one-third up in the oven. Preheat the oven to 375 degrees F.
Grease the bottom and sides of a 9 x 3-inch springform pan and line the bottom with a round of baking-pan liner (parchment works well) cut to fit. Grease the paper. Dust the pan all over the inside with fine, dry bread crumbs. Invert the pan over paper, and tap lightly to shake out excess crumbs. Set the prepared pan aside.
In a small bowl marinate the cherries for at least an hour, pouring the cognac over the cherries. When ready to make the cake, drain the cherries thoroughly. The liquid can be used in cocktails or discarded.
Sift the almond flour into a small bowl and stir in 1/4 cup granulated sugar. Set aside
Place the chocolate in the top of a small double boiler over warm water on moderate heat. Cover until partially melted, then uncover and stir until just melted and smooth. Remove top pan from double boiler and set it aside until tepid or room temperature.
In a stand mixer bowl put the butter. Beat the butter until soft. Add the remaining 1/4 cup granulated sugar and beat to mix. Add the egg yolks one at a time, beating and scraping the sides of the bowl as necessary until smooth. On low speed add the chocolate and beat until mixed. Then add the almond flour/sugar mixture and beat, scraping the bowl, until incorporated. If you have only one stand mixer bowl, transfer batter to another large bowl. If you have two, leave batter in stand mixer bowl and set aside while you prepare the egg whites.
Wash and rinse out and dry the stand mixer bowl if there is batter clinging to the sides. In that large bowl of a stand mixer, with clean beaters (I used the whisk attachment) beat the whites with the salt and lemon juice, starting on low speed and increasing it gradually. When the whites barely hold a soft shape, reduce the speed a bit and gradually add 1/4 cup granulated sugar. On high speed continue to beat until the whites hold a straight point when the beaters are slowly raised. Do not overbeat. Whites should not be stiff or dry.
Stir a large spoonful of the beaten whites into the chocolate mixture to soften it a bit. Then, in three additions, fold in the remaining whites. Do not fold thoroughly until the last addition and do not handle any more than necessary.
Turn 1/2 the batter into the prepared pan and spread to sides. Scatter the marinated cherries over the batter evenly. Cover with the remaining batter. Rotate the pan a bit briskly from left to right in order to level the batter.
Bake for 20 minutes at 375 degrees F. and then reduce the temperature to 350 degrees F. and continue to bake for an additional 50 minutes (total baking time is 1 hour and 10 minutes). Do not over bake; the cake should remain soft and moist in the center. (The top might crack a bit, but that is OK.) NOTE: I found that I needed to check the cake after about 30 minutes and that it was done, so check early and often.
Let cake stand on cooling rack until tepid, 50 - 60 minutes.
Release and remove the sides of the pan. Do not cut around the sides with a knife - it will make the rim of the cake messy. Let the cake stand until it is completely cool, or longer if you wish.
The cake will sink a little in the middle as it cools. Use a long, thin, sharp knife and cut the top level, removing the higher sides. Brush away loose crumbs. (I skipped this part, iced the cake right side up, and was very happy with the results. When the icing goes on its a little thicker in the center, which we found to be fine.)
Place a rack or a small board over the cake and carefully invert. Remove the bottom of the pan and the paper lining. The cake is now upside down; that is the way it will be iced (unless you do as I did and ice the top). Place four strips of baking-pan liner paper (each about 3 x 12 inches) around the edges of a cake plate (although I forgot to do this and the drips were enchanting). With a large, wide spatula, carefully transfer the cake to the plate; check to be sure that the cake is touching the papers all around. The paper help to keep the icing off the plate when you ice the cake. (I chilled the cake, still on the springform pan bottom, overnight, then turned it out onto my hand, finger spread, removed the pan bottom & the paper and set the cake on a cake plate. Because it was cold it wasn't difficult to work with.)
Icing
1/2 cup soy creamer (or whipping cream)
6 oz. semisweet chocolate, cut into small pieces (I used Scharffen Berger semisweet for both cake and icing)
Scald the soy creamer or whipping cream in a 5-6 cup saucepan over moderate heat until it begins to form small bubbles around the edges. Add the chocolate and stir occasionally over heat for 1 minutes. Then remove the pan from the heat and whisk or stir until the chocolate is all melted and the mixture is smooth.
Let the icing stand at room temperature, stirring occasionally, for about 15 minutes or until the icing barely begins to thicken.
Stir to mix the icing and pour it slowly over the top of the cake, pouring onto the middle. Use a long, narrow metal spatula to smooth the top and spread the icing until a little runs down the sides, then use a small, narrow metal spatula to smooth that icing over the sides. The icing on the sides should be thinner than that on the top.
Remove the strips of paper by pulling each on out toward a narrow end.
If desired, sprinkle decorations on top while icing is still wet.
Labels:
birthday cake
,
cherries
,
chocolate
,
Maida Heatter's Cakes
,
Queen Mother Cake
Subscribe to:
Posts
(
Atom
)


