Monday, April 26, 2010

Has It Been That Long?...Sentimental Journey

Sweetie and I met in Berkeley. We got married a few blocks from Chez Panisse. We knew and loved Peets coffee when it was a local coffee hangout. Now that we have been married an amazingly long time considering that we both had struck out once before in the marriage department, we took a trip for our anniversary back to Berkeley and checked out some favorite places.

We started by taking Xam on a short walk at Cesar Chavez park...which used to be landfill. Next we went by the hotel where we spent our one night honeymoon, right by the marina. A drive down to the pier showed that both fancy restaurants and the Yacht Club were still going strong. There is even a brand new marine museum near the children's play area.

We drove through Emeryville, bemused that a run down industrial area is now a shoppers delight, including a huge IKEA where we looked at bathroom sinks and fixtures for the upcoming remodel. It was nice to see that the hardwood place on Ashby was still there, including the carved bears.

When we finally reached our old house we parked and took a walk in the park. The monkey bars where our daughter swung one morning, fell and fractured her wrist were still there.

So was the community garden and the funky climbing structure. We were surprised at how much the trees and shrubs had grown. The plum tree in front of the house now masks most of the front of the house and its roots have pushed up the brick steps up so they are very uneven. I was happy to see that the pomegranate shrub was still there. Max really enjoyed its fruits.

We headed for the University,

noticing businesses and building that were still there and others that were new.

Top Dog was still there near Telegraph, complete with cartoons and political clippings. We had lunch at the cafe in the Berkeley Art Museum and remembered the kids running up and down the ramp outside,

plus our daughter's birthday party in the park area nearby.

The cafe has a different name now, but the food was great...very fresh and flavorful. I had the portobello mushroom panino and Sweetie enjoyed a quesadilla with ham, cheese and veggies. A nice side salad had just the right amount of a good vinaigrette.

Walking down Telegraph I noticed that there were a lot fewer vendors than when I sold Christmas ornaments there one year. Moe's books was still there and just as much fun to browse in as usual.

I even found a copy of Baking with Julia written by Dorie Greenspan which, since it was used, was actually affordable.

Walking and driving around Berkeley always reminds me that it is a city with lovely gardens...most of them private. Even the smallest yard is often brightened with flowers, shrubs and vines. The flower at the top of the post and this one are a couple of examples, both from the old neighborhood.


One of the things that has always delighted me about Berkeley is the inventiveness of attire. We saw a wide range of fashion.

This couple caught my eye... the jester hat she is wearing is purple velvet and the shawl is purple lace. Loved this backpack...obviously belonging to a Cal supporter.

It really was fun to visit familiar and unfamiliar places in a town we once knew very well. We both have lots of happy memories of our time in that crazy place.

Although it was fun to visit the past, it's always fun to try new places, too. Coming next: an evening at Henweigh Cafe'.

Sunday, April 25, 2010

Orange and Chocolate in a Cookie

The siren song of the garden has been drawing me out of doors, plus Sweetie and I celebrated a big anniversary this week (no, not the 50th! ...that one will require fireworks or something), plus clinic, so not much of interest has been going on in the kitchen lately. The exception is a bread I baked this week which will soon be revealed on the Bread Baker's Dog and the second exception are these cookies.

The other evening I made Orange Chicken with Mustard (which has been blogged about in its lemon and orange variations) and I grated way too much orange zest to use in that dish. I saved it because God punishes people who waste good things like fresh orange zest.

You probably think that I'm all organized and always know what I'm going to make or bake, good old Elle the competent one. Wrong! Some days I forget to brush my teeth. Others I forget to eat lunch. Sometimes I even put out butter to soften for baking but forget to bake anything...or don't know exactly what I want to bake.

These cookies were the result of such an experience. I knew I had butter, eggs and buttermilk. All were put out to soften/warm for baking but then the garden took over followed by extreme fatigue. Who knew that an urn full of potting soil and a rose bush could weigh so much? Same for bags of potting soil that needed moving.

I got my stairmaster workout by transfering the veggie flats from the sunspace to the deck for watering and sunbathing, which requires going up and down quite a few steps quite a few times. We won't even talk about the weeding, hauling pulled weeds to the compost area or green bin, more weeding, more hauling. The end result was no baking that day. Used the buttermilk the next day for the bread. Tried again with the re-chilled butter the following day. Then realized I didn't know what I wanted to make with it. See? I can be pretty disorganized.

Finally decided that I wanted to make chocolate chip cookies. That may have had something to do with a few bloggers like Lynn of Cookie Baker Lynn, Peabody of Culinary Concoctions by Peabody and the sweet blogger at Sinful Southern Sweets who have been making variants of chocolate chip cookies recently. It may have been because the idea of cc cookies with orange somehow sounded so appealing knowing that I had leftover orange zest waiting.

Whatever the reason, that's where the softened butter went, along with sugars, an egg, flours (including barley flour!) and both baking soda and apple cider vinegar. I used all the rest of the orange zest, which was more than a tablespoon, but a tablespoon would be sufficent to get that orange grove flavor and fragrance that goes so well with dark chocolate. I added chopped walnuts because I love 'em in cookies.

We have a picnic coming up at the end of the week. These cookies will be great picinic food...if there are any left! They are full flavored, crispy but with a soft middle, full of chocolate chips and the chocoalte is well balanced with the orange. Yummy!

Orange - Chocolate Chip Cookies
based on a recipe from King Arthur Flour website Makes about 33 cookies

¼ cup (1/2 stick, 2 oz.) unsalted butter
½ cup vegetable oil
(Note: I used 1 ¾ sticks of butter instead …it was softened, twice)
¾ cup granulated sugar
¾ cup dark brown sugar, firmly packed
2 teaspoons vanilla extract
1 tablespoon orange zest
3//4 teaspoon salt
1 large egg
1 tablespoon cider vinegar
½ teaspoon baking soda
½ teaspoon baking powder
1 cup whole barley flour (If no barley flour available, substitute unbleached all-purpose flour)
1 cup whole wheat flour, traditional or white whole wheat flour (I used ½ cup whole wheat and ½ cup unbleached all-purpose flour)
2 2/3 cups (16 oz) semisweet chocolate chips
1/2 cup chopped walnuts (optional)

Preheat the oven to 350 degrees F. Lightly grease (or line with parchment or a silicon baking mat) two baking sheets.

In a large bowl, beat together the butter, sugars, vanilla, orange zest, and salt until smooth.

Beat in the egg to combine. Beat in the cider vinegar. Beat in the baking soda and baking powder and as soon as they are beaten in add the barley flour and whole wheat flour, combine thoroughly, then add the chocolate chips. It looks like too many chips, but don’t worry. If using walnuts, add at the same time as the chocolate chips.

Drop the dough, by tablespoonfuls, onto the prepared baking sheets. Bake for 15 – 17 minutes, until the cookies are an even golden brown, without any hint of softness in the center. Remove from the oven, and allow to cool for 5 minutes before transferring to a rack to cool completely.

Wednesday, April 21, 2010

Truly Wonderful Afternoon Tea

Last weekend my sister Natasha and our friend Miroslawa came to town and we met at a high end bakery, Patisserie Angelica, that has begun to serve a full afternoon tea recently. To date our favorite tea place is the Camellia Tea Room in Benicia...I would happily travel there any time to enjoy their afternoon tea delights. The late La Dolce V also had a nice selection of goodies to go with tea. It's nice to have one fairly close, although they are only open to the public for tea on Fridays and Saturdays. It's worth coming then, though. The afternoon tea is splendid! I thought that their scones were the best yet.

The server deserves first mention because she was excellent - sweet, there when you needed her and not when you didn't, enthusiastic but not overly so, helpful and informative and thoughtful. We ordered a little something for Natasha to take home and she offered immediately to hold it in the fridge until we were finished to keep it cool. A nice touch. She also encouraged us to linger as long as we liked which is just what we like to do.

The setting is lovely. The decor is Paris meets West County with some gold framed mirrors and fancy fabrics but not too fussy or overbearing. We had a comfortable table and chairs right by the window which looks out on some plantings. Along a wall to the right of the entrance there are padded benches and small tables. Sometimes there might be outdoor seating. It was peaceful and it was fun to see future brides and their fiancees coming in to do cake tastings. Patisserie Angelica is well know for its fabulous, world class wedding and specialty cakes.

For our tea we had many choices of green, black and decaffeinated teas. Mine was golden and slightly fruity black tea from Mariage Freres of France and it went quite well with the afternoon tea offerings. Miroslawa had lavender scented and flavored black tea and Natasha had organic Earl Gray. We each had a pot of tea in a white pot, plus china teacups with lovely flowered patterns... a different one for each of us. The delightful server keep the tea pots refilled with boiling water as needed.

As you can see from the photo at the top of this post, the selection of treats was wonderful! They use pure butter, local dairy products and eggs and hand craft everything they make (no mixes allowed). We each had one or two of each offering which were spaced around the server so that we could easily reach our own. At the top were the sweets. These included the favorite... macarons with a lightened praline buttercream. It almost melted in your mouth and was rich but light. My second favorite was the tiny raspberry and frangipane tart, although I did enjoy the dense and buttery not too sweet shortbread, too. If you don't enjoy butter this is not your kind of bakery!

The next level down held three kinds of tea sandwiches including egg salad, ham and cucumber. All were fine but paled in comparison to the goodies baked on site. The lowest level had a darling and delicious square tart that had caramelized onion, spinach and mushroom filling. Another savory was Parmesan cheese twists which were crunchy puff pastry and quite delicious. The best item of the whole tea was the currant scone, served with home made lemon curd, strawberry jam and 'mock' Devonshire cream. If you find that the full on tea is too much, they also serve a cream tea that features these wonderful scones and the curd, jam and cream with a pot of tea.

This is the kind of treat that you deserve...you know it is. A leisurely time spent sipping tea, conversing, nibbling on delicious little goodies...what could be more relaxing and delightful?

If you happen to be in the Sebastopol area (about 25 minutes west of Santa Rosa, CA, which is about an hour north of San Francisco), call up Patisserie Angelica and reserve a tea party for yourself. Better yet, invite some friends to join you and you can have as much fun as we did.

Patisserie Angelica, custom pastry and wedding cake design
Hours: Friday and Saturday 10 am - 9 pm
(707) 827-7998
6821 Laguna Park Way, Sebastopol, CA 95472

Friday, April 16, 2010

It Must Be Spring and Pecan Tart Still Sounds Fine

It must be spring...everyone around here is talking about the weather. The other seasons have plenty of fluctuations in temperature and storms, but somehow spring is the most erratic. I'm mentally all set to switch to short sleeves and sweaters but next week looks like it will be back to rain gear and fleece.

My seedlings are big enough to go outside, too, but it may be May 15 before things warm up enough to plant them in the ground. The chill and rain doesn't seem to bother the apple blossoms. It was warm enough yesterday to open the car windows and take in the elusive and sweet fragrance that has such a short season.

After a crazy busy work day it's pretty nice to find a baking recipe that is also short and sweet. I'll be bringing this to a dinner party tonight, so I took a little extra time and arranged the nuts so they would look nice...all facing up. Given a choice of gingerbread, or maple and nuts, Sweetie chose the later. I'm glad he did!

A quick and easy tart with the delectable flavors of maple and pecans. No need for a mixer here…just use a whisk or fork to make the filling. I mixed the crumb mixture with a silicon spatula right in the pot I melted the butter in. Although this tart is fine just as it is, you can guild the lily with a drift of softly whipped cream or vanilla ice cream spooned next to each slice as you serve.


Maple –Pecan Tart with Graham-Gingersnap Crust
based on recipe in Instant Gratification by Lauren Chattman

½ cup (1 stick) butter, divided
1/3 cup plus 2 tablespoons sugar, divided
1 cup graham cracker crumbs
½ cup gingersnap crumbs (about 8 cookies)
¼ cup dark corn syrup
2 large eggs
¼ cup pure maple syrup
1 ½ cups pecan halves

Preheat the oven to 325 degrees F. Melt 5 tablespoons of the butter in a saucepan. Once butter has cooled a little bit (2-3 minutes), stir in the 2 tablespoons of sugar, the graham cracker crumbs and the gingersnap crumbs. Stir well to combine. The mixture will look like damp sand. Press the mixture evenly across the bottom and all the way up the sides of a 9 inch tart pan with removable bottom. Pack the mixture tightly with your fingertips so it is even and compacted.
(Reminds me of making sand cakes in the sandbox and sand castles at the beach.) Place the pan in the freezer until ready to use. (You may want to put a tray under the tart so that the removable bottom doesn’t move and disturb the nice crust you’ve made.)

Melt the remaining 3 tablespoons of butter. In a medium bowl whisk together the melted butter, the remaining 1/3 cup sugar, the dark corn syrup, eggs, and maple syrup.

Remove tart pan from freezer. Scatter the pecans evenly across the bottom of the tart shell. (I like to turn them all so the top of the nut half faces up…look prettier to me…although it is more work and takes time.)Slowly pour the filling over the nuts.

Bake in the preheated oven until the filling is just set, 15 to 20 minutes. (I placed my tart pan on a Silpat lined baking sheet in case any gooey filling overflowed the tart pan.) Let cool completely on a cake rack before removing the sides of the pan and serving.

Serves 6-8

Monday, April 12, 2010

Perhaps the Best Yet...Irish Apricot and Walnut Sourdough Braid

What do you do that makes you happy? This is a question that comes up early on in a book I just read. The School of Essential Ingredients by Erica Bauermeister. It is set in a cooking school and has wonderful characters and a lyrical use of language. It’s a fairly short book but, at least for me, had quite a few places that got me thinking about myself and my own life, even though the lives of most of the characters were quite different from mine.

What do you do that makes you happy? As a small child it was making pretend cakes in the sandbox and decorating them with leaves, twigs and flowers. At the beach my sand castles would be decorated, too, with shells and bark and perhaps a scrap paper flag on a coffee stirrer if I found those on the beach. I guess I like being creative and making things and embellishing them.

When I was older I loved to make my own paperdoll clothes and to bake cookies, and, later, real cakes with Hershey cocoa icing. More creativity, but more useful than sand.

When I was at school one of the things that made me happy was a day trip with a canoe on top of the car and friends to be with who also liked to travel down swollen creeks in the spring and lazy rivers in the summer, aiming our canoes through the rapids for a brief funhouse ride. Maybe I have a wild side!

Being in the kitchen when I can be creative almost always makes me happy. Sharing the results with Sweetie and others who love good food makes me happiest of all. The creation of food, raw, cooked, baked, and grilled, brings out the artist in me and there is something truly magical about creating food items specifically for those you love…some of your love seems to seep into the food as you prepare it…and they feel that when they eat it.

Drawing together to share food, a process as ancient as any, is an elemental and satisfying way to connect with those we love. If the TV is off it is an opportunity for conversation, sharing of daily trials and accomplishments, subtle instruction…and not so subtle sometimes…of the youngsters, appreciation for our blessings and, sometimes, a bit of flirting, too. If you can, try to sit down to eat with your loved one(s) at least once a day with no distractions other than the food. It is one secret to keeping the love and connections alive…and it just might be something you do to make yourself happy.

When I was in high school I was lucky enough to take a sculpture class taught at a nationally renowned museum in Washington DC. We worked with clay and I found the medium to be absolutely wonderful! Clay lets you be godlike, molding and pushing it around to suit yourself.

Recently Sweetie asked me why I don’t work in clay now since I liked it so much. My answer was “Now I have bread dough.” Bread dough is even more fun because it is alive with yeast. That means that you have to cooperate with the dough more than you do with clay…clay is much more submissive…but when you are done you can eat the bread and make another ‘sculpture’ another time!

This braid is truly a delectable bread sculpture...fun to make and fun to eat. As long as you remember that walnuts can give the dough a red tone you can enjoy the flavor they add. Chopped dried apricots give nuggets of intense apricot flavor here and there as you eat the slices.

Sweetie thinks that this might be the best bread yet. Not sure about that but I know it makes the best toast!

The recipe is from a book I bought last spring in Ireland and then somehow left in with the travel books. When it came to light this week I was thrilled to find that it had this bread because I'd been wanting to make a bread with apricots in it. The cook book is called Soups and Breads - The Irish Kitchen by Nuala Cullen. There are wonderful soup recipes in the front and lots of bread recipes in the back. Here and there are charming line drawings, but no photos.

This was written as a recipe for a boule, but I felt like playing with dough and making a braid. Since I used my sourdough starter instead of dried active yeast, the liquid measurements were wrong at first, so I added extra milk...but didn't measure. Add additional milk/water and flour as needed to get a firm dough that is smooth and only barely tacky. Allow plenty of time for rising if you use starter.If you braid the strands loosely you can get a really pretty braid once it rises.

With packaged yeast the first rise should be about an hour and the second, after braiding, about a half hour. Do make this with active dry yeast if you don't have starter...it is really good and worth your time. I'm sending it over to Susan of Wild Yeast for the weekly Yeastspotting event.

Irish Apricot and Walnut Bread
Makes one loaf

75 g/3 oz/2/3 cup finely chopped dried apricots
75 g/3 oz/3/4 cup roughly chopped walnuts
450 g/1 lb/4 cups strong white flour
75 g/3 oz/3/4 cup coarse brown flour (I used whole wheat)
1 tablespoon or one sachet instant dried yeast (I used 1 cup sourdough starter and adjusted the milk/water)
325 ml/12 fl oz/1 ½ cups mixed milk and water
1 tablespoon olive oil (I forgot to put this in, but it turned out fine)
1 teaspoon salt

If using dry yeast: In a large mixing bowl mix together the flours, apricots, nuts, salt and dried yeast.

Make a well in the center and pour in the milk and water, kneading and drawing in the flour from the sides until it is all incorporated. Knead for 2 minutes with a dough hook or 5-6 minutes by hand on a floured surface. Oil the mixing bowl, put in the dough, cover with plastic wrap/clingfilm and allow to rise until doubled in bulk, about 1 hour.

If using sourdough starter: In large mixing bowl (I used stand mixer bowl) put the sourdough starter and 1 ¼ cups mixed milk and water, slightly warmed. Stir or whisk to combine.

In another large bowl combine the flours, apricots, and walnuts. With dough hook in place and mixer on low speed, gradually add the dry mixture until the dough is soft and cleans the sides of the bowl. Knead with the machine for 3-4 minutes. If you prefer you can combine the wet and dry ingredients as described in the first paragraph and hand knead. With sourdough starter you might need to have a longer rising time...I did.

Knock the air out of the dough and knead briefly before turning out onto a floured surface. Shape as desired. I did a three strand braid. Cover and let rise until doubled in bulk. Again, this usually takes longer when you are only using sourdough starter, but the additional flavor that develops is well worth the wait. I also refrigerated my dough overnight before the first rise...even more flavor that way!

Bake in a preheated 375 degree F oven for about 30 minutes. Remove from the oven and tap underneath. If a hollow sound results, the bread is cooked. If not, bake a little longer and test again. You could also shape the dough in two loaves and bake this in two 8 x 4 loaf pans.

Do try some of this toasted...it is sublime.

Sunday, April 11, 2010

Pumpkin for Spring

Pumpkin brings to mind autumn, crisp days, colorful leaves and wood smoke. If you love fall as much as I do, sometimes you need to bring a bit of fall into another part of the year. Rainy spring weather has a similar feel in some ways to fall weather...cool and gray and windy. That's what we are having this weekend, right after a spectacular warm and sunny Friday.

There is something about a rainy spring day that pushes me towards the kitchen with a yen to bake and to make long simmering foods like chili and ragu sauce. The light is different than in mid winter, when it also rains a lot around here, and even with the cloudy skies you can tell that the days are longer, too. Yesterday we started on our bathroom project by purchasing the flooring and by visiting a kitchen and bath showroom to look at solid surface shower enclosure examples.

Once we were home all I wanted to do way play in the kitchen with eggs and flour, spices and chocolate and nuts. The result was a lovely loaf of pumpkin bread, liberally spiced with cinnamon, nutmeg and cloves and laced with walnuts and chocolate chips. The perfect thing to go with afternoon tea, followed by nice long conversations with Natasha and my Mom.

The nice thing about this recipe, one I found in a cookbook I’ve had for ages called Favorite Brand Name Recipe Cookbook, is that you probably have all the ingredients in your fridge and pantry and it goes together quickly…so you, too , can have a nice warm slice, with melty, oozy chocolate and crunchy nuts…in hardly any time at all. Maybe even today. It didn’t start out with any chocolate, but chocolate was just what the day…and the bread…needed. I also subbed a little whole wheat flour, added some cloves, changed the sugar to brown and left out the butter. This is the recipe I ended up with:

Pumpkin Nut Bread…with Chocolate
Makes 1 loaf

1 ½ cups all-purpose flour
½ cup whole wheat flour
½ teaspoon baking soda
2 teaspoons baking powder
1 teaspoon salt
1 teaspoon ground cinnamon
½ teaspoon ground nutmeg
¼ teaspoon ground cloves
1 cup canned solid pack pumpkin (not pumpkin pie filling)
1 cup brown sugar, packed
½ cup milk
2 eggs
1 cup chopped walnuts
1 cup semi-sweet chocolate chips

Preheat oven to 350 degrees F. Grease a 9x5x3 loaf pan.

Combine dry ingredients in a large bowl (both flours, soda and powder, spices).

Put the pumpkin, brown sugar, milk and eggs in a mixing bowl and mix until well blended.

Add the dry ingredients and begin to combine. Add the nuts and chocolate chips and mix just until all are well blended.

Pour into the prepared pan and smooth the top. Bake in preheated oven 45 to 55 minutes or until toothpick inserted in center comes out clean.

Cool in pan five minutes, then turn out of pan and cool on a cooling rack.

Monday, April 05, 2010

Themes and Variations and Dinner Rolls

Some spaces of time are for questions…others are for answers. There was a while, perhaps imperceptible, perhaps not, when many of the usual pastimes lost their sparkle. It wasn’t that I was depressed, just pausing, perhaps questioning the ways I had been spending time. Now I feel like I’m more in an answer part, but it includes some repeats of old songs, with variations.

Jazz players can jam together for hours, riffing, weaving their way around a tune, a rhythm; finding variations on the theme. This playfulness seems to be the essence of creativity. The willingness to try things brings a new perspective.

This week I took a good but simple roll and changed it with fresh herbs and a little whole wheat flour to something memorable.

Today when there were no fresh cherries for a recipe I made last year, I found dried cherries and soaked them in kirschwasser. The chocolate zucchini bread with cherries was different this way, but delicious. I took it to a musical afternoon and book release party so there are no photos. I can, however, show you the book cover I designed.


Don’t be afraid to play around with recipes yourself. Sometimes it will not work out, but you learn something from that, too. I had that experience this week, as well. Leftover Hollandaise sauce seemed to me to be a great starting place for making a drop cookie. I added sugar and almond meal, colored bits of the dough in Easter egg colors.

When the dough lumps hit the heat of the oven they melted down to discs. Perhaps I didn’t have the courage of my convictions and took them out of the oven too soon, but it is just as likely that I should have added egg white and/or flour to the batter. They did taste great but were flat and tore easily.

If I make Hollandaise again I’ll try another shot at Hollandaise cookies. Maybe I’ll create a good cookie next time, but I’m still glad I tried this time, even if the results didn’t match my aspirations.

Here is changed up recipe for the rolls I shared with Sparkle Plenty and Arcadia:

Herbed Pull Apart Dinner Rolls
based on a recipe from Amanda’s Cookin’
makes 12 rolls

1 package quick-acting active dry yeast
1 1/3 cup milk (105 – 115 degrees F)
3 to 3 ½ cups flour (I used 2 cups bread flour, 1 cup whole wheat flour, and about another ½ cup all-purpose flour)
3 tablespoons extra virgin olive oil
1 tablespoon sugar
1 teaspoon salt
½ cup minced fresh mixed herbs – I used a combination of parsley, basil and rosemary with a bit of dry oregano and dry thyme)
1 tablespoon melted butter
coarse salt for the tops

Dissolve yeast in warm milk with sugar in electric mixer bowl. Let stand 5 minutes.

Stir the flours together in another bowl or large mixing cup if you are using mixed flours.
Stir in 1 cup flour mixture, the oil and the salt into the milk/yeast mixture. Beat until smooth. Stir in enough remaining flour until soft dough forms. Cover and let rise in warm place until double, about 45 minutes.
Punch dough down and turn out onto a lightly floured board. Press down on dough to create a rectangle, roughly 8 inches by 10 inches in size. Spread half of the herb mixture over the dough, leaving edges free of the herbs.

Roll up jelly roll fashion, pinching the edges together. Fold in the ends. Press down on the dough to create another rectangle, roughly the same size. Spread the second half of the herb mixture over the dough in the same way, roll up and pinch to seal the same way, and then knead for a few minutes to distribute the herbs throughout the dough.

Prepare a 12 cup muffin pan with non-stick cooking spray. Pinch off 1 inch balls of herbed dough and quickly roll in the palm of your hands. Put 3 balls into each muffin cup, repeating until all dough is used.

If baking right away, brush with melted butter and sprinkle with coarse salt. If not baking right away, brush with melted butter and refrigerate up to a few hours. When read to bake, preheat oven to 400 degrees F. Sprinkle rolls with coarse salt if not already done.

Bake until crust is light golden brown, about 15 minutes. Immediately remove from oven and from pan. Store loosely covered. Serve warm.

Sunday, April 04, 2010

Bread and Memories

Happy Easter to those who celebrate Easter and Happy Spring to those who celebrate the mid-point between the shortest day and longest day of the year. This is actually a bit toward the longest, but you would never know it from our weather. Chilly nights, rainy days and, as a result, tulips that last and last isn't so bad, really. The apple blossoms are getting ready to bloom but have been discouraged by unseasonal cool.

One of the nice things about cooler weather is that my interest in bread baking has revived. There is something that is emotionally warming about the smell of freshly baked yeast breads.That slice of toast with marmalade goes so well with a warming cup of tea or coffee, too.

The last couple of days I've been baking or talking about baking with other bread bakers including J of the Green Thumb and Sparkle Plenty. One of the things that has come up is that my Dad used to bake loaves of bread for sandwiches. I forget if this happened a long time before he retired or shortly before, but I remember how much better I liked sandwiches made with his bread. Since we were a large family, he would bake at least four loaves on a weekend afternoon, ready for school lunches.

After he retired and I had moved to California he and I discussed bread baking because i was learning the mysteries of yeast and kneading. One of my favorite artisan breads was Struan bread, a complex loaf with mixed grains and a hearty taste. When I found a book by Brother Juniper (who used to have a cafe and bakery in nearby Forestville, although that was before I lived in the North Bay area) that had the recipe. I sent it to my Dad and he tried it. I think it was a little "crunchy granola" for him. When you consider that his simple white bread loaves were the best white bread you could have, I can't blame him for going with white and whole wheat fine flour breads. I think he made rye bread, too, probably 'deli rye'. I often think of him when I make loaves of bread, especially bread I plan to use for sandwiches.

This past week I wanted some sandwich bread for our house, so I took a recipe that included seeds and nuts and simplified it down. I used white bread flour, whole wheat flour and the 12 grain blend from King Arthur, but they are all fine flours, so the bread was a nice simple loaf with a great crunchy crust, moist fine crumb and delicious flavor.

It made great toast as well as being perfect for sandwiches. If you don't have a sourdough starter, just soften a package of yeast (about 2 teaspoons) in 1/4 cup warm (about 115 degrees F) for 10 minutes. Use that plus 3/4 cup warm water in place of the sourdough starter. It changes the flavor of the bread and usually rises a bit faster, but you will have a yummy loaf of sandwich bread. You can double the recipe for two loaves.

Sourdough Sandwich Loaf
Makes one loaf

2 cups all purpose unbleached flour
1 cup 12 - grain flour (or use additional wheat flour)
1 cup whole wheat bread flour
1 cup sourdough starter
1 1/2 cups lukewarm (70 degree F) water
1 tablespoon salt

In a large bowl mix the all purpose flour, 12 grain flour, and whole wheat flour together to combine. (I used a whisk to whisk them until combined.)
Put the starter, water and 1 cup flour mixture in the bowl of a stand mixer and whisk to make a smooth batter. Use the paddle or dough hook with mixer on a low speed to work in additional 1 1/2 cups flour mixture. If not using dough hook, change to dough hook at this point. Add rest of the flour mixture to the dough, 1/2 cup at a time with the mixer on a low speed. Let the mixer knead the dough for about 5 minutes, or until dough is elastic, or turn the dough out onto a floured board and knead in the rest of the flour then knead for 5 minutes until the dough is elastic.

Lightly coat a 4-quart mixing bowl with oil and transfer the dough to the oiled bowl. Turn the dough over layer of plastic wrap and allow the dough to rise at room temperature, until it has doubled in bulk, at least 8 hours, preferably overnight.

Press the air out of the risen dough and gently knead it until it is springy again.

Shape the dough into a loaf. My method is to press the dough into a rough rectangle, roll it up like a jelly roll, tuck the ends under and then put into a prepared bread pan with the tucked ends on the bottom.

Loosely cover the loaf with plastic wrap and let rise until doubled in size, about 4 hours.
Preheat the oven to 450 degrees F. Bake until well browned and sound hollow when tapped, about 35 minutes. An instant read thermometer inserted into the center of a loaf will register 200 degrees F.

Transfer the baked loaf to a cooling rack and let cool 5 minutes, then turn loaf out of bread pan. Let cool to room temperature before slicing.

Friday, April 02, 2010

Second Time's the Charm

It was fun making the Hot Cross Buns that I posted a few days ago, but it was even better today. A dear friend, J of the Green Thumb, invited me to bake with her, so we made another batch of hot cross buns with some variations.

These had all bread flour and no whole wheat flour, citron and candied pineapple instead of the marmalade, and a proper cross with Meyer lemon juice using a lemon she picked right before we made the icing! so they were truly different, although still a bit spicy and fruity. I liked these better. They were more tender, the citron and pineapple were somehow more to my taste, and the lemon juice in the icing really brought out the spices. Best of all, they were not overbaked as the earlier ones were! This is surprising since we were talking up a storm and not being diligent about keeping track of the time :)

We had fun with the currants, too. Since we didn't use raisins this time, we used more currants and they made little faces when we turned them into buns after weighing the dough pieces. Keeping them close to the same weight is supposed to keep them pretty much the same size, but maybe more had fruit than others because the sizes were markedly different. Once you started eating them that didn't really make any difference. Yummy hot cross buns! One other difference was that the dough was dry when we hadn't even added all the flour, so we added about 1/4 cup fresh orange juice and removed the dough from the dough hook, mixed some of the juice into the dough with a spatula, then started up the machine with the dough hook again and let it mix in the rest of the juice. Then we could add the additional flour and let the machine knead it a little while.

We started them about 10 am and they were baked by 2 pm. After cooling for a half hour we iced them. You might be able to shave a half hour off, but still, four to four and a half hours isn't bad for fresh, soft yeast rolls that make your kitchen smell wonderful. There were even two pans of buns, so we each had some. Thanks J! It sure was fun!!


I'm sending this version over to Yeastspotting since it is a new week. Do check out Wild Yeast and the great bread showcased there.
Hot Cross Buns - April version
Makes 16 buns

3/4 cup warm (100° to 110°) whole milk
4 1/2 teaspoons (2 packages) active dry yeast
1 large egg
1/4 cup brown sugar
1/4 cup butter, melted and cooled
3/4 teaspoon salt
1/2 teaspoon nutmeg, preferably freshly grated
1/2 teaspoon cinnamon
1/4 teaspoon cloves
Finely shredded zest of 1/2 large orange
About 3 cups bread flour
½ cup candied citron, chopped
¼ cup candied pineapple, chopped
1/2 cup dried currants
¼ cup triple sec (or rum)
1 tablespoon fresh Meyer lemon juice
1 cup powdered sugar – or enough to make a thick icing

1. In a bowl of a stand mixer, combine milk and yeast; let stand until yeast softens, 5 to 10 minutes. In another bowl, whisk together the whole egg, brown sugar, cooled melted butter, salt, nutmeg, cinnamon, cloves, and orange zest. Add to the milk/yeast mixture and beat on medium speed with dough hook until blended.

2. Blend most of the flour into the batter. Beat on medium speed until dough is smooth and stretchy, 10 to 12 minutes, using dough hook. Add just enough additional flour, a tablespoon at a time, (about 1/4 cup) so dough is only slightly tacky or add fresh orange juice if batter is too dry.

3. Soak currants in the triple sec for 10 minutes, then drain off the triple sec and use for another purpose or discard. Add candied citron, pineapple and the currants to the dough, pick up dough, and mix with your hands to distribute fruit.(I turned the dough out onto a lightly floured board and kneaded the dough in...that way I was sure that I had the dough well kneaded before adding the fruit and that the fruit was well distributed.)
Return dough to bowl, cover, and let rise in a warm place until doubled, about 1 1/4 hours.

4. Punch down dough. Turn out onto a lightly floured surface. Use a bench scraper or knife to divide dough into 16 pieces.With floured hands, shape into 16 smooth rounds. Evenly space rounds in two buttered 8- or 9-in. round pans.

5. Cover loosely and let rise in a warm place until doubled and puffy, about 40 minutes. Meanwhile, preheat oven to 400°. Brush buns with beaten egg. Bake until deep golden, 13 to 15 minutes. Let cool in pans at least 30 minutes.

6. In a small bowl, stir together lemon juice and powdered sugar until smooth. Spoon into a small, heavy-gauge plastic bag, snip a hole in a corner, and squeeze icing onto buns to form large Xs.

Tuesday, March 30, 2010

Seasonal Sensations - Hot Cross Buns

Seasonal treats of springtime include the wonderful, soft, spicy, fruity hot cross buns. They are fairly quick and easy to make and delicious to eat. I remember eating buns like these when I was a child. Easter was a special time for children when I was growning up. We often had something new to wear to church and the church would have pots of Easter lilies at the altar. After breakfast we were anxious to check out our Easter baskets, all lined up in a row in the living room, filled with jelly beans and marshmallow eggs, yellow and pink marshmallow chicks, and chocolate bunnies. The eggs we had colored the day before became the stars of Easter egg hunts,

and my dad would take home movies of us finding the eggs on automobile bumpers and in clumps of grass, holding up the bright egg to the camera with a smile. It's no wonder that I still enjoy making colored eggs and special treats like these buns.

The recipe called for candied orange peel, but I had some fresh orange marmalade left over from the Orange Tians so I substituted that and added additional flour to offset the extra moisture from the marmalade. I like the strong dose of orange in these buns, but you could substitute lemon zest and candied lemon peel or citron if you prefer. Some recipes also call for mixed fruit like you use for fruitcake. I like the relative simplicity of currants and golden raisins.

Sweetie likes his buns without the icing cross...but I think you need the cross to make 'em hot cross buns.

This is my entry to Tangerine's Kitchen for Bread Baking Day #28 - Bread Buns, plus I'm sending it over to Susan of Wild Yeast's Yeastspotting weekly event. Many thanks go to Susan for this weekly compilation of wonderful yeast based recipes!

Hot Cross Buns
Makes 16 buns

3/4 cup warm (100° to 110°) whole milk
4 1/2 teaspoons (2 packages) active dry yeast
1 large egg
1/4 cup brown sugar
1/4 cup butter, melted and cooled
3/4 teaspoon salt
1/2 teaspoon nutmeg, preferably freshly grated
1/2 teaspoon cinnamon
1/4 teaspoon cloves
Finely shredded zest of 1 large orange or 1 large lemon
About 31/2 cups flour - I used 2 cups bread flour, 1 cup whole wheat flour, and 1/2 cup all-purpose flour
1/2 cup chopped candied orange peel(or candied lemon peel or candied citron) or 1/2 cup orange marmalade*
1/4 cup dried currants
1/4 cup rum
1/4 cup golden raisins
2 teaspoons fresh orange juice
2 teaspoons fresh Meyer lemon juice
1 cup powdered sugar

1. In a bowl of a stand mixer, combine milk and yeast; let stand until yeast softens, 5 to 10 minutes. In another bowl, whisk together the whole egg, brown sugar, cooled melted butter, salt, nutmeg, cinnamon, cloves, and orange or lemon zest. Add to the milk/yeast mixture and beat on medium speed with dough hook until blended.

2. Whisk the flours together in a bowl or large measuring cup if using more than one kind. Blend most of the cup flour into the batter. Beat on medium speed until dough is smooth and stretchy, 10 to 12 minutes, using dough hook. Add just enough additional flour, a tablespoon at a time, (about 1/4 cup) so dough is only slightly tacky.

3. Soak currants in the rum for 10 minutes, then drain off the rum and use for another purpose or discard. Add orange peel and currants to the dough, pick up dough, and mix with your hands to distribute fruit.(I turned the dough out onto a lightly floured board and kneaded the dough in...that way I was sure that I had the dough well kneaded before adding the fruit and that the fruit was well distributed.)
Return dough to bowl, cover, and let rise in a warm place until doubled, about 1 1/4 hours.

4. Punch down dough. With floured hands, shape into 16 smooth rounds. Evenly space rounds in two buttered 8- or 9-in. square pans.

5. Cover loosely and let rise in a warm place until doubled and puffy, about 40 minutes. Meanwhile, preheat oven to 400°. Brush buns with beaten egg. Bake until deep golden, 13 to 15 minutes. Let cool in pans at least 30 minutes.

6. In a small bowl, stir together juices and powdered sugar until smooth. Spoon into a small, heavy-gauge plastic bag, snip a hole in a corner, and squeeze icing onto buns to form large Xs.

* If you use marmalade, you should plan to use about another cup of flour

Saturday, March 27, 2010

Daring Bakers Orange Dessert Delight

Once upon a time in the Land of St. Honore' March came in like a lion, with rain and cold. It was a good time to gather in the living room as a family, basking in the glow of the television set. Maman put a frilly apron on over her sleek black outfit, then put the coffee pot on. As she set the dessert delight she had made onto pretty little plates and added the caramel orange sauce she thought back to the fun she had had creating these light and citrus-rich morsels.

Although she had cooked and baked for years she had never segmented oranges as this recipe required. As the juice dripped off her hands into the bowl, she cradled the peeled orange in one hand and sliced next to each membrane to release the segments. The remaining membranes reminded her of a fan somehow.

Oranges add such a bright look and flavor, so welcome in winter!
She has also never made fresh marmalade, even though she loved it on toast. It was pretty easy to do and the taste so much fresher and lovely than the store bought kind. It was interesting that the whole orange was used and that the blanching removed a lot of the bitterness usually found when the pith is included in recipes. Here's the slices being blanched:


Soon she was layering the caramel covered orange segments,

a lovely whipped cream based band of white, and fresh marmalade on a sweet, crisp cookie.

Once chilled and put on the plate it looked like a dessert you would see at a fine restaurant. The sauce added just the right touch of extra elegance.


As her family gathered to watch the Academy Awards ceremony and to see if they had guessed correctly on Best Picture, she served them the Orange Tians and freshly brewed coffee. The perfect dessert for a festive evening!

The 2010 March Daring Baker’s challenge was hosted by Jennifer of Chocolate Shavings. She chose Orange Tian as the challenge for this month, a dessert based on a recipe from Alain Ducasse’s Cooking School in Paris.

Thanks to Jennifer for choosing such a delightful, delectable dessert! It was fun to make and even more fun to eat!


You can find the recipe here at Jennifer's blog. Do check out other Daring Baker's versions of this treat by using the Blogroll.

Thanks for joining me for the March 2010 Daring Baker's Challenge. Sweetie says orange you glad you did?

Friday, March 26, 2010

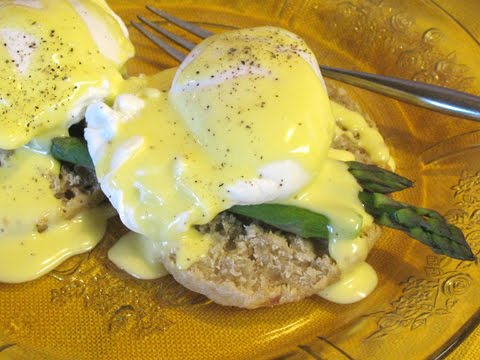
Seasonal Sensations - Eggs Benedict

Eggs benedict isn't just for fancy restaurants. You can make them at home. This classic dish is perfect for spring. Farm fresh eggs can be found at farmers markets and roadside stands.

Asparagus are sweet and green and bursting with flavor. Egg yolks and asparagus are a great pairing. This is a truly decadent dish, especially since it has Hollandaise sauce…all those egg yolks and that melted butter makes a heavenly, rich sauce! If you can find Meyer lemons, they work beautifully in this sauce. If not, use a fresh lemon in any variety available to you. Don’t use bottled or frozen juice…the fresh juice helps the egg yolks accept the butter in the sauce and adds a sprightly flavor, too. This would be impressive for a springtime brunch with a select, small guest list.

I think I’ve only had Eggs Benedict about 5 times in my life, and never with asparagus. I’ve wanted to try making it for a long time but was put off by all of the parts seeming so complicated and not sure that I could pull it off. Well, dear readers, I did it! I'm going to make this my first entry in the High Five Un-group hosted by the lovely Lynn at Cookie Baker Lynn blog. If you want to participate, check it out here.


I made this for Sweetie for breakfast on a morning when we were not in a hurry. He enjoyed his coffee while I put together the various parts. I had made the English muffins ahead and had them ready to toast. This recipe did create quite a few dishes to wash up, and it does take some concentration to get all of the parts ready at the same time, but none of it is difficult.

The sauce is ready in minutes – I read the classic way to do it and blessed the invention of the food processor and blender...so much faster and fairly foolproof unlike the old way. The eggs take less than one minute to put into cups and four minutes to poach. The asparagus only take three or four minutes total. I suspect that toasting the muffins takes the longest.

TIMING is Everything
Plan the order in which you will do the different parts and everything will turn out fine. Read through the various recipes. You may want to make your own list. This is the order I used:
Split the muffins and set by toaster.


Fill the pot to 2 ½ inches and bring to boil, add the vinegar, then set to simmer
Prepare the asparagus for steaming
Juice the Meyer lemon and strain the juice
Separate the egg yolks for the hollandaise and put into the food processor
Crack an egg into four custard cups
Set out the plates, the pitcher for the sauce, and two bowls for hot water
Melt the butter for the hollandaise
Toast the first English muffin
While muffin is toasting, begin the hollandaise, through adding the hot melted butter…leave it running
Slip the eggs into the simmering water. Set timer
Pour the finished sauce into pitcher and fill bowl with enough hot water to come half way up pitcher
Put second English muffin in toaster
Steam the asparagus
Put hot water into second bowl
When timer goes off, use slotted spoon to remove poached eggs to bowl of hot water
Remove asparagus from microwave
Plate toasted muffins, add asparagus
Use slotted spoon to removed rinsed eggs from hot water, let drip, put over asparagus and muffins
Pour on hollandaise

Grind on pepper
(Take photos if you are a blogger) and prepare other plate the same way
Serve!


If you like you can do the following the day before:

- Juice the lemon, strain the juice, store in a small container in fridge. Let come to room temperature.
- Split the muffins. Store in airtight container
- Prepare the asparagus but don’ t steam. Store in fridge. If still cold when steamed, you may have to steam a little longer
- Separate the eggs for the sauce. Reserve the whites for another use. Store, covered, in the fridge. Bring to room temperature to use for the sauce
- Crack an egg into individual cups or containers. Store, covered, in the fridge. Bring to room temperature before poaching

Here are the parts of the recipe:

Eggs Benedicts with Asparagus and Meyer Lemon Hollandaise Sauce

The Asparagus
For each serving: 3 – 4 spears of very fresh asparagus, ends snapped off. Steam your favorite way, and keep warm until ready to assemble.( I put mine on a microwave safe plate, added a teaspoon of water, covered and microwaved two minutes on high power. I did this after the eggs had started poaching, while the second English muffin was toasting, and after the hollandaise sauce was done and keeping warm.)

The English Muffins
Prepare English muffins using your favorite recipe, or purchase some.

Split with a fork to keep the craggy interior to trap the egg yolks and hollandaise. Toast while the hollandaise is being prepared and eggs are poaching. Keep warm until ready to assemble the dish. (I covered mine with a folded dishtowel.) Plan on an English muffin per person, plus a few extras for swabbing up the copious egg yolk.

The Blender Hollandaise (I used a food processor and it worked fine)
from All Recipes:http://allrecipes.com/Recipe/Blender-Hollandaise-Sauce/Detail.aspx
Ingredients – enough for 3-4 people

3 egg yolks
1 tablespoon lemon juice
1/2 cup butter
Directions

In the container of a blender (or food processor), combine the egg yolks, and lemon juice. Cover, and blend for about 5 seconds.

Place the butter in a glass measuring cup. Heat butter in the microwave for about 1 minute, or until completely melted and hot. Set the blender on high speed, and pour the butter into the egg yolk mixture in a thin stream. It should thicken almost immediately. (If doing in a food processor, keep it running for another minute or two while you get the eggs into the poaching water. The extra time helps with the thickening process). Keep the sauce warm until serving by placing the blender container in a pan of hot tap water. (If using a food processor, pour the hollandaise into a heat proof small pitcher and put that into a pan or bowl of hot water.)


The Poached Eggs – enough for 2-3 people

You will need:
4 to 6 fresh, cold, eggs
2 quarts boiling water in a saucepan about 8 inches in diameter
(depth of water should be about 2 1/2 inches)
1/3 cup, white vinegar (2 1/2 tablespoons per quart)

Equipment: a perforated spoon; a kitchen timer; a bowl of very warm water (120 degrees).

Preparing the poaching water: Pour the vinegar into the boiling water, and reduce the heat so that the water is just at the simmer – quietly bubbling. Vinegar quickly coagulates the white when the naked egg enters the water, and this in turn helps preserve its oval shape – again, if the egg is reasonably fresh. If you can find fresh eggs from the farm, do use them. You really taste the eggs in this dish.

Getting the eggs into the water: Being a wuss about boiling water, I took the low road and cracked an egg each into four custard cups. Once I was ready, with the English muffins toasting, the asparagus ready to steam, and the hollandaise sauce almost finished in the food processor, I made sure that the water was simmering, then put the lip of the custard cup as close to the top of the water as possible and gently let the egg slide with one movement into the simmering water. Set timer for 4 minutes. Rapidly continued with the 3 other eggs, adding them clockwise around edge of pan. Because I didn’t do the version where you prick the end of the egg and give it a quick bath in the shell in boiling water, bits of the white did trail away from the poaching eggs, but it was fine in the end.

Finishing the eggs: Regulate the heat so that the poaching water remains at hardly a bubble, and when 4 minutes are up, carefully remove first egg with a perforated spoon and slide it into the bowl of very warm water, to wash off the vinegar. Estimating how much time you took for each additional egg - it will be 15 seconds at most when you are used to the movements - remove the other eggs in turn.

Keeping eggs warm after cooking them: The eggs will keep warm as long as the water remains warm, and they cannot overcook if water is not hotter than 120 degrees; if your wait is a bit long, pour a little boiling water into the bowl from time to time. (I also added a bit of boiling water to the bowl holding the hollandaise pitcher, just to make sure it stayed warm.) If you will be serving more than three people, I would have another pan of water to poach additional eggs, but keeping the timing right is tricky for 4-6 eggs and more difficult with more eggs and toasted English muffins to keep warm. You could serve one muffin half, one egg and some asparagus alongside to double the number served, but be prepared for requests for seconds!


Putting It All Together
Have the table set and plates ready. Once the eggs are in the warm water to rinse off the vinegar, put an English muffin, toasted, both top and bottom if you are having two eggs per person, onto each plate. Top each plated muffin set with 3 spears of the steamed asparagus, laid crosswise over the muffin pieces, top each muffin piece with a poached egg (the classic method is to dry the egg in a clean towel…I just used the slotted spoon and let the water drip for a couple of seconds) placing over any part of the asparagus that is on the muffin, and immediately pour on some hollandaise sauce over all. If desired, grind some fresh pepper on top of each egg. Serve at once while everything is hot. Repeat for each plate of Eggs Benedict. Enjoy the compliments of your family and/or guests.