Saturday, October 16, 2021

Babes Bake Pumpkin-Shaped Bread


You know fall has arrived when everywhere you turn there is pumpkin spice this and pumpkin spice that...and lots of actual carving pumpkins at the market, too.

For October, the Bread Baking Babes have been given a seasonal challenge by Cathy of Bread Experience, our Kitchen of the Month. She asked us to make boules (round loaves of bread) shaped with string to resemble pumpkins. She gave us a recipe for the bread, but I struck out in another direction, making a bread that I last made in 2007. It's a potato bread, with the potato part being boiled and mashed garnet yams. They impart a light orange color to the bread and contribute both flavor and moisture as well. In 2007 I made the bread with garlic as the recipe called for, but this time I wanted a more neutral bread so I skipped the garlic and added just a touch of...wait for it!...pumpkin spice.


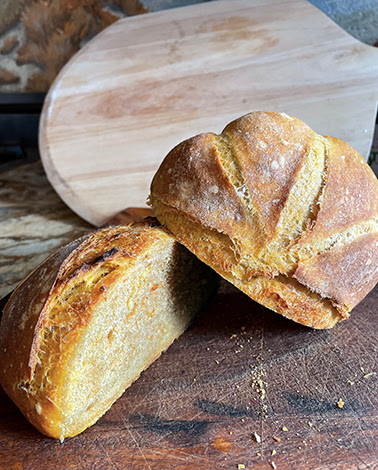
Shaping these little loaves was fun if challenging. Mine had quite a bit of oven spring, so they tore a bit. The first one did that and I blamed it on my forgetting to cut any slashes to allow for expansion, but I did quite a few slashes on the second one and still had it tear . Fortunately, they both still had shape from the string and looked somewhat pumpkin-like. I used bakers twine which I marinated in olive oil for a while and I had no trouble removing the string once the loaves were done. The crust was thin but crisp and the crumb was moist and tight. I loved the flavor. It wasn't sweet, had a taste of yam and a hint of the spice mix. I liked it best with just a bit of non-dairy butter, but tried it toasted, too. Both were delicious. Sweetie says this is the best bread yet, but I think it's because its been so long since I baked bread.


Do try this yourself. The given recipe can be found on Cathy's site, and she also has great photos of the process of laying out the strings that shape the ball into a squash shape (after oiling the strings), and all the information you need to be successful.

Be sure to visit the other Babes sites, too, to see what they did with this fully fall bread! 


Yam Bread 'Pumpkins'

based on a recipe by Narsai David

1 cup warm water (preferably the water the yams were boiled in)
1 cup mashed yams (boil until tender, then peel and mash and cool to room temperature)
2 teaspoons sugar
1 package active dry yeast
3 - 4 cups white bread or all-purpose flour (about)
1 teaspoon salt
1/4 teaspoon pumpkin pie spice (optional)
spray oil

Place the water, sweet potatoes (yams), sugar, and yeast in a mixing bowl. Let rest for 5 minutes. Add half the flour and all the salt, and pie spice if using. Mix well with a dough hook or heavy paddle. The dough will be quite soft and sticky. Add another cup of flour. If using a dough hook, you may need to add a little more flour to keep the dough around the hook and to make the dough firm enough to shape. Continue mixing for 4-5 minutes if you are using a mixing machine, knead about the same amount of time if kneading by hand.  Spray oil (I use olive oil spray) to coat a large bowl or rising container. Put in the dough and turn to coat the dough with oil. Cover with oiled plastic wrap or with a clean shower cap.

Place the dough in a warm place to rise.. When the dough has doubled in volume, anywhere between 1 and 2 hours, turn it out onto a floured surface and punch it down to get out the air that has inflated it. Kneading a few times also helps in this step. Divide the dough into two equal pieces. Shape each piece of dough into a ball, pulling the dough to the 'back' of the ball repeatedly to form a skin of dough. This is a very soft dough, so use plenty of flour to keep it from sticking to the board.

Now it's time to shape these balls into pumpkins! Use a round piece of parchment - either a pre-cut one or one that you cut to fit your Dutch oven or other baking pot.

Use a food safe string for tying. I used baker's twine. The key thing is to oil your string well. I cut eight lengths (four for each 'pumpkin') that would encircle the dough ball with a fair amount left over for tying, then put these, one by one, into a bowl. I added olive oil and pushed the string down into the oil and let them soak until it was time to use them. I had no trouble peeling the string off the pumpkins once the breads were baked, but if you do, use a sharp paring knife to help loosen the string if it sticks.


Lay four pieces of string on the parchment circle with the ends beyond the parchment paper. Lay two in a cross and the other two between those. Put the dough ball right where the strings all cross, then pick up the ends of the strings and gather them together and tie at the top. Don't tie the string too tight in order to give the loaf room to expand in the oven. However, you don't want it to have too much oven spring because it could tear and mess up the shape. (I had too much oven spring, so mine did tear and the pumpkin shape wasn't as clear, but it was still pretty.

Put each shaped and tied dough ball (boule) into a lined and floured banneton or flour two tea towels well and use them to line two bowls, then put the dough balls in those. Cover lightly with oiled plastic wrap and allow to rise for about half an hour. Balls will get puffy. Reserve the parchment circles for baking time.

When it is about 45 minutes before baking time, preheat the oven and a deep cast iron pot or Dutch oven, with lid, to 450 degrees F. If you don't have that kind of pot, a baking stone with either a deep sauce pan or an overturned metal bowl will work. You are creating a mini-oven for each 'pumpkin' to bake in, in turn.

When ready to bake, return the bread to the parchment circles,  Score the bread in a pattern (I used a short vertical slash three time for each section) and then carefully remove the pot to a heavy towel.  Using hands protected with oven mitts, remove the lid and lower the 'pumpkin' loaf on the parchment paper into the pot. Immediately put on the lid and return the pot to the oven. Bake for 15-20 minutes, then remove the lid and bake an additional 15-20 minutes. Loaf will be golden to medium brown and when the bottom of the loaf is tapped, it will sound hollow. Immediately remove the strings and set the loaf to cool on a wire rack. Repeat the baking with the second shaped ball of dough.

Makes two medium-sized pumpkin shaped rustic loaves. 

Friday, October 08, 2021

Fig and Walnut Tart

It really feels like fall today, with cooler temperatures and lots of trees changing into their autumn colors. One of the lovely fruits of fall is fresh figs. A neighbor gifted us with some that she grew...the purple ones that have a sort of magenta seed section that is so pretty. I decided to combine them with another fall crop...walnuts...in a tart.

Frozen puff pastry is such a delightful thing to have on hand. You just defrost it overnight in the fridge and it's ready to use. Having made puff pastry from scratch, with all the rolling, folding, and successive bouts of chilling, I know how much work is saved by using the pastry from the store. Since I can't do dairy, I use the kind made with shortening. Perhaps it doesn't have as much flavor as that made with butter, but it is still delicious and flaky.

You start by rolling out a piece of the thawed puff pastry to make it a bit bigger. With a sharp knife you trim around the edges to create thin strips which become the sides of the tart once you 'glue' them onto the remaining base with water.


Inside the tart, you spread a mixture that is a combination of ricotta cheese (I used the non-dairy Kite Hill ricotta - it's very hard to tell it apart from dairy ricotta), sugar, orange zest, and an egg yolk. On top of that you place wedges of the fresh fig in a nice pattern...I just used rows. Chopped walnuts get sprinkled between the fig wedges. An egg  wash, using the egg white that remained when the yolk was used in the filling, is brushed carefully over the pieces of pastry that make up the sides...carefully because you don't want any wash to go down the sides or it won't rise properly.


The tart gets baked in a hot over...425 degrees F until the fruit juices start to run and the crust is golden brown. After a bit of time cooling, treat yourself to a rectangle of pure autumn deliciousness! The nuts have roasted, the filling has firmed up, and the fruit is juicy and mellowed by the cooking. Sublime! 

The actual recipe will be posted here tomorrow.


Thursday, September 30, 2021

Fresh Tomato Soup

Here we are at the end of September. The tomatoes are ripening in multiples a day. I only planted two plants this year. The Black Krim has produced at least a half dozen super sized tomatoes and there are a few more ripening now, but the Early Girl plant has produced dozens and dozens of tomatoes. They are smaller and their flavor is milder, but they are perfect for putting in a green salad. I also love to slice them, spread the slices on a nice plate, douse them with good olive oil and balsamic vinegar, then sprinkle with pepper, a bit of salt, and some chiffonade of fresh basil. So good.

Since I have such a bounty of tomatoes, I decided to make fresh tomato soup for lunch. My Dad had a recipe from 1977 in which you simmer the peeled, seeded, and diced tomatoes in butter, then puree them in a blender before adding seasonings and flour for thickening, water and white wine or chicken broth. 

I used that recipe as a jumping off place. Before I simmered the tomatoes, I gently cooked a whole onion, diced, in olive oil, adding a minced garlic clove toward the end of cooking. I added the tomatoes to that with some non-dairy butter, but, although I peeled them, I didn't seed them and only cut each into six wedges. I used a hand blender to smooth out the cooked vegetables but it didn't make the soup smooth, just smoother. The seasonings were the same, but I put in a can of chicken broth instead of water and chicken broth. I also stirred in a few leaves of basil that I had minced. I let it all simmer then made a slurry of flour and water which I stirred in and let it all simmer a bit more until it thickened just a little. Eating it was like tasting the essence of summer. It's also healthy...only 85 calories a serving.

I'm going to give you Dad's recipe, but you can always change things up as I did to make it your own.


Fresh Tomato Soup

2 pounds ripe tomatoes, peeled, seeded, and diced (See note)
3 tablespoons butter or margarine or olive oil
2 tablespoons flour
1 teaspoon salt
1/2 teaspoon sugar
1/8 teaspoon fresh-ground pepper
1 cup water
1/2 cup dry white wine or or vegetable broth or chicken broth - canned or home made

In large saucepan, simmer tomatoes in butter about 5 minutes. Remove from heat and rub through a wire strainer or whip smooth in a blender.
Return to saucepan. Sprinkle in the flour, salt, sugar and pepper, mixing well. Add water, and wine or chicken broth. Heat to simmering. Garnish with pat of butter or crisp crackers or thinly sliced fresh basil.
Makes 6 servings - about 85 calories per serving.


Note:
To peel tomatoes, bring a pot of water to boiling, only filling pot half way. With a sharp knife, cut and x on the 'bottom' of the tomato (the end opposite of the stem end). Place the tomatoes into the boiling water and cook a minute or two until the skin near the x starts to separate. Remove tomatoes from boiling water and peel from the x. Peel will come off easily - if it doesn't, return the tomato to the boiling water. To seed, cut in half horizontally and squeeze out the seed and gel. Remove stem end at center and dice.

Sunday, September 19, 2021

Early Fall Fruitfulness in a Tart


Years and years ago when our son was pre-kindergarten age, he and his friends would roam the hill having fun in simple ways. We had an old telephone van that was beyond repair and became a favorite play area. It was at different times a fort, spaceship, racing car...and site for what Max called 'a feast'. The feast was usually held about this time of year when there were plenty of things they could collect to eat together. One time he showed me a serving: a large grapevine leaf held a half dozen or so ripe blackberries, a couple of walnuts that had been smashed enough with a rock that you could pry out the nut meat, and an apple from the Gravenstein apple tree. A nice snack from the land.

I was thinking about that when I dreamed up today's tart. I had collected a few ripe quince and a large handful of blackberries. I already had some of those early apples in a basket and a round of pastry dough ready. It took a little while, but soon I had the peeled, cored and sliced quince poaching, the dough into a tart pan, lined with parchment and filled with pie weights ready to pre-bake for 10 minutes or so, and the apples peeled and cored and sliced, ready to add to the tart.

Usually I make a frangipane filling with almond meal, but this time I wanted to use walnuts, just like those feasts of long ago. I took half the sugar needed for the frangipane and added it to the walnut pieces in the food processor...yes, you do need a food processor to make this recipe as written, but it will still taste great if you substitute already ground almond meal. A quick run in the food processor, followed by pulsing until it was all finely ground but not paste, and the walnut meal was ready to be added to the frangipane, along with some warm spices like allspice and cloves.

The fun part, aside from eating it, is placing the fruit in a nice pattern. I put drained poached quince slices on the outer edges, then apple slices, then blackberries in the middle and in a few places within the apple slices that had space.

This made a delicious tart, full of the fruits of the land in September here in Northern California. If I were to make it again, I'd add a row of blackberries all around the outer edge of the tart...but I should have remembered that Max loved his blackberries from the time he was a toddler. Their sweet/tart juiciness added a lot to the sweet quince and apples.


Early Fall Fruit Frangipane of Walnuts Tart

makes one 9-inch tart

1 medium quince, peeled, cored, and cut into slices
2 cups water
1/4 cup sugar
1-inch square (roughly) piece of orange zest/peel with no white pith

dough for 1-crust pie crust
parchment circle and pie weights

3 tablespoons butter or margarine, softened
2/3 cup granulated sugar, divided
1/4 teaspoon salt
1/4 teaspoon orange extract
2 large eggs
1 cup walnut pieces
1/8 teaspoon ground allspice
dash ground cloves

1 medium apple (preferably Gravenstein, but any cooking apple OK), peeled, cored, and cut into slices

1/4 cup ripe fresh blackberries

Put the sugar (1/4 cup) in a small saucepan with the water and piece of orange zest. Bring to a boil and stir until sugar is dissolved. Add the prepared quince, stir, return to a boil, reduce heat to simmer, cover and cook, stirring now and then, for 1 hour. Remove from heat, uncover, and let cool. When cool, drain the fruit over a large bowl or measuring cup. Reserve the liquid for another use (it's great for flavoring iced tea, for instance). Set aside the fruit. If any of the fruit is left over after making the tart, it makes a great addition to muffins, pancakes or waffles. You can poach a larger amount of fruit to make sure you have some for that if you like.

About a half hour before the quince are done, put the rolled out pie dough into the tart pan with removable bottom. fold extra dough down into inside of pan to make a double wall. Press dough into ridges of pan. Place in the freezer for 15 minutes. When frozen for that amount of time, line with parchment and fill parchment with pie weights. Bake in a preheated 425 degree oven for 10-12 minutes until light golden brown. Remove from oven and let cool completely on a wire rack. Remove pie weights and parchment. Set aside.

In a large mixing bowl cream the butter and the rest of the sugar (1/3 cup) along with the salt and orange extract. Add the eggs, one at a time, beating well after each addition. 

In a food processor, add the final 1/3 cup sugar and the walnuts. Process for 30 seconds, then pulse until the mixture is light and has only very small pieces of walnut...meal size. Add the allspice and cloves and pulse a couple of times to mix the spices in. Add the walnut mixture to the butter mixture and beat until just combined. Pour mixture into the prepared tart shell and spread to even top.

Preheat the oven to 350 degrees F.

Place the prepared fruit, including the apple slices, blackberries, and poached quince slices, in a nice pattern by pushing the fruit into the walnut mixture.

Bake in preheated oven for 25-30 minutes, or until top is golden brown and middle looks set. Remove from oven and cool on wire rack before removing sides. Serve warm or cool. 


Thursday, September 16, 2021

Babes Bake Wool Bread


You read the title right...this bread is designed to look like rolls of yarn...thick yarn in my case. It's a fun bake brought to us by our wonderful kitchen of the month Judy at Judy's Gross Eats.

I guess this idea of shaping bread to look like wool has been going around the internet recently, but somehow I missed it. Still, I do love milk bread (although I substitute soy milk and non-dairy margarine for the dairy products) and Sweetie loves it even more. I wasn't actually sure if soy milk would work for this recipe but it does! The dough needed a bit more flour than the recipe called for but once it came together, the dough was easy to work with and it bakes up into fluffy, soft, tender, mildly milky rolls. I followed the King Arthur Baking Company recipe that Judy had given us except for those dairy substitutions.

I had some cinnamon sugar in the cupboard so it was easy to use it to fill the rolls after I had shaped them with a bench scraper and before I rolled them up. Be sure to go to Judy's blog to see the photos...it will help with your shaping. I used a cake pan and they fit perfectly.

Do consider becoming a Bread Baking Buddy...this is an easy and fun bake and delicious eating! It looks impressive, too, in case you have someone you want to impress with baked goods. To be a Buddy, just bake the recipe, take a photo, and send Judy an email with the photo and a brief description of your bake, plus a URL of your post if you have one. Sept. 29th is the deadline, so you have some time.


Be sure to visit the other Babes on their blogs to see what they have done with this fun bread. Thanks to Elizabeth for again making this lovely badge, as she does every month.


Wool Rolls Bread

Japanese Milk Bread recipe from King Arthur Baking Company

INGREDIENTS

Tangzhong

·                     3 tablespoons (43g) water

·                     3 tablespoons (43g) whole milk

·                     2 tablespoons (14g) King Arthur Unbleached Bread Flour

Dough

·                     2 1/2 cups (298g) King Arthur Unbleached Bread Flour

·                     2 tablespoons (14g) Baker's Special Dry Milk or nonfat dry milk

·                     1/4 cup (50g) sugar

·                     1 teaspoon (6g) salt

·                     1 tablespoon instant yeast

·                     1/2 cup (113g) whole milk

·                     1 large egg

·                     4 tablespoons (57g) unsalted butter, melted

INSTRUCTIONS

1.      To make the tangzhong: Combine all of the ingredients in a small saucepan, and whisk until no lumps remain.

2.      Place the saucepan over low heat and cook the mixture, whisking constantly, until thick and the whisk leaves lines on the bottom of the pan, about 3 to 5 minutes.

3.      Transfer the tangzhong to a small mixing bowl or measuring cup and let it cool to lukewarm.

4.      To make the dough: Weigh your flour; or measure it by gently spooning it into a cup, then sweeping off any excess. Combine the tangzhong with the remaining dough ingredients, then mix and knead — by mixer or bread machine — until a smooth, elastic dough forms; this could take almost 15 minutes in a stand mixer.

5.      Shape the dough into a ball, and let it rest in a lightly greased bowl, covered, for 60 to 90 minutes, until puffy but not necessarily doubled in bulk.

6.      Gently deflate the dough and divide it into four equal pieces; if you have a scale each piece will weigh between 170g and 175g.

7.      Flatten each piece of dough into a 5" x 8" rectangle, then fold the short ends in towards one another like a letter. Flatten the folded pieces into rectangles again (this time about 3" x 6") and, starting with a short end, roll them each into a 4" log.

8.      Place the logs in a row of four — seam side down and side by side — in a lightly greased 9" x 5" loaf pan.

9.      Cover the loaf and allow it to rest/rise for 40 to 50 minutes, until puffy.

10.  Towards the end of the rising time, preheat the oven to 350°F.

11.  To bake the bread: Brush the loaf with milk and bake it for 30 to 35 minutes, until it's golden brown on top and a digital thermometer inserted into the center reads at least 190°F.

12.  Remove the loaf from the oven and cool it in the pan until you can transfer it safely to a rack to cool completely.

13.  Store leftover bread, well wrapped, at cool room temperature for 5 to 7 days; freeze for longer storage.


Here are some notes from Judy:

There is some debate about the origins of Wool Roll Bread.  It was popularized by a Malaysian baker (Apron), but another blogger in Vietnam had demonstrated bánh mì cuá»™n len (which translates to wool roll bread).  It is also similar to some Middle Eastern and European breads.

 Basically, it’s a soft, pillowy yeast dough stuffed with a sweet or savory filling, then sliced, rolled and stacked in a round pan, so as the dough rises and bakes, the final result resembles rolls of wool or thick yarn.  My version is not stuffed, because I couldn’t decide on a filling, but please feel free to go wild.  Most of the bakers use the milk bread/tangzhong method for the yeast dough, but there are other versions, such as sourdough or egg-free (see other links below).  I used a basic tangzhong dough from King Arthur Baking Company.

 Technique is the key component.  Feel free to search the Internet for YouTube videos that show all the possibilities.  Here is my shaping technique:

 Prepare pan:  You can use a bundt pan, cake pan, or a springform pan, which is what I used.  I greased the bottom and sides, and added a layer of parchment, also greased, to the bottom.

Dough shaping:  Divide the dough into 5 pieces.  Roll each piece into a thin, oblong shape, then, using a sharp object (I used a wobbly pizza cutter), start about 2/3s from the designated top and make 1/8” to ¼” cuts.  

 If you’re using a filling, add it now.   

 Begin rolling from the solid top, ending at the bottom, and carefully place it in the prepared pan.  

 Let the dough rise, brush with milk or egg wash, then bake as directed in the recipe.  Let the bread cool if you can, then enjoy the process of eating it, strand by strand. 

Monday, September 13, 2021

Stuffed Cabbage Rolls Like It Was Mid-Century


One of the cooler weather dishes that I really enjoyed growing up was stuffed cabbage rolls which are cooking in a tomato sauce. Not sure if it was the interesting bit of stuffing the cabbage leaves, or the challenge of keeping them together with toothpicks, even while browning them, of the comfort food aspect of eating them, but I remember them fondly. The leaves are stuffed with a mixture of ground beef and rice, plus a few secret ingredients. Since I can no longer eat beef, I substituted ground turkey and they were still tasty. If you can eat beef, use it because it gives an authentic and totally savory experience.

The hardest part was probably separating the leaves from the head of cabbage because I wanted unbroken leaves and the edges of my cabbage had grown together and didn't want to become individual leaves. The next challenging part was securing the cabbage once rolled with toothpicks so that they didn't unroll. One kinda did, but the others stayed together...I even was able to turn a couple of them over to brown on both sides! I know, supposed to do that with all of them, but it was fine and the flavor stays the same.

Because you have protein, starch, and some veg all in one dish, you don't have to have a side dish, but a green salad goes well with this meal. Leftovers are even better than the day they are made...must be the onions.

Do try this when you have a yen for a delicious, savory, flavorful meal where you get to play with your food in the making of it.

Stuffed Cabbage in Tomato Sauce 
Serves 6

1 lb. lean ground beef
1 cup cooked rice
1 small onion, chopped
1 teaspoon caraway seed
1 teaspoon salt
¼ teaspoon black pepper
1 egg
12 whole cabbage leaves
¼ cup vegetable oil
2 cans tomato sauce (8 oz. cans)
¼ cup water
1 can beef consommé or beef broth
2 tablespoons cornstarch

Mix together the ground beef, cooked rice, onion, seasonings and egg in a large bowl. Trim off thickest part of the stem from the cabbage leaves which have been softened with boiling water and drained. Divide meat into 12 portions, wrap each in a leaf, and fasten with wooden toothpicks.

 Brown the cabbage rolls in hot oil. Add tomato sauce and water and stir. Cover; cook slowly over low heat about 40 minutes. Add beef consommé or broth. Remove cabbage rolls; thicken gravy with the cornstarch which you have mixed with at least ¼ cup water. Once gravy thickens, serve with cabbage rolls while both are hot. Serves 6.

Tuesday, September 07, 2021

Spicy Bean Bake

I'm in the process of re-doing my family cookbook. It's fun! One of the things I did early on in the renovation was to change the font size to make it smaller. Originally I had it larger for my Mom, but this time around I'm looking at this as a resource for the next generation...and, perhaps, beyond, so I think they can handle a smaller type face.

As a result there is more room for extra recipes. In a kind of serendipity, I also found some recipe cards that had been missing, including some in my Mom's handwriting. One of the recipes was for a baked bean concoction that became popular with the family after I left home and moved to the West coast, so I had to ask Mom for the recipe and now it's in the cookbook. It's called Spicy Bean Bake, but it's not really that spicy. I suspect that my hot sauce loving siblings may add extra heat via sauces that contain things like habanero chilis after it's served. My Mom didn't really care for extra spicy things. You could also make this vegan by leaving out the ham or other meat and the bacon and adding a cup of cooked corn. 

What this recipe does have is a lot of flavor! It's also easy to make and makes a lot. The leftovers were even better than the original dish. Score!

I only made half the recipe, but Sweetie liked it so much that next time I'll make the full amount.,


Spicy Bean Bake

Serves 8-12 

One can 40-oz., baked beans
One can 1-pound, red kidney beans
2 large apples, chopped
1/2 cup raisins
1 1/2 cups chopped onion
1 cup chopped bell pepper
3 cups chopped cooked leftover ham, pork or beef
4 slices crumbled crisp bacon
1 cup catsup
1/2 cup pickle relish
1/2 cup brown sugar, packed
1 teaspoon dry mustard
1/2 cup molasses

Mix all ingredients in a 3-quart casserole. Cover and bake in a 250 degrees F. oven about 1 1/2 hours.


Saturday, September 04, 2021

Morning Glory

It's fun to know that you can have a muffin and a flower with the same name...morning glory. At this time of year, the morning glories in my garden are going a little wild, having made their upward climb, some are twining on themselves for support so they can keep going, other are swooping down to attach lower down so they can climb again. I love the flowers...trumpets of pink, magenta, deep purple, pale blue and more. The truth is that they self-seed if not constantly dead-headed and become a weed sometimes, but I love them anyway.


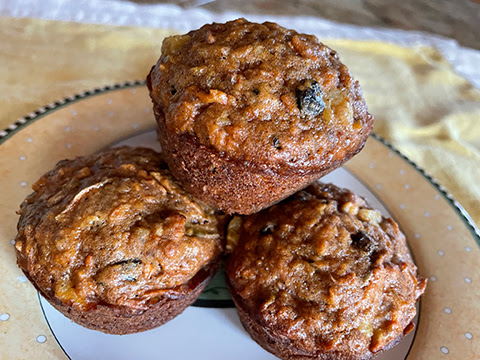
The morning glory muffins are also prolific. One recipe makes a full two dozen muffins...that's a lot! They are filled with all sorts of deliciousness...apples, carrots, pecans, crushed pineapple, coconut, raisins and dried cherries as well as vanilla and spice. The wet ingredients includes apple butter but I found a jar of pumpkin apple butter and decided to use that to welcome in fall now that school is back in session. Since I did that, I also used a bit of pumpkin pie spice along with the cinnamon the recipe calls for. Since my supply of dried cherries was running low, I used some dried currants in their place and that worked well. Seems to me the recipe as written is a takeoff on Hummingbird Cake. 


Between the large quantities (you need two cups shredded carrots and a cup of shredded apple for example) and long list of ingredients, the prep takes a bit of time, but you end up with fragrant, delicious, moist and fairly healthy muffins...and lots of them. Do yourself a favor and make sure you set each and every ingredient on the counter before you start making these because it's easy to miss an ingredient. Better yet, prep and measure everything in advance. That way it will all go together quickly and you'll get the best rise out of the baking soda that is the only rising agent used. 

I removed these from the muffin tins in about 3 minutes after taking them out of the oven and I did have to run a butter knife around the edges on some of them to loosen them. If you stand them on their sides in the muffin cup to finish cooling it saves space and they are sturdy enough to hold their shape, too. 

Do try these delightful muffins. They are great for breakfast but also good for afternoon tea and would be a treat in a school lunch. The recipe came from my family but I suspect that it's been around for a long time. 


Morning Glory Muffins
Makes 2 dozen

2 1/2 cups all purpose flour
1 cup brown sugar, packed
2 teaspoons baking soda
2 teaspoons ground cinnamon
1/2 teaspoon salt
2 cups shredded carrot
1 cup shredded apple
3/4 cups raisins
1/2 cup dried cherries
1/3 cup chopped pecans
1/4 cup flaked coconut (sweet)
one 8-oz. can crushed pineapple, in juice, drained
1/3 cup vegetable oil
1/3 cup apple butter
2 teaspoons vanilla
2 large eggs
2 large egg whites

Preheat the oven to 350 degrees F.

Coat 24 (2 dozen) muffin cups with cooking spray or vegetable oil.
Combine flour, brown sugar, baking soda, cinnamon, and salt in a large mixing bowl.
Stir in carrot, apple, raisins, cherries, pecans, coconut and pineapple and make a well in the center of the mixture when combined.

In another bowl combine the oil, apple butter, vanilla, eggs and egg whites. Stir with a whisk. 
Add oil mixture to flour mixture, stirring with a wooden spoon or silicon spatula until just moist/barely combined.

Spoon the batter evenly in prepared pans, filling about 2/3 full.

Bake at 350 degrees F. for 25 minutes or until muffins spring back when touched lightly in center.

Remove from pan at once and cool on a wire rack. Yields 2 dozen.

NOTE: Can be stored, airtight, in freezer for 1  month. Wrap in foil and reheat at 300 degrees F.

Saturday, August 28, 2021

Classic Apple Pie

My Mom made the best apple pies. You might be able to say the same, but I've never tasted your Mom's, so I still believe that my Mom's is the best. Apple pie was one of my Dad's favorites. He actually enjoyed any pie, especially fruit pies, but since Mom's was the best, you can imagine how much he liked her apple pie! A few years ago I created a cookbook of family favorites and a double crust apple pie was, of course, included. 

Before I could make an apple pie, I had to learn how to make good pie crust dough, which I did. The truth of the matter is that I prefer to use Pillsbury ReadyCrust pie dough because it's almost as good as from scratch and much faster and easier...and Sweetie loves anything made with it. Still, I'll include the recipe for a two-crust pie dough in case you want to really experience the full apple pie making deal.

For apples I us Gravenstein apples because we have two trees loaded with them. They are ripe early for apples, getting just right about the middle of August. Still, later in the year I like to mix any that is still useable with a nice, tart apple like McIntosh or a sweet, crisp one like Honeycrisp. Use your favorite apple or a mixture, but do make an apple pie by the end of September and welcome in the fall. The traditional pie spices of cinnamon, cloves and nutmeg, plus a pinch of allspice, are those warm spices that herald the change of season to cool, crisp weather and crystal blue skies (we hope-right now we are having smoky skies from wildfires, but hope springs eternal).


Two-Crust Pie Pastry

2¼ cups flour, sifted
1 teaspoon salt
¾ cup shortening
Ice water

Sift flour and salt into a bowl. With a pastry blender or two knives, cut shortening into flour until mixture resembles coarse meal. Sprinkle water, a tablespoon at a time, over mixture, stirring gently with a fork until all is moistened (6-8 tablespoons). Press dough into a ball. Wrap in plastic and chill before rolling out. Divide dough into two pieces. Roll out each piece until it is slightly larger than the pie tin. Makes one 2-crust pie or 2 pie shells.


Apple Pie

6-7 cups tart apples. peeled and sliced
2 tablespoons flour
¾ teaspoon ground cinnamon (and you can add 1/4 teaspoon nutmeg and/or cloves and/or allspice)
1-2 tablespoons butter, in small lumps
Pastry for a two-crust pie

Mix apples, flour and cinnamon. Pile apples in large, pastry-lined pie tin. Dot top with butter. Place second crust over the top, sealing the edges with water, and flute the edges. Slash the top crust in a few (about 5) places to allow the steam to vent. 

Bake for 10 minutes in a 4500 F. oven. Reduce heat to 3500 F and bake for an additional 40 minutes. Remove from oven and cool on rack.


Wednesday, August 25, 2021

Applesauce Hand Pies


 The Gravenstein apples are ripe! We have a couple of trees and so I made some Gravenstein apple sauce with some of the apples. They are so flavorful that I only added some pie spice to them...no sugar needed...then cooked the sauce down so it was pretty thick. A potato masher worked well to break up the cooked apples into a chunky sauce.

In the morning I had the bright idea to turn some of the applesauce into hand pies. Since I had my trusty ReadyCrust pre-shaped pie dough handy, I unrolled one crust worth of dough and cut the circle in half. Then I stacked the halves, long sides together, and cut the half into thirds. That gave me the dough pieces for three hand pies.

Bottom wedge of dough, two tablespoons of applesauce, leaving a half-inch edge, wet the edges, place the matching wedge of dough on top, press to seal all around, use the tines of a fork to double seal all around, cut a steam slit with a sharp knife, then onto parchment. Repeat with the other two sets of dough.

Before I started to assemble the hand pies I preheated the oven to 450 degrees F. and placed a baking stone on a lower rack in the oven. By the time I had the pies ready to put in the oven, it was ready. I slid the parchment and pies onto the baking stone using a cake transfer wide spatula to move the pies on the parchment. Have just the parchment between the pies and baking stone meant well cooked pastry on the bottom and any juices that escaped stayed on the parchment.  After 10 minutes I turned down the oven to 350 degrees F. and continued to bake the pies until they were browned, about another 6 -10 minutes.

Don't forget to let the pies cool a bit on a rack. The filling gets really hot!

Enjoy as is or drizzle with some confectioners sugar mixed into icing with a bit of hot water, for more sweetness. I like mine less sweet, so just ate them plain. They were outstanding!

Saturday, August 21, 2021

Sweet Potatoes and Orange


A number of years ago I published a cookbook of family favorite recipes, mostly from midcentury, as a way to remember my Dad and to keep the recipes in the family. It's been long enough that it's time to update the book. Part of the update includes getting more picture of the finished recipe into the book, so I've started making some of the recipes for just that purpose.


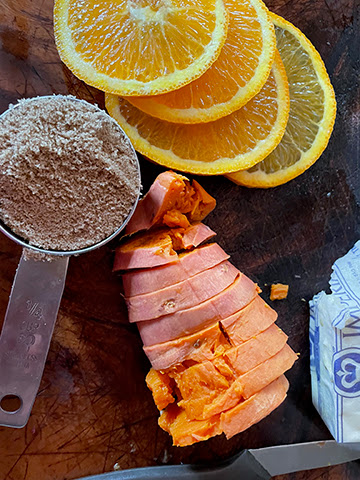
Tonight we had Sweet Potatoes Margherita, a lovely casserole that has boiled and peeled sweet potatoes (yams actually), a bit of brown sugar and butter, and very thinly sliced oranges. If you can find seedless navel oranges, use them. 


All these elements get layered in a buttered casserole dish and baked. During baking you baste the dish with some of the collected juices/syrup. I made about half the recipe since there are only two of us eating the dish, not a family of eight, nine, or ten people. I also reduced the sugar and butter a bit and removed the pith from the orange slices that were in the lower layer. It helps reduce the bitterness that comes with orange pith, but isn't really necessary to do. What I ended up with was a very fresh tasting dish where you could really taste and appreciate the sweet potato flavor and the oranges. If you make it exactly as the recipe suggests, it will be a bit sweeter and richer and more bitter but still tasty. A lot of people prefer candied sweet potatoes and the given sugar, butter and water will give you a true syrup with lots of orange flavor to complement the sweet potatoes.

Although the recipe was popular before microwave ovens, I suspect that you could substitute sweet potatoes that are washed, poked with the point of a knife to prevent bursting, wrapped in a paper towel to keep moistness, and microwaved until tender in place of the boiled sweet potatoes. Then cool, peel, and continue with the recipe as written.

This is a great Thanksgiving dish, which is when we usually had it, but it goes well anytime with pork chops or roast turkey breast. Add a green salad and you have a meal that can take you back to 1950. Here is how the casserole looked right before baking.


Sweet Potatoes Margherita

Boil 6 sweet potatoes in water to cover until tender. Slice the peeled potatoes and arrange in layers in a buttered or greased baking dish, alternating with brown sugar, dots of butter or non-dairy butter and slices of orange with peel left on. Add enough water to make a thick syrup. Bake for 1 hour in a 350 degree oven, basting occasionally with the syrup in the dish.


Thursday, August 12, 2021

Happy Birthday Max!


Sometimes days can be bittersweet. August 12this one of them. Almost 40 years ago Sweetie and I became the parents of a good sized baby boy. We called him Max after my Dad and his middle name was the same as Sweetie's Dad. An auto accident took him over 20 years ago, but it's still his birthday, so we still wish him Happy Birthday. You can see where the bitter comes from. The sweet was him, even though he also was so curious that it took an eagle eye to keep him out of mischief.


Today August 12th was also a cause for another celebration. Our daughter and HER Sweetie have bought a house! We are so excited for them and impressed with their choice and all of the avenues to a good life that come with it.

Hoping that you, dear reader, have some sweet in your day this 12th day of August in the year 2021.

Saturday, August 07, 2021

Bruschetta

 Although my tomatoes are still about a week away from being ripe, this is really the time of year to enjoy fresh tomatoes in the Northern Hemisphere. I have yet to meet anyone who isn't allergic to fresh tomatoes who doesn't love bruschetta once served them. If you can, use heirloom tomatoes for the best flavor. You can often find them at the market as well as the farmer's market at this time of year.

You start with a baguette or other good bread, then brush with olive oil and toast. The best part is the tomato mixture which uses fresh tomatoes, fresh basil and fresh garlic. Unless you roast the garlic before making the tomato mixture, you will have strong garlic breath but I think it's worth it for the punch of flavors which go so well with the crunch of toasted bread.

If you have time, make the tomato mixture a day ahead and let it sit in the fridge so the flavors really mingle. The time to top the toasted bread is right before you plan to serve these. That way the toast stays crunchy. These make a wonderful appetizer. If you combine them with a green salad that includes some beans and corn, you have a complete meal and lots of deliciousness. Try it with some cooked Rancho Gordo beans and fresh corn, lightly steamed and cut off the cob. A taste of summer with the bruschetta!

Bruschetta for Two

4-6 1/2-inch slices baguette or other flavorful, firm bread
1 medium to large fresh, ripe tomato, preferably heirloom
1 tablespoon best quality olive oil
1 clove garlic or roasted garlic
3-4 leaves fresh basil
salt and pepper to taste

Brush the bread with olive oil. Toast the bread slices to a golden brown color. If possible, use a grill to toast them.

Chop the tomato into very small dice and place in a medium bowl, keeping as much tomato juice as possible with the tomatoes. Add the olive oil, mince the garlic and add, finely chop the basil and add it to the bowl.

Stir the tomato, oil, garlic and basil together. If possible, cover and let sit in the fridge for 2 to 24 hours. 

When you are ready to serve the bruschetta, warm the toasts, place them on the serving platter and top each with about a tablespoon of the tomato mixture, including some of the juices. If you have a few tiny basil leaves you can garnish the bruschetta with them. Add salt and pepper to taste...although you may not need any. Serve at once.

Monday, August 02, 2021

Spicy Tangy Plum Jam


 It's taken me longer than I had hoped, but today I made some plum jam using the small (an inch to an inch and a half in size) fresh ripe plums that a neighbor gave me. These plums have a yellow flesh, a green to rosy skin that is pretty tart, and a pit that is fairly easy to remove, but which takes up about a third of the plum.

Once processed by rinsing, cutting in pieces and removing the pit, the plums weighed two and 1/4 pounds. the recipe that I used, The Flavor Bender by Dini K., said to use one cup of sugar for each pound of plums. I decided to use brown sugar and to spice it up with a bit of cake spice and some ginger, both fresh and preserved. The tangy part came from the skins.

This is a great recipe. I didn't use pectin but I did grate an apple and use some lemon juice to help it set up as suggested by Dini. The mixture sat in the fridge for two days, except for the lemon juice which I added today when I started to boil the mixture. I made a great jam with just enough sweetness, offset by the tang from the skin and the mix of spices. 

The website, The Flavor Bender, includes great advice about jam making, so do read before going to the actual recipe. Because my jam was made with yellow fleshed fruit, it is an amber color, not the purple on the website, but if you use red or purple fleshed fruit, you will get that color.

Do give this a try...prepping the fruit takes the most time, followed by the stirring of the jam until it is thick enough. I used both a thermometer and the frozen small plate methods for deciding when to stop cooking. I boiled the jars, lids and bands while I was making the jam, so when it was ready I was able to remove the hot jars to a towel and immediately fill the jars. The amazing this was that it made exactly the right amount to fill three very small jars and one pint jar. Not too much, not to little. That never happens! 


Spicy Tangy Plum Jam
 from The Flavor Bender blog by Dini K.

Note: made by weight of prepared fruit - read all of the blog post HERE to get full information about making jam.

2 1/4 pounds fresh plums, washed, cut up and pit removed (from about 3 pounds fruit if small)
2 cups plus 2 tablespoons brown sugar
pinch of salt
1/2 teaspoon cake spice (mixture of cinnamon, nutmeg, cloves, cardamom)
1/4 teaspoon minced fresh ginger
1 teaspoon finely chopped preserved ginger
/14 cup grated green apple (OK to leave peel on)
1 tablespoon lemon juice


1.             Wash the plums well. To remove the seeds - first cut the plum in half. Next, cut the plum half with the seed, in half again (into quarters). One of these quarters will have the seed attached, which you can easily pull out. Alternatively, you can cut the plum flesh around the seed.

2.     Repeat with all the plums.

3.     Cut all the plums into 1 inch chunks (roughly). It’s OK if the plums are a little crushed at this point, since they will be cooked down anyway.

4.     WEIGH the chopped plums, so you can decide how much sugar needs to be added. Place the plums in a large bowl (large enough to accommodate the sugar that will be mixed in too).

5.     Add sugar, salt, spices, ginger, preserved ginger and apple shreds into the bowl. Mix well.

6.     Cover with plastic wrap and refrigerate for at least 8 hours (or up to 48 hours). Also, place some small saucers / bowls / spoons in the freezer for the jam test (explained below).

7.     When you're ready to cook the jam, scrape all of the plum-sugar mix into a large pot. Add the lemon juice and stir to combine.

8.     Bring the mixture to a boil over medium-high heat. Stir the mixture to let it heat evenly. Lower the heat to medium - medium low, and cook until the fruits start to soften.

9.     MASH the plums with a potato masher, OR you can pass about ¾ of the mix through a food mill (this will remove the skins).

10.   Continue to cook the plums until the mixture reduces and starts to thicken slightly. Stir frequently to prevent the jam from sticking to the bottom and burning. While the jam is cooking, sterilize some heat-proof jam jars and lids.

11.           Check the temperature of the plum jam every 10 - 15 minutes (more frequently as it thickens more). Cook the jam until the temperature reaches 220°F (105°C).

12.           If you don’t have a thermometer, you can perform the JAM TEST. To do this, drop a little jam on a frozen surface (saucer / bowl / spoon). Then keep it in the freezer for about a minute and check the consistency. If the consistency is jelly-like without being runny, then you’ve cooked the jam to the right temperature. (If you run a finger through the jam to create a streak, the jam shouldn't join back up in the middle to fill the streak, if it's at the right consistency).

13.           Remove the pot from the heat.

14.           Using clean tongs, clean ladles and clean paper towels, carefully ladle hot jam into the hot, sterilized jars. Please be careful, as the jam and jars will be very hot at this stage (wear gloves or oven mitts to protect yourself).

15.           Screw on the lids while the jars are hot. As the jam and jars cool down, this will create a seal.

16.           Allow the jars to cool to room temperature completely. Then label and store.