Wednesday, March 05, 2014

Science!


Growing up we were actively discourage from playing with our food. Eating was a serious business. Conversation was encouraged. Spilling milk, which seemed a daily occurrence when there were a lot of little kids, was discouraged. Cleaning your plate was encouraged. You get the idea.

Now that I'm not only a grown up but an elder it seems, playing with food is a blast. This past weekend it was fascinating, too. Warrior woman and I used a kit she found online to have some fun with food science. We made molecular mixology cocktails. Whah? What's that? Well, in this case we used some cool chemicals to create two liquids. When you dropped drops of one of the liquids into the other, it created little liquid filled balls, sort of like caviar. These went into Cosmopolitan cocktails. Frosty! 
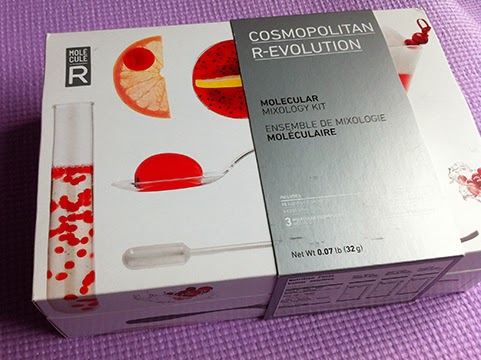


Here is the kit from R-EVOLUTION. It's for Cosmopolitans, but they also have other kits for Mojitos and more.

The contents:

You even get pipettes. And recipes. 


You start with cranberry juice, add sugar, then put together a mixture with citrus liquor and lime juice, and some red food coloring, too. This will be the liquid that turns into little globes with a thin skin, the 'caviar'. 


One of the cool chemicals is sodium alginate. It gets added to the cranberry mixture. 


It gets thoroughly mixed in with a stick blender, then sits to let the air bubbles pop. We had to scoop off some of the remaining bubbles, too.


Next you make a bath with water and another of the chemicals, calcium lactate. Science! 

When the cranberry liquid, with it's sodium alginate mixed in, meets this chemical bath, a thin skin forms around the liquid through a chemical reaction. Over time the reaction continues, which leaves you with no liquid inside but a ball more like the tapioca balls in Vietnamese coffee. Either way, the different mouth feel of the spheres swimming in the cocktail is excellent and fun. 


This cute pipette lets you drip the mixture in little drops to create the 'caviar' effect. 


Once you have made enough 'caviar', 


you scoop it out and drain it, then rinse with water. After trying different tools, we found that clean hands were the best thing for scooping the spheres into the sieve. 


They felt weird, too. Weird science!

The Cosmopolitan mixture is pretty normal, vodka, lime juice, triple sec, plus we think you need to add some white cranberry juice. Without it the mixture is pretty strong. We had to use red since we didn't have any white...it makes it harder to photograph, but the last photo shows the drink that way.


Then comes the fun part, adding the 'caviar' to the drink. We didn't have a regular blender, so couldn't blend in ice, which was recommended. Without that blended ice the juice balls sank to the bottom. 


Next time we'll get a blender and blend the drink with ice to allow those cool little spheres to be throughout the drink. Even so, it was excellent to take a gulp of the drink and have tiny little juice spheres floating around in your mouth.


So this was a fun evening and I would recommend the kit, but be sure to get both red and white cranberry juice and make sure you have a blender, too. For more impact, add at least 6 drops red food coloring, but then be sure to work on a non-staining surface, because, like cooking, this can get messy. 

The bottom line is that in the end you have a delicious cocktail unlike any you've likely had outside of a trendy bar. Yay for science!

Sunday, February 23, 2014

Lamb


We are fortunate to have new grass after last week's wonderful, long awaited rain. We also have been lending part of our property to neighbors as pasture. This past Thursday we welcomed two new lambs! One is a boy and one a girl. They are so cute, but, as newborns, sleep a lot. These are photos from this morning.

The neighbors also bring in hay and the lamb with the black head was asleep on top of some of the hay when the mom sheep (a hair sheep, hence the weird looking coat...not fleece, but matted hair) decided that she wanted to eat that particular bit of hay, so she sort of ate under it and the little sleeping lamb slid off onto the ground and woke up. Guess all that nursing makes the ewe hungry! Top photo was taken after the lamb work up and she seems fine.


Happy Sunday!

Sunday, February 16, 2014

Bad Babe


Today is the 6th anniversary posting date for the Bread Baking Babes and I've been a bad babe...no post...no bread...no time. On the positive side I have been celebrating family, friendship, good food and drink, bread baking with friends (although not the BBB bread for February sadly), and becoming a senior citizen in good standing. With luck I'll post in a day or two.

In the meantime, check out the posts of the excellent Babes who have made and posted the Rgaif bread!

Kathy at Bread Experience, Jamie at Life's a Feast, Ilva of Lucullian Delights, Aparna of My Diverse Kitchen, Tanna of My Kitchen in Half Cups, Lien of Notitie van Lien, our Kitchen of the Month.


Tuesday, February 11, 2014

Rain and Gooey Cookies


We have been having a severe drought. Really bad. Winter is the time when Mother Nature usually gives our area of the country lots of water since once spring comes we usually don't see rain again until October.This year there has been virtually no rain, until this past weekend. Oh, there may have been a drizzle here and a brief shower there, but no rain to soak into the ground and replenish the water table and give the plants and trees and shrubs a drink. Then we had about 9 inches from Friday through Sunday. Yay!

Sweetie and I went for a walk yesterday to see the changes. At the Laguna the frogs were singing loudly, the red wing blackbirds were calling to each other, and the lumpy birds that we think are a kind of heron were back in the trees. They are usually here all December and January, but this is the first we have seen them. The Laguna itself was well past its banks, flooding the path we usually take


 and the nearby fields, too.

 Yay!

Today I made an early Valentine's gift for some friends. I used to call these seven-layer bars, but an even older name is Hello Dolly or Hey There Doll Face bars, an easy and quick layering of buttery graham cracker crumb crust, sweetened condensed milk, nuts, chocolate chips and coconut. I think that for seven layers there were also white chocolate chips and butterscotch chips, but I like this version better. It is still pretty ooey gooey and sweet, so your really only need small portions.

I got this version from a cookbook that Sweetie gave me for Christmas, Butter Baked Goods, by Rosie Daykin. She owns and operates a bake shop. By the looks of her recipes, I wish she had one near by. Recipes for lovely cakes, cookies, treats and breakfast goodies can be found in the book. Yay!


"Hey There, Doll Face" Bars
from Butter Baked Goods by Rosie Daykin

These quick to put together bar cookies are ooey, gooey, and a classic, combining graham crackers, pecans, chocolate chips and sweetened condensed milk.

3/4 cup pecans
1/2 cup butter
1 1/4 cups graham cracker crumbs
3/4 cup condensed milk
1 cup dark chocolate chips
3/4 cup sweetened fancy long shred coconut

Makes 16 bars

Preheat oven to 350 degrees F. Prepare a 9 x 9-inch baking pan by buttering it and lining it with parchment paper. Set aside.

Place the pecans on a cookie sheet and bake in the preheated oven for about 10 minutes, or until lightly toasted. Stir the nuts after about 5 minutes to ensure even toasting. Remove from the oven and cool. Chop lightly and set aside.

In a small saucepan over low heat, melt the butter. Place the graham cracker crumbs in a bowl and pour the melted butter over the crumbs. Mix well to combine. Press the crumb mixture in the prepared 9 x 9-inch pan and press down firmly and evenly to make a crust. Spread the condensed milk over the crumb crust with the back of a spoon.

In another bowl, mix together the toasted pecans, chocolate chips and coconut. Sprinkle the mixture over the condensed milk in the pan.

Bake in the preheated oven for 15 - 17 minutes, or until the coconut is just lightly browned.
Removed from the oven and allow to cool completely in the pan.

Run a small knife along the edges of the pan. Carefully remove the slab from the pan and cut into approximately 2 x 2-inch bars. Make sure to use at least a 10-inch knife to avoid cutting and dragging the knife across the bars (instead press the sharp, long knife down through the bars to cut them).


Bars will keep in an airtight container for up to a week, or in the freezer for up to 3 months.

Wednesday, February 05, 2014

Crisp and Chocolate and Cinnamon


One of the joys of being a long time baker is playing with a recipe. This past weekend we helped with a move and our neighbors across the street helped, too. While we were between loads, G mentioned that he liked Mexican chocolate. Since his birthday was coming up, this was music to my ears. I knew I could bake something with those flavors to surprise him. He really appreciates baked goods. His wife baked him the most awesome orange tart I've ever had for his birthday meal, so he knows good baking.

One of the things I've been doing this winter is going through old magazines and throwing lots of them out. Every now and then I do spot a recipe that needs to be saved. One of them recently was a recipe for Peppermint White Chocolate Cookie Brittle. Still haven't made that version of it, but I knew I could change a few things and make a delicious Mexican Chocolate Cookie Brittle for G's birthday.

A little dark cocoa was an easy addition. Subbing chocolate chips for the white chocolate was also easy, although I did include some hand-chunked ScharffenBerger bittersweet chocolate to replace the peppermint chunks on top. I added cinnamon and just a touch of cayenne pepper for the Mexican chocolate flavors. A sprinkle of red and yellow sanding sugars added a bit of crunch and sparkle, plus color on the top.


If I make this again I'll make sure to roll the cookie dough out a bit thinner, but otherwise I'm happy with the way it turned out. Chocolate is the first flavor you notice, but then you taste the cinnamon and a hit of pepper. So good with a cup of coffee, but I bet some hot chocolate would be great, too. I only had a taste since chocolate is not a recommended food for me, but Sweetie had a hard time stopping his tastes. Since he continues to lose weight, we gave all the rest to G and his Sweetie to enjoy.


Mexican Chocolate Cookie Brittle
adapted from a recipe in the Dec. 2004 Bon Appétit magazine
A giant cookie is topped with chunked dark chocolate and melted chocolate chips and sparkling sugars, then broken into irregular pieces.
Makes about 24 pieces
1 1/2 cups all purpose flour
1/2 teaspoon baking soda
1/4 teaspoon salt
3 tablespoons cocoa
1/2 teaspoon cinnamon
dash cayenne pepper (or use more if you like more of a kick)
3/4 cup (1 1/2 sticks) unsalted butter, melted, cooled slightly
1/2 cup sugar
1/3 cup golden brown sugar
1/2 teaspoon vanilla extract
1 1/2 cups chocolate chips, divided
1 tablespoon shortening
1/2 cup chunks dark chocolate (I used ScharffenBerger bittersweet chocolate)
red and yellow sanding sugar, or colors of your choice

Preheat oven to 350 degrees F. Line baking sheet with parchment paper.
Whisk flour, baking soda, salt, cocoa, cinnamon and cayenne in a medium bowl.
Whisk melted butter, both sugars, and vanilla in large bowl until smooth. Stir in flour mixture until just blended. Stir in 1 cup chocolate chips until well distributed in dough.
Transfer dough to prepared sheet. Press dough into 14 x 8-inch rectangle, about 3/8 inch thick. Bake cookie until top is firm and darkening at edges, about 30 minutes. Check at 25 minutes since chocolate tends to scorch.
Cool on sheet 10 minutes. Transfer to rack; cool completely.

Stir remaining 1/2 cup chocolate chips and shortening in top of double boiler over barely simmering water until melted and smooth. Using small spoon, drizzle about half of melted chocolate in think lines over cooled cookie.  Sprinkle chocolate chunks and sugars over melted chocolate. Drizzle remaining melted chocolate over top, especially over the chocolate chunks (to help adhere them). Let stand until melted chocolate sets, about 1 hour. 

Break cookie into irregular 2 - to  3 inch pieces. (Can be made 2 days ahead. Store in airtight container at room temperature.)

Sunday, February 02, 2014

Of Pesto and Chicken


Pesto is one of my favorite flavors. There is something wonderful about the combination of basil, pine nuts, olive oil and Parmesan cheese. It can liven up rice, pasta, a baked potato and all manner of entrees. And that basil smells fantastic, too.

It was cold and rainy today, so I stayed inside most of the day. I am so thankful that it rained...we have been having a terrible drought this winter and usually winter is when we get most of the water for the year. It also made it nice to fool around in the kitchen trying out a new recipe, with the rain pattering against the kitchen windows.

This recipe started off life as a sweet crostata with fresh grapes and golden raisins and a nut crust. The rustic look which is achieved by folding the outer couple of inches the crust over the filling is a favorite of mine, but I'd never tried it with a nut crust before. The filling is interesting, too, because it is based on whipped egg whites.

I decided that I wanted to change the recipe around to a savory crostata, filled with a pesto infused whipped egg white filling and then covered with sauteed onions, golden raisins and Parmesan coated chicken pieces. Since I was going with sunny flavors of the Med, I changed the dough to use pine nuts instead of walnuts or pecans of almonds.

The crust didn't turn out quite like I had hoped...it tended to fall apart while I was working on it...but it tasted wonderful once baked and the filling was excellent. We had a slice for dinner with some steamed mixed vegetables and Sweetie was very happy, especially since he was able to watch the Super Bowl while I played in the kitchen. We did take a nice walk with Pi during half time when there was a break in the rain, so it was a pretty nice day all around. Guess I pretty easy to please.


Nut Pastry Dough
     
1/3 cup walnuts, hazelnuts, almonds, pine nuts or pecans
1 1/2  cups all-purpose flour
1 1/2  teaspoons granulated sugar
3/4  teaspoon salt
1 1/2  tablespoons cold butter, cut into pieces
2 1/2  tablespoons walnut oil
5-6  tablespoons cold water

Preheat oven to 350 degrees F
.
Spread nuts in a pie pan and bake for 5 - 7 minutes, or until fragrant. Let cool

In a food processor, combine nuts, flour, sugar, and salt; process until nuts are finely chopped. Add butter and process until incorporated. Transfer to a large bowl.

Drizzle oil over flour mixture. Use your fingertips to rub oil into the mixture. On tablespoon at a time, add water and mix with a fork until dough is crumbly and holds together when pressed.

If making a single crust, gently form dough into a flattened disk. If making a double crust, divide dough into two pieces, 1 slightly larger than the other, and form each into a disk. (The dough will keep, tightly wrapped in plastic wrap, in the refrigerator for up to 2 days or in the freezer for up to 6 months. Return dough to room temperature before rolling.)

Chicken Pesto Crostata
1/4 cup pine nuts
1 recipe  pine nut Pastry Dough (see above)
1/2 yellow onion, peeled and thinly sliced
1 tablespoon olive oil
1 1/2 tablespoons cornstarch
2 large egg whites
1/4 teaspoon salt
2/3 cup grated Parmesan cheese, divided
1/3 cup prepared pesto
1/4 cup golden raisins
2 1/2 cups cooked chicken, cut into small bite sized pieces
pepper, to taste
1 tablespoon milk
Grated Parmesan cheese for dusting crust

Spread pine nuts in a oiled pan and bake in preheated 350 degree F. oven for about 5 minutes or until fragrant (can do this at same time nuts are being baked for pie dough if making same day). Alternatively, pine nuts can be toasted in a large cast iron skilled, shaking pan often. Let cool. Finely chop and set aside.

Raise oven temperature to 400 degrees F.

Place two overlapping sheets of plastic wrap or a wide sheet of parchment paper on a work surface. Set dough in center and cover with two more overlapping sheets of plastic wrap or another wide sheet of parchment paper. Roll dough into a 12-inch circle. Remove top sheets of plastic (or top parchment) and invert dough on to a large baking sheet with sides that has been lightly oiled or coated with nonstick spray. (I put mine on a large piece of parchment paper.) Pull off rest of plastic or the other sheet parchment. Sprinkle semolina (or cornmeal) over the crust, leaving a 1 1/2-inch border. Set aside.

In a skillet over medium-high heat, sauté the onion in the olive oil, stirring frequently, until onion is light golden brown, about 7 - 10 minutes. Remove from heat and set aside.

In a small bowl, beat egg whites and salt with an electric mixer on medium speed until soft peaks form. Gradually add 1/3 cup grated Parmesan and beat until shiny. With a rubber spatula, fold pine nut mixture and pesto into meringue until thoroughly combined.

Drop spoonfuls of meringue onto crust and gently spread over semolina. Sprinkle raisins over meringue.
Distribute caramelized onions evenly over meringue.

In a bowl, toss the chicken pieces with the remaining 1/3 cup grated Parmesan cheese and pepper, to taste. Arrange chicken over raisins, onions and meringue, distributing evenly. Fold border of crust over filling.

Brush crust with 1 tablespoon milk and dust with some grated Parmesan.


Bake for 25 - 30 minutes, or until crust is golden and grapes are puffed. With 2 large spatulas, transfer crostata to a large platter. Let cool. Serve warm or at room temperature. 

Makes 8 servings.

Thursday, January 30, 2014

Year of the Horse


 The Chinese New Year is often referred to as the "Lunar New Year" since the dates follow a lunisolar calendar. The first day is for the welcoming of the deities of the heavens and earth, officially beginning at midnight. It is a traditional practice to light fireworks, burn bamboo sticks and firecrackers and to make as much of a din as possible to chase off the evil spirits.

Some families may invite a Lion troupe as a symbolic ritual to usher in the Chinese New Year as well as to evict bad spirits from the premises. Members of the family who are married also give red packets containing cash known aslai see or angpow, a form of blessings and to suppress the aging and challenges associated with the coming year, to junior members of the family, mostly children and teenagers. Business managers also give bonuses through red packets to employees for good luck, smooth-sailing, good health and wealth.

Wishing you prosperity and good health and good luck!

Wednesday, January 22, 2014

Buttermilk and Cherries


We are in that season where much of the fruit available in the markets are imported, except for apples and pears. Pears are often not ripe and I made apple crisp last time this friend was over for dinner, so yesterday I decided to make a dessert with things on hand. I had some buttermilk, eggs, and butter in the fridge and a jar of pitted sweet dark cherries in the pantry.

 A short amount of time on the internet led me to a lovely recipe for a moist, fluffy, tender single layer cake with cherries. Well, the recipe actually used raspberries, but I knew cherries would work well with the cake. I also used almond extract instead of vanilla because almond flavor brings out the cherry flavor so well and these were not fresh fruit, so could use that bit of help. Otherwise I mostly followed the recipe and we enjoyed the cake after dinner. It was not too much, and not too little...just right.


Cherry Buttermilk Cake
based on Raspberry Buttermilk Cake in
Gourmet, June 2009, by Melissa Roberts

Simple, tender buttermilk cake topped with a nice, sugary crunch and enriched with cherries

Ingredients
1 cup all-purpose flour
1/2 teaspoon baking powder
1/2 teaspoon baking soda
1/4 teaspoon salt
1/4 teaspoon ground cardamom
1/2 stick unsalted butter, room temperature
2/3 cup sugar
1/2 teaspoon almond extract
1 large egg, room temperature
1/2 cup well-shaken buttermilk, room temperature
1 cup pitted cherries (I used some that had been canned in a jar and drained off the juice used to pack them, but fresh cherries would be even better), drained
1 tablespoon soft butter and 3 tablespoons sugar for the pan
1 1/2 tablespoons sugar, preferably sanding sugar, for the topping

Preheat oven to 400 degrees F, with rack in the middle. Butter the bottom and sides of a 9-inch cake pan, then coat with the sugar, shaking out any excess into the sink. Set aside.

Whisk together the flour, baking powder, baking soda, salt and cardamom.
Beat butter and sugar together with an electric mixer until pale and fluffy, about 2 minutes, then beat in the almond extract. Add egg and beat well.

At low speed, beat in 1/2 of the flour mixture, the buttermilk, then the rest of the flour mixture, beating only until combined each time.

Spoon batter into prepared pan, smoothing top. Scatter the drained cherries evenly over the top. Sprinkle top with the sanding sugar. Bake in preheated oven for 25 - 30 minutes, or until cake is golden and a wooden pick inserted in the center comes out clean.

Cool in the pan 10 minutes, then run a knife blade around the sides of the pan to loosen the cake and turn it out onto a rack. Invert onto a serving plate and let cool 10 - 15 minutes more. Cherries will have sunk to the bottom of the cake, and the top will be crunchy with sugar.


Serves 8

Tuesday, January 21, 2014

Football Viewing Party


Yesterday was a bit strange. I watched two football games, one right after the other. That is not strange behavior for many folks, but it is for me. On occasion I have watched a good amount of a Super Bowl game, but usually I'm also doing something else. It might be because I didn't grow up going to or watching sports, but it could also be because I have trouble sitting through hours of almost anything.

Yesterday was different because we had people over to watch the game. Our daughter was here for both and some good friends were here for the San Francisco 49er vs Seattle Seahawks game.

Since our daughter used to work at the stadium where the game was played and is very familiar with the loud fans, you would think she might be a fan. Not so much. She has been a Californian at heart even when living in Washington State and a 49er fan for a long time.

It was fun. It was exciting for a lot of the game. It was heartbreaking at the end. We had a good time together and ate and drank and cheered and shouted.


At Sweetie's request food was pretty healthy: two kinds of melon and some pineapple, fresh vegetables and hummus, peanuts, olives, little cheese cubes and multigrain crackers. I made up some burritos in the morning and at half time we brought them out and heated them up, adding toppings if desired. One version was sort of Mediterranean.  I used leftover rice, lemon juice, pesto, mozzarella cheese, fresh tomatoes cut in a small dice, and some leftover roasted chicken for one version. The other version was more traditional Mexican, with rice, kidney beans, salsa, cheddar cheese, avocado, lime juice, and fresh chicken.


For a sweet to end the game our daughter brought two cupcakes from a local cupcake store that we split to share. Red velvet and salted caramel buttercream is a dreamy combination.

Hope you had a fun Sunday, too!

Two Kinds of Burritos


Chicken Pesto Burrito
makes 3
cooked rice, about 1 1/2 cups
1/4 cup shredded mozzarella cheese
juice of 1/2 a lemon
3-4 tablespoons prepared pesto
1/4 cup finely diced fresh tomato
1/2 cup cubed cooked chicken
salt and pepper to taste
3 burrito size tortillas

In a bowl mix together all the ingredients except for the tortillas. For each burrito, mound 1/3 of the mixture in the center of a burrito, then rearrange the mixture into a torpedo shape. Fold in the 'sides', then the 'bottom, then rollover until all the filling is enclosed. Place on a plate with the edge side down and 'sides' facing out. Repeat for the other two burritos. When ready to eat, place a burrito on a microwave safe plate. Microwave on high for about a minute, or until heated throughout. Serve with additional pesto and/or diced tomatoes for garnish.


Chicken Salsa Burrito
makes 3
cooked rice, about 1 1/2 cups
1/3 cup kidney or black beans, drained and rinsed
1/4 cup shredded cheddar cheese (or a mixture of jack and cheddar cheeses)
juice of 1/2 a lime
1/3 cup prepared salsa
1/2 ripe avocado, diced
1/2 cup cubed cooked chicken
salt and pepper to taste
3 burrito size tortillas

In a bowl mix together all the ingredients except for the tortillas. For each burrito, mound 1/3 of the mixture in the center of a burrito, then rearrange the mixture into a torpedo shape. Fold in the 'sides', then the 'bottom, then rollover until all the filling is enclosed. Place on a plate with the edge side down and 'sides' facing out. Repeat for the other two burritos. When ready to eat, place a burrito on a microwave safe plate. Microwave on high for about a minute, or until heated throughout. Serve with sour cream, additional salsa and/or diced tomatoes and/or cilantro for garnish. I had some hot sauce and garlic powder available, too, for adding if desired.

Thursday, January 16, 2014

Chocolate Prune Bread a Babes Delight


Last month the Bread Baking Babes had a cake that was actually a bread (Lardy Cake) and this month we have a bread that has many of the flavors of a cake. If you love chocolate and bread combined, you'll love this loaf. I made mine with chopped pecans in the dough and with chunks of bittersweet chocolate and dried cherries (instead of prunes) kneaded in before shaping. It is full of flavor from the cocoa in the dough, too. I only made half the recipe, which makes one loaf...plenty for two people. In the recipe below the amounts in parentheses and italics are the amounts of ingredients I used for the half recipe.


Although I had expected some rise in the dough when I first set it out to expand, it was pretty inactive for a couple of hours. Then it was bedtime, so I covered the bowl (same one I made it in, unwashed, un-oiled Elizabeth!) and put it into the fridge. The next day I was too busy to deal with it, but the next day, after the dough had warmed up some, it rose just fine. Back into the fridge it went. The next day I kneaded in the cherries and chocolate and shaped it into a loaf shape. Working with fairly cold dough is helpful. I had already buttered the pan and sprinkled it with sanding sugar, so in went the shaped loaf. It rose by about 1/3 in the pan while the oven preheated. After an egg wash and more sanding sugar on top, I slashed the top to allow for oven spring. Glad I did that because the oven spring was awesome! The bottom of the loaf was a little more browned than I would have like...chocolate can burn easily, but overall it was a delicious, decadent bread. Although many flavors were cake like, you could still see the bread texture and still taste the yeast, so not cake...BREAD!

Thank you Jaime, our Kitchen of the Month, blogging at Life's a Feast, for choosing this interesting recipe.


Thank you Elizabeth for lending me your Battle Apron, which I felt I needed when the dough refused to rise the first day. That and some patience seem to be what was needed to be successful with this lovely loaf.

Do try it for yourself! You can be a Buddy by making it, taking a photo or two and sending Jaime an e-mail (please include your name and your blog’s name) by January 26th to jamieannschler AT gmail DOT com with January Bread Baking Buddy in the subject line. Do visit all the Bread Baking Babes to see their bountiful versions, too.  OOPS! Buddy deadline is actually Jan. 29th! Still time....

Karen - Bake My Day 
Elizabeth - Blog from OUR Kitchen 
Heather - Girlichef 
Lien - Notitie van Lien   


Chocolate Prune Bread:
Makes one 1 ½ pound loaf if half recipe used

1 ½ pounds (about 680 g – the size of a small cantaloupe) (full amount if half recipe was made) of the Chocolate Chocolate Chip Bread dough {SEE BELOW}
Softened unsalted butter for greasing the pan

2 ounces (55 g) high-quality bittersweet chocolate - * use 6 ounces (170 g) if you did not add chocolate chips to the original Chocolate Bread Dough

¾ cup chopped pitted prunes (or dried cherries...like I used)

Egg wash (1 egg beaten with 1 Tbs water)
¼ cup (50 g) sugar for sprinkling over the top of the bread and preparing the pan

On baking day, generously grease an 8 ½ x 4 ½ - inch (22 x 11 ½ cm approx) nonstick loaf pan with butter, sprinkle some sugar evenly over the butter and shake the pan to distribute.

Dust the surface of the refrigerated dough with flour and cut off a 1 ½ pound piece. Dust the piece with more flour and quickly shape it into a ball by stretching the surface of the dough around to the bottom on all sides, rotating the ball a quarter turn as you go. Using a rolling pin, roll out the dough into a ½ - inch-thick (scant 1 ½ cm) rectangle. As you roll out the dough, use enough flour to prevent it from sticking to the work surface but not so much as to make the dough dry.

Sprinkle the chocolate and chopped prunes over the dough and roll up the dough jelly-roll style to enclose them. Fold the dough over itself several times, turning and pressing it down with the heel of your hand after each turn. This will work the chocolate and prunes (or cherries) into the dough; some may poke through.

With very wet hands, form the dough into a loaf shape and place it into the prepared pan. Allow to rest and rise for 90 minutes, loosely covered with plastic wrap.

Preheat the oven to 350°F (180°C). A baking stone is not required and omitting it shortens the preheat.

Using a pastry brush, paint the top of the loaf with egg wash and sprinkle with sugar. Bake the loaf in the center of the oven for 50 to 60 minutes until firm. Smaller or larger loaves with require adjustments to baking time.

Remove the bread from the pan and allow to cool on a rack before slicing and eating.

**************************************************************************
CHOCOLATE BREAD DOUGH RECIPE (Chocolate Chocolate Chip Bread)

Makes two 2-pound loaves. This recipe is easily doubled or halved. Amounts in parentheses and in italics are for the half recipe.

2 ½ cups (565 ml) (282.5 ml) lukewarm water (100°F or below)
¾ cup (170 ml) (85 ml) vegetable oil
1 Tbs (0.35 oz / 10 g) (5 g) granulated yeast
1 to 1 ½ Tbs (17 to 25 g) (6 to 12 g) kosher salt – * use less if using fine table salt, more if using coarse salt
1 cup (7 ounces / 200 g) (100 g) sugar
5 ½ cups (1 pound, 11 ½ ounces / 780 g) (390 g) all-purpose flour
¾ cup (3 ounces / 85 g) (1.5 oz/ 42.5 g) dark, unsweetened cocoa powder
1 ½ cups (6 ounces / 170 g) (3 oz/ 85 g) bittersweet or semisweet chocolate chips (or finely chopped pecans) - * can omit (for the chocolate prune bread you will be adding chocolate, the amount changes depending upon whether or not you added chocolate chips to the dough at this point)

Mixing and storing the dough:

Mix the oil, yeast, salt and sugar with the water in a 6-quart bowl or a lidded (not airtight) food container.

Mix in the flour, cocoa powder and the chocolate chips without kneading, using a spoon or heavy-duty stand mixer (with paddle). If you are not using the machine, you may need to use wet hands to incorporate the last bit of flour.

Cover (not airtight) and allow to rest at room temperature until the dough rises and collapses (or flattens on top), approximately 2 hours.


The dough can be used immediately after the initial rise, though it is easier to handle with cold. Refrigerate the container of dough and use over the next 5 days. Beyond the 5 days, freeze the dough in 1-pound (about 450 g) portions in airtight containers for up to 4 weeks. When using frozen dough, thaw in the refrigerator for 24 hours before using, then allow the usual rest and rise time.       

Monday, January 13, 2014

Breakfast Buns


Bread baking has been on the back burner lately, but I noticed that some mornings I would love to have just a little something to go with the morning cup of coffee and fresh fruit. I decided to put together a breakfast bun that would work, and to put in some healthy ingredients, too. Most of all, it has to be yummy because when you can only have a small amount of bread, it should be delicious bread, right?

For starters I cooked up some oatmeal...1/2 cup rolled oats and twice that amount of water...and set it to cool. I also mixed some yeast, water, a tiny bit of sugar and some flour to make a poolish. It all sat out on the counter while I went to the gym, collecting wild yeast if I was lucky.

Later in the day I mixed the cooked oatmeal, the poolish, some milk, and egg and some more water together. In a bowl I mixed all-purpose flour, whole wheat flour, salt, a little more yeast (in case no wild yeast were around that were strong enough), and a touch of cinnamon and added those to the liquid mix to make a nice dough.

After the dough had time to rise, I turned it out onto a flour board and kneaded in dried cranberries, chopped pecans and golden raisins. Those were stretched into a large rectangle, most of the rectangle was given a light coat of butter, a sprinkle with brown sugar, and also with cinnamon. I rolled it up, jelly-roll fashion, and cut it into buns.

The buns went into a 9 x 13 pan and lightly covered. They rose over time and then were baked in a 350 degree F oven until golden brown.


So now I had a dozen breakfast buns. There is about 1/6 of the usual amount of oatmeal one might eat at breakfast, whole grain, cinnamon for antioxidant and flavor value, dried fruits and nuts, milk and egg and only about 1/3 tablespoon of butter per bun, with even less sugar. Fairly healthy as buns go and very tasty. For one of the buns I added a small amount of an icing of confectioners sugar mixed with hot water. That made it a little too sweet, so I think in the future I'll stick with the 'plain' buns. Each bun went into it's own bag, then into the freezer for future enjoyment on those days when they will be the perfect thing to go with coffee and fruit.

You might think that I would want one every day, but today I had coffee, fruit and some plain yogurt and it was just enough breakfast. Normally I'd give you the recipe, but I didn't really measure a lot of the ingredients, so I'll have to see if I can figure it out and post it later.


Sunday, January 12, 2014

A Little Lamb and Some Older Sheep


Our neighbors across the road have a half dozen sheep and one little lamb. We offered to have them in our pasture for a while since our grass has started to be long enough in the fenced pasture and the sheep have eaten all the grass in their own pasture. If we are lucky they will still be with us when one of the mama sheep delivers another lamb. At the moment Pi is very happy to have some other animals on the property and I find it amusing that they bleat quite insistently any time they see us.

Happy Sunday!

Tuesday, January 07, 2014

A Little This...A Little That

One of the things I find about the post-holiday season is that hidden in the depths of the fridge there are remnants of meals gone by. It was hard to keep up with all the goodies, especially when well-meaning helpers put them away after a meal and then arranged them, say, behind the large container of grated Parmesan cheese, where they were hard to spot. A few days ago I hunted out quite a few small containers of this and that and put together a nice lunch for two with some of them.

The first find was a good sized amount of cooked rice. I had added some lemon when it cooked, so that was a great place to start. There was a small head of broccoli, so I cut that up into florets and steamed them. I mixed the rice with some pesto I found on the door and heated that up. The last addition was the best; I cut up the last of the smoked salmon into squares, put it on top of the heated rice, and heated that in the microwave for just one minute. With the broccoli placed around the sides of the bowl, it was a lovely looking dish. There was just enough for two lunch sized plates of the mixture and Sweetie as delighted to enjoy it with me while he took a break from installing the new sink in the studio.

Did you find nice ways to use up leftovers after the holidays?


Smoked Salmon with Pesto Rice and Broccoli
Serves 2

1 1/2 cups cooked rice
3 tablespoons prepared pesto (or use more if you desire)
1 cup broccoli florets, steamed (small stems can be used, too)
salt and pepper to taste
2 oz. smoked salmon, cut into bite sized pieces

In a medium bowl mix the cooked rice and the pesto. Heat in the microwave for about 2 minutes, until hot throughout. You may want to stir the mixture after one minute.
Steam the broccoli florets with a small amount of water until bright green and just tender when pierced with the tip of a knife. Drain and keep hot.
Place the pieces of salmon on top of the hot rice and microwave for one more minute. Arrange the hot broccoli around the sides of the bowl and serve at once.

Friday, January 03, 2014

Almost Entenmanns


It might seem like I'm a great baker of breads and pastries and that I always have been, but during the 20 years or so when I was most involved in raising my kids, keeping the household going, and holding down a job, that really was only true in a very limited way. Cookies and birthday cakes were about it. For Christmas I would buy a Raspberry Danish pastry from our local bakery outlet Entenmanns. The pastry itself was a fairly flat rectangle in a foil pan, about 6 inches by 10 inches. It had two strips of raspberry jam running down the long way and a dense white drizzle of confectioners sugar icing over the top. My kids loved it! I liked it too, especially because it was easy to heat up in the toaster oven and easy to serve.

This Christmas my daughter wanted that pastry for Christmas morning breakfast, along with our usual fruit bowl and scrambled eggs. Although the local bakery outlet has been closed for about a year, I went online and saw that there was one about 20 minutes away, and promptly forgot all about it. On the Monday before Christmas I looked up the outlet location again and saw that it had been closed. No biggie, right? Went to the Entenmann's site and put in the produce, thinking that I would just buy it at a grocery store. Well, that was wrong. It isn't carried by any store in our county, even though they do carry Entenmann donuts and other products. Whoops! Another search on the internet...don't you just LOVE how easy it is to find out so many things so quickly online?...led to a recipe for a clone of the Entenmann's Raspberry Danish, so I could just make the darn thing. It wouldn't have that certain something from the abundance of chemicals found in the original, but we would just have to put up with a Danish that tasted good.

Knowing that a laminated dough like Danish takes some time, I began making the dough in the morning of Christmas Eve. A butter block (a combination of butter and flour, combined and shaped into a rectangle, then chilled until firm) is essential for achieving the many layers of dough that provide the flakiness characteristic of Danish pastries. The soft, rich dough is wrapped around the butter block, then it is beaten with the rolling pin to break it up a bit, then the dough is rolled out and folded up like a letter. The dough is then chilled. The process is repeated a number of times, each time adding more layers to the dough. Eventually the dough is homogeneous and more turns are taken.

I was also preparing a holiday dinner for special guests that day. By dinner time the dough was done, so I divided it into three long rectangles, set side by side as the recipe directed, in a jelly roll pan.  I missed the part of the directions saying this was for 1/2 the amount of dough; with my experience of major rising, I probably should have divided the dough into four pastries instead of making one. With the warmth of the kitchen as dinner finished cooking and during the meal, the dough rose up mightily! After dinner I quickly turned on the oven and put the raspberry jam down the indents between the dough rectangles, but it was still a monster pastry! As soon as the oven was hot enough I baked it, fearful that it would fall before I had a chance to bake it. When I removed the golden brown, gorgeous (if huge) pastry from the oven I knew that it would be better than anything Entenmann's had ever made. Overnight it flattened out some, which was fine, but it was still a super Danish. I made up some glaze in the morning to drizzle over it (leaving out the apricot glaze) and cut narrow slices. I loved it, but Sweetie and my daughter preferred the grocery store version that Sweetie had found at Raley's on Christmas Eve afternoon, just in case. I guess it did taste and look more like the Entenmann's version, but I loved the buttery, flaky, raspberry good Danish that I made. Next time I'll make four smaller ones and freeze the other three, just for those who appreciate it.


Homemade Entenmann’s® Raspberry Danish Twist

Danish Dough (Makes enough for 2 Loafs):

Primary Dough-
16oz. AP flour
1/2 teaspoon salt
2 1/2 oz. sugar
2 eggs
1 Tablespoon butter, cold
1/2 cup water
1/2 cup milk
1 1/2 Tablespoons yeast

In a saucepan, heat milk and water to 180 degrees. Allow to cool to 110 degrees. Add yeast and whisk to dissolve.

In the bowl of your mixer add flour, salt and sugar. Using paddle, mix to combine. Cut in butter to evenly disperse. Mix in yeast mixture until barely combined.

In a small bowl, whisk eggs to break up. Slowly add eggs to dough until barely combined. Mix using dough hook, on speed 4 for approximately 4 minutes, until dough is elastic. You will need to stop halfway through to peel dough off the dough hook. Dough will be firm but slightly sticky.
Let sit at room temperature for 30 minutes.

Butter Dough-
8 oz. butter, room temperature
2 oz. AP flour

Cream butter and flour together. Form into rectangle shape. Let chill in refrigerator until hardened.
Roll primary dough to 1.5 times the size of butter dough. Encase butter dough in primary dough (as seen in cartoon). Do 2 total turns, chilling the dough from 45 minutes in between each turn.

Apricot Glaze-
2 Tablespoons apricot butter
2 Tablespoons corn syrup
Mix together.

Sugar Glaze-
1 cup confectioners sugar, sifted
pinch of salt
1 tablespoon milk
Mix together. 

Assembly (Using 1/2 of dough):
Roll dough into 8″x4″ rectangle, 1″ thick.  Cut vertically into 3 long strips. Lay each strip close to each other, barely touching on a sheet pan covered in  aluminum or parchment.  Turn on oven to 200 degrees for 3 minutes with a cake pan filled with hot water on bottom shelf. Turn oven off. Put sheet pan  with Danish dough into oven and close the door. Do not touch for 60 minutes. (This is how I turn my home oven into a ‘proofer’.)(Note from Elle: my kitchen was so warm that I didn't need to do this...just sitting on top of my microwave was all that was needed.)

After 60 minutes remove tray and cake pan filled with water. The logs that were barely touching should have puffed up.

Fill 1/2 of jam in each crevice between the dough rectangles (logs).

Preheat oven to 375 degrees. Beat 1 egg in a small bowl. Brush egg on danish dough.

Bake at 375 degrees for 20 minutes. Lower heat to 350 degrees and bake another 10 to 15 minutes until caramel brown.

While warm brush with Apricot Glaze.  Let cool to room temperature. Drizzle with Sugar Glaze.

Wednesday, January 01, 2014

Janus


In ancient Roman myth, Janus was the god of beginnings and endings, which is one reason that they named January after him. Now that we are past the shortest, darkest day of the year, it is somehow fitting to begin to look towards the time of year when there will be more light, more growing things, and plenty of time out of doors to enjoy. But it's also a useful time to look back at what worked and didn't work in our lives this past year, to remember the good times, too. I like to look back at the things I've included on the blog. A careful look has reminded me that my list of recipes with links is waaaaay overdue for updating. A New Years's resolution waiting to happen, right there.

One thing I can tell you is that the kidney stone I had last January made a different diet essential; one that does not include as much oxalate. Banished are much loved foods like spinach, chard, chocolate and mery much of whole grains. Limited quantities of legumes, except for lentils, and of flours and other processed grains has also cut into my usual dishes and baking. The good news is that there are still plenty of wonderful foods to enjoy, including things like broccoli and all the squashes, romaine lettuce and iceberg (which at least has crunch) and many other veggies like carrots, celery, tomatoes and cucumbers. I confess that I'm still a bit unbalanced by it since things I had thought were good for me, like whole grains and spinach, are actually bad for me now. So for, say, Christmas Eve dinner, I had a half of one of those great rolls, a small portion of those delicious potatoes, but a goodly portion of the salad since it had romaine, iceberg and red cabbage, plus carrots and tomatoes. Went light on the ham, too, because of all the sodium, but that's a different health issue. In truth the most important part of the meal is the people around the table and the enjoyment of them is full and wonderful and hasn't changed a bit. I still enjoy my occasional glass of wine, too.

Some of the recipes from 2013 that I'm pretty sure I'll return to include the potatoes and rolls on the last post,
these crock pot caramelized onions,

these white chocolate macadamia nut cookies (because I can't have regular chocolate, but I can have white chocolate!),

this oyster stew since there is plenty of soup weather to come (and it better include LOTS of rain since we are in a severe drought right now and NEED rain),

this cherry tomato salad, because it is simple and fast, burrata is delicious, and with our lack of rain I'm not likely to grow anything next summer but cherry tomatoes.

Because there is always a great selection of stone fruits and berries each summer, I know I'll want to make

the free form pie with moondust powder using some of that fruit. Since there is also likely to be an occasion that requires bringing a pot luck dish,

I'm going to keep this post of a wild rice and carrot side dish handy. It has all of the necessary attributes for a good pot luck dish: delicious, sits at room temperature well, filling, pretty easy, can be made ahead, and is unusual. The bowl that it is served in is often the first one empty at pot lucks, so that should tell you something.

We made a lot of good bread this year, but my favorite Bread Baking Babes bread was the Italian flavored
Tomato Basil Garlic Filled Pane Bianco. Not only is the large loaf delicious and stunning to look at, but the same ingredients can be used to make little appetizer rolls. Another great baked good from 2013 is for

classic blueberry muffins. I can almost smell them!

There is also Fast Focaccia, a recipe that I also made for Christmas this year. That sort of brings it all full circle.
Do you have any other favorites from this year's Feeding My Enthusiasms posts? I would love to know what they are!