Monday, June 16, 2014

Poizin Bread With The Babes


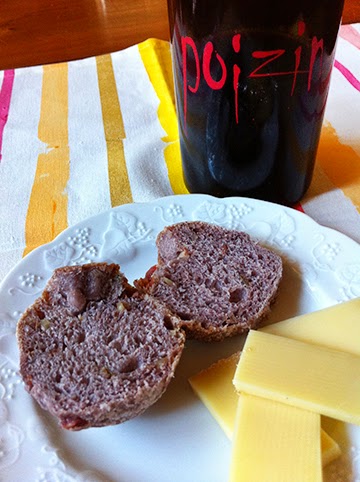
This is one of the most flavorful breads ever! Thanks to our Kitchen of the Month, Tanna or My Kitchen in Half Cups, the Babes are baking red wine bread this month and shaping it like a bunch of grapes. Although the recipe calls for Beaujolais wine, I had an open bottle of Armida winery's lovely Poizin zinfandel wine, so I used that.

Armida happens to be our go-to picnic winery because it has great zinfandel, large and comfortable tables and chairs under red umbrellas on a deck overlooking a pond and the Dry Creek Valley. If no one is using it or kids aren't throwing the balls into the pond, the boccie ball court is a fun place to while away some time and see who has the best pitch.


This is an interesting wine to make because the liquid is totally the wine. I didn't follow the directions as far as putting the dough together, although I was careful to have the wine at just the right temperature and to keep the dough soft with not too much flour. The change was that I mixed it up with my stand mixer and used that for kneading too. The dough was soft and a little tacky when I put it in for the first rise. It didn't rise very much, but the dough felt great. I kept out the additions to the dough until the second rise. Because Tanna recommended trying it, I went for cooked, drained and crumbled bacon (a half cup), finely chopped walnuts (a half cup) and about two tablespoons chopped fresh rosemary. It is a great combination! Very savory, very bacon-y, and just a hint of the rosemary. You can also really taste the wine in this bread, so use one you like drinking. The wine and the walnuts combine to make the bread a purplish color. The texture is fairly dense and a bit chewy. Sweetie had some for lunch with some cheese and I had a hard time keeping him from eating the rest, which we plan to share with our neighbors later today. Even though the individual little grapes are small, it's still a lot of bread.


There isn't a thing I would do differently. One of the changes that I really think you might consider is cutting the dough into smaller chunks. I kept a large piece for the stem and leaf, but cut the dough so that there were 20 'grapes' instead of 15. Some are a bit smaller than others, but that helps make it look like a bunch of grapes. This makes them about a two bite size which is perfect for having with a glass of your favorite wine.


Do try this one, either using the original recipe, found HERE on Tanna's site, or get creative as I did. This bread has enough flavor from the wine to stand up to any number of variations. Perhaps feta and pine nuts? Chopped spinach and Parmesan? Lots of different seeds? If you want to be a Buddy, bake it and post about it by June 29th and let Tanna know what you have done, plus send her a photo. Check out her blog post to see what wonderful bread she made and to get more information on being a Buddy.

Also be sure to visit the blogs of my fellow Bread Baking Babes.


Beaujolais Bread
From: A Passion for Bread, written by Lionel Vatinet

Ingredients:

454 grams white bread flour, unbleached, unbromated, 16 oz; 3.5 cups
7 grams fine sea salt, .24 oz; 1 1/8 teaspoons
5 grams instant dry yeast, .18 oz; 1.5 teaspoons
21  grams honey, .75 oz; 1 tablespoon
320 grams Beaujolais wine, 11.2 oz; 1 1/4 + 2 tablespoons
1/2 cup each cooked and crumbled bacon, finely chopped walnuts
2 tablespoons fresh rosemary, chopped

1. Scale all dry ingredients in a large bowl.


2. In the bowl of a stand mixer, add the honey to wine and check the temperature.The wine should be between 82° F and 84°.
3. With dough hook attached, add the dry ingredients slowly to the wine mixture, letting dough form and climb the dough hook. Knead with the stand mixer at least 8 minutes (more is good) until the dough is smooth and satiny, although still very soft and a bit tacky.

4. Turn the dough out onto the counter.
The dough will be soft and sticky; do not give into the temptation to add more flour.

Kneading  dough for a minute to make sure all is combined. The dough should be soft, pliable and hold it’s shape; it should not be stiff and dry.

Form dough into ball: using both hands, lift front and fold over, quickly dropping it down to the counter.

Repeat 4-5 times until a ball is formed. Use the scraper to ensure all the dough is gathered.

5. Turn the ball of dough into a rising container, coating with oil if that is your preferred method. Cover lightly and set in warm, draft free area to rise for about an hour. Dough will not rise very much and may spread out of the dough shape.

6. Turn dough out of the rising container onto a lightly floured surface. Using the palms of your hands, flatten the dough ball into a rectangle. Scatter half the bacon, walnuts and rosemary evenly over the dough. Wrap the sides up and over filling, pinch dough together, turn and repeat until the filling is incorporated.

Form into a ball. Using the palms of your hands, flatten the dough ball into a rectangle. Scatter the other half of the bacon, walnuts and rosemary evenly over the dough. Wrap the sides up and over filling, pinch dough together, turn and repeat until the filling is incorporated. Knead dough to fully incorporate both sets of filling.
Shape dough into a ball and return it to the rising container. Cover lightly and let ferment 2 hours.

 Total Time: three hours.

7. Dividing
Flour the counter. Scrape the dough onto the counter and allow to rest 30 seconds.
If the dough is very sticky at this point dust your hands with flour but do not add additional flour. Use the bench scraper to lift the dough if it sticks to the counter but do not pull and do not stretch the dough. Press the dough into a rectangle 12 inches by 4 to 5 inches wide. Be sure the dough is not sticking to the counter by lifting it to gently up. Cut the dough into 22 equal pieces with the bench scraper. Set two pieces aside for the stem and leaf.

8. Shaping
Use parchment paper or a silicone liner in a baking sheet.
Roll 20 pieces into a small ball shape for rolls, the last piece will become the grapevine. Create a triangle by setting four balls together in a line followed by a line of three balls then two balls and finally one ball. Stack and angle the remaining  balls over and to one side of the triangle so that the entire piece resembles a large cluster of grapes.

With the last piece of dough roll it into a rope about 10 inches long and shape it into a curved grape vine shape and leaf (if desired) that you attach to the top of the grape cluster. Dust with flour.

9. Final fermentation
Final fermentation may take from 60 to 90 minutes. If it over proofs but dough will be unusable. Place the baking sheet in a warm 75 to 80°F draft free place. Final fermentation will take from 60 to 90 minutes.

Preheat the oven to 450°  with a baking stone about 30 minutes before you are ready to bake. An effective and cheap way to achieve a crisp crust is to cover the bread with a stainless steel bowl when it is first placed in the oven on the lowest oven rack. (I just baked the bread with no covering and it worked out fine.)

Determine the dough is ready to be baked by uncovering and making a small indentation in the center of the role with your fingertip. The dough is ready to be baked if the indentation slowly and evenly disappears.

9. Baking
Slide the baking sheet into the oven onto the pre-heated baking stone. Bake until the bread is golden brown has a thick crust,about 20-25 minutes.


When fully baked transfer to cooling rack for at least one hour to cool.


Sunday, June 15, 2014

They Both Prefer Pie or Tarts


It's Father's Day so my thoughts turn to fatherhood and my Dad as well as Sweetie. According to my Mom, Sweetie is a wonderful father who deserves sushi for Fathers Day, so we had a sushi feast last night at our favorite sushi place. Our daughter was in town for the day so a Saturday celebration was just fine.

When I was growing up we celebrated Fathers Day on the correct Sunday as we did Mothers Day in May. By the time I had been away from home for a few years somehow those days morphed into Parent's Day and it was a movable feast. Perhaps the change happened because with so many grown children it made it more possible to gather a greater number of the family to celebrate and one day was far easier than two. Our Saturday celebration and week before celebration of Mothers Day this year just carried on a grand tradition.

Living so far to the west of my parents, I was usually only present for Parents Day by phone, so the one time we had Parents Day in Berkeley, exactly 30 years ago this month, was memorable. One of my west coast sisters was getting married, so many of the family came to California that June. Three of us were already living in Berkeley and the gathering was our home a few blocks from the downtown. We had a small but sunny backyard and a newly renovated kitchen with lots of counter space, so it made sense. I remember lots of laughter and good conversation and my Dad's hugs.

He gave good hugs. I'm pretty sure that Mom made a pie, probably a cherry pie. My Dad really loved fruit pies, something he and Sweetie share.


For Fathers Day this year I made Sweetie a tart, at his request. It has a lovely light, crisp, buttery crust using a new-to-me recipe by David Lebovitz. Unlike the usual method for making tart crust where you cut very cold butter into flour, then add icy water and, perhaps, egg yolk, this crust is created by putting butter, oil, water and sugar, plus a little salt, into the oven and cooking it until it browns just a bit. Once the mixture is removed from the oven, you stir in some flour and you have tart dough! Super easy and it makes a very delicate and delicious crust.


The crust was filled with my version of Quick Chiboust Pastry Cream (which is used for the decadent Gateau St. Honore), made all the more interesting by the omission of the gelatin. I had it soaked but forgot to add it when the pastry cream came off the stove. By the time I remembered as I was folding in the whipped egg whites, it was too late to add. I refrigerated the cream while we went to dinner and it was still soft but thick enough by the time we were home to put into the tart shell, topped by fresh blueberries and sliced local strawberries, tiny and sweet. I think my Dad would have loved the tart. I know we did. Here are the three parts of the tart:

Saint Honore Cream (Rapid Chiboust or Diplomat Cream)

1 envelope unflavored gelatin (7 gr.) (try to remember to add this instead of leaving it out like I did)
1/4 cup cold water (60 ml)
1/2 cup + 2 tablespoons sugar (130 gr.)
1/2 cup all-purpose flour (70 gr.)
1/4 teaspoons salt
5 egg yolks
2 cups whole milk (500 ml)
1 tablespoon rum or 1 teaspoon vanilla extract (also forgotten this time)
1/4 cup whipping cream (57 gr.)
3 egg whites
dash salt
1/2 cup sugar (105 gr.) I used about half of that amount

Soak the gelatin in the 1/4 cup cold water

Put the sugar, flour, and salt into a saucepan and stir together with a whisk. Add the yolks and enough milk to make a paste. Whisk in the remainder of the milk.

Place over low heat and, stirring constantly, cook until thick. Remove from heat and pour into a mixing bowl and !! stir in the vanilla and the gelatin mixture. Stir until the gelatin is completely dissolved.

Stir in whipping cream. Set the mixing bowl in cold water and stir until the cream is cool.

Place the egg whites in a clean bowl and, using clean beaters, whip them with the dash salt. As soon as the whites begin to stiffen, gradually add the 1/2 cup of sugar (or less) and beat until they are fairly stiff but still glossy. Fold the egg whites into the cooled cream. Use at once or place a piece of plastic wrap directly on top of the cream and refrigerate.

David Lebovitz's French Pastry Tart Shell
One 9-inch (23 cm) tart shell

Adapted from a recipe by Paule Caillat of Promenades Gourmandes

American all-purpose flour and butter work well in this recipe. Small crack in the dough are normal so it is not appropriate for a thin, custardy filling but works well filled with fresh berries resting on a base of pastry cream.

Be really careful with the hot bowl of butter. The butter spatters when you add the flour but the hot bowl can burn your hands if you grab it, so wear mitts and use a trivet or towel between the bowl and your counter if necessary to protect the counter.

3 ounces (90 g) unsalted butter, cut into pieces
1 tablespoon flavorless vegetable oil
3 tablespoons water
1 tablespoons sugar
1/8 teaspoon salt
1 slightly rounded cup all-purpose flour (5 ounces or 150 g)

Preheat the oven to 410 degrees F or 210 degrees C.

In a medium-sized ovenproof bowl, such as a Pyrex bowl, combine the butter, oil, water, sugar and salt.

Place the bowl in the oven for 15 minutes, until the butter is bubbling and starts to brown just around the edges.

When done, remove the bowl from the oven (and be careful, since the bowl will be hot and the mixture might sputter a bit), dump in the flour and stir it quickly, until it comes together and forms a ball which pulls away from the sides of the bowl.

Transfer the dough to a 9-inch (23 cm) tart mold with a removable bottom and spread it a bit with a spatula.

Once the dough is cool enough to handle, pat it into the shell with the heel of your hand, and use your fingers to press it up the sides of the tart mold, reserving a small piece of dough, about the size of a raspberry, for patching any cracks.

Prick the dough all over with the tines of a fork about ten times, then bake the tart shell in the oven for 15 minutes, or until the dough is golden brown.

Remove from the oven and if there are any sizable cracks, use the bits of reserved dough to fill in and patch them.

I put the shell back into the oven for 2 minutes, with the oven off, after the patching, to cook the patches just a bit.

Let the shell cool completely before filling.


Fruit Tart

Take cooled tart shell and mound in pastry cream. There will likely be far more cream than you need. Use in another tart or go wild and eat it out of the bowl with a spoon, because it is too good to waste.

Use the back of a spoon or an offset spatula to spread the cream evenly in the shell.

Top with fresh fruit arranged in a nice pattern.

If desired, glaze with melted apricot preserved or current jelly, then cool in the fridge for a short time to firm up the tart and set the glaze.


Friday, June 13, 2014

Life Rolls On

Hard to believe how long it's been since my last post. It's not that we haven't been eating, but, mostly, what we've eaten has been variations of our usual fare, with nothing to base a new post on, foodwise.

We have been moving along on the project, with paint on the walls and trim. Today Sweetie showed me how to use a battery operated airless sprayer to paint the pantry door. It is so light and much easier to use than the corded version. He has a real feel for spray painting and a supple wrist to make it happen. Because the weather today was perfect for painting we were able to paint both sides and get the door back where it belongs by dinner time. Dinner was lasagna from the freezer and carrot sticks...see, food has taken a backseat for a while.

Last weekend we visited our neighbor's pigs. They are so cute (and I never thought I'd say that about pigs!) and big show-offs. You could even say hams. Sorry, couldn't resist.

We try to take a walk with Pi at least every other day. One day this week the waterway we like to walk by was pretty as a picture.

We walked past blooming blackberry bushes, past blooming anise plants, past wild grapes that were in flower, too.

The heat the weekend before is encouraging rampant growth of the blackberries, so Sweetie brought clippers and snipped off the ones that were headed across the path. Pi walked along with his tail swinging; a very happy dog.

It was foggy most mornings during the week until today, but now we will have a row of days with high heat. That seems to be the way of it in summer. Maybe I'll beat the heat by trying bread baking on the BBQ like Elizabeth does. If I do, I'll let you know how it goes.For now, there are cabinet knobs and pulls to pick out, faucets to find and more painting to do. Life rolls on. Hope yours has been as enjoyable.

Sunday, June 08, 2014

Apricot Coffee Cake


I know that the post title is boring, but the coffee cake wasn't. It was zingy with fresh apricots, crunchy due to the sugary topping, and warm and mellow and tangy because it was warm from the oven and had some buttermilk in it. I love that this one is baked in a cast iron skillet because it gets a bit crusty on the bottom, too. We had some the evening it was made, but I didn't take photos. The next morning we had some for breakfast with our fruit bowl and some coffee. Heavenly!

The fresh apricots came for our local strawberry farm on Hwy 12. The wonderful family that farms there are from Thailand and the stand was recently written up in the regional paper. Lo and behold, the lines became longer and longer, especially on weekends. A couple of years ago hardly anyone knew about the place, which seriously has the sweetest strawberries ever. You never know when they will be open, so if we drove by and the flag was out, we would pull over and buy berries, or what ever else they were selling.

Last year they started putting in a lot of other crops including onions, garlic, melons, cabbage, green beans, and more. The stand started to be open more, too. Everybody wins and some great recipes are swapped while we are in line waiting for our turn. I have yet to see anybody grumpy about the wait, probably because they know that in the end will be amazing strawberries! Recently there have also been sweet cherries, blueberries, and these apricots. It's pretty hot this weekend, so next week there should be even more bounty.

My Mom received a digital photo frame for Mothers Day so I have been spending time recently going through my photo files and putting pictures up on the frame. I'm starting to scan old photos from pre-digital days so that they can go on the frame, too. Good times and good memories overall.

Happy Sunday, dear reader.


Apricot Almond Coffee Cake
An Elle original recipe


4 tablespoons sweet butter, at room temperature
1/4 cup granulated sugar
1 egg, at room temperature
1/4 cup buttermilk, at room temperature
1/4 teaspoon almond extract

1 cup unbleached all-purpose flour
1 1/2 teaspoons baking powder
1/2 teaspoon salt
4-5 fresh, ripe apricots, peeled, pitted, and sliced

Preheat oven to 350 degrees F. Butter well a heavy 9-inch skillet that can go in the oven.


Cream butter and sugar until light. Beat in egg. Scrape beater and bowl.


Stir together the buttermilk and almond extract. Set aside.

Sift dry ingredients together. Beat half into creamed mixture, beat in half of the milk, Repeat, beating well.


Pour batter into prepared skillet. Arrange apricot slices on top of batter...5 pretty much covers the top.


Bake for 25 minutes. While cake bakes, prepare the topping.

Topping
1/2 cup granulated sugar
1/4 teaspoon grated nutmeg
1/2 cup chopped almonds (I used whole raw almonds with skin on them)
4 tablespoons sweet butter

Cut ingredients for topping together in a small bowl with a fork.

After cake has baked for 25 minutes, open oven and quickly crumble topping over apricot slices.

Close oven and bake for another 8 minutes, or until cake is firm and has pulled away from edges of the skillet.

Monday, June 02, 2014

Spring Fruits in Scones


If you read through some of my blog posts it probably seems like I bake all the time, just because. In truth I used to do just that, but for a while now I've had to curtail my impulse to bake for a couple of reasons, but mainly because as we get older it seems to be harder to burn off those extra calories and so fewer calories are needed. While I would love to eat nothing but baked goods, good sense encourages me to fill up on fruits and veggies and quality protein instead.

That said, I still love to bake, so it is wonderful when I have a reason to bake something as delicious as scones. This past weekend I attended a P.E.O. conference in LA and we had a very early flight, so I made scones for Sweetie and I to enjoy at the start of our trip, plus I made a few extra to enjoy with committee members during our early morning committee meeting on Sunday. Since I had fresh blueberries and apricots on hand, plus a bag of sweet, moist dried apricots, I decided to make scones with them, some sliced almonds, and to use buttermilk for the liquid. It's tang goes so well with those fruits and it helped to keep the scones moist until Sunday morning, even though I baked them on Friday. P.E.O. supports women in their educational goals through scholarships and low interest loans, plus we own a college, Cottey College. The effort is almost all done by volunteers, like my fellow committee members, so they deserved some fine scones for getting up so early, right?

These were rough looking because I barely gathered the dough bits together, similar in technique to making Irish soda bread. The upside of that is they were tender and almost flaky. There was enough butter that you didn't need to add any and the flavor combination with the apricot, blueberry, lemon and almond flavors, combined with buttermilk, was excellent and hit the spot in the early morning with a cup of coffee. These don't take much time and would take even less without the dried apricots and if you left the peel on the fresh apricots, so mix up a batch yourself. You'll be glad you did.

Blueberry and Double Apricot Scones
Adapted from a Ladies Home Journal recipe March ‘97
Heat oven to 425 degrees F. Grease a cookie sheet or use parchment or silicone mat.

1/4 cups all-purpose flour
½ cup sugar
2 ½ teaspoons baking powder
1 teaspoon salt
½ teaspoon baking soda
¾ cup unsalted butter, at room temperature (no substitutions)
1/4 cup finely diced dried apricots

½ cup chopped fresh, peeled apricots½ cup fresh blueberries, dusted with a bit of flour
½ cup sliced almonds
1/4 cup buttermilk
1 egg

1 tablespoon grated lemon peel

Glaze: 2 tablespoons heavy cream
2 tablespoons sparkling sugar

Combine flour, sugar, baking powder, salt, and baking soda in a large bowl. With pastry blender or two knives, cut in butter until mixture resembles coarse crumbs. Add diced dried fruit, fresh apricot pieces and the blueberries and sliced almonds. 


Combine buttermilk, egg and lemon peel in a bowl or measuring cup. Pour over crumb mixture. Stir together with fork just until mixture comes together. Gather dough gently into a ball; it might be crumbly...that is OK. Divide dough in half and transfer to prepared cookie sheets. Shape each piece into a 6 inch x 1 inch thick circle, 2 inches apart. Using floured knife, cut each circle into 6 wedges.

For glaze, brush tops with cream and sprinkle with sugar.


Bake 20 – 25 minutes until toothpick inserted in the center comes out clean. Serve warm or at room temperature.


Makes 12 scones.


Thursday, May 29, 2014

Lots of Fruit


What would you make if you had some really nice fresh apricots, ripe and fragrant and about the size of a tennis ball? How about ripe, sweet and juicy strawberries? Firm, dusky blueberries? Fat sweet dark red cherries? I have some of all of those from a local farm stand in my kitchen right now and the first of the ollaliberries are going to be ripe within the week. I don't use a lot of jam or jelly except for making cookies at Christmas, so it has to be something else. We do eat lots of fruit fresh and with no preparation other than a quick wash and removal of stems or stem end leaves or inedible peels in the case of mangoes.

If you have a recipe to go with your suggestion, that would be excellent! Don't want the fruits of spring and early summer to come and go without some fun cooking and baking!

Tuesday, May 27, 2014

Ooodles of Asian Noodles and More


When warm weather hits like it has this weekend, it's nice to be able to turn to a fairly quick and easy and filling pasta salad to sit on the plate with chicken fresh off the grill. Sweetie brushed on some teriyaki sauce while he grilled them, so that had  a nice dark color and Asian flavor. I contributed a dish I'd seen on the Food Network a week or so ago.


It's called Sesame Peanut Noodles, and it has two kinds of peanuts - peanut butter and chopped peanuts, plus cilantro, lime, fresh ginger, rice vinegar and soy sauce which combine together to make a great sauce, along with a little honey and some toasted sesame oil. The recipe called for toasted sesame seeds, too, but I'm supposed to take it easy on sesame seeds, so I skipped that part. The pasta is whole wheat linguine and the salad part includes sliced cabbage, green onion, red pepper (and some broccoli slaw because I had some and wanted to add it). Sweetie and Straight Shooter both loved it and even though it makes a big bowl, we somehow managed to polish off every strand and chunk.

The most time consuming part of this was measuring out the ingredients for the sauce, grating the fresh ginger and lime zest, and juicing the lime. The pasta cooks while you make the sauce and chop up the veggies and then you just toss the drained pasta with the veggies and sauce and sprinkle chopped peanuts on top. Yum!


Sesame Peanut Noodles
from the Food Network


Ingredients
12 oz. linguine
Peanut Dressing:
1/4 cup creamy peanut butter
3 tablespoons soy sauce
2 tablespoons rice vinegar
1 tablespoon grated fresh ginger
1 tablespoon water
1 tablespoon honey
1 tablespoon Sriracha (I used some cayenne pepper instead)
1 teaspoon sesame oil
Zest and juice of 1/2 lime
Salad:
1/2 cup loosely-packed chopped fresh cilantro
2 green onions, sliced
1/2 head green cabbage, thinly sliced (I used some broccoli slaw mix, too)
1/3 red bell pepper, in thin strips
1/4 cup roughly chopped skinless roasted peanuts, for garnish

Directions
Put a large pot of water on to boil. When water is boiling, add the pasta. Cook the pasta until al dente. Do not overcook. Drain, reserving some of the starchy pasta water, rinse and set aside.

For the peanut dressing: Place the peanut butter in a large measuring cup and microwave to soften, 15 seconds. Whisk in with the soy sauce, vinegar, canola oil, ginger, honey, Sriracha, sesame oil and lime zest and juice in a small bowl. Thin with the starchy pasta water if needed, 1 tablespoon at a time. (Dressing should be thick, but pourable.)

For the salad: Place the pasta in a large mixing bowl and add the cilantro and vegetables and toss with the dressing. Top with the chopped peanuts  and serve.

Sunday, May 25, 2014

Birthday Cake On A Hot Evening


When you know that the birthday party for a dear friend will include his two grandsons, it makes sense to plan for a birthday cake. I don't know about you, but I feel almost as much joy now as I did when I was a kid when a beautiful cake topped with lit candles is brought to the table and placed in front of the person having the birthday. The traditional birthday song is sung with whatever success can be expected, depending on the singing talents of the group.  What was sweet this time is that the eldest grandson, a second grader, was asked to step over and help blow out the candles after the song. I'm not sure that the birthday 'boy' blew at all. Fortunately there were only three candles, each representing a significant chunk of his life.

The cake requested was chocolate with vanilla icing. It has been a couple of years since I've baked a frosted layer cake...sad, isn't it? I do remember that chocolate cake crumbs just love to lodge in the vanilla icing, so I decided to do chocolate whipped cream on the sides and vanilla whipped cream between the layers and on top. What I didn't count on was a heat wave that had my kitchen hot enough to melt whipped cream.

Fortunately we had a new refrigerator delivered the day before, so the old one was virtually empty, although cold. I got my workout going up and down the new front steps numerous times carting baked layers to the old freezer section to firm up, whipped cream to the fridge section, to keep the whipped cream thick, frozen layers back into the kitchen, partially frosted cake to the freezer and then back in again later for the final topping of snowy whipped cream, a sprinkle of mixed sugar decorations, and a last trip to the freezer to get that cake as cold as we could for the drive to the birthday boy's home. I carried it on my lap during the drive and watched the frosting thaw on the way. It stayed on the cake, so back into the freezer it went while we ate dinner, then onto the counter to thaw a bit as we kept talking after dinner. Worked like a charm. The icing was firm enough that it didn't slide off the cake and the cake was thawed enough to enjoy its lovely texture and great chocolate flavor.

The cake was one I had been wanting to try from Maida Heatter's Book of Great Chocolate Desserts, a collection of amazingly wonderful chocolate desserts, including my favorite chocolate bundt cake, a silky chocolate pie and so much more. If you love chocolate, track down this book! I have at least a half a dozen places bookmarked to make in the future. This cake was one of them. It uses melted chocolate chips and buttermilk and is a moist, fine-grained, fairly light cake with a good chocolate flavor, but not one so intense that it would put off kids or people who don't adore chocolate. For those who adore chocolate I turn to the Sin City Cake, but I wasn't sure if it would be too intense for the kids.

The Chocolate Buttermilk Layer Cake recipe makes not two, but three nice layers, so it becomes a pretty impressive cake once you put it together. It is not a quick recipe, so allow time to prepare the pans, to cool the melted chocolate and the chill the baked, cooled cake layers for easier handling. Putting on icing can take some time, too. If you use whipped cream, be sure to ice with the whipped cream the same day you will serve the cake, and keep it chilled between icing the cake and serving it.

This tall, beautiful cake was a big hit and the hostess made sure to move it to her own plate after those who wanted them had seconds, so that there would be cake for breakfast! Since I have to make sure to not eat too much chocolate, that was just fine with me.

I'm not going to give a recipe for the whipped cream frosting since I was unhappy with the chocolate version and the vanilla version was just heavy cream whipped with a little sugar and 1 teaspoon of vanilla added once the cream started to hold its shape.

If you are keeping up with our kitchen spruce up, I painted the ceiling a flat, bright white in the old front hall and hallway on Friday and have picked out a nice gold color for the accent walls facing the barn. And there is the new Frigidaire side by side refrigerator, too...and cake! Life is good.


Chocolate Buttermilk Layer Cake

6 oz. (1 cup) semisweet chocolate morsels
1/4 cup water or prepared, cooled, coffee
2 1/3 cups sifted, unbleached all-purpose flour, divided
3 tablespoons unsweetened cocoa powder
1 teaspoon baking soda
1/4 teaspoon salt
6 oz. (1 1/2 sticks) sweet butter, at room temperature
1 teaspoon vanilla extract
1 3/4 cups granulated sugar
3 eggs (graded large or extra-large) at room temperature
1 cup buttermilk, at room temperature

Adjust two racks to divide the oven into thirds and preheat oven to 375 degrees F. Butter (or use pan spray) three 9-inch round layer-cake pans. Line the bottoms with wax paper cut to fit. Butter (or use pan spray) the wax paper. Mix together 1/3 cup flour and the cocoa in a small bowl. Use a fine-mesh strainer to dust the mixture over the bottom of each pan and then tilt the pan to make sure all inner surfaces are coated with the flour mixture. Shake out excess. (Working over the sink makes for easy clean up because this is messy work.) Set the prepared pans aside.

Place the chocolate morsels and water or coffee n the top of a small double boiled over hot water on moderate heat and cover until the chocolate is partially melted. Then uncover and stir until completely melted and smooth. Remove the top of the double boiler and set aside uncovered to cool.

Sift together the flour, baking soda, and salt and set aside.

In the large bowl of an electric mixer, cream the butter. Add the vanilla and then the sugar and beat to mix well. Add the eggs one at a time, scraping the bowl with a rubber or silicone spatula and beating until well mixed before adding the next egg. (The mixture might look curdled...that's O.K.) Add the melted, cooled chocolate and stir until smooth. On low speed gradually add the sifted dry ingredients in three additions, alternating with the buttermilk in two additions. Scrape the bowl with the spatula and beat only until smooth after each addition.

Divide the batter evenly between the prepared pans and smooth the tops.

Place one pan on one rack and the other two on the other rack. Do not place one directly above another one.

Bake for about 25 minutes, or until a toothpick gently inserted in the middle of the cake comes out clean and dry. (I switched two of the pans about half way through the baking and turned all the pans 180 degrees to help them bake evenly.) Check each pan carefully...don't overbake. I checked 5 minutes earlier, just in case.

Let the layers stand in the pans on a cooling rack for 10 - 15 minutes. Then, with a small sharp knife carefully cut around the sides to release. Cover each pan with a rack, invert pan and rack, remove the pan and the wax paper lining, cover with another rack and invert again, leaving the layers right side up. Let stand until completely cool. I put a sheet of baking parchment under each layer before I did the second inversion...that way each layer sat of parchment as it cooled and that made it easy to move the rack and layer to the freezer when they had cooled. These are somewhat delicate layers, so freezing makes them easier to handle when icing them.

Prepare a flat cake plate by placing four strips of wax paper around the outer edges. Place one layer upside down on the plate, checking to be sure that the wax papers touch the cake all around. Ice the first layer with about 1/2 cup of your favorite icing, then put the second layer on right side up. Ice the second layer with another 1/2 cup or so of icing, then place the final layer, right side up, on top. I like to ice the sides and then the top, but many people ice the top and then the sides. Choose which ever you like. Using an offset spatula makes it easier to apply the icing. Decorate as you choose. Chill for a while if your icing needs to set, then let the cake come to room temperature before serving. Cut yourself a piece and enjoy!


Wednesday, May 21, 2014

A Tale of Chicken Livers


Raising your own chickens has become increasingly popular in our area. Sweetie has been there, done that and has the tee shirt, too, after helping to start an egg co-op in Micronesia in the early '70s. As a result, he is smart enough to let others raise the chickens. Fortunately our neighbors across the road have taken to chicken farming with delight, raising both egg layers and chickens for eating. Since we help them now and then with chasing the chickens into their coop at night (so as to not get eaten by the local foxes), they gift us now and then with a chicken dinner, fresh broth, and very fresh livers. For a recent chicken dinner, I made one kind of pate', the goodwife made another, plus chicken livers wrapped in bacon and broiled. It was a feast! G made outstanding barbecued chicken for the main meal.

Freshness and careful handling are very important when dealing with chicken livers. Since it was too hot to turn on the oven, I made the kind of pate where you gently simmer the livers in water flavored with celery and peppercorns, then process them with yummy things like cooked onion, garlic, whipping cream, brandy and herbs. Since this makes a light and smooth paste, I added chopped walnuts and crumbled bacon for both flavor and texture. It went well on baguette slices. My friend made a pate' with a bit more texture and deep, wonderful flavor from anchovies and citrus zest, plus wine. Served with toasted slices of country bread it was delightful. The broiled bacon wrapped livers were excellent, too. We enjoyed them all!


Not about chickens, but about a kickstarter campaign you might be interested in. This fellow is not chicken at all and has a great idea for a flavorful bun for sandwiches. Check out Perry Livingston of the Bread Beaker here: https://www.kickstarter.com/projects/1656767705/bread-beaker-an-experiment-in-flavor I wish him every success and am impressed by his initiative.

Back to the regular post - I didn't get a recipe from my friend, but I can give you mine, which was a combination of about four recipes I found in various cookbooks. The uniting theme was the simmer in flavored water until barely cooked...there should be some pink in the center when you cut into the livers. The recipe made enough that we had another crock ready for a picnic this weekend, but it wasn't as nice as the freshly made pate', so consider eating it all at once, or making a smaller amount.


Chicken Liver Pate' de la Maison
Makes enough for 6-8  


2 tablespoons butter
1/2 cup finely chopped onion
1 clove garlic, minced
2 small stalks celery
4 whole peppercorns
1 teaspoon salt
6 cups water
1 lb chicken livers
1 stick softened butter
pinch cayenne pepper
1 teaspoon dried thyme
1/2 teaspoon ground nutmeg
1/4 teaspoon ground allspice
1/2 cup heavy cream
1/4 cup brandy or Cognac
1/2 cup chopped walnuts
1/2 cup cooked, drained, crumbled bacon
2 tablespoons Italian parsley, chopped

Melt butter and sauté onion and garlic over medium heat until translucent, about 5 minutes.

In a medium saucepan, place the celery stalks, peppercorns and salt. Add the water and bring to a boil. Reduce heat so water just simmers. Simmer, covered, for 10 minutes. Remove cover, add rinsed and drained chicken livers, return to a simmer, cover, and simmer gently for 10 minutes. Insides of livers should still be a bit pink.

Drain mixture in pot, discard celery and peppercorns. Placed drained livers in a food processor fitted with a metal blade.

To the food processor add the butter, cayenne pepper, thyme, nutmeg, allspice, heavy cream and brandy or Cognac, and onion mixture. Process until mixture is smooth, scraping down work bowl as needed.

In the same pan you used to sauté the onions, place the walnuts and cooked bacon. Cook over medium-high heat, stirring constantly, until bacon releases a bit more oil and walnuts are fragrant. Add the parsley and stir to combine. Add this mixture to the liver mixture and stir to combine.
Scrape the pate mixture into small crock or crocks. Smooth the top, decorate with a parsley leaf if desired, cover with plastic wrap and chill 4 hours or more. Let stand at room temperature 30 minutes before serving. Serve with slices of baguette or toasts.

Friday, May 16, 2014

It Started in Forestville


Long, long ago (well about 30 years ago or so) there was a little cafe in the tiny town of Forestville, CA. They apparently made all sorts of wonderful food, but everyone raved about the bread. From that small beginning, Brother Juniper's Breads grew to a local company that wholesaled breads in the area where I live, and eventually the force behind Brother Juniper's, Peter Reinhart, became a world renowned artisan bread baker.

My local market used to carry Brother Juniper's Wild Rice and Onion Bread. It was wonderful for sandwiches and made a savory toast, too. You can imagine my delight when our wonderful Kitchen of the Month, Baking Soda of Bake My Day, chose this bread from Peter Reinhart's Artisan Bread Every Day book to be the May bread for the Bread Baking Babes. It has wild rice and onion, a nice crust, a bit of chew and a lovely fragrance. Do try it!


I only made a few ingredient substitutions. I substituted some whole wheat flour for some of the bread flour, used caramelized onions, and less yeast...about 2.5 oz. instead of 19! I gave it plenty of time to have the yeasties grow in the fridge...4 days...so I wasn't worried.

I'm afraid that I didn't follow the directions. I put the liquid and yeast together and let it bloom, put the yeast mixture in the stand mixer along with the cooked rice and onions, put on the dough hook, added the mixed dry ingredients in to create a dough, let it knead for 3 minutes, then did the rest of the kneading by hand. Worked like a charm. I love the texture of this bread and the slight chewiness. The crust would have been better if I added some steam, but it was fine.

I made the half batch of dough up into two short baguettes, each with about 13 oz. of dough. We had one with salad for dinner last night and will have the second one on Sunday when we take a picnic to a winery. The second one is a bit flatter, but it was the fault of my shaping technique, not the dough.

Thanks for choosing this bread Baking Soda! It is a winner. Dear Readers, please check out the other Bread Baking Babes to see how they handled this artisan bread:

Bake My Day - Karen
Blog from Our Kitchen - Elizabeth
Bread Experience - Cathy
Girlichef - Heather
Life's a Feast - Jaime
Living in the Kitchen with Puppies - Natashya
Lucullian Delights - Ilva
My Diverse Kitchen - Aparna
My Kitchen in Half Cups - Tanna
Notitie van Lien - Lien
Thyme for Cooking - Katie our BBBB with the wonderful round-ups

If you would like to be a Buddy, and why not?, e-mail Baking Soda at bakemyday (at) gmail (polkadot) com with a link to your post or Facebook post and a photo if you would like to be included in the round-up. Get it to her by May 29th and thank her and Brother Juniper for this lovely bread. Bake on!


Wild Rice and Onion Bread
(Peter Reinhart: Artisan Breads Every Day)

After struan, wild rice and onion bread was the most popular bread at Brother Juniper’s Bakery, and a version of this recipe appears in my first book, Brother Juniper’s Bread Book. The recipe calls for wild rice, but it can also be made with brown rice or a combination of wild and brown rice, or any other cooked grain. At Brother Juniper’s, during the holiday season we even added parsley, sage, rosemary, thyme, garlic powder, and black pepper, which made for a wonderful bread for stuffing turkey. Note that it only takes about 1/4 cup of uncooked wild rice to make 1 cup (6 oz, by weight) of cooked wild rice; still, if you’re going to cook wild rice especially for this recipe, you might as well make a bigger batch and freeze 1-cup packets for future use—or have it with dinner!

This new version uses the overnight fermentation method. The yeast is added directly to the bowl, not re-hydrated with the warm water and buttermilk. You can use either dried or fresh onions, and you can form the loaves into any size or shape. Dried onions are about one-tenth the weight of fresh onions and will absorb water from the dough, while fresh onions will leach moisture back into the dough. If you use dried onions, don’t re-hydrate them before adding them to the dough, but do be aware that you may have to add an extra 2 to 4 tablespoons (1 to 2 oz) of water while mixing.

6 cups (27 oz / 765 g) unbleached bread flour
2 1/4 teaspoons (0.6 oz / 17 g) salt, or 3 1/2 teaspoons coarse kosher salt
2 tablespoons (0.66 oz / 19 g) instant yeast
1 cup (6 oz / 170 g) cooked wild rice or another cooked grain
1/4 cup (2 oz / 56.5 g) brown sugar
11/2 cups (12 oz / 340 g) lukewarm water (about 95°F or 35°C)
1/2 cup (4 oz / 113 g) lukewarm buttermilk or any other milk (about 95°F or 35°C)
1/4 cup (1 oz / 28.5 g) minced or chopped dried onions, or 2 cups (8 oz / 227 g) diced fresh onion (about 1 large onion)
1 egg white, for egg wash (optional)
1 tablespoon water, for egg wash (optional)
Do Ahead
Combine all of the ingredients, except the egg wash, in a mixing bowl. If using a mixer, use the paddle attachment and mix on the lowest speed for 1 minute. If mixing by hand, use a large spoon and stir for 1 minute. The dough should be sticky, coarse, and shaggy. Let the dough rest for 5 minutes.

Switch to the dough hook and mix on medium-low speed, or continue mixing by hand, for 4 minutes, adjusting with flour or water as needed to keep the dough ball together. The dough should be soft, supple, and slightly sticky.
Transfer the dough to a lightly floured work surface. Knead the dough for 2 to 3 minutes, adding more flour as needed to prevent sticking. The dough will still be soft and slightly sticky but will hold together to form a soft, supple ball. Place the dough in a clean, lightly oiled bowl, cover the bowl tightly with plastic wrap, and immediately refrigerate overnight or for up to 4 days. (If you plan to bake the dough in batches over different days, you can portion the dough and place it into two or more oiled bowls at this stage.)
On Baking Day
Remove the dough from the refrigerator about 2 hours before you plan to bake. Shape the dough into one or more sandwich loaves, using 28 ounces (794 g) of dough for 4 1/2 by 8-inch loaf pans and 36 ounces (1.02 kg) of dough for 5 by 9-inch pans; into freestanding loaves of any size, which you can shape as bâtards, baguettes, or boules; or into rolls, using 2 ounces (56.5 g) of dough per roll. When shaping, use only as much flour as necessary to keep the dough from sticking. For sandwich loaves, proof the dough in greased loaf pans. For freestanding loaves and rolls, line a sheet pan with parchment paper or a silicone mat and proof the dough on the pan.

Mist the top of the dough with spray oil and cover loosely with plastic wrap. Let the dough rise at room temperature for 1 1/2 to 2 hours, until increased to about 1 1/2 times its original size. In loaf pans, the dough should dome at least 1 inch above the rim. If you’d like to make the rolls more shiny, whisk the egg white and water together, brush the tops of the rolls with the egg wash just before they’re ready to bake.

About 15 minutes before baking, preheat the oven to 350°F (177°C), or 300°F (149°C) for a convection oven.
Bake the loaves for 10 to 15 minutes, then rotate the pan; rotate rolls after 8 minutes. The total baking time is 45 to 55 minutes for loaves, and only 20 to 25 minutes for rolls. The bread is done when it has a rich golden color, the loaf sounds hollow when thumped on the bottom, and the internal temperature is above 185°F (85°C) in the center.
Cool on a wire rack for at least 20 minutes for rolls or 1 hour for loaves before slicing.

Thursday, May 15, 2014

Suddenly Summer Spring Salad


I'm not a huge fan of heat. I know that some folks like lots of hot, sunny weather, but I live in a fog belt for a reason. This week, which should be the best of spring time, we have had really hot weather, breaking records all over the bay area. Fortunately, the spring strawberries are sweet right now and I rediscovered a great salad dressing recipe just in time to make a strawberry-chicken-crisp spring veggie salad.

First of all, the dressing is a Whole Foods recipe and it features strawberries and balsamic vinegar, with some shallots, fresh thyme, mustard and pepper for seasonings. It is 0 fat, 0 cholesterol, low sodium and low sugar fresh wonderfulness. You do need a blender or food processor, but it goes together really fast. Hulling the strawberries, getting those tiny fresh thyme leaves off the stems, and mincing the shallots are really the only tasks beyond measuring.


For the salad I started with a pre-cooked rotisserie chicken. Why heat up the kitchen at all? Nice, crunchy iceberg lettuce was the base, steamed, cooled and cut sugar snap peas and asparagus add flavor and vitamins and fiber, as does the celery, avocado some creaminess, walnuts a bit of crunch, and the strawberries sing Spring with every bite. I layered my ingredients in a pretty, wide bowl, then drizzled the dressing on after each serving went on the plate. A few slices of purchased baguette and we had dinner!


Strawberry-Balsamic Dressing
a Whole Foods recipe
makes about 1 cup to serve 8

2/3 cup washed, hulled and sliced fresh organic strawberries
1/4 cup balsamic vinegar
1/2 shallot, chopped
2 teaspoon fresh thyme leaves
1 1/4 teaspoons Dijon mustard
1/4 teaspoon ground black pepper

Combine all ingredients and 1/4 cup water in a blender and blend until very smooth. Serve chilled.

Suddenly Summer Spring Salad
Serves 4-6

1 recipe Strawberry-Balsamic Dressing
1 rotisserie chicken, skin removed, cut off the bone and cut into bite-sized pieces
1 small to medium head iceberg lettuce, shredded
2 stalks celery, chopped
1-2 cups sugar snap peas, strings and ends removed
1/4 lb asparagus tips, washed and ends removed
1 ripe avocado, peeled, pit removed, and sliced
1/2 cup walnuts, chopped
1 pint fresh organic strawberries, washed, hulled, and sliced

Prepare the chicken and return to refrigerator to keep cold until just before serving.
In a large salad bowl, place the iceberg lettuce. Sprinkle the chopped celery on top.

Steam the sugar snap peas until bright green and barely cooked, about 1-2 minutes. Cool under running water or in an ice water bath. Drain. Cut into bite-sized pieces and return to refrigerator to cool.

Steam the asparagus tips peas until bright green and barely cooked, about 1-2 minutes. Cool under running water or in an ice water bath. Drain. Cut into bite-sized pieces and return to refrigerator to cool.

When ready to serve, put half the sliced strawberries over the celery and lettuce in the salad bowl. Add the sugar snap peas, the asparagus and the chicken. Pile the remaining strawberry slices in the center of the bowl. Arrange the avocado slices around the outer edge and sprinkle the walnuts between the avocado slices and the pile of strawberries. Serve at once with the Strawberry-Balsamic Dressing.

Wednesday, May 07, 2014

Pizza Dough with Italian Flour


Since I have an excellent scale for weighing food ingredients, I love it when baking recipes give dry ingredients by weight. It is much more precise than cups and tablespoons and that usually makes the finished product better. It is also easy, if you have a scale that tares back to O to weight the bowl, go to zero, weigh the first ingredient in the bowl, go to zero, weight the next ingredient right on top of the first, in the bowl, and so on. Once you are done, all the ingredients are exactly what is called for and all are in the bowl, ready for the rest of the recipe.

This recipe is one I found in the food section of our local newspaper, the Press Democrat. The dough makes two 12-inch pizzas and is ready to work with in about 4-5 hours, so pizza can be on the table in less than 5.5 hours. You can start the dough before work and stash it in the fridge until you get home, set it out at room temp. to warm up, then make the pizza, with the pies being ready to eat about an hour after you took the dough out of the fridge. Excellent! It uses Italian OO flour, a very fine wheat flour. I think that gave the crust just a bit of extra chewiness. It is tasty crust, too.

For toppings I went with a jarred tomato sauce, fresh mozzarella sliced and torn into pieces, a scatter of shredded mozzarella, a sprinkle of dried oregano and basil and garlic powder, some crumbled bacon and a sprinkle of olive oil, then grated Parmesan. It was delicious and cheesy. For the second pizza I spread on some pesto, added crumbled bacon, shredded and fresh mozzarella, a spritz of olive oil and some grated Parmesan. Sweetie really like this one! The bacon was used because the pepperoni slices I thought were in the deli drawer turned out to be gone. Still, bacon is good on anything and it was true here, too.


This meal was completed with a very large serving of a mixed kale, broccoli slaw, shaved Brussels sprouts and radicchio salad with poppy seed dressing, pumpkin seeds and dried cranberries. Strangely enough, it went well together. Such is the menu when some of the kitchen cabinets are being torn out. The dough was made the day before and safely stashed in the fridge. Even though the cabinet and counter to the left of the stove was gone by dinnertime, we still had the stove, so pizza was a great choice. I did shape the dough into smaller shapes than 12-inches in diameter, so next time I'll work a little harder at getting the shape larger and the crust thinner, but otherwise this was great pizza!

Have gotten to the fun time of picking out the wall paint. So far a light blue green seems to be the favorite choice. It has gray in it too. Very soft and comforting somehow. Funny how color can evoke so many emotions. Should be interesting to see what we end up with. I'll keep you posted.

To a faithful reader: Deb, hope you did something wonderful with the eggs. Our neighbor is so glad that you have them.


Pizza Dough from Roberta's in Brooklyn
Created by Tony Calzone and his team
Makes two 12-inch pizzas

153 grams OO flour (about 1 cup plus 1 tablespoon)
153 grams all-purpose flour (about 1 cup plus 1 tablespoon and 2 teaspoons)
8 grams fine sea salt (about 1 teaspoon)
2 grams active dry yeast (3/4 teaspoon)
4 grams extra-virgin olive oil (1 teaspoon)
1 cup lukewarm water

In a large mixing bowl, combine flours and salt.

In a small mixing bowl stir together 200 milliliters (about 1 cup) lukewarm tap water, the yeast and the olive oil, then pour the mixture into the flour mixture. (I put the active dry yeast into the water, let it sit 5 minutes to hydrate, then added the olive oil, whisked and added the mix to the flour mixture.)

Knead with your hands until well combined, approximately 3 minutes. Let the mixture rest for 15 minutes.

Knead the rested dough on a lightly floured surface for 3 minutes. Cut into 2 equal pieces and shape each into a ball. Place on a heavily floured surface, cover with a dampened cloth, and let rest and rise for 3-4 hours at room temperature or for 8-24 hours in the fridge. (If you refrigerate the dough, let it rest at room temperature for 30 - 45 minutes before you begin to shape it for pizza.)

To make pizza, place each dough ball on a heavily floured surface and use your fingers to stretch it, then your hands to shape it into rounds or squares. Top and bake.


Note: Measurements for dry ingredients are given by weight for greater accuracy. The equivalent  measurements by volume are approximate.

Saturday, May 03, 2014

Enjoying Spring


Although far too much time is being spent with tools and ripped out drywall these days, Sweetie and I do try to take the dog for walks almost every day.

One of our favorite walks includes this vista of bright green spring grass being happily eaten by those happy California cows. The family that farms there have been raising cows for all the years that we have lived around here, so they know what they are doing.


The area where the cows are chowing down was flooded in the winter, so the grass grows especially lushly there. Bet that milk is rich and wonderful!

Hope you are having a fine Spring weekend.

Thursday, May 01, 2014

Pantry Perfect


This morning I brought a lovely quick bread I'd baked to a meeting, so my worry about not baking during the project wasn't justified. Some baking will continue...it's one of my creative outlets after all.

Because the project does come with time constraints, I headed to my pantry for the ingredients, especially the canned pumpkin. I know that pumpkin seems like a fall and winter flavor, but a good pumpkin bread is delicious any time of the year. This one has vanilla, nutmeg, cinnamon and ginger for flavor, plus a dollop of Irish whiskey, for fun. I used both white and brown sugar, some eggs, some room temperature butter, and all purpose flour leavened with both baking soda and baking powder. At the end I threw in some dried cranberries, too. The finished bread was a golden brown with a lovely deep gold interior.

The recipe began as a King Arthur Flour recipe without the cinnamon, ginger, Irish whiskey, brown sugar or butter. I also changed the method because I used butter and creamed it with the sugars and vanilla, then added the eggs and water. Once these liquid ingredients were combined, the addition of the mixed dry ingredients went very quickly, yielding a very light and tender bread. It makes two good sized loaves. You could even freeze a loaf for later enjoyment. Since it goes together so quickly, give it a try.

You might wonder why I end up changing so many things. Why not start with a recipe that is closer to what I want to bake? Well, King Arthur Flour's website has so many recipes that I know I'll find one that will work as a starting point. They really seem to test their recipes, so I know the proportions will work. After that it is easy for me to make the substitutions since I have so much experience with baking. For this one, for instance, I wanted something similar to pound cake, so I used the creamed butter and sugar base instead of the melted butter or oil. Those give a slightly heavier texture to the finished bread. I can assure you that you won't want to leave out the Irish Whiskey (unless you replace it with bourbon) because it adds a hint of smokiness that is wonderful with pumpkin.


Spiced Pumpkin Bread with Dried Cranberries
Loosely based on a recipe found at King Arthur Flours

  • 1 cup butter, softened
  • 1 2/3 cups granulated sugar
  • 1 cup brown sugar
  • 4 large eggs
  • 2 cups (or one 15-ounce can) pumpkin (not pumpkin pie filling)
  • 1/2 cup water
  • 1/4 cup Irish Whiskey
  • 3 1/2 cups all-purpose flour
  • 1/2 teaspoon baking powder
  • 2 teaspoons baking soda
  • 1 1/2 teaspoons salt
  • 1 teaspoon nutmeg
  • 1 teaspoon cinnamon
  • 1/4 teaspoon ginger
  • 1 teaspoon pure vanilla extract
  • 3/4 cup dried cranberries
Preheat the oven to 350°F. Lightly grease two 8 1/2" x 4 1/2" loaf pans.

In a large bowl, cream the butter, then cream in the sugars.

Add the eggs, one at a time, beating each egg into the batter before adding the next egg.

Add the pumpkin, water,  and the Irish Whiskey and mix to combine well.

In a large bowl combine the flour, baking powder, baking soda, salt and spices. Add the flour mixture to the batter and beat only until barely combined.

Mix in the dried cranberries, if you're using them.

Spoon the batter into the prepared pans. and smooth tops a bit.

Bake the bread for 60 to 80 minutes, or until a cake tester or toothpick inserted in the center of the loaf comes out clean; and that same tester inserted about 1/2" into the top of the loaf doesn't encounter any totally unbaked batter.

Remove the bread from the oven, and cool it on a rack. When it's completely cool, wrap it well in plastic wrap, and store it overnight before serving.


Yield: 2 loaves.

Sunday, April 27, 2014

Noodle


We've been saving scraps for Noodle lately. Fruit peels and broccoli ends and the occasional chicken bone, which he apparently thinks is as good as caviar. Noodle is our neighbor's copper colored pig and he is a charmer. They recently added another pig to the pen, a gray one named Mouse, but I don't have a photo of her.

Not much cooking or baking worth noting going on right now. We are deep in the heart of kitchen planning, including moving lots of stuff out and setting up an alternate kitchen in the studio, so things will be sparse here food wise for a while. Our kitchen planner has been a huge help in all the tiny details and the big decisions, too.

Noodle is food on the hoof in a way. I suspect that he may become a pet instead...he is too cute.

Monday, April 21, 2014

Easter Surprise


My darling daughter had a visitor from out of town over the weekend, so I didn't think we would see her. Imagine my delight when she phoned Easter morning and said she wanted to visit at lunch time. The friend had to fly home in the morning.


We agreed that if I could get some eggs hard cooked in the morning that we would both love to color the eggs. She could take them home to have for lunch at work during the week.


It was a gorgeous day in the mid 70s, with a light breeze. We set up the little dishes with food coloring, vinegar and boiling water out on the deck and had our fun listening to the birds and watching the butterflies flit by. What a wonderful way to spend Easter afternoon.


Hope your weekend was great, too!


Want to learn how to color Easter eggs the old fashioned way? (Even if it is past Easter, eggs are a symbol of Spring and in some places, and you really know this year who you are, it is just barely past winter...a perfect way to celebrate the warming of the weather and coming of the flowers and new leaves...color eggs.

This method uses hard cooked, cooled eggs, food color, vinegar and boiling water...plus some creativity.
Give it a try! The link takes you to step by step directions. Child's play really.