Sunday, February 08, 2015
Cherries
Every year at Christmas time one of the gifts we look forward to are the cherries from Michigan. One of my sisters lives near Traverse City, Michigan, which is cherry country with a capital C. She often sends us dried cherries and they usually are eaten before the tree gets taken down. Last year I hid some for baking because they are excellent in baked goods. Yesterday I had to use some from the store since the Michigan cherries are all gone, but I was thinking of her as I baked this slab pie and wishing she was here to have a slice. I also wished I had Michigan cherries, but had to settle for Montmorency cherries canned in a jar (from Wisconsin I think).
This pie is a variation of one I found in XX. The original recipe was for apple pie, but Sweetie isn't a huge fan of apples, plus I had a yen for cherries. This would make an excellent Valentine's Day dessert. It looks like it feeds a crowd, but is really about six slices long. I'm pretty sure that you could cut it into 4 huge slices if you needed to. We shared it with our dinner partners last night and it served the four of us with medium slices, plus a couple left over for their breakfast. We were treated to an excellent Middle Eastern feast by the KitchenThink kitchen designer whom we love, so it was great that she loved this slab cherry pie, too.
The challenge for me with this recipe was to make a filling to replace the apple filling. I used another recipe in the book, for regular cherry pie, but added extra thickener and used fewer cherries. Because I was using canned cherries, I also included some dried tart cherries which I marinated in Amaretto liquor since almonds and cherries are a great combo. I also added about a teaspoon grated Meyer lemon zest to the Meyer lemon juice for some zing since canned cherries can be a bit bland. It all worked out well. The filling was thick enough for a slab pie, it was flavorful and had just a bit of tang. I know I'll make it again soon.
The crust was the one called for in the book, a all-butter pie crust that you can make in the food processor. It is very similar to the Martha Stewart one, but was even better and very flaky. I did increase the ice water to 1/4 cup. The mixture still looked like crumbs at that point, but it did hold together when squeezed. When I wrapped it up in plastic, I kneaded it together just a bit, then shaped it into a rectangle. Not sure if it is important, but I chilled the flour in the freezer and put the small cubes of butter there, too. The water was very cold. I think that having such cold ingredients and not overworking the dough helped with making it flaky.
Another change was that I painted the edges that became sealed together with the egg wash before folding the dough over. The recipe called for water, but I had the egg wash ready to go, so I used it. The filling that came out did so from a vet not the edges, so it worked to keep those edges really sealed. I also left the salt out of the egg wash. There was so much sparkling sugar on top that it really wasn't missed.
Cherry Slab Pie
a variation of Apple Slab Pie in The Culinary Institute of America's Pies and Tarts book
Makes on 5 x 15 inch slab pie
(about 6 servings)
One All-Butter Pie Dough (recipe below) formed into in rectangular disc
3-4 cups canned or frozen tart cherries, drained...reserve 1/4 cup juice
1/2 cup dried tart cherries in a small bowl with enough Amaretto to cover tehm
1/3 cup cornstarch (I used 1/2 cup tapioca starch, which worked well)
2 teaspoons fresh lemon juice (I used Meyer lemons)
1 teaspoon fresh lemon zest, grated fine
1 1/4 cup granulated sugar
1/4 teaspoon salt
Egg Wash of 1 egg whisked with 1 teaspoon water
Sanding sugar (or granulated sugar) for the top of the pie
Preheat the oven to 375 degrees F. Make sure the pie dough is chilling in the fridge. Line a baking sheet with parchment paper. Set aside.
In a small bowl, combine the reserved 1/4 cup cherry juice, the cornstarch or tapioca starch and whisk together with a small whisk or a fork. Set aside.
Drain the dried cherries. The liquid can be used for other purposes (like sipping)
In a medium saucepan, combine the drained cherries, lemon juice and zest, sugar, salt and drained dried cherries. Bring to a gentle simmer over medium heat, and simmer, stirring, for 10 minutes to reduce some of the liquid. Remove the pan from the heat and stir in the cornstarch mixture. Return the pan to the stove top and bring to a simmer over medium heat. Stirring constantly, cook for 3-5 minutes, until clear and thickened. Mixture will thicken more as it cools. That is fine. Remove the pan from the heat and allow to cool for 30 - 45 minutes, or until cooled to room temperature.
Dust a 13" x 18" sheet of parchment paper lightly with flour. On it roll out the chilled dough to 1/8 inch thick. Using a pastry wheel, trim the dough to 10 inches by 15 inches. If dough is at all soft refrigerate by placing the parchment on a baking sheet and putting the whole thing in the fridge.
On chilled rectangle of dough, spread the cherry filling on one half, along the long side, leaving a 1/2 inch border on three sides. If needed, press gently on filling with a spatula to eliminate any air gaps.
Use the egg wash and a pastry brush to brush the wash on all edges of the pastry, about 1/2 inch in. Using the parchment paper to help, fold half the dough over the other half. Press down on the edges to seal and further seal and crimp by pressing down with the tines of a fork.
Carefully turn the pie over onto the parchment lined baking sheet. Brush the top with egg wash. Sprinkle liberally with sanding sugar or granulated sugar. Use a paring knife to cut 6 or 7 vents in the top at 2 - 3 inch intervals.
Bake in the preheated oven until the filling is bubbly and top is golden, about 45 - 50 minutes. Remove the baking sheet from the oven and place it on a cooling rack. Let cool for 2 - 3 hours. The filling will continue to thicken and set as the pie cools.
To serve, cut wedges down the pie, with the point of the wedge facing in one direction for one slice and in the opposite direction for the next slice.
Refrigerate any leftovers.
All-Butter Pie Dough
from same book as above
1 1/2 cups all-purpose flour, put into the freezer for 1 hour
1/2 teaspoon salt
1/2 teaspoon sugar
4 oz - 1 stick, unsalted butter, cut into 1/2-inch cubes and frozen
1/4 cup ice cold water, more if needed
In the bowl of a food processor fitted with steel blade, combine the cold flour, salt and sugar. Process for a few seconds to combine.
With the processor off, add half the frozen butter. Pulse for 3 - 5 seconds, or until the butter looks like small peas. With the processor off, add the remaining butter and pulse for 4 - 5 seconds, or until the mixture is well mixed and butter pieces are various sizes from small to pea sized or larger.
With the processor off, sprinkle half of the ice-cold water over the mixture. Pulse for 3 - 5 seconds, or until just combined. With processor off, add half of the remaining water. Again pulse for 3-5 seconds. Check the dough by pressing it to the side of the work bowl. If it does not hold together, add the rest of the water and pulse for 3 - 5 seconds, and check again. The dough should just hold together when pressed to the side of the bowl. It will be very dry looking and should not form a ball or mass of dough in the bowl.
Turn the dough out onto a lightly floured work surface. Shape the dough into a disc, kneading gently just a bit if needed to make the dough cohesive. Shape disc into a rectangle and wrap tightly in plastic wrap. Chill in the refrigerator for at least 1 hour or, preferably, overnight.
Use straight from the fridge to roll out.
Labels:
Amaretto
,
cherries
,
dried cherries
,
Martha Steward Food Processor Pie Crust
,
Meyer Lemons
,
pie
,
slab pie
Thursday, February 05, 2015
Apricots and Almonds
Fragrances are often a memory trigger, especially food aromas. From now on, warm apricots and almonds will remind me of the trip to bury my Mom. I knew that we would be getting in late and might want something easy for breakfast, so I baked an apricot almond bread to take with us. I could smell it in the car on our way to the airport, even though it was inside my carry-on bag. I even ate some of it, pulled roughly from the end of the loaf and eaten with my airplane coffee when I felt the need of a snack. It was wonderful. The morning after we arrived I had a slice, toasted, with some coffee before getting ready to get out the door. It was comforting and the heat from the toaster brought out the fragrance of apricot even stronger.
It was an emotion filled time. I grieved over the loss of not only my Mom, but of the place she held in the family and how her home was the true home place for so many. We had no choice but to begin taking things out of the house, which was a jolt, even though expected. One day before 2015 winds down someone else will buy it and the house will start the next chapter in its life. It is the place of my childhood, filled with mental snapshots of long ago excitement and disappointments, birthdays and Christmases, books and baking, puzzles and plantings. Time to bid childhood places good bye, too. I hope that someone with a young family moves in. It's a good house for a family. My family grew together there and we held together these past few days, too, sharing photos and memories, exchanging hugs and stories, supporting each other as we buried Mom with Dad as the air was filled with drizzle which mingled with my tears. On either side of me, solid with love, was my Sweetie and my wonderful daughter. Even in my sadness I know that I'm truly blessed.
Hope you try this bread and hope it evokes good memories for you the next time you smell almonds and apricots.
Apricot Almond Braid
a variation on the Autumn Festival Bread in The Festive Bread Book by Kathy Cutler
This is a rich and elegant bread, flecked with dried apricots and sliced almonds. It has a texture similar to a brioche and is wonderful toasted.
a variation on the Autumn Festival Bread in The Festive Bread Book by Kathy Cutler
This is a rich and elegant bread, flecked with dried apricots and sliced almonds. It has a texture similar to a brioche and is wonderful toasted.
Makes 1 loaf
1 tablespoon active dry yeast
2 tablespoons warm water (105 – 115 degrees F)
2 ¼ - 3 cups unbleached bread flour
½ teaspoon salt
1/4 teaspoon ground nutmeg
½ cup diced dried apricots
3 tablespoons sugar
1/3 cup warm milk (105 – 115 degrees F)
1 egg
1/4 teaspoon almond extract
4 tablespoons unsalted butter, softened
½ cup sliced almonds
Dissolve yeast in warm water. Set aside for 5 minutes.
Combine 1 ½ cups flour, salt, nutmeg, diced dried apricots and sugar in mixing bowl. Mix thoroughly.
Mix together the warm milk, egg and almond extract. Add the milk mixture, yeast mixture and butter to the dry ingredients. Mix thoroughly.
Add enough remaining flour to make a soft dough. Knead on lightly floured surface until smooth, about 10 minutes.
Place in greased bowl, turning to coat top. Cover and let rise in warm place until double in bulk – about 1 hour.
Punch down dough. Flatten dough and sprinkle half of the sliced almonds over it. Roll up like a jelly roll, then fold the two ends towards the center. Flatten dough again. Again sprinkle on the sliced almonds, using them up. Again roll up like a jelly roll and fold the two ends towards the center. Knead dough about ten turns to fully incorporate the sliced almonds. Divide the dough into thirds. Make three ropes. Braid on a greased, parchment covered, or silicon mat covered baking sheet. Be sure to tuck the ends under.
Cover and let rise in a warm place until double – about 30 -45 minutes.
Bake in a preheated 400 degree F oven for 15 minutes.
Lower the oven temperature to 325 degrees F and return the loaf to the oven. Bake an additional 30 – 35 minutes or until done. Check at 20 minutes and cover lightly with aluminum foil if loaf looks like it is getting too dark or the nuts are burning.
Cool on a wire rack. If desired, drizzle with Confectioners Sugar Icing and sprinkle on some additional sliced almonds for decoration.
Confectioners Sugar Icing: Mix together 1/2 cup confectioners' sugar, 1/2 teaspoon vanilla, 1/4 teaspoon almond extract and 1-2 tablespoons milk.
Labels:
braided bread
,
childhood memories
,
dried apricots
,
food related memories
,
sliced almonds
Wednesday, January 28, 2015
What's An ANZAC?
If you're from New Zealand or Australia, you probably know the answer. Those two countries combined armies for a time during the First World War. The Australian and New Zealand Army Corps (ANZAC) was a First World War army corps of the Mediterranean Expeditionary Force that was formed in Egypt in 1915 and operated during the Battle of Gallipoli. They were disbanded after that battle. In Greece in 1941 during the Second World War they also fought together under that name and again in the Vietnam conflict.
They are also a delicious biscuit (cookie in America) which was sent to soldiers and also sold to raise money for the troops and later the veterans. (Recipe at the bottom.) At the website anzacday.org.au they give this info:
"During World War 1, the wives, mothers and girlfriends of the Australian soldiers were concerned for the nutritional value of the food being supplied to their men. Here was a problem. Any food they sent to the fighting men had to be carried in the ships of the Merchant Navy. Most of these were lucky to maintain a speed of ten knots (18.5 kilometers per hour). Most had no refrigerated facilities, so any food sent had to be able to remain edible after periods in excess of two months. A body of women came up with the answer - a biscuit with all the nutritional value possible. The basis was a Scottish recipe using rolled oats. These oats were used extensively in Scotland, especially for a heavy porridge that helped counteract the extremely cold climate.
The ingredients they used were: rolled oats, sugar, plain flour, coconut, butter, golden syrup or treacle, bi-carbonate of soda and boiling water. All these items did not readily spoil. At first the biscuits were called Soldiers’ Biscuits, but after the landing on Gallipoli, they were renamed ANZAC Biscuits.
A point of interest is the lack of eggs to bind the ANZAC biscuit mixture together. Because of the war, many of the poultry farmers had joined the services, thus, eggs were scarce. The binding agent for the biscuits was golden syrup or treacle. Eggs that were sent long distances were coated with a product called ke peg (like Vaseline) then packed in air tight containers filled with sand to cushion the eggs and keep out the air.
As the war drew on, many groups like the CWA (Country Women’s Association), church groups, schools and other women’s organisations devoted a great deal of time to the making of ANZAC biscuits. To ensure that the biscuits remained crisp, they were packed in used tins, such as Billy Tea tins. The tins were airtight, thus no moisture in the air was able to soak into the biscuits and make them soft. Most people would agree there is nothing worse than a soft biscuit.
During World War II, with refrigeration in so many Merchant Navy Ships, the biscuits were not made to any great extent. It was now possible to send a greater variety of food, like fruit cake.
ANZAC biscuits are still made today. They can also be purchased from supermarkets and specialty biscuit shops. Around ANZAC Day, these biscuits are also often used by veterans’ organisations to raise funds for the care and welfare of aged war veterans."
We had a visit from an Australian friend and his sister today, so I made some anzac biscuits using his wife's recipe to go with our tea. I have fond memories of watching her make them in their kitchen in Perth. This is a really easy, quick recipe as long as you have all the ingredients on hand. Your house will also smell wonderful with the butter, sugar, coconut, nuts and oats fragrances. Best of all they are irresistible. Hard to only eat one.
Anzac Cookies
makes about 2 dozen
1 stick (1/2 cup) butter, melted
2 tablespoons hot water
2 tablespoons golden syrup
3/4 cup brown sugar
1 cup rolled oats
2 tablespoons hot water
2 tablespoons golden syrup
3/4 cup brown sugar
1 cup rolled oats
1/2 cup flour
1/2 cup self-rising flour
1/4 teaspoon salt
1/2 teaspoon baking soda
3/4 cup dry coconut
3/4 cup walnuts, chopped
1/2 cup self-rising flour
1/4 teaspoon salt
1/2 teaspoon baking soda
3/4 cup dry coconut
3/4 cup walnuts, chopped
1) Preheat the oven to 350 degrees F.
2) Combine the melted butter, hot water, golden syrup and brown sugar in a mixing bowl (or the pot you melted the butter in if it large enough to hold the batter). Stir to blend well.
3) On a sheet of waxed paper combine the oats, flours, salt and soda. You could also combine them in a mixing bowl.
4) Add the nuts, coconut, dry ingredients and dried fruit to the butter mixture. Stir to blend well.
5) Pack dough into greased small tart pans or make into drop cookies on a cookie sheet. Bake in preheated oven for 15 minute until golden brown. (New note: Check cookies at 10 and 13 minutes :)
6) Cool cookies on wire rack. Store in airtight container. These cookies ship well. Enjoy!
Labels:
ANZAC
,
Anzac cookies
,
butter
,
coconut
,
cookies
,
rolled oats
,
self-rising flour
,
walnuts
Saturday, January 24, 2015
The Comfort of Buttermilk Biscuits
It's true that I get revved up thinking about making new recipes, especially the ones that the Bread Baking Babes and Cake Slice Bakers make each month. New ideas and techniques really get my creative juices flowing and it's fun to discover foods that can become favorites.
Sometimes, though, it's so nice to make a recipe that I've made over and over again. The process is usually faster and calmer and somehow comforting. I've made these biscuits since I was a young girl. My Dad loved his biscuits for breakfast and he loved them with stew. He loved them with ham and they make a great topping for chicken pot pie. Best of all they are great with some butter and honey, just out of the oven, with nothing but a cup of coffee. Well, I like them that way.
I haven't made biscuits for a long time, but this morning I was in the mood and I had all the ingredients ready to go. It's a short list, just self-rising flour, shortening and buttermilk. I keep my Crisco in the back of the fridge because I use it so rarely that it goes rancid in my cupboard between uses. That also makes it nice and cold for cutting into the biscuit flour. The essential thing with these biscuits is to avoid over handling the dough. You don't want a lot of gluten for these, just tender flakiness. I only knead the dough a few times; just enough to make sure the ingredients are evenly distributed. I do roll out the dough to about half the thickness I plan on having, then fold half of it over the other half. This makes it easy to split the biscuits when baked. Pushing straight down on the biscuit cutter is another tip. These really are easy as child's play, so try them soon. I bet you'll enjoy them as much as my Dad did. Don't forget the honey. I'm thankful to my newest neighbors who gave us a jar of local honey with comb in it for Christmas. They made these biscuits just perfect!
Classic Self-Rising Flour Buttermilk Biscuits
3 cups sifted self-rising flour
½ cup shortening
1 cup buttermilk ( you can also use plain milk)
Cut shortening into the flour until consistency of coarse meal. Add enough milk to make a soft dough (may be slightly more or less than one cup).
Turn dough out onto a lightly floured surface; knead gently about ten strokes. Roll 1/4 the thickness desired for finished biscuit height. Fold half of the rolled out dough over the other half. Cut with a floured biscuit cutter (or drinking glass rim) pushing straight down. Don’t twist the cutter.
Place biscuits on a baking sheet. Bake in a preheated 4000 F oven for 12-15 minutes. Makes about 14 two-inch biscuits.
Thursday, January 22, 2015
Hot and Savory Chicken Pot Pie
At some point in November right around Thanksgiving Sweetie gave me a recipe that he had seen in the Sunday newspaper supplement. It was for Turkey Pot Pie and these little pot pies were baked in individual ramekins and each was topped with puff pastry. They looked delicious!
It took a while (but life has been unusual this winter) and some thought, but I made something similar a few nights ago. I went with Chicken Pot Pie because I had some already cooked chicken thigh meat and no turkey. I chose to make one big casserole instead of the individual portions, which worked out well. The filling stayed nice and moist and the line up of golden rectangles of puff pastry looked really nice. Best of all, this pot pie is delicious.
You start by cooking some cubed potatoes in chicken broth. I leave the peel on mine, but feel free to peel the potatoes before cubing them if you like. Chopped onion, bell pepper, carrots and celery are sauteed in a little butter, then seasoned with poultry seasoning, thyme, salt and pepper. Flour is added and cooked a bit to take the 'floury' taste away, then a mixture of chicken broth and milk are added and cooked to make a thicker sauce. Some peas and corn are lightly cooked and added, along with the chicken and cooked, drained potatoes. It smells really wonderful by this time. You could substitute out green beans or asparagus for the corn or peas and could add in mushrooms or those tiny onions if you like. This is a recipe that allows for variations.
In the past I've tried making dishes like this with the puff pastry baked right on top. It rarely works. I just get melted puff pastry drooping over the filling. This time I baked the pastry rectangles on a baking sheet and then put them on top of the hot filling. That worked beautifully! The softness of the filling was a good foil for the crisp golden pastry.
If you are trying to increase your veggie intake, you can put a lot of veggies in this and it will still taste delicious. Feel free to increase the amounts.
I kind of made up this recipe as I went along, so there is no source for it. If you go online you might find some that are similar. The photo is terrible, too, but I find that my new kitchen makes photography after dark very difficult. There is something about the light. It tastes far better than it looks.
Chicken Pot Pie with Puff Pastry Topper
3-4 yellow Finn potatoes, washed and cubed
1 3/4 cups chicken broth
1/2 yellow onion, chopped
2 stalks celery, sliced
2-3 carrots, sliced into coins
1/4 yellow bell pepper and 1/4 red bell pepper diced
3 tablespoons butter
1/3 cup flour
1/4 teaspoon poultry seasoning
1/4 teaspoon dried thyme
salt and pepper
1/4 teaspoon dried thyme
salt and pepper
about another 1/2 cup chicken broth
1/2 cup milk
2 - 2 1/2 cups
cooked, cubed chicken (I used skinless thighs)
1 cup frozen peas
1/2 cup frozen corn
1 sheet (half package) frozen puff pastry, thawed
1 tablespoon milk or 1/2 and 1/2
In a large pot with a lid, add the chicken broth to the
cubed potatoes. Place over high heat, bring to a boil, reduce to a simmer and
cover. Continue to simmer for about 20 minutes, until potatoes are tender when
pierced with the point of a sharp knife.
Meanwhile, prepare
the onion, celery, carrots and bell pepper. When potatoes are cooked, drain
them, reserving the cooking liquid.
Preheat the oven to 450 degrees F.
Melt the butter in the pot the potatoes were cooked in.
Add the onion, celery, carrots and bell pepper. Over medium heat, cook,
stirring often, for 5-8 minutes or until onion is translucent.
Add the flour, poultry seasoning, dried thyme and salt
and pepper to taste to the cooked veggies. Stir for 1 minutes to allow the
flour to cook a bit.
In a large measuring cup, measure the reserved potato
cooking liquid. Add additional chicken broth to bring the level up to 1 3/4
cups. Add the milk. Stir this mixture, all at once, into the veggie/flour
mixture and continue stirring over medium heat until the mixture thickens
slightly. It's OK if mixture bubbles a bit once it has thickened.
Add the cubed chicken and stir to combine.
In a microwave safe container, cook the peas and corn for
1-2 minutes to warm. Add warmed peas and corn to the pot with the chicken and
veggies. Add the cooked and drained potatoes. Stir to combine everything, then
spoon mixture into a greased 9" x 13" casserole.
Cut the sheet of puff pastry into 9 rectangles. Place
pieces on a parchment lined baking sheet, leaving at least an inch between
them. Bake puff pastry in preheated oven. When pastry has puffed but is not yet
brown, put the casserole into the oven to heat (I put it on a lower shelf).
When puff pastry rectangles are puffed and golden brown,
remove them from the oven. Remove the casserole from the oven. Place the
rectangles on top of the casserole mixture. Serve at once.
Makes 6-8 servings.
Tuesday, January 20, 2015
A Chocolate Velvet Swirl
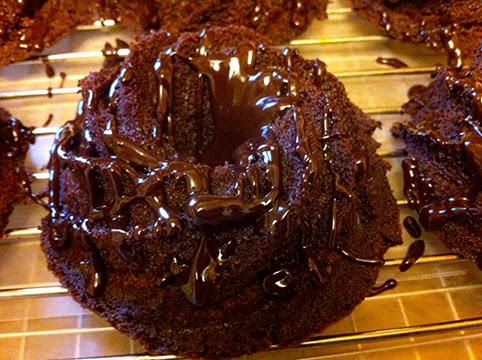
This month the choices for recipes for the Cake Slice Bakers included Whoopie Pies, a decadent Ambrosia Cake, a classic Italian Cream Cake and my choice, Chocolate Velvet Cupcakes. We are baking from Southern Living's The Southern Cake Book, so all the recipes looked amazing. It was really hard to choose. I finally settled on the Chocolate Velvet Cupcakes because I decided that was the perfect recipe for using the mini-swirl Bundt cake pan that was a Christmas gift. These little cakes aren't cupcakes, but they are not too far off. A tender chocolate cake baked up beautifully as small swirl cakes and looked so pretty with a decoration of melted chocolate mixed with whipping cream.
We were supposed to make a cream cheese based browned butter frosting, but the recipe made 5 cups! That would have been perfect for 36 cupcakes, but I cut the recipe down and made 1/3 or it, so that much frosting was too much.
These little cakes made the perfect treat to celebrate our daughter's birthday. It is really, really early to be celebrating, but she will be gone for work on her actual birthday, so we celebrated over the weekend.
I made the cake batter as described with one small change (other than the portion). I could have sworn that I bought sour cream, but couldn't find it, so I substituted plain yogurt. Worked like a charm.
Do try this recipe if you like chocolate cake. The crumb of the cake is tight and tender, the chocolate flavor is just assertive enough and your kitchen will smell heavenly while you make these treats.
I'm including the full recipe for 36 cupcakes in case you want to go big.
Chocolate Velvet Cupcakes
Makes 36 cupcakes
Preheat the oven to 350 degrees F. and prepare enough cupcake pans to hold 36 cupcake papers.
Melt 1 1/2 cups semisweet chocolate morsels in the microwave at HIGH in a microwave-safe bowl. Microwave for about a minute at a time, stirring well after each, until chocolate is melted and smooth. Set aside.
In the bowl of an electric mixer, beat 1/2 cup soft butter and 16 oz. of brown sugar until well blended (about 5 minutes). Take three room temperature eggs and add them, one at a time, beating well after each addition. Add the melted chocolate. Beat until well blended, scraping beater(s) and bowl as needed.
Sift together 2 cups of all-purpose flour, 1 teaspoon baking soda and 1/2 teaspoon salt. Add this mixture to the batter alternately with 8 oz. sour cream, adding a third of the flour first, then half the sour cream, a third of the flour, the rest of the sour cream and the final third of the flour mixture. Scrape beater(s) and bowl as needed. Blend thoroughly , then gradually add 1 cup hot water in a slow, steady stream at low speed, mixing just until blended. Stir in vanilla.
Fill prepared baking cups 3/4 full. Bake in preheated oven for 18 - 20 minutes or until a wooden pick inserted in the center of a cupcake comes out clean. Cool in pans on wire racks for 10 minutes. Remove cupcakes from pans to wire racks and cool completely (about 45 minutes) before frosting.
Pipe frosting on cupcakes. (you will need about 5 cups frosting).
Browned Butter-Cinnamon Cream Cheese Frosting
In a small heavy saucepan over medium heat cook 1/2 cup butter, stirring constantly, for 6-8 minutes or until butter begins to turn golden brown. Butter will start to smell nutty. Immediately remove from heat and pour butter into a heat proof bowl. Chill butter 1 hour, or until butter is cool and begins to solidify. Beat butter and two 8-oz. packages of softened cream cheese at medium speed with an electric mixer until creamy. Gradually add two packages (16 -oz each) powered confectioners; sugar, beating until light and fluffy. Stir in 1 teaspoon ground cinnamon and 2 teaspoons vanilla extract. Makes 5 cups.
Friday, January 16, 2015
Bread Baking Babes Get Puffed Up
It's the 16th of the month, and reveal day for this month's Bread Baking Babes bread. Our kitchen of the month, the ever popular and witty Elizabeth of Blog From OUR Kitchen, has gathered us around the table to make Chapatis, that wonderful staple of Indian cuisine. I'd never made these before and got a thrill when the first one I cooked puffed up just like it was supposed to when I turned it over to cook the second side and held it over the gas flame. It didn't really get brown when it puffed, but the flame caught an edge, so there was a bit of burning. Dangerous stuff this Bread Baking Babes baking!
The results were delicious and the texture was awesome with firm outer surface and almost flaking interiors. Sweetie ate most of them before I noticed, but I did snag two. My plan had been to have some butternut squash biryani and chicken cooked with coconut milk, but my late morning eye exam was brutal and so I didn't have the energy to do anything more than make the chapatis. Glad that I did and I'll make them again soon and do the full meal.
One of the things that I discovered while mixing up the dough was that it takes a little while for the flour to be absorbed. Glad that I stopped adding the boiling water long before all of the flour had gotten wet. I kept stirring with the fork and gradually all of the dry flour found its way into the dough and it seemed to have that silly putty texture. The kneading was relaxing and there was no need to add very much flour to the board, although my hand did stick a few times.
Do try this easy and fun recipe yourself! Check out the experiences that the rest of our BBB crew had to get tips for creating this wonderful and fast hot bread.
Bake My Day - Karen, Blog From OUR Kitchen - Elizabeth,
Bread Experience - Cathy, Girlichef - Heather, Life's A Feast - Jaime,
Lucullian Delights - Ilva, My Diverse Kitchen - Aparna, My Kitchen in Half Cups
- Tanna, Notitie van Lien - Lien, Thyme for Cooking - Katie (who does the round-up).
If you do make these, consider becoming a Bread Baking Babe Buddy by making the recipe by Jan. 29th and sending Elizabeth an e-mail with a photo and a description of your experience making chapatis. She'll do a round-up shortly after that.
Here are the wonderful directions and recipe that Elizabeth gave us. Have fun!
CHAPATIS, AKA ROTIS (INDIAN FLATBREAD)
based on "Flat Wholewheat Bread - Roti"
in A Taste of India by Madhur Jaffrey
After struggling for months trying to make these, I now understand why all the recipes I looked at seemed to be so vague. Here is how we have finally managed to make pretty good rotis, using an electric stove and North American flour. I apologize in advance for any vagueness and urge you to keep trying even if your rotis don't turn out perfectly the first (second, third, fourth...) time(s). As Shehzad Husain says in Entertaining Indian Style:
Do not get disheartened [...] you will improve with
practice.
Equipment
- stove
- open wire rack (single burner open wire rack on feet that set the rack about an inch off the burner)
- rolling pin
- heavy carbon steel shallow frying pan (tava)
- tongs
- lidded pot
(We went to our local India town to get the tava and wire
rack. They are not very expensive items. You can probably use a flat heavy
griddle in place of the tava.)
Ingredients to make 8 rotis
- 1 c. unbleached all purpose flour
- ½ c. whole wheat flour
- 1 tsp. salt
- up to 1 c. just-boiled water
- In a bowl, mix flours and salt. Add hot water gradually, stirring with a fork until you have a soft dough. The amount of water will vary drastically depending on air temperature and humidity. You just have to play with it. You are aiming for dough that resembles silly putty.
- Using as little extra flour as possible, knead on a board or in the air for 10 minutes until the dough is soft and silky.
- Put the dough back in the bowl. Cover with a damp cloth or plate and let sit on the counter for 30 minutes to one hour.
- Put the tava on medium heat. Do not oil it. Put the wire rack on another burner at the highest heat possible. (I used a cast iron skillet. The tava would be better, but it worked.)
- Cut the dough into 8 equal pieces. Lightly flour each one and put 7 pieces back in the bowl. Cover the bowl. Form the piece of dough into a ball and flatten it. Roll it out into a round til it is quite thin but not too thin (this is again is one of those infuriating things where you will just have to practice to find out what thinness works best for you) - about 2 mm?? As you roll out the dough, make sure it is not sticking to the board and that there are no holes. Keep the rolling pin lightly dusted with as little flour as possible and the board the same way.
- Place the round of dough on the hot tava (griddle). As soon as you see little bubbles form, turn it over using tongs. As soon as there are little bubbles on the reverse side, lift the bread off the tava with the tongs and place it on the wire rack. It should puff up. Turn it over once or twice to ensure that it puffs up completely. Don't be worried to see a few dark brown spots on it. (If you are lucky enough to have a gas stove, you can hold the bread directly over the flame. - I did this and supported the other side with a spatula. Worked OK, but then I put the chapati back into the hot skillet to brown a few spots.)
- Put the finished bread into a pot and cover it with a lid. Keep it in a warm oven. Roll out the next piece of dough and repeat til you have 8 rotis. As you put a new roti on the stack, turn the finished rotis over to keep the bottom ones from getting wet. (I kept the finished rotis on a paper plate set on a heavy pot holder and covered it with an inverted paper plate. That seemed to work well and was easy because it was on the counter next to the stove, readu for the next rotis to be added.)
Saturday, January 10, 2015
Sweet Cookie Fingers with Raspberry Jam and Meyer Lemon Glaze
Christmas cookies never happened this year and I had two appointments that prevented me from baking cookies for the funeral of a friend on Friday. Thought we might bake cookies when my daughter came on Friday, but I was too tired. Finally felt up to it late this afternoon.
It was good to be baking again. These sweet cookie fingers have a butter base and some raspberry jam sweetness, plus a little crunch from the almond slices and the tang of Meyer lemon (or any lemon, really) in the glaze. The dough was crisper than I had expected, but that might have been because I forgot to add the 2 tablespoons of milk that went in before the flour mixture. I also only made a half recipe because even though I was wanting to eat some cookies, I really don't want to eat 40 of them. You can easily double the recipe if you do want to make 40. That's how the recipe was actually written.
On the good news front, my nephew in Colorado and his wife are the proud parents of a beautiful baby boy. Congrats to grandpa NoName!
Raspberry Ribbons
from The Fannie Farmer Baking Book
makes about 20 slices
5 tablespoons (about 1/3 cup) butter, softened
1/3 cup sugar
1 egg yolk
1/2 teaspoon vanilla extract
1/4 teaspoon almond extract
1 cup flour
1/2 teaspoon baking powder
1/8 teaspoon salt
about 1/2 cup raspberry jam
1/4 cup sliced almonds
Lemon Glaze (see below)
Combine the butter and sugar in a mixing bowl, and beat until well blended. Add the egg yolk and the vanilla and almond extracts. Beat until light in color.
Combine the flour, baking powder and salt (I used a sheet of waxed paper and a whisk), then add to the butter mixture. Beat well until mixed. Mixture will be firm. Divide into two pieces as close to the same size as possible. Wrap each and refrigerate for at least 30 minutes. (I chilled them for about an hour and a half and that was still fine.)
Preheat the oven to 375 degrees F. Grease a large cookie sheet. (I used a half sheet pan.)
Work with one piece of dough at a time, keeping the other refrigerated.
On a lightly floured work surface, roll one of the pieces of dough into a rectangle about 11 x 3 inches.
Transfer the dough to the cookie sheet...you may need to use a spatula, but I didn't.
Using your fingers, press a 1-inch wide trench down the center of the rectangle. Spoon about 1/4 cup raspberry jam in the trench, smoothing with a wet finger.
Repeat with the second piece of dough. The cookie sheet should hold both rectangles of dough.
Bake for about 10 minutes or until the edges just start to take on color. Scatter half of the almonds on each rectangle, sprinkling them over the hot jam. Return to the oven and bake another 1-2 minutes, or until the edges are light golden brown.
Remove the pan from the oven and brush or drizzle the Lemon Glaze over the rectangles. Slice each rectangle into about 10 slices.
Store in an airtight container with waxed paper between the layers, or carefully place in a plastic bag, tie snugly, and freeze.
Lemon Glaze
1 tablespoon freshly squeezed lemon juice (I used Meyer lemons)
1/2 teaspoon grated lemon zest (Meyer lemon here, too)
1/3 cup sifted confectioners' sugar
Mix the lemon juice and zest. Put the sugar in a small bowl. Add the juice mixture and stir or use a small whisk to combine until smooth and well blended.
Labels:
Bar Cookies
,
Lemon Glaze
,
Meyer Lemons
,
raspberry jam
Monday, January 05, 2015
Fine Clementine Slices
Continuing with post without actual recipes, today we have directions for a wonderful little dessert or snack, perfect for winter because the main ingredient is clementine or tangerine segments. This treat is brought to you by my wonderful daughter. Not sure where she discovered this combination, but she made up a few trays of these for our post-Christmas gathering.
First you divide your clementine or tangerine into segments. She carefully removed all traces of pith and thin white strings on the segment membranes, leaving nice and pretty segments. Then she dried them and laid them out in rows on parchment paper which was laid on baking sheets.
In a microwave proof bowl she melted enough chocolate chips to coat the ends of each. One at a time she dipped the end in the warm chocolate, then set each segment on the parchment. Before the chocolate had time to dry, she sprinkled on just a bit of sea salt of the finishing salt variety. The segments dried and then were enjoyed by all. Since she dipped quite a few, I do know that she reheated the chocolate a few times in the microwave to keep it liquid.
I would imagine that you could do the same thing with orange segments, but I can tell you that the smaller clementine segments treated this way were a delight to indulge in.
Sunday, January 04, 2015
What New Year?
Whoops! Looks like I missed the opportunity to do a review of the blog posts of 2014 and to welcome in the New Year of 2015. Late wishes still count, right?
Happy New Year!
Perhaps I'm just resisting getting into the second half of this decade, but I have another post related to 2014. That wonderful rum cake that the Cake Slice Bakers made has another chapter here at my house. Not only did I make the cute pecan and cherry decorated little rum cuties, but I also baked a round layer with the rest of the batter. It has been languishing in my fridge, waiting for it's turn.
Last night Sweetie and I had a healthy meal of stir fried veggies over rice, with a little duck thrown in for protein. Since it was mostly veggies I felt that we could have a more decadent dessert. Anyone for a dressed up rum cake with tropical overtones?
The slices of rum cake (single layer) were topped with a scoop of rum raisin ice cream, then I layered on some bananas that I had warmed in a little butter and brown sugar. On top of that I scattered cubes of fresh pineapple. It was a great combination! No recipe, but I'll bet you could duplicate it without problem if you bake the rum cake.
This is the last of the 2014 related recipes, so soon there will be a whole new year of yummy food.
Sunday, December 28, 2014
Rum A Tum Tum
The Little Drummer Boy would probably have turned up his nose at my Rum Cakes because of the good dose of rum, but they are delicious, even though I made them over a week ago. I decided to go with smaller cakes instead of the large Bundt that the recipe called for, and they are so cute!
Why Rum Cakes? Because this is the December Cake Slice Bakers choice I made. We had some really great choices from The Southern Cake Book, including little fig cakes, a decadent carrot cake, and a cheesecake that includes baklava as an ingredient, but I liked the simplicity of the Rum Cake.
These little cakes are very rich (three sticks of butter!), but they were easy to make. Butter and sugar are beaten together, eggs are beaten in along with some citrus zest and vanilla. The dry ingredients go in alternately with the wet, which is a classic way to make cake batter. I skipped the banana flavors and went with straight rum.
To fancy some of them up I put a pattern with pecan halves and a cherry in the middle on the bottom of the little square pans, then added the batter. That way when you turn them out you see the pattern on the top. I also doused them with some straight rum instead of a syrup, then let them age in the fridge for a few weeks.
I'm quite late in posting this, but was gone during the regular posting time due to a death in the family. Quite a few Cake Slice Bakers did post and their cakes look amazing! Do check them out.
Amy - Spin the Meal made the same Rum Cake
Rachel - A Sweet Muddle made the darling little Fig Cakes
Anabel - Oven Delights made the darling little Fig Cakes, too
Punetta - As Long As There's Cake made the darling little Fig Cakes, but with a different glaze
Kim - The Ninja Baker made cute cupcakes from the Carrot Cake recipe
Maria - Box of Stolen Socks made Baklava Cheesecake
Diana - The Domestic Goddess Wannabe made the Rum Cake and added Mixed Fruit for a seasonal treat
Emily - Emily's Cooking Foray made the Baklava Cheesecake in a smaller size
Rum Cake
from The Southern Cake Book by Southern Living Magazine
1 1/2 cups butter, softened
1 1/2 cups granulates sugar
3 large eggs
1 large egg yolk
2 teaspoons vanilla extract
2 tablespoons lemon zest
3/4 cup dark rum
3 cups all-purpose flour
2 teaspoons baking powder
1/2 teaspoon baking soda
1/8 teaspoon salt
1 cup whipping cream
shortening or butter for greasing the pan(s)
optional: pecan halves and cherry halves to decorate
Preheat the oven to 350 degrees F. Grease (shortening or
butter) a large 12 -cup Bundt pan or smaller pans which will hold the full
amount of batter. Set the pans aside.
Beat the butter and sugar together for about two minutes.
Mixture will be light and fluffy. Add the eggs one at a time, scraping bowl as
needed, letting the egg incorporate into the batter before adding the next.
Last, add the egg yolk and mix to blend. Add the vanilla and lemon zest and
rum. Beat to mix well.
Sift the dry ingredients together. Make sure the whipping
cream is at room temperature. With mixer at low speed, add the dry ingredients
in three additions and the whipping cream in two additions, alternating between
dry and wet and incorporating that ingredient before adding the next. Scrape
bowl and beater(s) as needed.
Scrape batter into prepared pan(s). Batter will be thick.
Use a spatula to even the top and rap the pan on the counter a couple of times
to release any air bubbles that are trapped.
Bake in the preheated oven 55-60 minutes for the large Bundt
pan and for a shorter period for smaller pans. Cake is cooked when a toothpick
or skewer inserted in the center comes out clean.
Cool pan(s) on a wire rack for 15 minutes, then turn out
and let cool completely. Serve at once garnished with a sifting of
confectioner's sugar or store in a covered container.
Optional: If desired, make a syrup of 10 tablespoons
butter mixed with 3/4 cup sugar & 1/2 cup rum, and cooked , stirring often
for 10-12 minutes until thickened. Pierce the cake(s) with a skewer and pour on
the syrup evenly over the cake(s) while they are still in the pan(s). Let stand
45 minutes before removing from the pan(s).
Optional: After pan is prepared, put a pattern of pecan
halves and cherry halves on the bottom. When batter is ready, cover the pattern
with the batter. Serve with the pattern side up.
Thursday, December 25, 2014
Christmas Snowflake
We toasted Mom at the viewing with Irish Mist, revisited clouds of incense at the funeral Mass, ate and drank and hugged and cried and talked endlessly. It was all good. Came home in time to make a wonderful sweet yeast bread for Christmas morning. Posting quite late, but better late, right?
This delightful brioche bread, which is almost (almost but really not quite) too pretty to eat is brought to you in part by Cathy of Bread Experience, our Bread Baking Babe Kitchen of the Month. It is very impressive to look at and delicious to eat, but not as difficult to make as you might think. Thanks Cathy for choose the perfect December recipe.
The brioche dough goes together easily, especially if you have a stand mixer to do some of the heavy work. If not, just remember that kneading bread is very contemplative and relaxing. It is an easy dough to handle, too, and rolled out easily.
The requested filling is Nutella, but I'm not a fan of chocolate and yeast bread, plus I don't enjoy hazelnuts, so I made a filling of very thinly spread cream cheese, sprinkled with a mixture of brown sugar and cinnamon. Sure made the house smell like Christmas!
The shaping looks difficult, but is in fact child's play. I took the cap of a spice jar and indented a small circle in the middle of the stacked, filled layers of dough. That helped me to keep the cuts more even in the center. Turning the pairs of dough a few times outward to create the stripes was easy and then I just stuck the ends together and turned them under.
Since I made the snowflake to this point on Christmas Eve, I covered it with oiled plastic wrap and stuck it in the fridge overnight. In the morning the dough rose while the oven preheated, so it was ready to eat by the time the fruit bowl was prepared and bacon cooked. Sweetie even made his signature scrambled eggs. What a feast!
Wishing you, dear reader, a joyful holiday season, no matter where you are.
If you wish to be a Buddy you still have time. Bake the bread, take a photo or two, send Cathy an e-mail telling of your experience making the bread and do it by December 29th.
Please visit the other Babes sites to see their versions. Bet you will be inspired to make this yummy bread yourself.
The original version:
Nutella Brioche Flower
Makes: 1 large Nutella Brioche Flower
Ingredients:
For the sponge:
1/2 cup (2.25 ounces) bread flour or all-purpose (I used Bob's Red Mill AP)
1 1/4 teaspoons instant yeast
1/2 cup (4 ounces) whole milk, lukewarm (90 to 100 degrees F.)
For the dough:
3 large eggs, slightly beaten
3 cups (13.75 ounces) all-purpose flour
3 tablespoons sugar
1 1/4 teaspoons sea salt
1/2 cup (4 ounces) unsalted butter, melted
1-2 teaspoons milk, if necessary to form a smooth dough
For the filling and glaze:
Nutella or similar hazelnut chocolate paste for the filling
1 tablespoon milk plus 1 tablespoon water for glaze
Icing (confectioner's) sugar
To make the sponge, stir together the flour and yeast in a large bowl (or the bowl of your stand mixer). Pour in the milk and whisk the ingredients together until all of the flour is hydrated. Cover with plastic wrap and let it ferment for 30 to 45 minutes, or until the sponge rises and falls when you tap the bowl.
To make the dough, add the eggs to the sponge and whisk (or beat on medium speed with the paddle attachment) until smooth. In a separate bowl, stir together the flour, sugar, and salt. Add this mixture to the sponge and eggs and stir (or continue mixing with the paddle on low speed for about 2 minutes) until all of the ingredients are thoroughly incorporated. Let the dough rest for 5 minutes to begin to develop the gluten. Then mix in the melted butter by hand, using a wooden spoon or Danish dough whisk or with the mixer on medium speed using the dough hook. Add in a couple of teaspoons of milk if the dough is too dry.
Transfer the dough to the work surface and knead for about 8 to 10 minutes until the dough is soft and smooth. It shouldn't be too sticky too handle.
Form the dough into a ball and place it in a clean bowl. It doesn't need to be oiled. The butter should keep the dough from sticking to the bowl. Let the dough bulk ferment in a warm place (70- 75 degrees F.) for 1-2 hours, or until doubled in size.
Meanwhile, cut out a circle of baking or greaseproof paper about 30 cm (12″) in diameter. Place the paper on a baking sheet.
To shape the flower, once risen, turn the dough out onto a surface, knock it back knead for 3-4 minutes. Divide the dough into 4 pieces and form each piece into a ball.
Roll a ball of dough out into a circle measuring about 25 cm (10″) in diameter. The dough should be about 3-4 mm (1/8″) thick.
Place the dough onto the baking paper and spread on a layer of Nutella, leaving a small gap at the edge. Don’t make the layer too thick but be sure to evenly cover the dough.
Roll out a second ball of dough, place it on the first layer and spread with Nutella. Repeat with the third and fourth balls of dough but do NOT spread Nutella on the final layer.
Cut the brioche into 16 segments but leave a small (3 cm/1½”) area in the centre of the dough uncut.
Take a pair of adjacent segments. Lift and twist them away from each other through 180°. Lift and twist through 180° again, then twist through 90° so that the ends are vertical. Press the edges together firmly. Repeat this process for all pairs of segments.
Place the brioche in a large plastic bag or cover with lightly oiled film. Leave in a warm place for 1-2 hours to prove.
Brush with the glaze then bake at 160°C/320°F fan oven, 180°C/360°F conventional oven for 20-25 minutes. I baked it at 375 degrees F. for 15 minutes, then turned it down to 350 and baked it another 5 minutes or so.
Place the bread on a wire rack to cool. Once cooled, dust lightly with icing sugar.
Friday, December 12, 2014
Sad News
A vibrant, classy, smart and loving woman, my Mom, died this morning. She will be missed by many, especially her large family. She was blessed with a long and wonderful life and slipped out quietly in her sleep. Rest in peace, Mom.
Friday, December 05, 2014
Bread Without the Sesame Seeds
The last time I made this bread I made it as rolls and it was a fun one where the bread snakes were rolled in sesame seeds. It's a King Arthur Flour recipe and a very good one.
Since I'm no longer supposed to eat sesame seeds I decided that I would make this bread without. It's been a while since I've made baguettes, so that's the shape I chose for these. I'm really happy with the way they held their shape. I used the Julia Child shaping method and it worked well. It didn't hurt that this was a relatively firm bread. I let it sit in the fridge overnight, too, so it had just a touch of sourdough flavor. Delicious!
Look at the wonderful texture:
Three Baguettes
Based on a recipe from King Arthur Flour
Starter
1 cup all-purpose flour
1/3 to 1/2 cup cool water, enough to make a stiff ball of dough
pinch of instant yeast
Dough
all of the starter
1 cup all-purpose flour
1 cup while whole wheat flour or regular whole wheat flour
1 1/4 teaspoons salt
2 tablespoons Baker's Special dry milk or nonfat dry milk
2 teaspoons instant yeast
2/3 cup lukewarm water
2 tablespoons olive oil
Directions
1) To make the starter: Mix the starter ingredients together, cover, and let rest at room temperature two - three hours. Note: This is a dry, stiff starter. If it's too dry to come together, dribble in sufficient water to make the dough come together, and proceed with the recipe as directed.
2) To make the dough: Combine the starter with the remaining dough ingredients, and mix and knead — by hand, mixer, or bread machine set on the dough cycle — to make a soft, smooth dough. You may need slightly more or less than 2 cups flour.
3) Place the dough in a lightly greased bowl or large (8-cup) measure; cover, and let it rise for about 90 minutes, till it's just about doubled in bulk. Punch down in the bowl, cover with plastic wrap and let sit overnight in the fridge.
4) Gently deflate the dough, and divide it into three equal pieces. Shape each piece into a rough log, and let the logs rest, uncovered, for about 10 minutes. This gives the gluten in the dough a chance to relax, which in turn will make the logs easier to roll.
5) Working on a lightly greased surface, roll each piece into a rope about 12" long.
6) Working with one rope at a time, start at one end of the rope and pull the dough around the rope. (I imagined one side of the rope to be the 'back' and pulled the dough toward the back, working my way down the rope. This stretches the 'skin' of the dough around the inner dough to help the baguettes keep their shape.)
7) Place each shaped baguette on a parchment lined baking sheet, When all three are shaped and on the baking sheet, cover lightly with oiled plastic wrap and then a tea towel, and let rise in a warm place until doubled in bulk.The resulting loaves will be about 14" long
8) Preheat the oven to 400 degrees F and brush the loaves with egg white. Score on the diagonal three or four places on each of the loaves with a very sharp knife or a lame.
9 Bake in the preheated oven for about 20 minutes or until loaves are golden brown and sound hollow when the back is tapped. Remove from oven and cool on a wire rack.
Yield: 3 baguettes
Subscribe to:
Posts
(
Atom
)